


 本文介绍了PXE和DHCP理论,PXE可通过网络接口启动计算机,依赖多个协议。还说明了环境准备,包括服务器初始化、DHCP、TFTP和HTTP配置。详细阐述了PXE配置步骤,如下载syslinux等。最后进行Kickstart实践配置,利用ks.cfg文件实现自动化安装操作系统。
一、理论介绍
1、PXE
预启动执行环境(Preboot eXecution Environment,PXE),通过网络接口启动计算机,不依赖于本地存储设备,如:U盘、硬盘、光盘等!
PXE依赖于:IP、UDP、DHCP、TFTP协议
PXE工作过程:
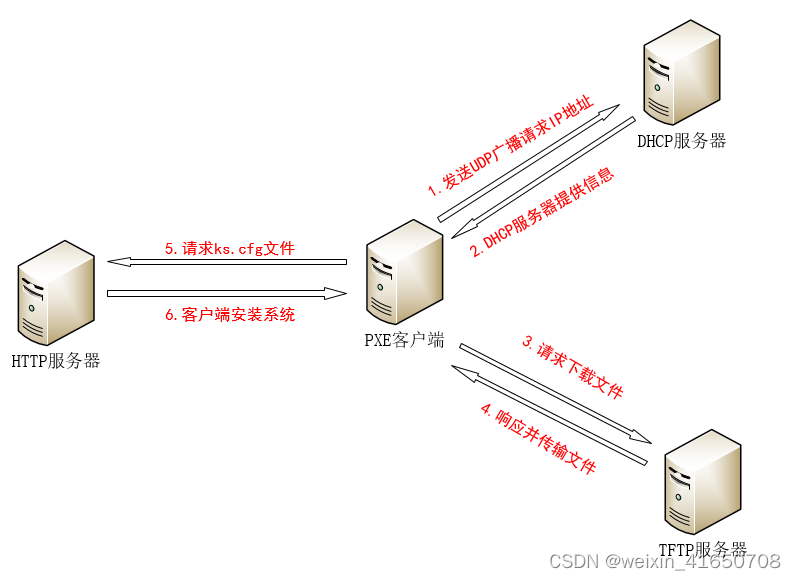
- PXE客户端向DHCP服务器发送UDP广播请求索要IP地址
- DHCP服务器响应PXE客户端并提供IP地址
- PXE客户端请求下载启动文件,包括pxelinux.0、pxelinux.cfg/default、vmliunz、initrd.img 等文件
- Boot Server响应PXE客户端,通过TFTP协议下载请求的这些文件
- PXE请求自动应答文件ks.cfg
- 通过ks.cfg找到OS Server位置后 PXE客户端安装操作系统
2、DHCP
动态主机配置协议(Dynamic Host Configuration Protocol)用于自动获取IP地址、管理IP地址、防止IP冲突

二、环境准备
1、服务器初始化
wget -O /etc/yum.repos.d/CentOS-Base.repo https://mirrors.aliyun.com/repo/Centos-7.repo
wget -O /etc/yum.repos.d/epel.repo http://mirrors.aliyun.com/repo/epel-7.repo

systemctl stop firewalld && systemctl  disable   firewalld
ln -s /usr/share/zoneinfo/Asia/Shanghai /etc/localtime
sed -i 's/SELINUX=[e|p].*/SELINUX=disabled/g' /etc/selinux/config
setenforce 0
2、DHCP
yum -y install dhcp
[root@node4 ~]# rpm -q  dhcp
dhcp-4.2.5-83.el7.centos.1.x86_64

[root@node4 ks_config]# vim /etc/dhcp/dhcpd.conf
[root@node4 ks_config]# cat /etc/dhcp/dhcpd.conf
#
# DHCP Server Configuration file.
#   see /usr/share/doc/dhcp*/dhcpd.conf.example
#   see dhcpd.conf(5) man page
#

subnet 192.168.58.0 netmask 255.255.255.0{

range  192.168.58.100 192.168.58.200;

option routers 192.168.58.254;
option subnet-mask 255.255.255.0; #掩码
option domain-name-servers 235.5.5.5;

option  broadcast-address 192.168.58.255;

default-lease-time 600;

max-lease-time 7200;

next-server 192.168.58.254;

filename "pxelinux.0";

}

#验证dhcp
[root@node4 ks_config]# systemctl is-active dhcpd
active
[root@node4 ks_config]# netstat -anpu|grep 67
udp        0      0 0.0.0.0:67              0.0.0.0:*                           3628/dhcpd
udp        0      0 0.0.0.0:67              0.0.0.0:*                           1915/dnsmasq
[root@node4 ks_config]# systemctl enable dhcpd
3、TFTP
安装和配置TFTP服务
#xinetd是用来管理tftp的,默认路径在 /var/lib/tftpboot 位置
yum -y install tftp-server tftp xinetd
[root@node4 ks_config]# rpm -q tftp-server tftp xinetd
tftp-server-5.2-22.el7.x86_64
tftp-5.2-22.el7.x86_64
xinetd-2.3.15-14.el7.x86_64
[root@node4 ks_config]# vim /etc/xinetd.d/tftp
[root@node4 ks_config]# cat /etc/xinetd.d/tftp
service tftp
{
	socket_type		= dgram
	protocol		= udp
	wait			= yes
	user			= root
	server			= /usr/sbin/in.tftpd
	server_args		= -s /var/lib/tftpboot
	disable			= no  # 改为no
	per_source		= 11
	cps			= 100 2
	flags			= IPv4
}
#验证服务
[root@node4 ks_config]# systemctl is-active xinetd.service
active
[root@node4 ks_config]# systemctl  restart  xinetd.service
[root@node4 ks_config]# netstat -anput |grep 69
tcp        0      0 0.0.0.0:4369            0.0.0.0:*               LISTEN      1/systemd
udp        0      0 0.0.0.0:69              0.0.0.0:*                           7090/xinetd
udp6       0      0 :::69                   :::*                                1/systemd
4、HTTP
yum -y install httpd
[root@node4 ks_config]# rpm -q httpd
httpd-2.4.6-99.el7.centos.1.x86_64
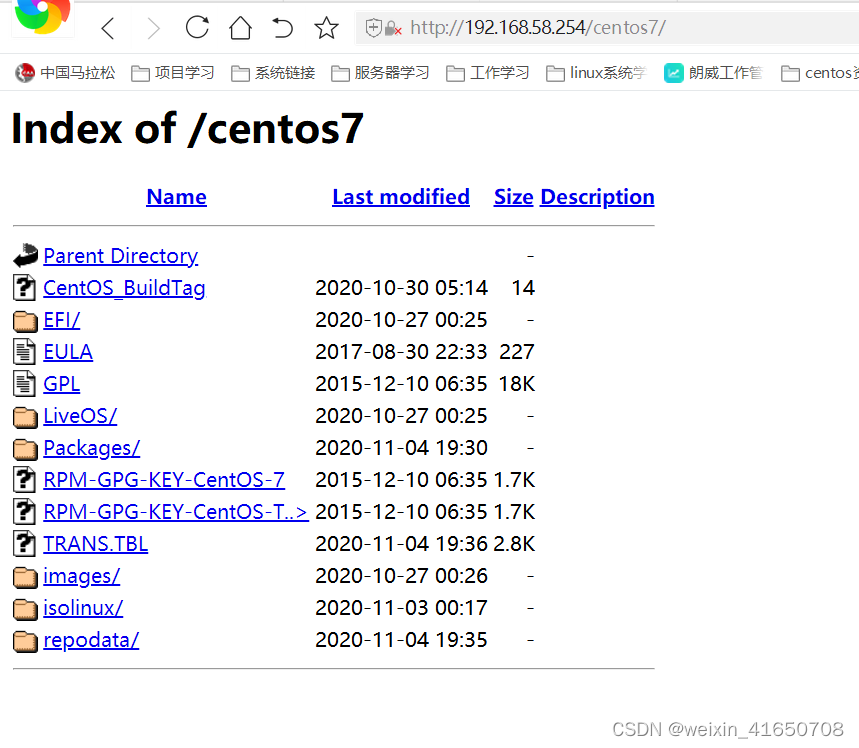
mkdir /var/www/html/centos7 # 用于提供iso下载目录
[root@node4 ks_config]# mkdir /mnt/cdrom/
[root@node4 ks_config]# mount /dev/cdrom /mnt/cdrom/
mount: /dev/sr0 写保护,将以只读方式挂载
[root@node4 ks_config]# cp /mnt/cdrom/ /var/www/html/centos7
[root@node4 ks_config]# df -hT /var/www/html/centos7
文件系统 类型 容量 已用 可用 已用% 挂载点
/dev/mapper/centos-root00 xfs 17G 11G 6.7G 62% /
[root@node4 ks_config]# curl -I 192.168.58.254/centos7
HTTP/1.1 301 Moved Permanently
Date: Tue, 10 Oct 2023 08:36:10 GMT
Server: Apache/2.4.6 (CentOS)
Location: http://192.168.58.254/centos7/
Content-Type: text/html; charset=iso-8859-1
三、PXE配置
syslinux是一个功能强大的引导加载程序,并且兼容各自介质
下载 syslinux就可以获取 pxelinux.0 引导文件
1、下载syslinux
yum -y install syslinux
2、拷贝所需文件 到TFTP目录
yum -y install syslinux

cp /usr/share/syslinux/pxelinux.0 /var/lib/tftpboot/     # pxelinux.0文件
cp /usr/share/syslinux/reboot.c32 /var/lib/tftpboot/     # 系统自动重启文件
cp /var/www/html/CentOS-7/isolinux/* /var/lib/tftpboot/  # 系统菜单文件
ll /var/lib/tftpboot/
-r--r--r-- 1 root root     2048 Jul 10 18:27 boot.cat
-rw-r--r-- 1 root root       84 Jul 10 18:27 boot.msg
-rw-r--r-- 1 root root      281 Jul 10 18:27 grub.conf
-rw-r--r-- 1 root root 55187100 Jul 10 18:27 initrd.img     # 驱动文件
-rw-r--r-- 1 root root    24576 Jul 10 18:27 isolinux.bin
-rw-r--r-- 1 root root     3032 Jul 10 18:27 isolinux.cfg
-rw-r--r-- 1 root root   190896 Jul 10 18:27 memtest
-rw-r--r-- 1 root root    26759 Jul 10 18:18 pxelinux.0     # 引导启动代码
-rw-r--r-- 1 root root      800 Jul 10 18:26 reboot.c32     # 重启系统文件
-rw-r--r-- 1 root root      186 Jul 10 18:27 splash.png
-r--r--r-- 1 root root     2215 Jul 10 18:27 TRANS.TBL
-rw-r--r-- 1 root root   153104 Jul 10 18:27 vesamenu.c32   # 界面框架
-rwxr-xr-x 1 root root  6762688 Jul 10 18:27 vmlinuz        # 内核文件
3、创建pxelinux.cfg目录,用于存放安装客户端的配置文件
创建pxelinux.cfg目录,用于存放安装客户端的配置文件
mkdir -p /var/lib/tftpboot/pxelinux.cfg
cp /var/www/html/CentOS-7/isolinux/isolinux.cfg /var/lib/tftpboot/pxelinux.cfg/default
chmod -R 777 /var/lib/tftpboot/
4、自定制PXE配置文件
cd /var/lib/tftpboot/pxelinux.cfg/
mv default default_old
vim default
[root@node4 ks_config]# cat /var/lib/tftpboot/pxelinux.cfg/default
# 使用欢迎界面
default vesamenu.c32
# 超时时间 单位毫秒
timeout 100

# 欢迎词
MENU TITLE welcome lwtz install.

# 启动本地设备
label local
  menu label Boot from ^local drive
  localboot 0xffff

# 启动ks配置文件设备
MENU SEPARATOR
label linux
  menu label ^Install Centos7 system for ks.
# 默认为ks
  menu default
  kernel vmlinuz
  append initrd=initrd.img ks=http://192.168.58.254/ks_config/ks.cfg

# 安装基本驱动
MENU SEPARATOR
label vesa
  menu label Install system ^basic video driver
  kernel vmlinuz
  append initrd=initrd.img xdriver=vesa nomodeset
5、检验配置正确
#验证配置
[root@node4 ks_config]# curl -I http://192.168.58.254/ks_config/kf.cfg
HTTP/1.1 404 Not Found
Date: Tue, 10 Oct 2023 08:47:09 GMT
Server: Apache/2.4.6 (CentOS)
Content-Type: text/html; charset=iso-8859-1

[root@node4 ks_config]# curl -I 192.168.58.254/centos7/
HTTP/1.1 200 OK
Date: Tue, 10 Oct 2023 08:47:40 GMT
Server: Apache/2.4.6 (CentOS)
Content-Type: text/html;charset=ISO-8859-1
四、Kickstart实践配置
ks.cfg这个文件是自动化装机文件,作用是,将你系统的选择编写成一个脚本,无需人为干涉,即可自动化安装操作系统。
1、检查环境状态
确保好PXE各个组件状态正常
[root@node4 ~]# systemctl  is-active  httpd
active
[root@node4 ~]# systemctl  is-active  xinetd.service
active
[root@node4 ~]# systemctl  is-active  dhcpd
active
[root@node4 ~]# netstat -anput |grep dhcp
udp        0      0 0.0.0.0:67              0.0.0.0:*                           1172/dhcpd
[root@node4 ~]# netstat -anput |grep xinetd
udp        0      0 0.0.0.0:69              0.0.0.0:*                           1166/xinetd
[root@node4 ~]# netstat -anput |grep httpd
tcp6       0      0 :::80                   :::*                    LISTEN      1217/httpd
[root@node4 ~]# curl -I http://192.168.58.254/centos7/
HTTP/1.1 200 OK
Date: Wed, 11 Oct 2023 01:37:00 GMT
Server: Apache/2.4.6 (CentOS)
Content-Type: text/html;charset=ISO-8859-1
2、准备ks.cfg配置文件
安装系统后 会生产ks.cfg文件,默认在root家目录,可以进行参考。
mkdir /var/www/html/ks_config
chmod -R 777 /var/www/html/ks_config/

cp /etc/yum.repos.d/CentOS-Base.repo /var/www/html/ks_config/
cp /etc/yum.repos.d/epel.repo /var/www/html/ks_config/

vim /var/www/html/ks_config/ks.cfg

[root@node4 ~]# cat /var/www/html/ks_config/ks.cfg
# 直接安装操作系统
install
# 键盘语言
keyboard --vckeymap=us --xlayouts='us'
# 系统语言
lang en_US.UTF-8
# Firewall configuration
firewall --disabled
# Use graphical install
graphical
firstboot --disable
# SELinux configuration
selinux --disabled

# 网络信息
# network  --bootproto=static --device=ens33 --gateway=10.10.14.154 --ip=10.10.14.100 --netmask=255.255.255.0 --ipv6=auto --activate
# network  --hostname=localhost.localdomain
network --bootproto=dhcp --device=ens33 --onboot=yes --noipv6 --activate  //启动并激活网卡的名称
network --hostname=lwtz //设置主机名
network --nameserver=235.5.5.5
# root密码 可以通过下面命令获取
# python -c 'import crypt;print(crypt.crypt("pulin666"))'
rootpw --iscrypted $6$WYFRobxjdcnIiq08$yf8YAk940lAyf2viOBCNUgkdg/pEiahPQ9SCCObeKNKpWrKPzSCOaXSlBtpxrOSdpedJ5Qyo6hv2HefKpauZe1
user --groups=wheel --name=pulin --password=123456
auth --enableshadow --passalgo=sha512
# 指定URL安装系统
url --url="http://192.168.58.254/centos7"
# YUM仓库指定
repo --name="Red Hat Enterprise Linux" --baseurl="http://192.168.58.254/centos7" --cost=100
# 安装后关闭chronyd服务
services --disabled="chronyd"
# 时区 上海
timezone Asia/Shanghai --isUtc --nontp
# 重启系统 这个最后生效
reboot

# 系统盘信息
bootloader --append=" crashkernel=auto" --location=mbr --boot-drive=sda
autopart --type=lvm

# 自动分区
clearpart --none --initlabel

#bootloader --append="rhgb quiet" --location=mbr --driveorder=sda
#bootloader --location=mbr
# 清空分区,重新分区
#zerombr
#clearpart --all --initlabel
# 分区信息 size=MiB
#part /boot --fstype="ext4" --size=1024
#part swap --fstype="swap" --size=2048
#part / --fstype="xfs" --grow --size=1
# 1 表示剩余所以分区都给根目录

# 安装系统软件包
%packages
@^minimal
@compat-libraries
@core
wget
vim
net-tools
bash-completion
@development
@security-tools
@smart-card
@system-admin-tools
kexec-tools

%end

%addon com_redhat_kdump --enable --reserve-mb='auto'
%end

%post --interpreter=/bin/bash
#yum_client
cd /etc/yum.repos.d/
rm -rf *
wget http://192.168.58.254/ks_config/CentOS-Base.repo
wget http://192.168.58.254/ks_config/epel.repo
%end

%anaconda
pwpolicy root --minlen=6 --minquality=1 --notstrict --nochanges --notempty
pwpolicy user --minlen=6 --minquality=1 --notstrict --nochanges --emptyok
pwpolicy luks --minlen=6 --minquality=1 --notstrict --nochanges --notempty
%end
获取加密密码命令:
python -c 'import crypt;print(crypt.crypt("qinziteng666"))'
3、万事俱备 只欠测试
注意:移除不需要的驱动、添加一块网卡,绑定VAN区段,绑定VAN区段的作用是保持和DHCP服务器在同一个网段,内存不得小于2G
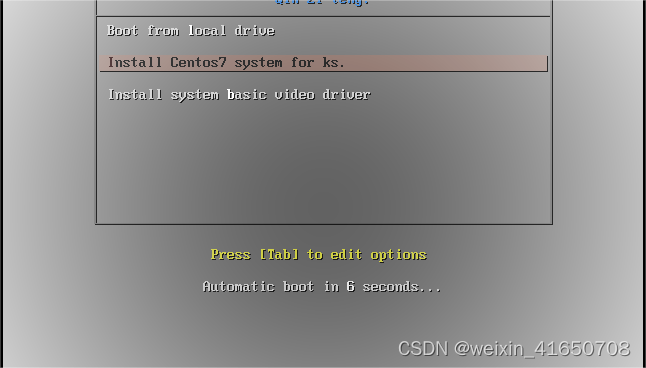
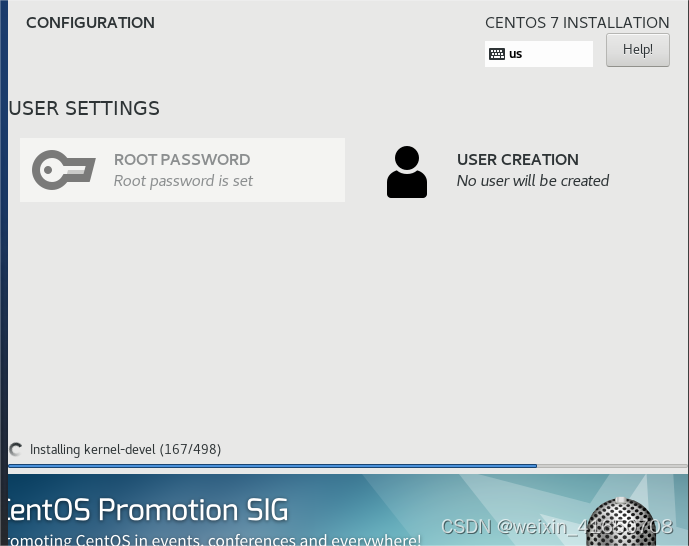
最后安装完成后 测试一下密码是否正确 就可以了


 815
815

 被折叠的 条评论
为什么被折叠?
被折叠的 条评论
为什么被折叠?
 到【灌水乐园】发言


