【vue+elementUI】要根据数组里的每一项值里面的某一个状态决定是否显示或样式

本文介绍了如何在 Vue 框架结合 ElementUI 的表格组件中,利用数据对象的特定字段(如 use_charge)来决定表格内图标或单元格的显示与样式。通过对数据的判断,实现动态控制表格内容的呈现。

摘要生成于 C知道 ,由 DeepSeek-R1 满血版支持, 前往体验 >

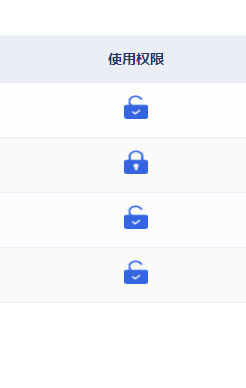
elementUI 根据某一行或列的状态显示不同的内容

在这里插入图片描述


   // 表格数据
   tableData: [
    {
     index: 1,
     date: "1981-06-26",
     dayTime: "下午05:00",
     discription: "影响注记服务",
     name: "影响注记服务",
     type: "普通用户",
     address: "上海市普陀区金沙江路 1518 弄",
     use_charge: true,
     management_charge:true
    },
    {
     index: 2,
     date: "1981-06-26",
     dayTime: "下午05:00",
     discription: "影响注记服务",
     name: "影响注记服务",
     type: "普通用户",
     address: "上海市普陀区金沙江路 1517 弄",
     use_charge: false,
     management_charge:true
    },
    {
     index: 3,
     date: "1981-06-26",
     dayTime: "下午05:00",
     discription: "影响注记服务",
     name: "影响注记服务",
     type: "普通用户",
     address: "上海市普
### Spring Boot与Vue结合Element UI进行项目开发 #### 创建Spring Boot项目 为了启动一个新的Spring Boot项目,推荐使用Spring Initializr工具。在创建过程中可以选择必要的依赖项,比如Lombok用于简化Java代码、Spring Web模块以及MyBatis框架和MySQL驱动程序来处理数据库操作[^2]。 ```java // application.properties 配置文件示例 spring.datasource.url=jdbc:mysql://localhost:3306/your_database?useUnicode=true&characterEncoding=UTF-8&serverTimezone=UTC spring.datasource.username=root spring.datasource.password=password mybatis.mapper-locations=classpath:mapper/*.xml ``` #### 构建前端环境并引入Element UI 对于前端部分,采用Vue CLI快速建立Vue应用,并通过npm安装`element-ui`库及其样式资源。这使得能够轻松利用Element提供的各种UI组件,如表格、表单、对话框等,从而加速界面设计过程[^1]。 ```bash # 安装 element-ui 及其 CSS 文件 npm install element-ui --save ``` 接着,在项目的入口文件main.js中全局注册Element: ```javascript import Vue from 'vue' import ElementUI from 'element-ui'; import 'element-ui/lib/theme-chalk/index.css'; Vue.use(ElementUI); new Vue({ render: h => h(App), }).$mount('#app'); ``` #### 后端API接口定义 后端主要负责业务逻辑处理和服务端渲染工作。可以借助于Spring Data JPA者MyBatis实现数据持久层的操作;而RESTful API的设计则遵循HTTP协议标准方法GET, POST, PUT 和 DELETE 来完成CRUD (Create Retrieve Update Delete) 功能。 ```java @RestController @RequestMapping("/api/users") public class UserController { @Autowired private UserService userService; @GetMapping("/{id}") public ResponseEntity<User> getUserById(@PathVariable Long id){ User user = userService.findById(id).orElseThrow(() -> new ResourceNotFoundException("User not exist with id :" + id)); return ResponseEntity.ok(user); } } ``` #### 前后端交互及状态管理 前后端分离架构下,通常会使用Axios发起异步请求获取服务器返回的数据。同时 Vuex Store可以帮助维护应用程序的状态变化,确保不同视图之间共享相同的信息流。 ```javascript // store/modules/user.js 示例 export const state = { token: localStorage.getItem('token') || '', }; export const mutations = { SET_TOKEN(state, token) { state.token = token; localStorage.setItem('token', token); }, }; ``` #### 登录验证机制 模拟成功的登录流程可以通过设置本地存储中的JWT(JSON Web Token),并在每次发送HTTP请求时将其附加到Authorization头部字段去认证身份。一旦接收到有效的响应,则跳转至首页显示欢迎消息。 ```html <!-- Login.vue 组件 --> <template> <div> <el-form :model="ruleForm" status-icon :rules="rules" ref="ruleForm"> <!-- 用户名密码输入框省略... --> <el-button type="primary" @click="submitForm()">提交</el-button> </el-form> </div> </template> <script> methods:{ submitForm(){ axios.post('/login',{ username:this.ruleForm.username, password:this.ruleForm.password }).then(response=>{ this.$store.commit('SET_TOKEN',response.data.token); // 存储Token router.push({path:'/'}); }); } } </script> ``` #### 使用Tree控件展示菜单结构 当涉及到权限管理和导航栏布局时,可选用Element提供的Tree组件来呈现层次化的节点列表。此组件支持多选模式(`show-checkbox`),默认展开全部子级(`default-expand-all`)等功能特性[^3]。 ```html <!-- Menu.vue 组件 --> <template> <el-tree :data="menuData" show-checkbox default-expand-all node-key="id" ref="tree" highlight-current :props="defaultProps"> </el-tree> </template> <script> export default{ data() { return { menuData:[], // 菜单项数组 defaultProps: { children: 'children', label: 'label' } }; } } </script> ```
评论
添加红包

请填写红包祝福语或标题

红包个数最小为10个

红包金额最低5元

当前余额3.43前往充值 >
需支付:10.00
成就一亿技术人!
领取后你会自动成为博主和红包主的粉丝 规则
hope_wisdom
发出的红包
实付
使用余额支付
点击重新获取
扫码支付
钱包余额 0

抵扣说明:

1.余额是钱包充值的虚拟货币,按照1:1的比例进行支付金额的抵扣。
2.余额无法直接购买下载,可以购买VIP、付费专栏及课程。

余额充值