


 本文详细介绍了在CentOs7.2环境下从源码编译安装Nginx和PHP的步骤,包括所需依赖库的安装、配置文件的设置、启动命令的使用,以及如何关联Nginx与PHP,实现通过sock模式通信。
LNMP环境搭建(源碼编译部署记录)
系統環境:CentOs 7.2
一 . Ningx编译安裝
下载nginx源码包,这里选择1.16
http://nginx.org/download/nginx-1.16.0.tar.gz
所需依赖:gcc-c++ libtool
三方库:zlib zlib-devel openssl openssl-devel pcre
1 编译工具及庫文件
yum install -y make zlib zlib-devel openssl openssl-devel gcc-c++ libtool
zlib库:zlib库是ngx_http_gzip_module(gzip压缩模块)所必需的
openssl库 :–with-http_ssl_module使用该模块必需装openssl库,来实现http支持https协议
2 配置安装文件
解压nginx源码包
tar -zxvf nginx-1.16.0.tar.gz
cd nginx-1.16.0
–prefix为nginx安装指定的目录(有需要可以自行变更)
./configure --prefix=/usr/local/nginx --with-http_stub_status_module --with-http_ssl_module --with-pcre=/usr/local/src/pcre-8.42
编译安装(时间略久,可以去冲杯咖啡)
make && make install
检查安装情况
/usr/local/nginx/sbin/nginx -V
3 启动命令
/usr/local/nginx/sbin/nginx     					  启动Nginx
/usr/local/nginx/sbin/nginx -s reload                 重新载入配置文件
/usr/local/nginx/sbin/nginx -s reopen                 重启 Nginx
/usr/local/nginx/sbin/nginx -s stop                   快速关闭 Nginx
/usr/local/nginx/sbin/nginx -s quit                   关闭Nginx
二 . PHP编译安装
首先下载php源码文件,这里选择的7.2贴上地址,如果有需要可以自行去php官网上下载
https://www.php.net/distributions/php-7.2.21.tar.gz
1 编译工具及庫文件
因为php安装需要编译,所以服务器应该保证gcc和g++环境的安装
依賴:libxml2 libxml2-devel
三方庫:openssl openssl-devel curl curl-devel libjpeg libjpeg-devel libpng libpng-devel freetype freetype-devel pcre pcre-devel libxslt libxslt-devel bzip2 bzip2-devel
这里补充库的用途
yum -y install libxml2
yum -y install libxml2-devel
yum install -y openssl openssl-devel curl curl-devel libjpeg libjpeg-devel libpng libpng-devel freetype freetype-devel pcre pcre-devel libxslt libxslt-devel bzip2 bzip2-devel
2 配置安装目录及模块
tar -zxvf php-7.2.19.tar.gz
cd php-7.2.19
./configure --prefix=/usr/local/php/php7.2 --with-curl --with-freetype-dir --with-gd --with-gettext --with-iconv-dir --with-kerberos --with-libdir=lib64 --with-libxml-dir --with-mysqli --with-openssl --with-pcre-regex --with-pdo-mysql --with-pdo-sqlite --with-pear --with-png-dir --with-jpeg-dir --with-xmlrpc --with-xsl --with-zlib --with-bz2 --with-mhash --enable-fpm --enable-bcmath --enable-libxml --enable-inline-optimization --enable-gd-native-ttf --enable-mbregex --enable-mbstring --enable-opcache --enable-pcntl --enable-shmop --enable-soap --enable-sockets --enable-sysvsem --enable-sysvshm --enable-xml --enable-zip
make && make install
3 配置php文件
- 拷贝php.ini文件 (就在安装文件中)
cp php.ini-development /usr/local/php/php7.2/lib/php.ini
- 设置启动脚本
cp ./sapi/fpm/init.d.php-fpm /etc/init.d/php7.2-fpm
chmod +x /etc/init.d/php7.2-fpm
- 然后设置php.ini
vim /usr/local/php/lib/php.ini
打开php配置文件找到cgi.fix_pathinfo配置项,这一项默认被注释并且值为1,根据官方文档的说明,这里为了当文件不存在时,阻止Nginx将请求发送到后端的PHP-FPM模块,从而避免恶意脚本注入的攻击,所以此项应该去掉注释并设置为0
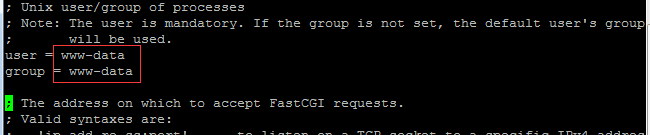
- 创建php运行账户 www-data
groupadd www-data
useradd -g www-data www-data
- 设置php-fpm.conf文件(实际上是修改www.conf,因为在php-fpm底部有一句 include 引入了php-fpm.d文件夹中的文件)
cd /usr/local/etc/php-fpm.d/
cp www.conf.default www.conf
vim www.conf
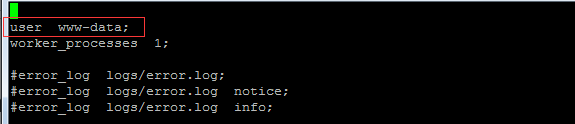
1.修改运行身份,使用之前创建的www-data用户
 、
、
这里使用sock模式与nginx进行通信,如果选择使用端口进行与nginx的交互请忽略下面两步:
2. 修改listen
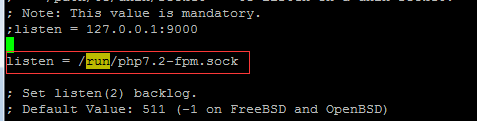
3. 设置sock所有者权限(保证nginx能够读到)

- 启动命令
/etc/init.d/php7.2-fpm restart 重启php-fpm
/etc/init.d/php7.2-fpm start 启动php-fpm
/etc/init.d/php7.2-fpm stop 停止php-fpm
- 检查php情况
ps aux|grep php

三 .关联nginx与php
我这里配置的是php与nginx通过sock模式进行通信,
通信方式有两种分别是通过端口进行TCP通信,以及我配置的这种UNIX通信
简单来说就是:
* TCP更加安全,可靠,但相对速度慢。
* UNIX速度快,但高并发相对不稳定。
参考:https://segmentfault.com/a/1190000018048956
确保自己在php安装过程中修改了listen以及soclk文件权限
1.修改nginx.conf 文件
vim /usr/local/nginx/conf/nginx.conf
- 运行账户(这里设置成了www-data,也可以设置成root)
- 找到server里面的关于php连接的文件,改成下面这样(如果是通过端口通信,直接去掉注释即可)
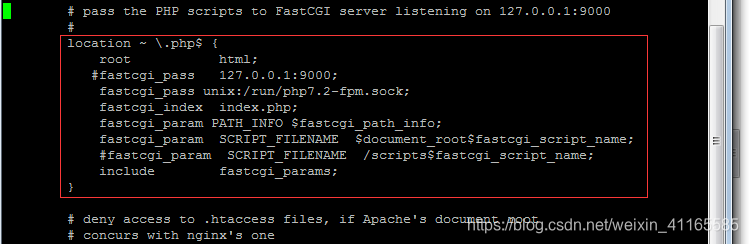
确保fastcgi_pass 的值与php配置中listen的值然后加上一致,在前面加上unix:
location ~ .php$ {
fastcgi_pass unix:/run/php7.2-fpm.sock;
fastcgi_index index.php;
fastcgi_param PATH_INFO $fastcgi_path_info;
fastcgi_param SCRIPT_FILENAME d o c u m e n t r o o t document_root documentrootfastcgi_script_name;
include fastcgi_params;
}
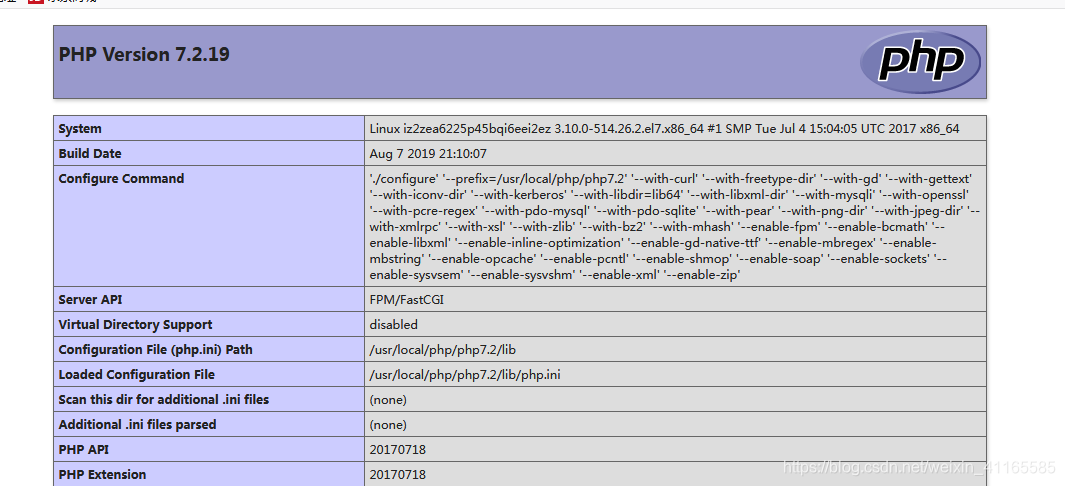
2 验证连接
重启nginx
/usr/local/nginx/sbin/nginx -s reload
在站点根目录下创建php文件(默认是nginx安装目录下的html文件。)
vim /usr/local/nginx/html/index.php
编写phpinfo
<?php
phpinfo();
查看


 1057
1057

 被折叠的 条评论
为什么被折叠?
被折叠的 条评论
为什么被折叠?
 到【灌水乐园】发言


