


 本文介绍了如何在Spring Boot应用中集成百度富文本编辑器Ueditor,并实现图片上传功能。通过配置imageUrlPrefix和serverUrl,设置Ueditor的图片上传接口,并在后端创建对应的Java接口处理图片上传,返回图片URL给Ueditor展示。
相信大家都是把Ueditor在前端部署好后,图片上传不知道怎么弄,我也是,研究分析很多篇文章,得出以下步骤可行
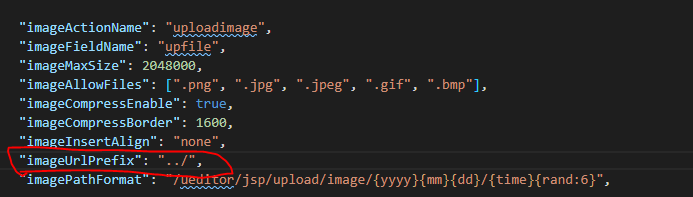
- 配置好在/Ueditor/jsp/config.json里的imageUrlPrefix,到时后端返回图片保存的访问url时,Ueditor会自动在访问url前加上你写的imageUrlPrefix,如图配置,服务端返回url为:“pic/123.jpg”,在ueditor显示为<img src="../pic/123.jpg">.
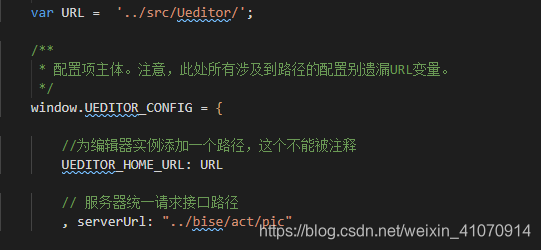
- 配置ueditor.config.js的serverUrl,改成你后端图片上传的接口,我这里使用了Nginx代理
-
- config.json配置好后,复制config.json文本,在你的spring项目里新建一个UeditorConfig类
-
package com.example.bise.util;

/**
 * @author Administrator
 */
public class UeditorConfig {
    public final static String CONFIG = "/* 前后端通信相关的配置,注释只允许使用多行方式 */\n" +
            "{\n" +
            "\n" +
            "    \"imageActionName\": \"uploadimage\",\n" +
            "    \"imageFieldName\": \"upfile\", \n" +
            "    \"imageMaxSize\": 2048000, \n" +
            "    \"imageAllowFiles\": [\".png\", \".jpg\", \".jpeg\", \".gif\", \".bmp\"], \n" +
            "    \"imageCompressEnable\": true, \n" +
            "    \"imageCompressBorder\": 1600, \n" +
            "    \"imageInsertAlign\": \"none\", \n" +
            "    \"imageUrlPrefix\": \"/\", \n" +
            "    \"imagePathFormat\": \"/ueditor/jsp/upload/image/{yyyy}
 最低0.47元/天 解锁文章


 被折叠的 条评论
为什么被折叠?
被折叠的 条评论
为什么被折叠?
 到【灌水乐园】发言


