


 本文是Spring Boot教程,介绍了两种配置文件Application.properties和Application.yml的使用,包括yaml的写法、配置文件值的获取。还对比了@ConfigurationProperties和@Value的区别,讲解了@PropertySource和@ImportResource的用法,以及配置文件占位符的使用,同时给出了乱码问题的解决办法。
1.会使用两种配置文件:
Application.properties,
Application.yml,或者yaml也可以。
配置文件得名字是固定得。
作用是修改spring boot自动配置的默认配置。
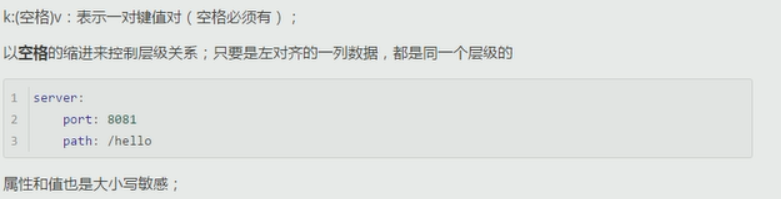
2.yaml的写法:
Server:
Port: 8081
基本语法:
Key : (必须有空格)
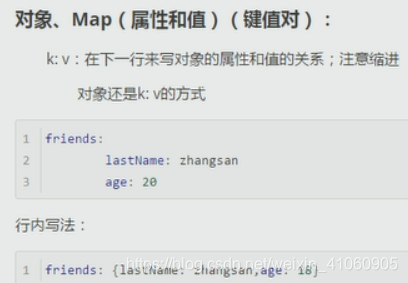
对象的写法:
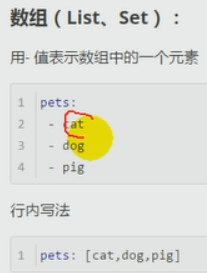
数组的写法:
当然,以上得可以混合写,什么数组,对象都可以混合写。
Yaml配置文件的值的获取
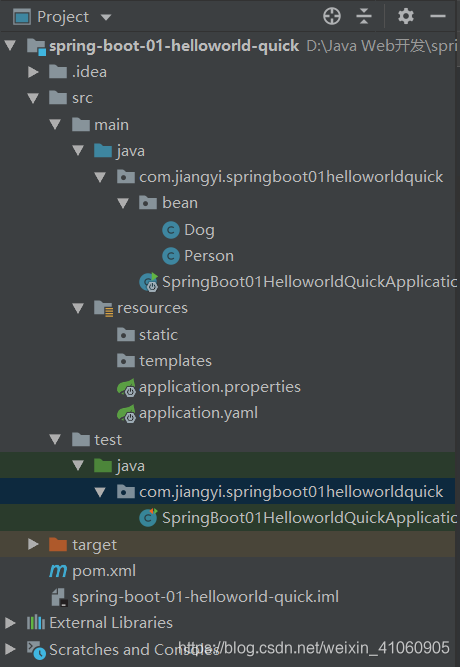
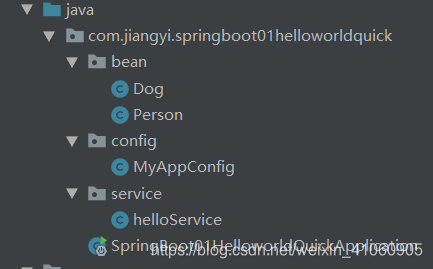
项目结构是这样的。
Person类:这是一个组件,
将配置文件中配置的每一个属性的值都映射到这个组件中。
@ConfigurationProperties(prefix = "person"),告诉
Spring Boot,将配置文件中得每一个值和这个组件进行绑定。
Prifix=”person”,与配置文件中对应的模块进行绑定。
这个注释,必须在容器中才可以,即必须得有@Component注释。
就这样,编译器会报错,上面会有一行报错信息,提示…..
点进去蓝色的链接,提示需要导入依赖,这样以后使用配置文件映射功能
就会有提示了。
@Component

@ConfigurationProperties(prefix = "person")

public class Person {

    private String lastName;

    private Integer age;

    private Boolean boss;

    private Date birth;


    private Map<String,Object> maps;

    private List<Object> lists;
Dog类:
private Dog dog;
public class Dog {

    private String name;


    @Override

    public String toString() {

        return "Dog{" +

                "name='" + name + '\'' +

                ", age=" + age +

                '}';

    }


    private Integer age;
需要得依赖:
<!--导入配置文件处理器,将配置文件进行绑定就会有提示-->
<dependency>

    <groupId>org.springframework.boot</groupId>

    <artifactId>spring-boot-configuration-processor</artifactId>

    <optional>true</optional>

</dependency>
Application.yaml:
person:
  lastName: zhangsan

  age: 18

  boss: false

  birth: 2019//4/02

  maps: {k1: v1,k2: 12}

  lists:

    - lisi

    - zhaoliu

  dog:

    name: xiaog

    age: 12
运行测试类:
package com.jiangyi.springboot01helloworldquick;
import com.jiangyi.springboot01helloworldquick.bean.Person;

import org.junit.Test;

import org.junit.runner.RunWith;

import org.springframework.beans.factory.annotation.Autowired;

import org.springframework.boot.test.context.SpringBootTest;

import org.springframework.test.context.junit4.SpringRunner;


/**

 * Spring Boot 单元测试

 * 可以在测试期间很方便得进行类似编码方式得自动注入得功能

 */

@RunWith(SpringRunner.class)//意识是用spring boot的驱动器来跑,而不是以前得junit

@SpringBootTest

public class SpringBoot01HelloworldQuickApplicationTests {

    @Autowired

    Person person;

    @Test

    public void contextLoads() {

        System.out.println(person);

    }


}
得到结果:

用application.properties来配置
会有乱码,默认idea使用utf-8来编码,而properties文件使用ansci码来
编码。
解决办法:在设置settings—》查找框里输入file enc,勾选相应得选项。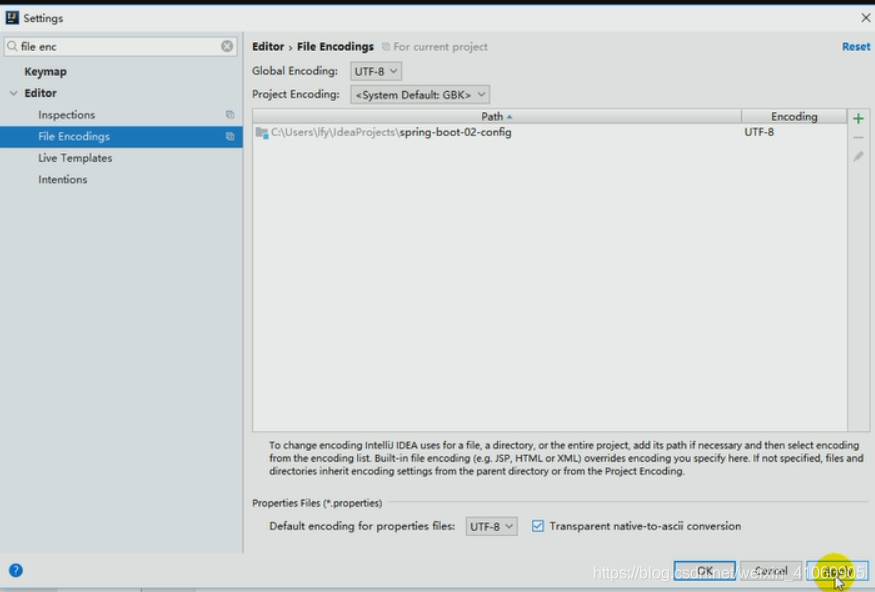

另外一种获取值的方式
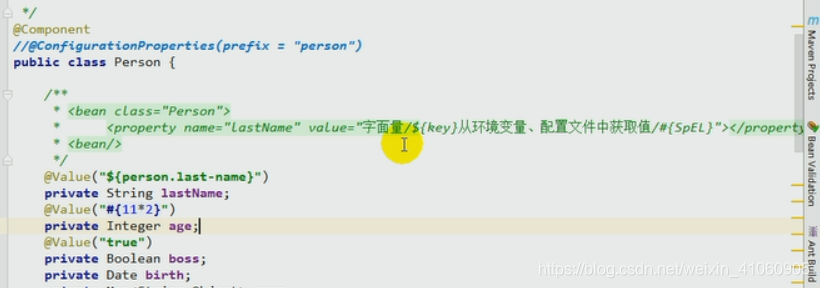
松散绑定:

使用JSR303校验:
@Validated在类上使用

@ConfigurationProperties和@Value两种的区别:
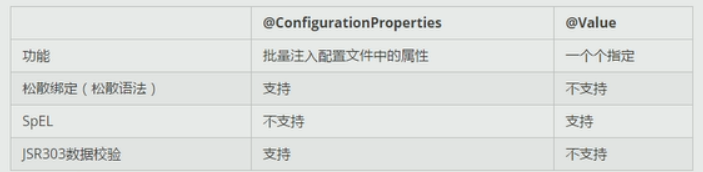
配置文件写什么都ok,数据都可以拿到。
但是,复杂类型封装,@Value不可以!比如集合:Map,list
在有的时候使用@Value比较方便,比如:
那么要在什么时候使用这两种呢(区别的使用)

@PropertySource和@ImportResource
@ConfigurationProperties(prefix = "person")
默认从全局里获得变量的值,即从那两个配置文件中获取。
如果我们要从resource文件夹下的我们自己写的properties的文件中
获取数据,则不能用那个注释!
![]()
可以加载到指定的配置文件。
@ImportResource
Spring Boot里面没有spring的配置文件,我们自己b编写的也不能
识别。想要让Spring的配置文件生效,要用@ImportResource标注在一个
配置类上。(这里标注在主类上)
---》这个不常用!
一般使用配置类的方式!
创建一个config.MyAppConfig.class
/**
* @Configuration指明当前类是一个配置

 * 类,就是来替代之前的 Spring配置文件

 * 在配置文件中使用<bean></bean>

 * 来添加组件

 */

@Configuration

public class MyAppConfig {

    //将方法中的返回值添加到容器中

    //容器中这个组件的默认的id

    //就是方法名

    @Bean

    public helloService helloService2(){

        System.out.println("配置类@Bean给容器中添加组件了");

        return new helloService();

        //这里返回这个方法的方法名helloService

    }

}
在测试类里检测是否注入成功,
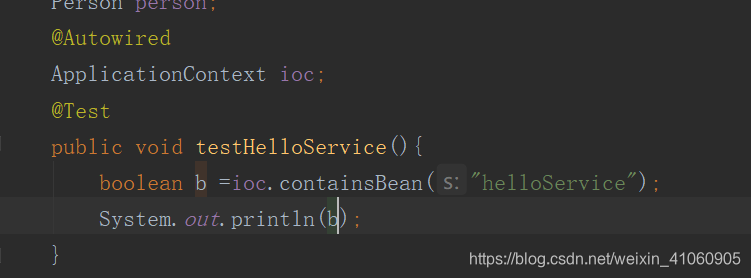
这里在配置类里使用helloService2作为方法名,故打印出来的是失败false。
如果修改为helloService,则打印出来的是成功。
配置文件占位符
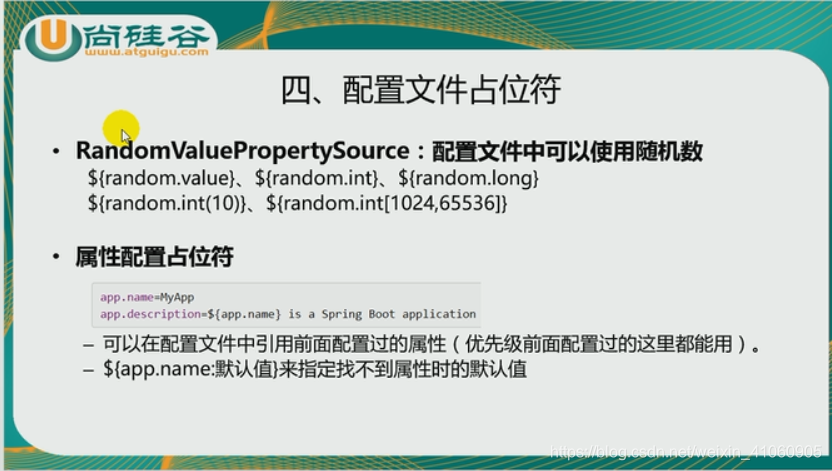
Ex:
person.last-name=江毅${random.uuid}
person.age=${random.int}

person.birth=2019/4/02

person.boss=true

person.maps.k1=v1

person.maps..k2=v2

person.lists=a,b,c

person.dog.name=${person.hello:hello}_dog

person.dog.age=3
结果:


 被折叠的 条评论
为什么被折叠?
被折叠的 条评论
为什么被折叠?
 到【灌水乐园】发言


