


 本文介绍了全景拼接的原理,包括关键点检测、特征匹配、单应矩阵估计和图像融合。通过SIFT、SURF、ORB等特征点提取方法,结合RANSAC算法进行图像配准。此外,讨论了相机位置变化导致的拼接挑战,并提供了OpenCV实现的代码步骤,适用于室内等不同场景的全景拼接。
一、全景拼接的原理介绍
全景拼接是将多副图之间的共同之处进行匹配连接,合成完整的一幅图像
二、步骤
1:从输入的两张图片里检测关键点、提取局部不变特征。
2:匹配的两幅图像之间的特征
3:使用RANSAC算法利用匹配特征向量估计单应矩阵(homography matrix)。
4:利用Step3得到的单应矩阵应用扭曲变换。
三、方法:
1.特征点提取:
sift、surf、orb等特征点提取;
2.基于特征点的配准:
RANSAC方法剔除匹配点并拟合图像变换矩阵(全局单应性矩阵);
3.图像融合:
先确定缝合线,再利用加权融合、多频带融合的方法融合;
**备注:**除了按照上文提到的顺序利用opencv进行拼接,还可以用opencv自带的stitch类,拼接很方便,效果也很好
存在问题:
由于镜头拍照的位置不同,会导致图片虽然有相同的拍摄区域,但是并不能简单的将图二和图一的重叠区域覆盖进行拼 接。因为拍摄图一和图二是,相机的世界坐标位置基本会发生变化。试想一下,你首先在A位置看到物体一,然后换到B位置再看物体一,物体一虽然仍在你的视野里,但是,它在你眼中与周围参照物的距离会发生变化(除非你只是转到一下眼珠),位置不同,光线也可能不同,这都是拼接过程中存在的问题
代码方法解析:
1. 获取两个图像之间的关键点匹配 (使用 cv2 实现)。
2. 对于所有匹配项, 根据比率测试筛选匹配项。此处我设置为 0.8
3 对于所有剩余的匹配项, 使用 RANSAC 算法完成的。
4.根据 H 矩阵估计筛选匹配项。经过大量测试后, 重新投影阈值设置为4.0。官方文档建议的值从1-10 不等, 默认值为3。
5. 使用从步骤3和步骤4幸存下来的像素数的比率来确定匹配的整体质量, 并将阈值设置为 0.7, 这意味着从步骤3到4的比赛损 失不超过30%
四、对不同场景进行全景拼接:
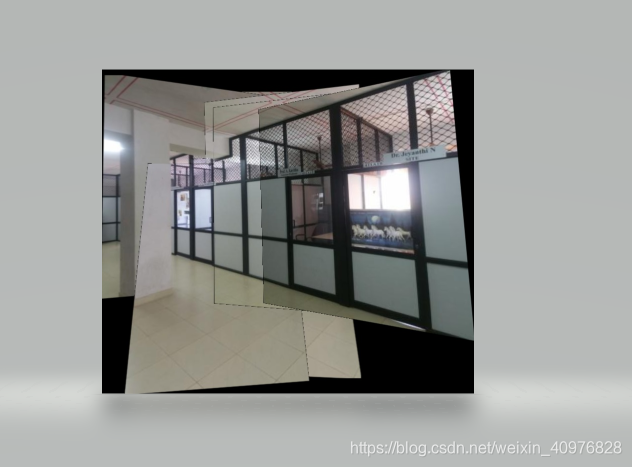
1.室内
主要代码
import numpy as np
import cv2
import sys, os
from matplotlib import pyplot as plt

 - ### GLOBAL VARIABLES ###

MIN_MATCH_COUNT        = 10 # Minimum number of keypoint pairs required for image matching
RATIO_TEST			   = 0.8
REPROJECTION_THRESHOLD = 4.0
H_F_RATIO              = 0.5


 - # Given a directory name and an extension of files to search for,
   # the function will return a sorted list of files in the folder.

def get_image_paths_from_folder(dir_name, extension):
	# Store current working directory, then change to desired directory
	cwd = os.getcwd()
	os.chdir(dir_name)

	# Get the image paths in the folder with the requested extension
	#img_list = os.listdir('./')
	img_list = os.listdir('F:/Program Files/Image-Stitcher-master (1)/Image-Stitcher-master/examples/church')
	img_list = [dir_name + "/" + name for name in img_list if extension in name.lower() ]
	img_list.sort(key=lambda x:int(x[:-4]))

	# Restore the working directory
	os.chdir(cwd)

	return img_list


 - # Given a list of image paths, return a list of the image data

def read_images(path_list):
	images = ['11.jpg' , '12.jpg' , '13.jpg']
	#images = ['11.jpg' , '12.jpg' , '13.jpg']
	for path in path_list:
		image = cv2.imread(path)
		images.append(image)

	return images


 - # Given an image, return the sift keypoints and descriptors

def get_sift_keypoints(image):
	# Convert image to grayscale
	image_gray = cv2.cvtColor(image, cv2.COLOR_BGR2GRAY)

	# Initiate SIFT detector
	sift = cv2.xfeatures2d.SIFT_create()

	# find the keypoints and descriptors with SIFT
	keypoints, descriptors = sift.detectAndCompute(image_gray, None)

	return keypoints, descriptors


 - # given two image heights and widths, and a homography matrix to transform one onto another,
   # determine the size of the resulting merge and the offsets which will be applied to the anchor
   # such that the anchor is placed in the correct position in the new coordinate system

def get_merge_size(h1, w1, h2, w2, homography):
	points
最低0.47元/天 解锁文章


 1万+
1万+

 被折叠的 条评论
为什么被折叠?
被折叠的 条评论
为什么被折叠?
 到【灌水乐园】发言


