


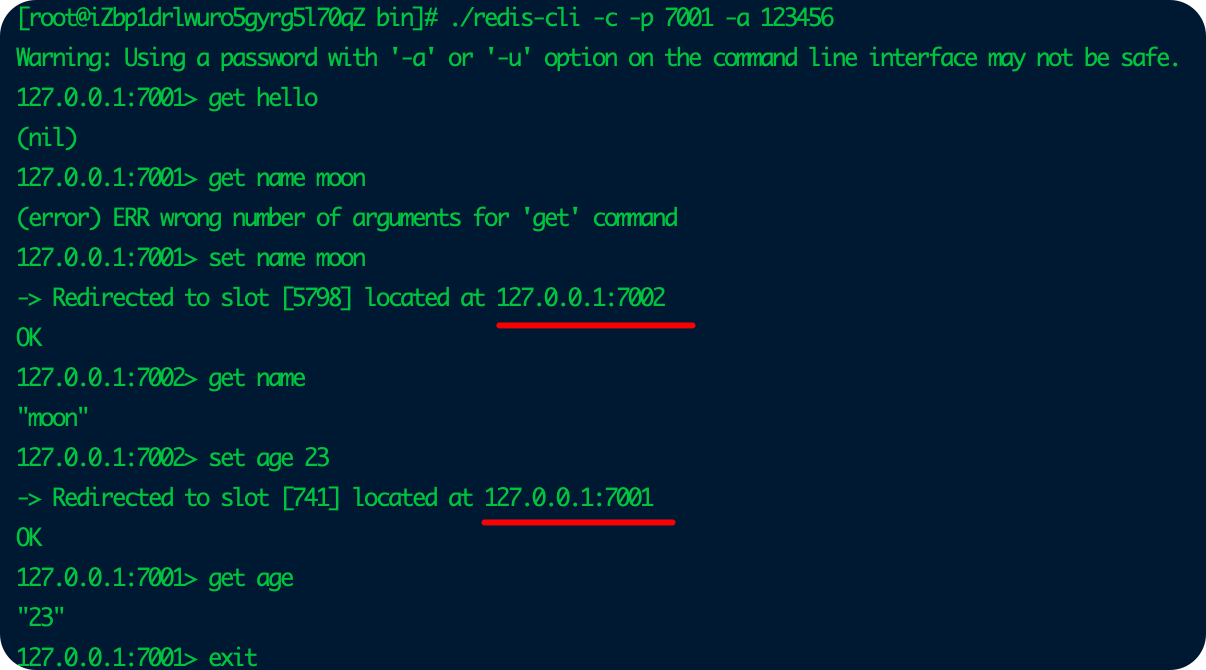
Redis Cluster 即 Redis 集群,是 Redis 官方在 3.0 版本推出的一套分布式存储方案。完全去中心化,由多个节点组成,所有节点彼此互联。Redis 客户端可以直接连接任何一节点获取集群中的键值对,不需要中间代理,如果该节点不存在用户所指定的键值,其内部会自动把客户端重定向到键值所在的节点。
Redis 集群是一个网状结构,每个节点都通过 TCP 连接跟其他每个节点连接。在一个有 N 个节点的集群中,每个节点都有 N-1 个流出的 TCP 连接,和 N-1 个流入的连接,这些 TCP 连接会永久保持。

Redis Cluster 同其他分布式存储系统一样,主要具备以下两个功能:
数据分区:Redis 集群会将用户数据分散保存至各个节点中,突破单机 Redis 内存最大存储容量。集群引入了 哈希槽slot的概念,其搭建完成后会生成 16384 个哈希槽slot,同时会根据节点的数量大致均等的将 16384 个哈希槽映射到不同的节点上。当用户存储key-value时,集群会先对key进行 CRC16 校验然后对 16384 取模来决定key-value放置哪个槽,从而实现自动分割数据到不同的节点上。
数据冗余:Redis 集群支持主从复制和故障恢复。集群使用了主从复制模型,每个主节点master应至少有一个从节点slave。假设某个主节点故障,其所有子节点会广播一个数据包给集群里的其他主节点来请求选票,一旦某个从节点收到了大多数主节点的回应,那么它就赢得了选举,被推选为主节点,负责处理之前旧的主节点负责的哈希槽。
集群部署
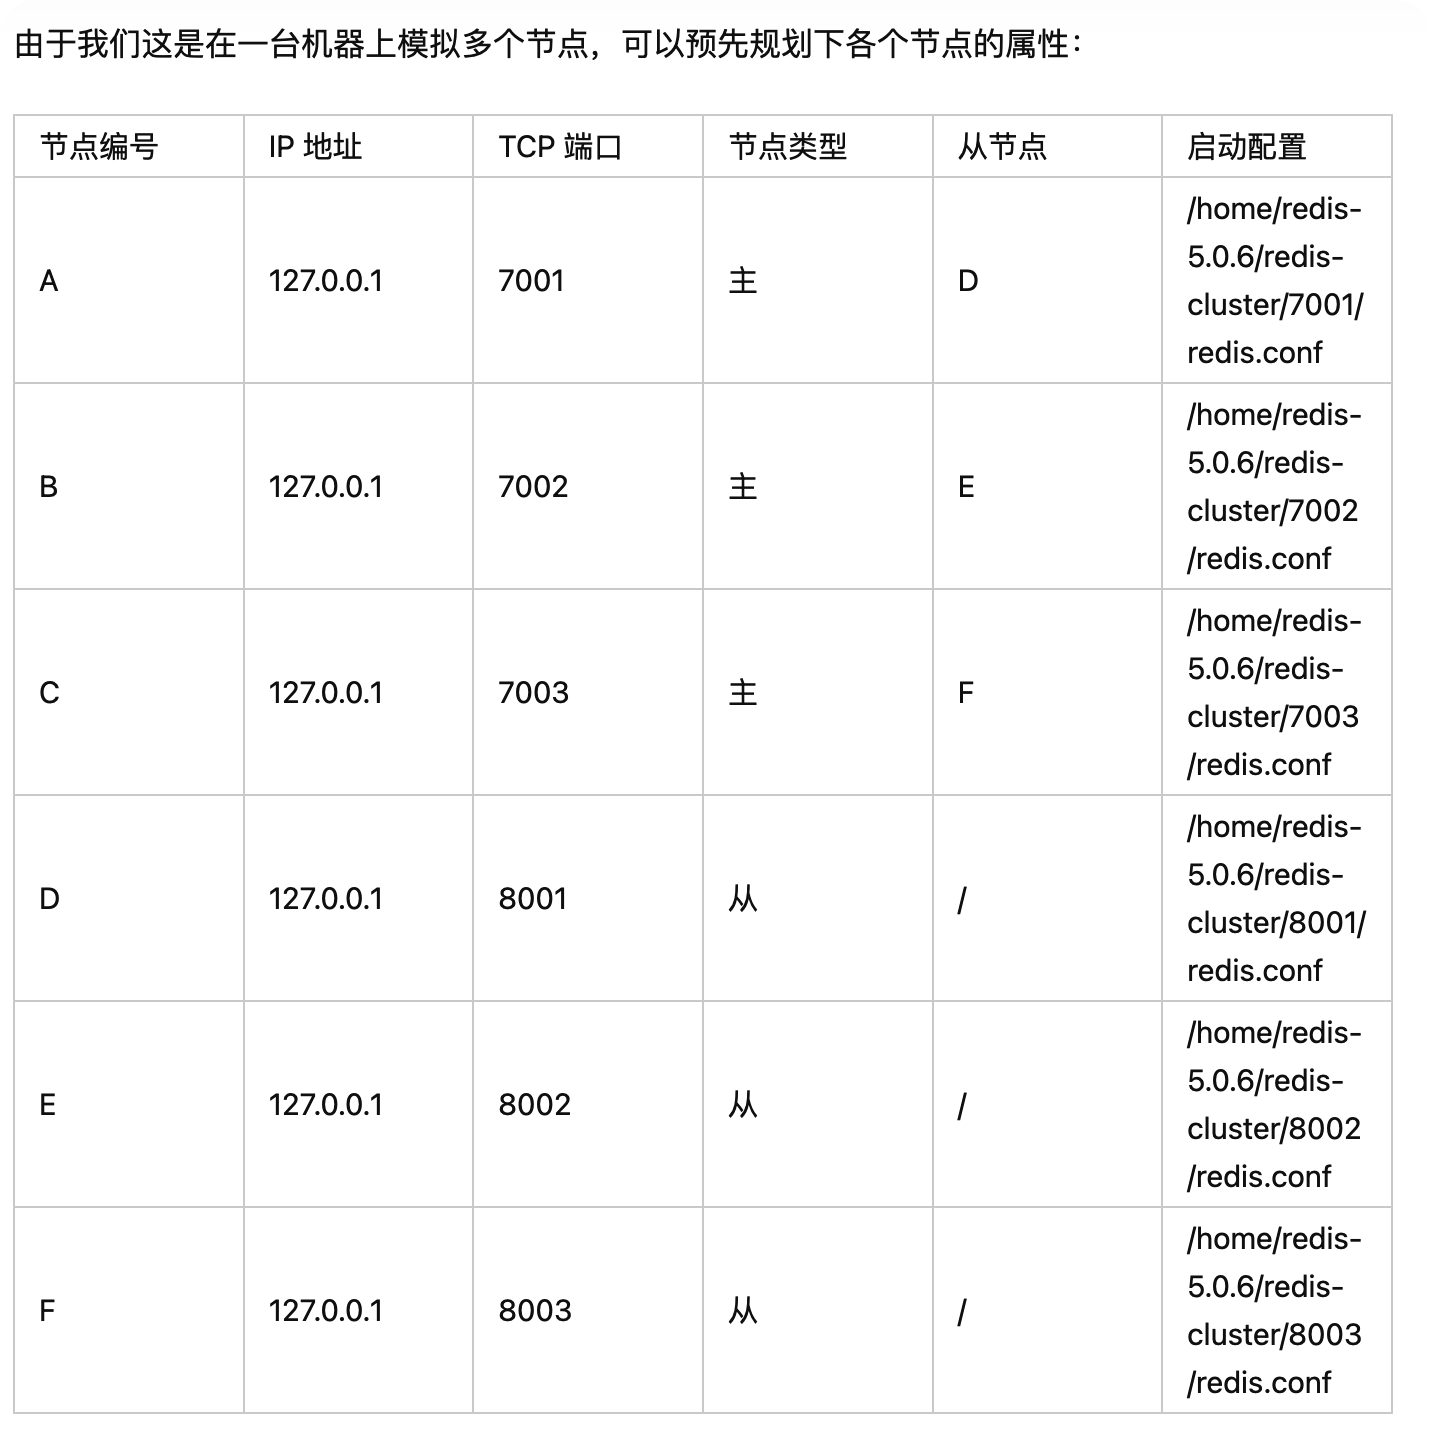
手动部署
演示了如何创建redis集群
bind 192.168.83.128 # 设置当前节点主机地址
port 7001 # 设置客户端连接监听端口
pidfile /var/run/redis_7001.pid # 设置 Redis 实例 pid 文件
daemonize yes # 以守护进程运行 Redis 实例
cluster-enabled yes # 启用集群模式
cluster-node-timeout 15000 # 设置当前节点连接超时毫秒数
cluster-config-file nodes-7001.conf # 设置当前节点集群配置文件路径
一键部署(使用create-cluster)
如果觉得以上过程很繁琐,Redis官方提供了另外的工具,在utils目录下存在create-cluster脚本。
create-cluster start
create-cluster create
就会创建3 mater 3 slave组成的redis cluster(首节点端口从30001 开始)
官方create-cluster工具用法:
Create-custer is a small script used to easily start a big number of Redis
instances configured to run in cluster mode. Its main goal is to allow manual
testing in a condition which is not easy to replicate with the Redis cluster
unit tests, for example when a lot of instances are needed in order to trigger
a given bug.
The tool can also be used just to easily create a number of instances in a
Redis Cluster in order to experiment a bit with the system.
USAGE
To create a cluster, follow these steps:
-
Edit create-cluster and change the start / end port, depending on the
number of instances you want to create. -
Use "./create-cluster start" in order to run the instances.
-
Use "./create-cluster create" in order to execute redis-cli --cluster create, so that
an actual Redis cluster will be created. -
Now you are ready to play with the cluster. AOF files and logs for each instances are created in the current directory.
In order to stop a cluster:
-
Use "./create-cluster stop" to stop all the instances. After you stopped the instances you can use "./create-cluster start" to restart them if you change your mind.
-
Use "./create-cluster clean" to remove all the AOF / log files to restart with a clean environment.
Use the command "./create-cluster help" to get the full list of features.
cd /root/redis/redis-5.0.14/redis-5.0.14/utils/create-cluster

# create-cluster经过修改,启动后可以被外网访问,默认密码为123456

# 启动所有的实例
./create-cluster start

# 创建集群
./create-cluster create

# 停止所有的实例
./create-cluster stop

# 删除所有的AOF/日志文件,以便用一个干净的环境重新启动
./create-cluster clean

# 使用命令"./create-cluster help "获得完整的功能列表
注意:如需外网访问,服务器需开放端口 30001-30006,40001-40006。并使用以下修改后的create-cluster 来启动集群。如不需要外网访问, 使用默认create-cluster启动即可,不需要任何修改,也不需要开放端口
#!/bin/bash

# Settings
PORT=30000
TIMEOUT=2000
NODES=6
REPLICAS=1

# You may want to put the above config parameters into config.sh in order to
# override the defaults without modifying this script.

if [ -a config.sh ]
then
    source "config.sh"
fi

# Computed vars
ENDPORT=$((PORT+NODES))

if [ "$1" == "start" ]
then
    while [ $((PORT < ENDPORT)) != "0" ]; do
        PORT=$((PORT+1))
        echo "Starting $PORT"
        ../../src/redis-server --port $PORT --bind 0.0.0.0 --protected-mode no --masterauth 123456  --requirepass 123456 --cluster-announce-ip 47.114.60.192  --cluster-enabled yes --cluster-config-file nodes-${PORT}.conf --cluster-node-timeout $TIMEOUT --appendonly yes --appendfilename appendonly-${PORT}.aof --dbfilename dump-${PORT}.rdb --logfile ${PORT}.log --daemonize yes
    done
    exit 0
fi

if [ "$1" == "create" ]
then
    HOSTS=""
    while [ $((PORT < ENDPORT)) != "0" ]; do
        PORT=$((PORT+1))
        HOSTS="$HOSTS 47.114.60.192:$PORT"
    done
    ../../src/redis-cli -a 123456 --cluster create $HOSTS --cluster-replicas $REPLICAS
    exit 0
fi

if [ "$1" == "stop" ]
then
    while [ $((PORT < ENDPORT)) != "0" ]; do
        PORT=$((PORT+1))
        echo "Stopping $PORT"
        ../../src/redis-cli -p $PORT -a 123456 shutdown nosave
    done
    exit 0
fi

if [ "$1" == "watch" ]
then
    PORT=$((PORT+1))
    while [ 1 ]; do
        clear
        date
        ../../src/redis-cli -p $PORT -a 123456 cluster nodes | head -30
        sleep 1
    done
    exit 0
fi

if [ "$1" == "tail" ]
then
    INSTANCE=$2
    PORT=$((PORT+INSTANCE))
    tail -f ${PORT}.log
    exit 0
fi

if [ "$1" == "call" ]
then
    while [ $((PORT < ENDPORT)) != "0" ]; do
        PORT=$((PORT+1))
        ../../src/redis-cli -a 123456 -p $PORT $2 $3 $4 $5 $6 $7 $8 $9
    done
    exit 0
fi

if [ "$1" == "clean" ]
then
    rm -rf *.log
    rm -rf appendonly*.aof
    rm -rf dump*.rdb
    rm -rf nodes*.conf
    exit 0
fi

if [ "$1" == "clean-logs" ]
then
    rm -rf *.log
    exit 0
fi

echo "Usage: $0 [start|create|stop|watch|tail|clean]"
echo "start       -- Launch Redis Cluster instances."
echo "create      -- Create a cluster using redis-cli --cluster create."
echo "stop        -- Stop Redis Cluster instances."
echo "watch       -- Show CLUSTER NODES output (first 30 lines) of first node."
echo "tail <id>   -- Run tail -f of instance at base port + ID."
echo "clean       -- Remove all instances data, logs, configs."
echo "clean-logs  -- Remove just instances logs."
常用命令
集群一键创建脚本
#!/bin/bash
# redis-server命令行所在位置
CMD_PATH=/usr/local/redis/bin
PWD=123456
CLUSTER_ANNOUNCE_IP=47.114.60.192
REPLICAS=1
TIMEOUT=15000

echo "正在启动集群节点..."
PORT=30001
${CMD_PATH}/redis-server --port $PORT --bind 0.0.0.0 --protected-mode no --masterauth $PWD  --requirepass $PWD --cluster-announce-ip $CLUSTER_ANNOUNCE_IP  --cluster-enabled yes --cluster-config-file nodes-${PORT}.conf --cluster-node-timeout $TIMEOUT --appendonly yes --appendfilename appendonly-${PORT}.aof --dbfilename dump-${PORT}.rdb --logfile ${PORT}.log --daemonize yes
PORT=30002
${CMD_PATH}/redis-server --port $PORT --bind 0.0.0.0 --protected-mode no --masterauth $PWD  --requirepass $PWD --cluster-announce-ip $CLUSTER_ANNOUNCE_IP  --cluster-enabled yes --cluster-config-file nodes-${PORT}.conf --cluster-node-timeout $TIMEOUT --appendonly yes --appendfilename appendonly-${PORT}.aof --dbfilename dump-${PORT}.rdb --logfile ${PORT}.log --daemonize yes
PORT=30003
${CMD_PATH}/redis-server --port $PORT --bind 0.0.0.0 --protected-mode no --masterauth $PWD  --requirepass $PWD --cluster-announce-ip $CLUSTER_ANNOUNCE_IP  --cluster-enabled yes --cluster-config-file nodes-${PORT}.conf --cluster-node-timeout $TIMEOUT --appendonly yes --appendfilename appendonly-${PORT}.aof --dbfilename dump-${PORT}.rdb --logfile ${PORT}.log --daemonize yes
PORT=30004
${CMD_PATH}/redis-server --port $PORT --bind 0.0.0.0 --protected-mode no --masterauth $PWD  --requirepass $PWD --cluster-announce-ip $CLUSTER_ANNOUNCE_IP  --cluster-enabled yes --cluster-config-file nodes-${PORT}.conf --cluster-node-timeout $TIMEOUT --appendonly yes --appendfilename appendonly-${PORT}.aof --dbfilename dump-${PORT}.rdb --logfile ${PORT}.log --daemonize yes
PORT=30005
${CMD_PATH}/redis-server --port $PORT --bind 0.0.0.0 --protected-mode no --masterauth $PWD  --requirepass $PWD --cluster-announce-ip $CLUSTER_ANNOUNCE_IP  --cluster-enabled yes --cluster-config-file nodes-${PORT}.conf --cluster-node-timeout $TIMEOUT --appendonly yes --appendfilename appendonly-${PORT}.aof --dbfilename dump-${PORT}.rdb --logfile ${PORT}.log --daemonize yes
PORT=30006
${CMD_PATH}/redis-server --port $PORT --bind 0.0.0.0 --protected-mode no --masterauth $PWD  --requirepass $PWD --cluster-announce-ip $CLUSTER_ANNOUNCE_IP  --cluster-enabled yes --cluster-config-file nodes-${PORT}.conf --cluster-node-timeout $TIMEOUT --appendonly yes --appendfilename appendonly-${PORT}.aof --dbfilename dump-${PORT}.rdb --logfile ${PORT}.log --daemonize yes


echo "正在创建集群..."
${CMD_PATH}/redis-cli --cluster create ${CLUSTER_ANNOUNCE_IP}:30001 ${CLUSTER_ANNOUNCE_IP}:30002 ${CLUSTER_ANNOUNCE_IP}:30003 ${CLUSTER_ANNOUNCE_IP}:30004 ${CLUSTER_ANNOUNCE_IP}:30005 ${CLUSTER_ANNOUNCE_IP}:30006 --cluster-replicas 1 -a $PWD
集群一键关闭脚本
#!/bin/bash
CMD_PATH=/usr/local/redis/bin
PWD=123456

echo "正在关闭集群节点..."
${CMD_PATH}/redis-cli -p 30001 -a $PWD shutdown save
${CMD_PATH}/redis-cli -p 30002 -a $PWD shutdown save
${CMD_PATH}/redis-cli -p 30003 -a $PWD shutdown save
${CMD_PATH}/redis-cli -p 30004 -a $PWD shutdown save
${CMD_PATH}/redis-cli -p 30005 -a $PWD shutdown save
${CMD_PATH}/redis-cli -p 30006 -a $PWD shutdown save
echo "正在清理日志..."
rm -rf *.log
echo "正在清理..."
rm -rf nodes*.conf

echo "正在清理持久化文件AOF&RDB..."
rm -rf dump*.rdb
rm -rf appendonly*.aof
echo "清理完成..."
ps -aux | grep redis
连接集群
redis-cli -c -p 30001 -a 123456

-p <port>          Server port (default: 6379).
-a <password>      Password to use when connecting to the server.
-c                 Enable cluster mode (follow -ASK and -MOVED redirections).
查看集群节点:

常见问题
PartitionSelectorException: Cannot determine a partition for slot 12440.
Caused by: org.springframework.data.redis.RedisSystemException: Redis exception;
nested exception is io.lettuce.core.RedisException:
io.lettuce.core.cluster.PartitionSelectorException: Cannot determine a partition for slot 12440.
-
原因
slot槽没能分配
-
解决办法
-
进入redis安装目录/usr/local/redis/bin,执行检查命令:
redis-cli -a 123456 --cluster check 47.114.60.192:30001
显示以下信息:
[OK] 0 keys in 1 masters.
0.00 keys per slot on average.
>>> Performing Cluster Check (using node 47.114.60.192:30001)
M: 7307aefd72f07b7686a03ee14cd473c9ff93f629 47.114.60.192:30001
   slots:[0-16383] (16384 slots) master
[OK] All nodes agree about slots configuration.
>>> Check for open slots...
>>> Check slots coverage...
[ERR] Not all 16384 slots are covered by nodes.
-
修复
过程中会显示是否执行的询问,直接回车即可,修复完成后继续修复30002, 30003端口的master
_注意_:47.114.60.192替换为自己的实际IP,30001、30002、30003位Master的端口(替换为自己实际的端口号)
redis-cli -a 123456 --cluster fix 47.114.60.192:30001
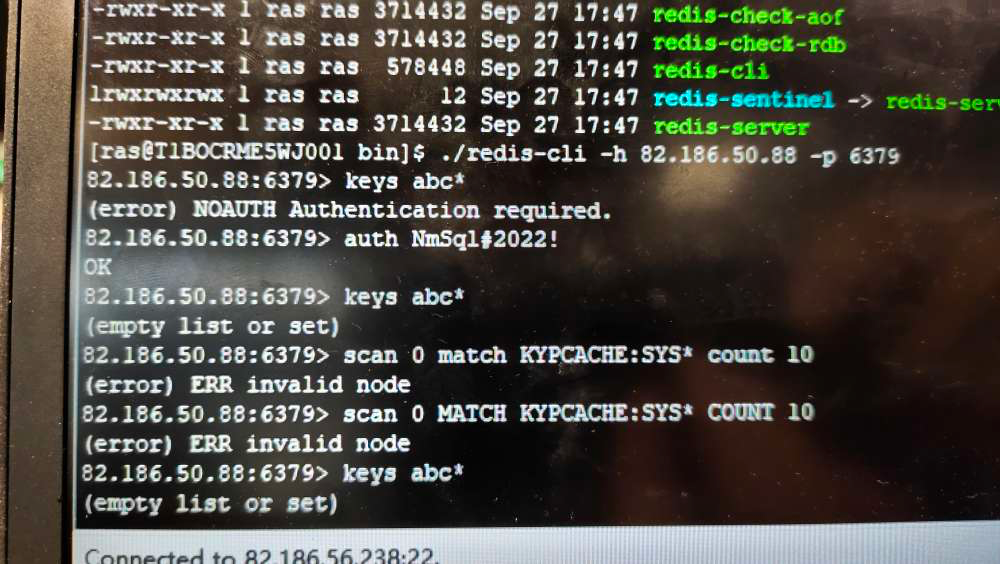
ERR invalid node
-
问题描述
环境使用的腾讯出的credis国产化redis产品, 且做了集群, java服务启动时连接redis报错:
org.springframework.data.redis.RedisSystemException: Error in execution; nested exception is io.lettuce.core.RedisCommandExecutionException: ERR invalid node
-
问题分析
定位问题代码,发现该处使用了scan 命令(scan 0 match KYPCACHE:SYS:DICT* count 100) 来查询出符合模式匹配的所有key
由于Redis是单线程的。因此在使用一些时间复杂度为O(N)的命令时要非常谨慎。可能一不小心就会阻塞进程,导致Redis出现卡顿。
有时,需要针对符合条件的一部分命令进行操作,比如删除以test_开头的key。那么怎么获取到这些key呢?在Redis2.8版本之前,可以使用keys命令按照正则匹配得到我们需要的key。但是这个命令有两个缺点:
-
没有limit,我们只能一次性获取所有符合条件的key,如果结果有上百万条,那么等待你的就是“无穷无尽”的字符串输出。
-
keys命令是遍历算法,时间复杂度是O(N)。如刚才所说,这个命令非常容易导致Redis服务卡顿。因此,要尽量避免在生产环境使用该命令。
在满足需求和存在造成Redis卡顿之间究竟要如何选择呢?面对这个两难的抉择,Redis在2.8版本给我们提供了解决办法——scan命令。
相比于keys命令,scan命令有两个比较明显的优势:
-
scan命令的时间复杂度虽然也是O(N),但它是分次进行的,不会阻塞线程。
-
scan命令提供了limit参数,可以控制每次返回结果的最大条数。
这两个优势就帮助我们解决了上面的难题,不过scan命令也并不是完美的,它返回的结果有可能重复,因此需要客户端去重。
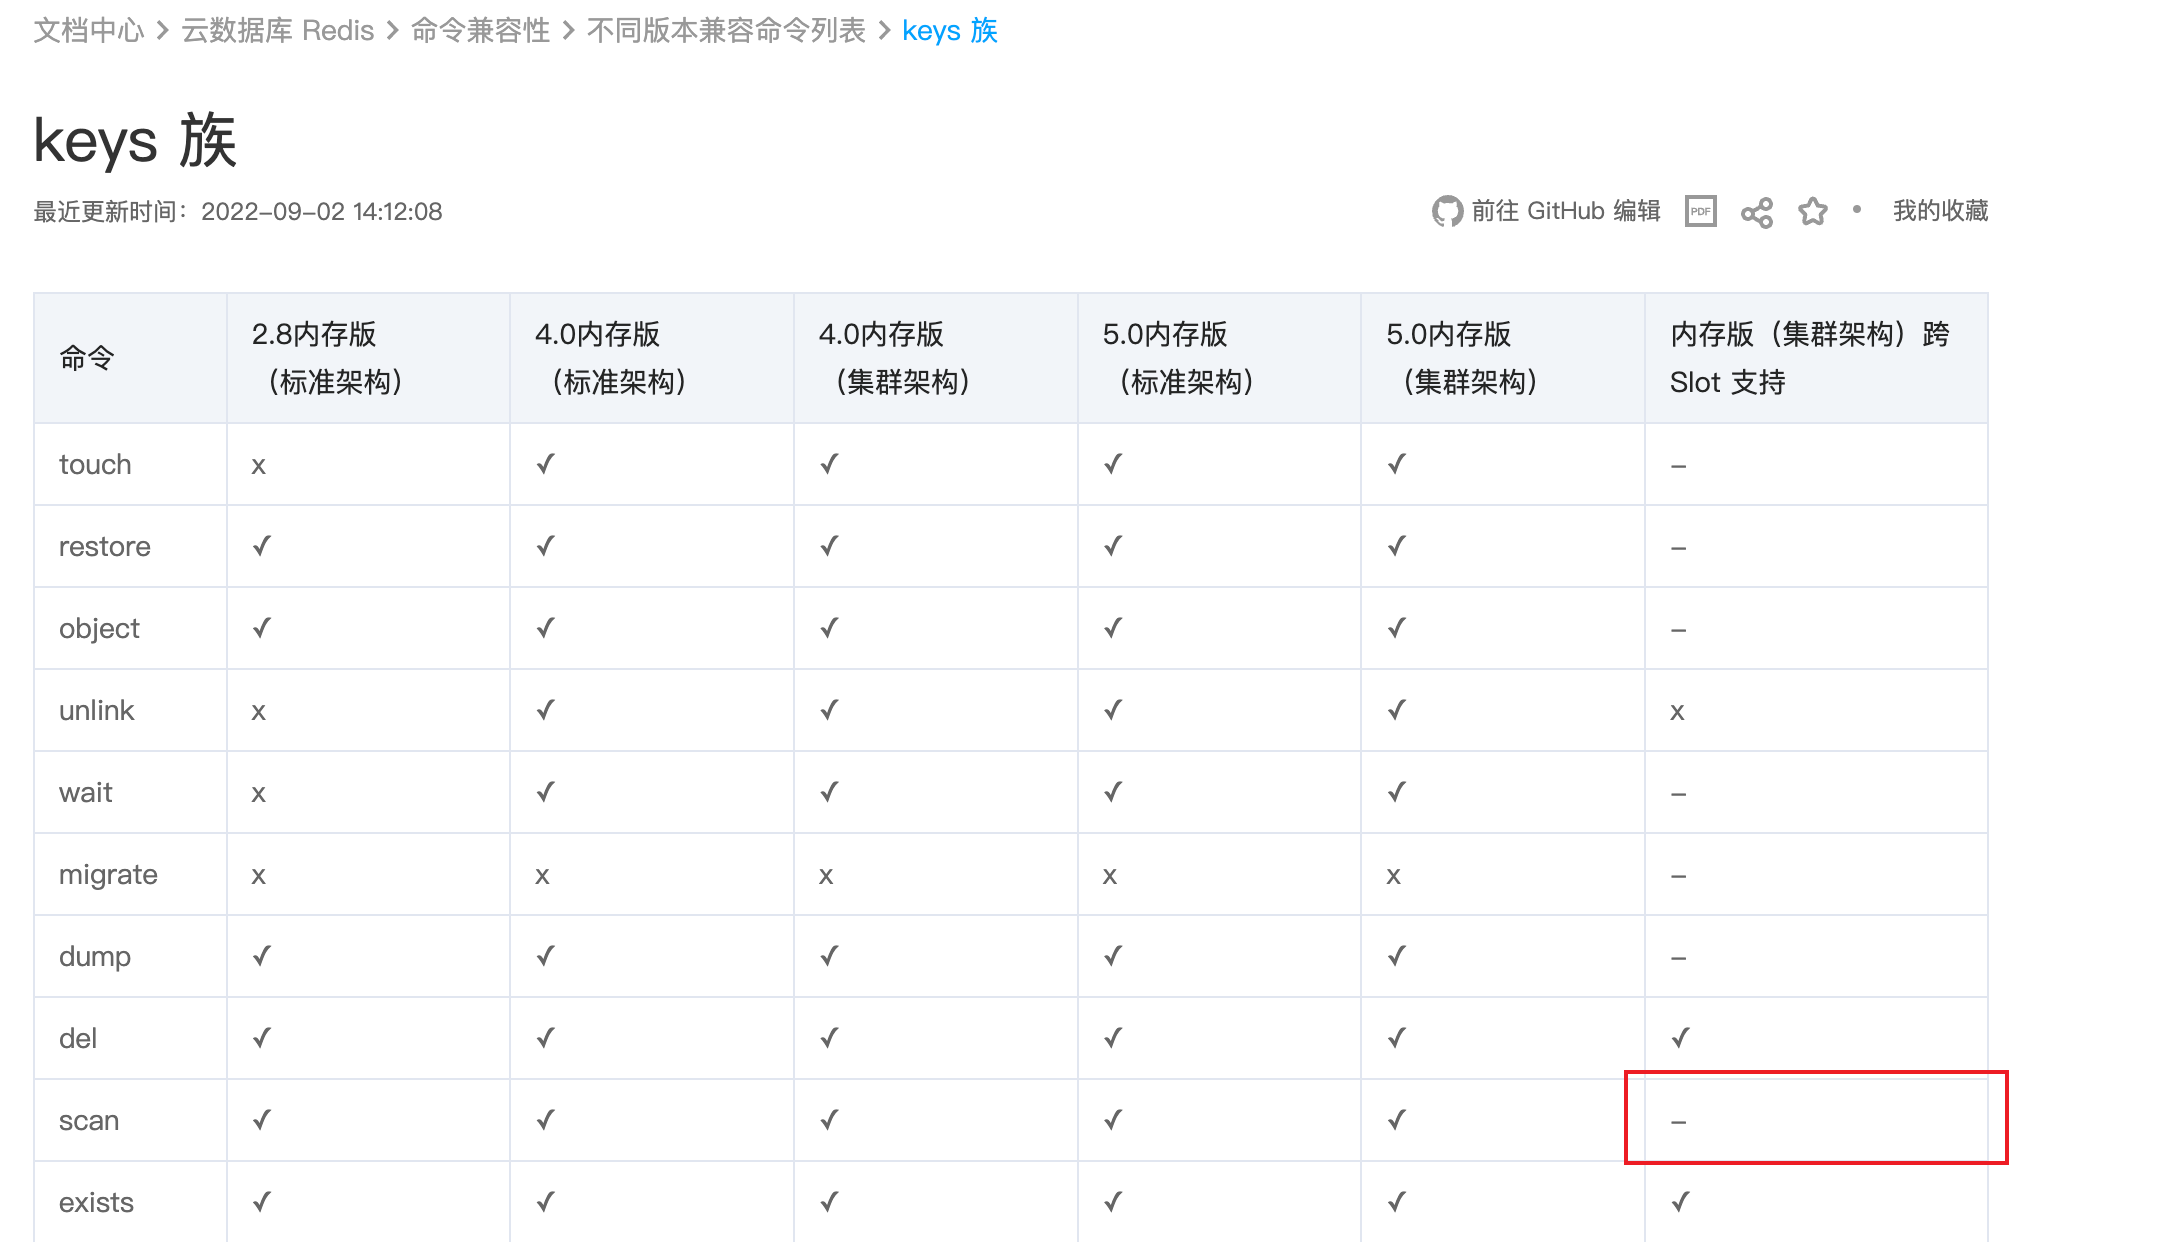
查阅credis文档发现,环境部署的CRedis版本不支持scan命令:
使用redis-cli连接测试 scan命令, 可复现该错误:
-
解决方法
为兼容CRedis,把scan命令,使用keys 命令来替换
1. scan命令的实现
String prefixPattern = keyPrefix + "*";
clearRedis(prefixPattern, 2000);

  private static void clearRedis(String prefixPattern, int count) {
        while (true) {
            ScanOptions options = ScanOptions.scanOptions().match(prefixPattern).count(count).build();
            Cursor<String> cursor = (Cursor<String>) redisTemplate.executeWithStickyConnection(redisConnection -> new ConvertingCursor<>(redisConnection.scan(options), redisTemplate.getKeySerializer()::deserialize));
            Set<String> container = new HashSet<>(count);
            cursor.forEachRemaining(key -> {
                container.add(key);
                if (container.size() > count) {
                    redisTemplate.delete(container);
                    container.clear();
                }
            });
            redisTemplate.delete(container);
            if (cursor.getPosition() == 0) {
                cursor.close();
                break;
            }
        }
    }
2. keys命令的实现
String prefixPattern = keyPrefix + "*";

Set<String> keys = redisTemplate.keys(prefixPattern)
集群模式不支持多数据库DB
-
问题描述
Redis实例使用StackExchange.Redis切换库出现以下错误。
Multiple databases are not supported on this server; cannot switch to database: 3
-
解决方案
由于架构原因,原生的Redis集群版是不支持多数据库DB,这意味着不可以通过spring.redis.database配置指定DB, 配置了也不生效,可使用阿里云带有Proxy的集群,通过Proxy可使Redis集群版支持多DB,详情请参见Redis Proxy特性说明。
-
单机模式, 和哨兵模式 支持多数据库DB


 335
335

 被折叠的 条评论
为什么被折叠?
被折叠的 条评论
为什么被折叠?
 到【灌水乐园】发言


