


 本文详细介绍了SpringBoot项目创建、配置文件使用、Mybatis、Redis、定时器的整合,以及Http请求的发送。通过SpringInitializr快速创建项目,无需手动配置,利用@SpringBootApplication简化启动类。探讨了SpringBoot的基本原理,如starter、依赖管理和自动配置。此外,讲解了配置文件的修改、测试、多环境配置以及松散绑定。还涵盖了Mybatis的整合步骤,Redis的集成,定时任务的实现,以及使用RestTemplate发送Http请求。最后讨论了SpringBoot项目的打包部署和热部署策略。
1 目标
- SpringBoot 项目快速创建(无需写任何配置文件)
- SpringBoot 基本原理介绍
- SpringBoot 配置文件的介绍和使用
- SpringBoot 整合Mybatis、Redis、定时器
- SpringBoot 发送Http请求
- SpringBoot 中的测试
- SpringBoot 打包部署
2 使用Spring Initializr 创建SpringBoot项目

- 配置项目信息
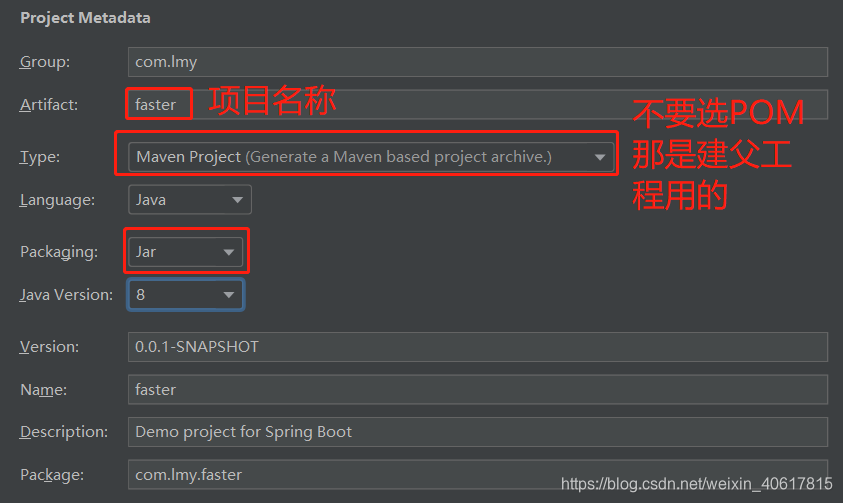
- 勾选起步依赖
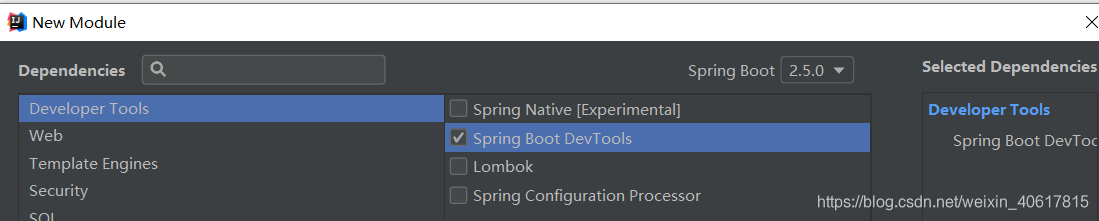
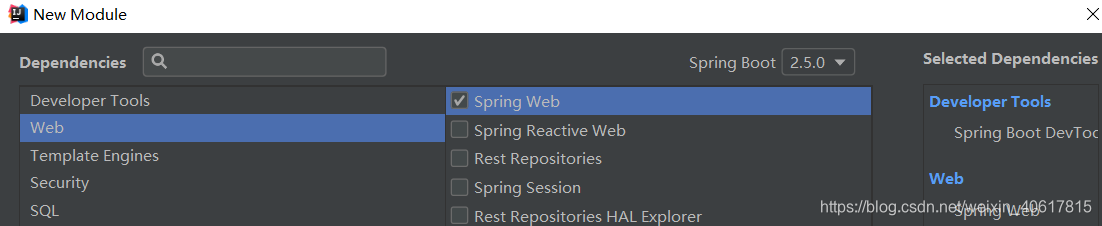
依赖的Jar包不再Pom文件手写了,而是直接勾选,方便了很多!勾选起步依赖之后,按照正常的步骤创建项目即可。
到此为止,基本项目创建完毕,只需要自己写controller中的业务代码即可,不再需要编写pom文件和SPringBoot的启动引导类,相比于之前那个项目,在项目构建上简单了很多!
此外,两个项目中用于修饰启动引导类的注解是不一样的,显然 @SpringBootApplication 注解更加方便:
/*IDEA快速创建SpringBoot项目*/

@SpringBootApplication
/**
 * @SpringBootApplication 一个注解顶三个:
 *  @Configuration 配置类注解,表明当前的类是一个配置类
 *  @ComponentScan 包扫描注解:如果不写参数basePackages,则扫描当前包及其子包
 *  @EnableAutoConfiguration 开启自动配置
 */
public class Springboot02FasterApplication {

    public static void main(String[] args) {
        SpringApplication.run(Springboot02FasterApplication.class, args);
    }

}
/*Maven创建SpringBoot项目*/
/**
* SpringBoot的启动引导类
* @Configuration 配置类注解,表明当前的类是一个配置类
* @ComponentScan 包扫描注解:如果不写参数basePackages,则扫描当前包及其子包
* @EnableAutoConfiguration 开启自动配置
*/
@Configuration
@ComponentScan
@EnableAutoConfiguration
public class DemoApplication {
public static void main(String[] args) {
/**
* SpringBoot应用程序入口(标配)
* SpringApplication.run(启动引导类的字节码文件,主函数参数)
* 返回值是spring的容器
*/
ConfigurableApplicationContext ioc = SpringApplication.run(DemoApplication.class, args);
}
}3 SpringBoot 中的基本原理
3.1 starter
starters是依赖关系的整理和封装,是一套依赖坐标的整合,可以更方便让进行项目依赖坐标的导入
有了这些Starters,无需配置(自动配置)、无需复制粘贴依赖坐标,一个坐标即可完成所有入门级别操作。
举例:就Web开发而言,只需要导入`spring-boot-starter-web`坐标即可
<dependency>
    <groupId>org.springframework.boot</groupId>
    <artifactId>spring-boot-starter-web</artifactId>
</dependency>
当然了,这个坐标可以建一个maven项目后自己写pom文件,也可以使用Spring Initializr一键生成项目不需要自己写配置
每个Starter包含了当前功能下的许多必备依赖坐标,这些依赖坐标是项目开发,上线和运行必须的,同时这些依赖也支持依赖传递
常用的starters有很多,详情参考链接:SpringBoot-Starts
3.2 依赖管理
依赖管理是对依赖坐标的抽取和复用,统一管理依赖坐标的版本,是由Maven提供的功能。
我的理解是:Maven的依赖管理功能被整合到starter里面了
3.3 自动配置
将配置信息预先写入配置类,封装到AutoConfiguration的jar包中,按需求加载配置信息。
我的理解是:类似于ip、端口号这样的配置信息就不要自己往配置文件中写一份了,而是先规定好这个配置信息的默认值,即:“约定大于配置”,所以一般不要再去修改了。
4 SpringBoot 的配置文件
4.1 查询配置
SpringBoot很多配置参数都有默认值,默认值的查询有2种方式:
- 方式1:直接从SpringBoot工程的依赖jar包中去找
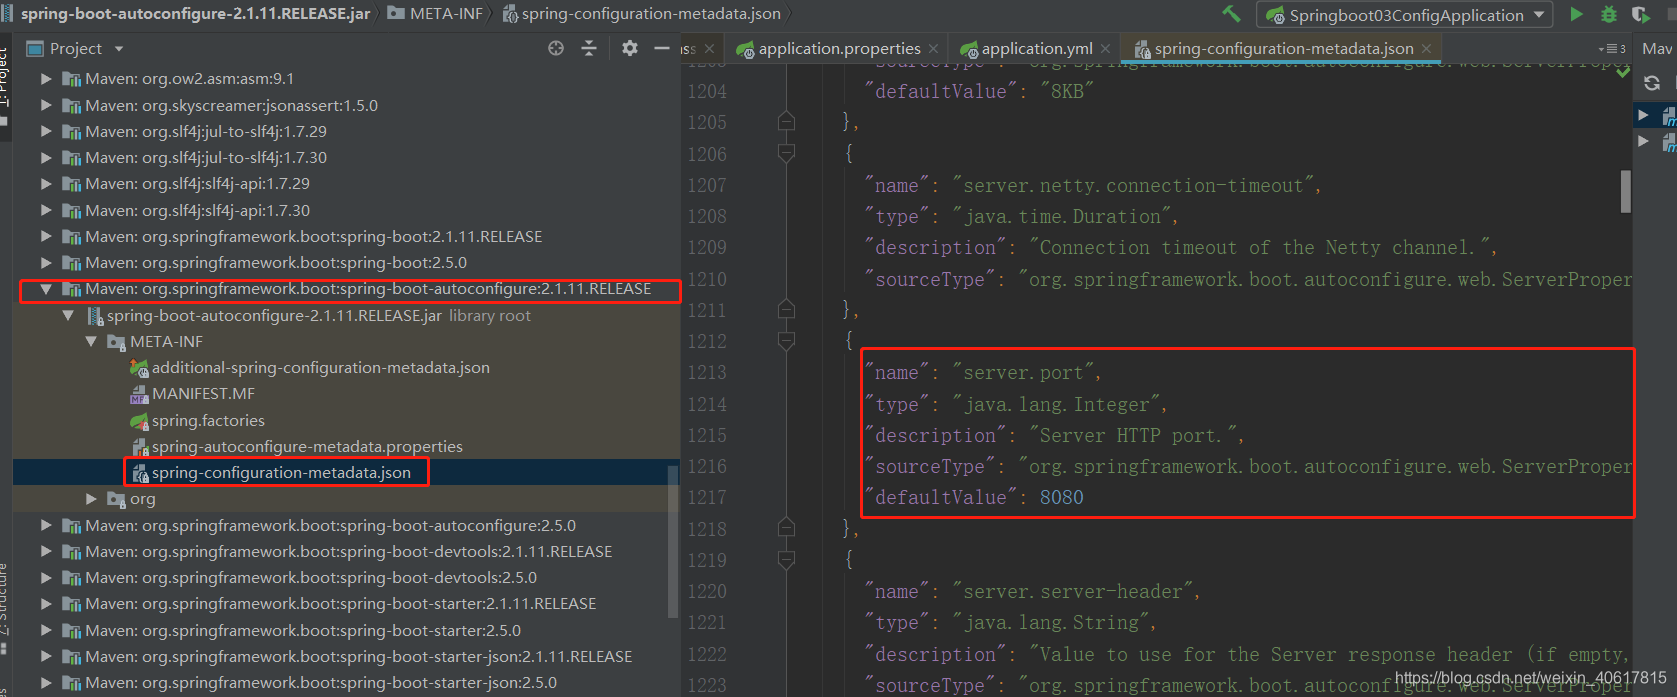
- 方式2:去官网查询:配置信息官网查询链接
4.2 修改配置
虽说SpringBoot很多配置参数都有默认值,是约定大于配置的,但是有时候能免要修改一些配置参数,于是提供了2种方式修改默认的配置信息:
- application.properties(常用,纯键值对形式,只适用于java语言)
- application.yml(可用于描述对象,具有一定的简单语法规则,稍复杂,适用于所有语言)
#properties文件修改配置

#端口配置
server.port=8888
#开启debug模式,详细日志输出,用于开发的一种设置
debug=true
#配置日志:logging.level.指定包下的日志
logging.level.com.lmy=debug
#配置context-path
server.servlet.context-path=/demo
#yml文件修改配置
server:
port: 8888
servlet:
context-path: /demoproperties和yml文件相互转换工具:转换链接
其中yml文件语法规则如下:
- 区分大小写
- 数值前必须有空格,作为分隔符
- 使用缩进表示层级关系
- 缩进不允许使用tab,只允许空格,缩进的空格数不重要,只要相同层级的元素左对齐即可
- #表示注释
- 数组和集合使用 “- ”表示数组每个元素
#一个人具有姓名、年龄、住址、城市(多个)、宠物(多个宠物,每个宠物都是一个对象)的属性
person:
	name: haohao
	age: 31
	addr: beijing
	city:
        - beijing
        - shanghai
        - guangzhou
	pets:
        - name: dog
          age: 2
        - name: tomcat
          age: 3
        - name: pig
          age: 5
除此之外,yml文件还具有“引用”和“生成随机数”的功能
#person这个类中的name属性引用了name这个变量的值
name: xiaoming
person:
	name: ${name}
# 生成随机字符串
my.secret: ${random.value}
# 生成随机数
my.number: ${random.int}
# 生成的随机数小于10
my.number.less.than.ten: ${random.int(10)}
# 生成的随机数范围在1024-65536之间
my.number.in.range: ${random.int[1024,65536]}
4.3 配置文件注入Bean
- 方法1:@value注解将配置文件的值映射到Spring管理的Bean属性值
特点:方便,但是只能一个个变量去配置

- 方法2:使用注解@ConfigurationProperties
4.4 多环境配置文件
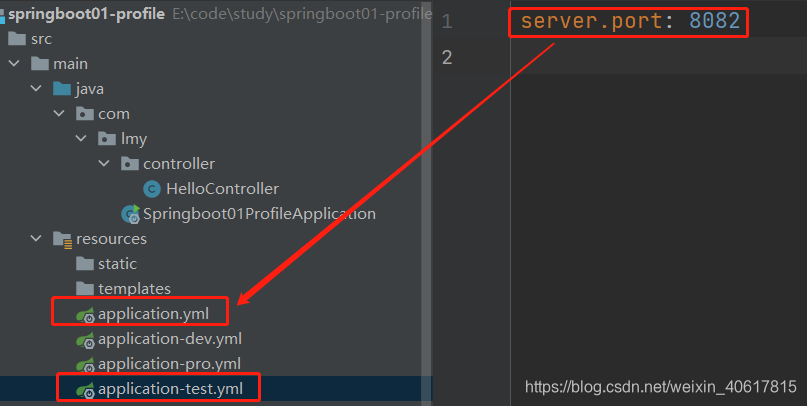
我们在开发Spring Boot应用时,通常同一套程序会被安装到不同环境(dev、test、pro)
其中数据库地址、服务器端口等等配置都不同,如果每次打包时,都要修改配置文件,会十分麻烦。
而SpringBoot的profile:就是来进行动态配置切换的。 、
profile配置方式有两种:
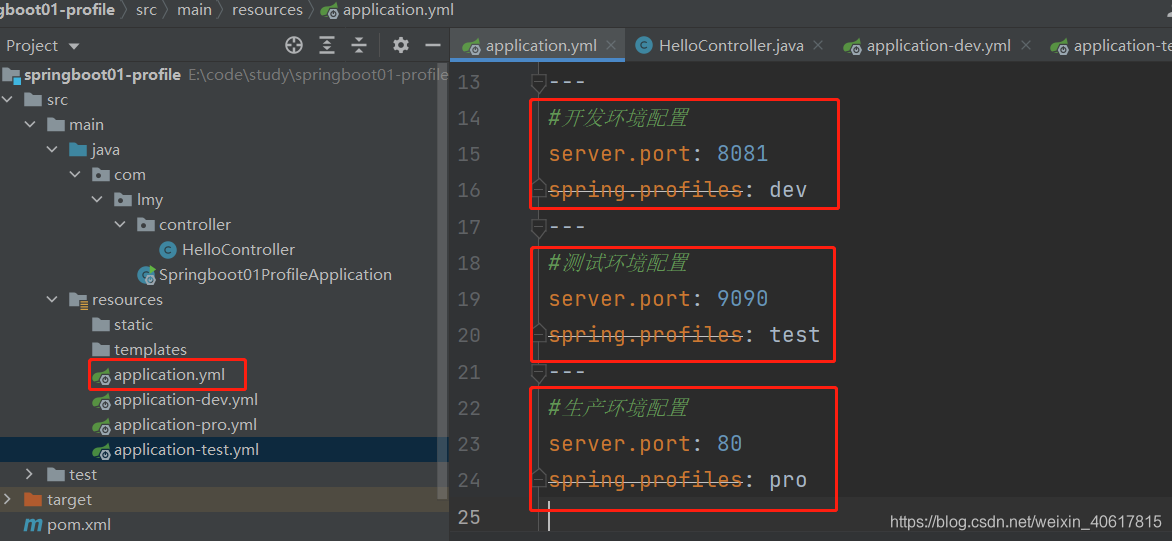
方式1:多profile文件方式:提供多个配置文件,每个代表一种环境。
- yml文件名称: application-dev.properties开发环境
- yml文件名称:application-test.properties/yml 测试环境
- yml文件名称:application-pro.properties/yml 生产环境
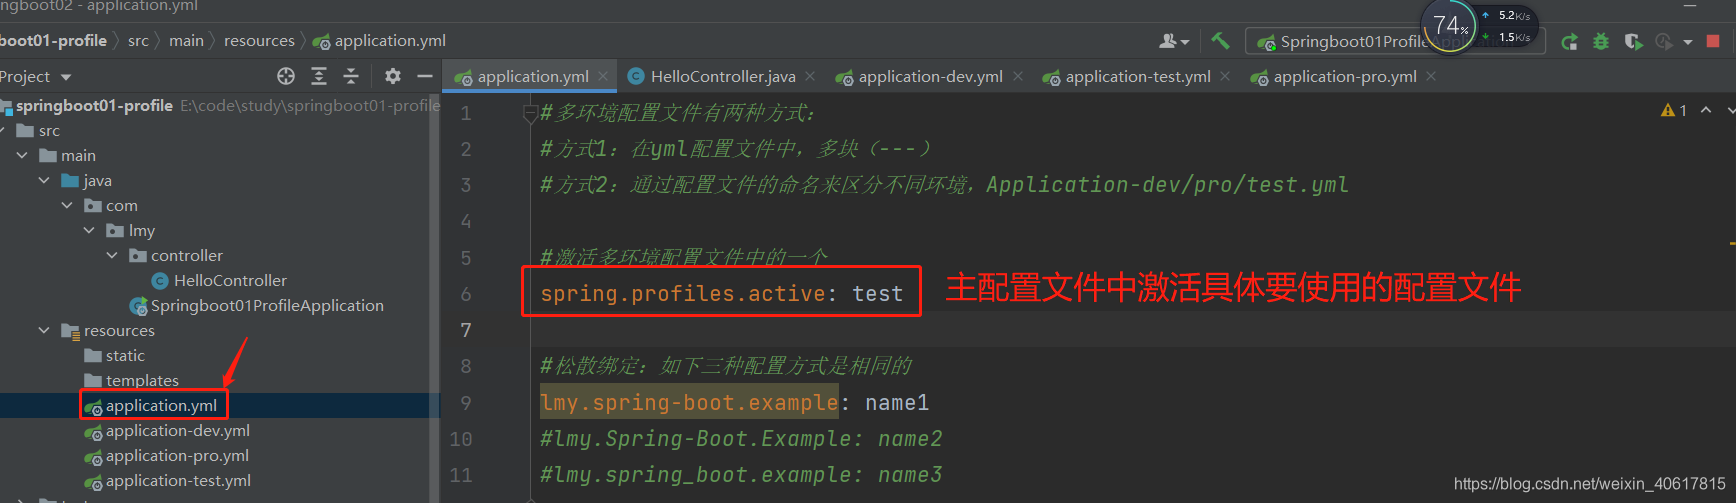
方式2:yml多文档方式:在yml中使用 --- 分隔不同配置
4.5 SpringBoot的松散绑定
将SpringBoot配置文件中的变量注入到被@Value 修饰的变量中时,配置文件中变量名的书写可以区分大小写和中横线、下划线(一般都是变量名字比较长的情况才会涉及到,否则没必要)
使用范围:properties文件、YAML文件、系统属性
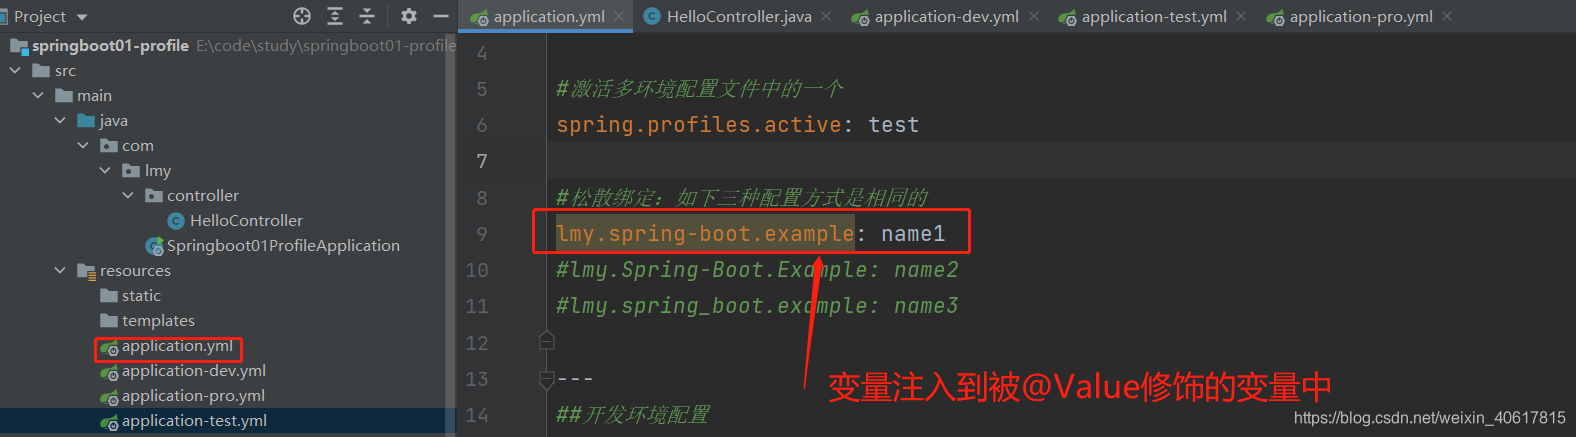
但是要注意:
- 配置文件中配置时可以不区分大小写或中横线、下划线
- 但是,在@Value这里必须要用中横线的形式
@RestController
public class HelloController {
    //配置文件中配置时可以不区分大小写或中横线、下划线
    // 但是,在@Value这里必须要用中横线的形式
    @Value("${lmy.spring-boot.example}")
    private String name;

    @RequestMapping("hello")
    public String hello(){
        System.out.println("松散绑定的属性值:"+name);
        return name;
    }
}
4.6 配置文件加载顺序

4.7 外部配置文件的加载顺序
请参考链接:SpringBoot外部配置文件加载顺序
4.8 修改配置文件的默认名称和存放位置
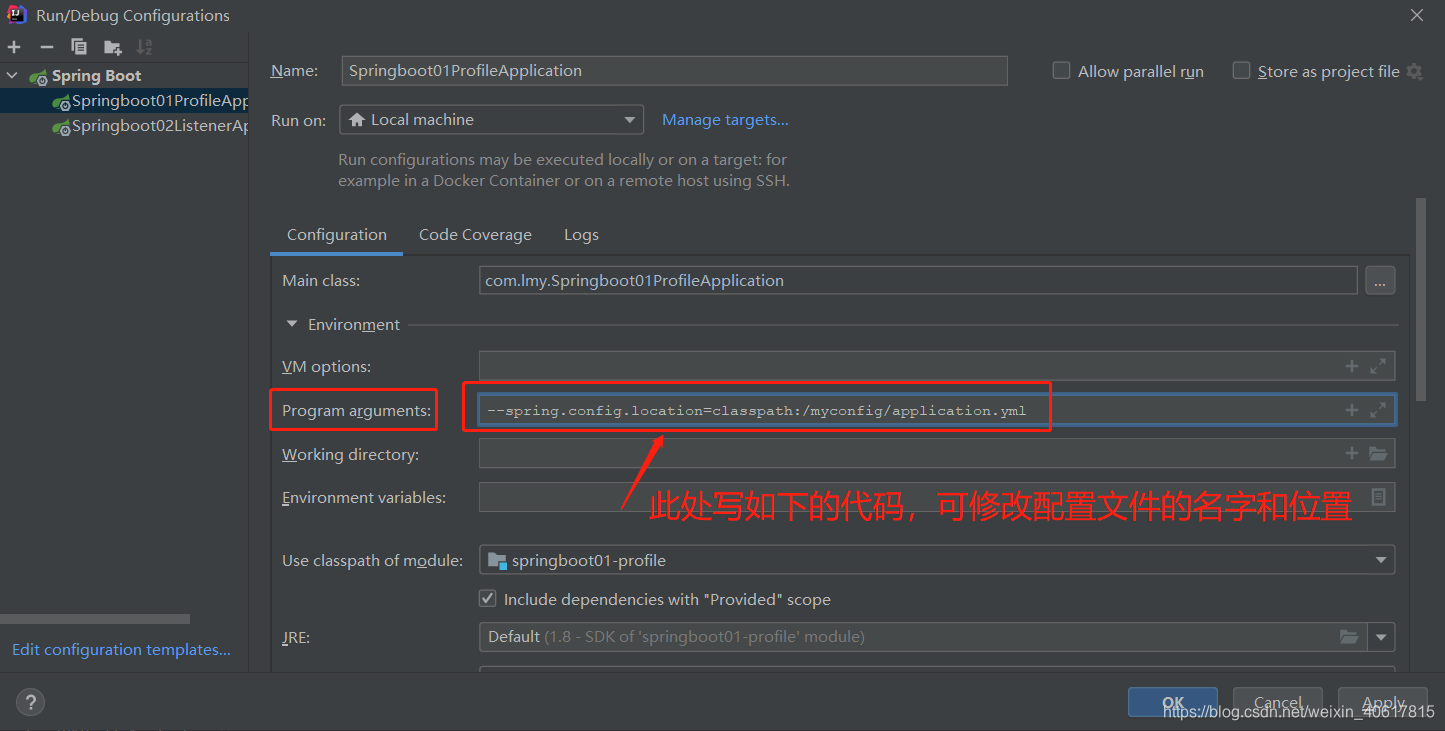
# 自定义配置文件名称
--spring.config.name=myApplication
# 指定配置文件存储位置
--spring.config.location=classpath:/myconfig/application.yml
也可以通过命令行进行配置,把上述配置信息写到IDEA的“VM options”中即可,或者直接在命令行中添加额外的配置信息。

5 SpringBoot 整合 Mybatis
5.1 整合步骤总结
- 创建SpringBoot工程,勾选MyBatis依赖坐标
- 创建Mysql数据库中的User表、创建实体User类
- 编写三层架构:Mapper、Service、controller,编写查询所有的方法findAll()
- 编写Mapper接口中的方法findAll()的SQL语句
- 配置文件:数据库连接信息
- 访问测试地址http://localhost:8080/queryUsers
5.1.1 创建SpringBoot工程,勾选MyBatis依赖坐标:

5.1.1 创建Mysql数据库中的User表、创建实体User类:
#Mysql脚本,创建数据库表

DROP TABLE IF EXISTS `user`;
CREATE TABLE `user` (
`id` INT(11) NOT NULL AUTO_INCREMENT,
`username` VARCHAR(50) DEFAULT NULL,
`password` VARCHAR(50) DEFAULT NULL,
`name` VARCHAR(50) DEFAULT NULL,
PRIMARY KEY (`id`)
) ENGINE=INNODB AUTO_INCREMENT=3 DEFAULT CHARSET=utf8;
-- ----------------------------
-- Records of user
-- ----------------------------
INSERT INTO `user` VALUES ('1', 'zhangsan', '123', '张三');
INSERT INTO `user` VALUES ('2', 'lisi', '123', '李四');
/*创建User对象*/
package com.lmy.pojo;

import lombok.Data;

@Data
public class User {
    private Integer id;
    private String username; //用户名
    private String password; //密码
    private String name;     //姓名
}
5.1.3 编写三层架构:Mapper、Service、controller,编写查询所有的方法findAll():
5.1.3.1 编写Mapper层
mapper层是一个接口,要么sql语句直接写在接口文件上,用@Select注解(或其他)即可
/**
 * 将当前接口的实现类对象,注入到spring容器中
 * @Mapper = @Component = @Service = @Repository = @Controller
 */

@Mapper
public interface UserMapper {
    /**
     * 查询所有
     */
    @Select("select * from user;")
    List<User> findAll();
}
或者,如果不想把sql语句写在接口文件中,可以用xml文件代替,xml文件的放置位置如下,那个黑色的小鸟就是Mybatis用来写sql的标识,它是一个插件:MybatisCodeHelperPro,7天试用免费。
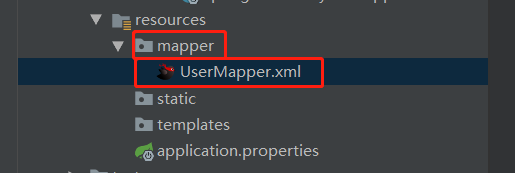
<?xml version="1.0" encoding="utf-8" ?>
<!DOCTYPE mapper
        PUBLIC "-//mybatis.org//DTD Mapper 3.0//EN"
        "http://mybatis.org/dtd/mybatis-3-mapper.dtd">
<mapper namespace="com.lmy.mapper.UserMapper">
    <select id="findAll" resultType="user">
        select *
        from user;
    </select>
</mapper>
5.1.3.2 编写Service层
service层比较简单,先写下面一个接口
public interface UserService {
    List<User> findAll();
}
然后实现这个接口,这个接口的实现类可以不用自己手动写,而是IDEA自动生成:
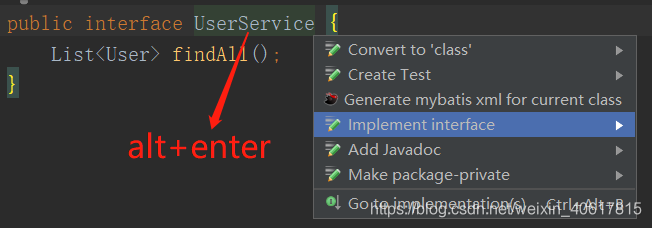
service层的接口实现类需要用@Service注解标识层为业务层, 用@Autowired注解来使用持久层的对象,不用new,使用持久层的方法。
@Service
public class UserServiceImpl implements UserService {

    @Autowired
    private UserMapper mapper;

    @Override
    public List<User> findAll() {
        return mapper.findAll();
    }
}
5.1.3.3 编写Controller层
Controller层没有接口,@RestController注解= @ResponseBody + @Controller
其中 @ResponseBody的作用是将java对象转为json格式的数据
其中 @Controller 用于处理Http请求,@Controller只是定义了一个控制器类,而使用@RequestMapping注解的方法才是处理请求的处理器。
@RestController
public class UserController {
    @Autowired
    private UserService service;

    /**
     * 查询所有用户
     * @return
     */
    @RequestMapping("/user/findAll")
    public List<User> findAll(){
        return service.findAll();
    }
}
5.1.4 配置文件中,填写数据库连接信息
在application.properties 文件中设置数据库的信息,并给JavaBean注册别名,这样写sql语句配置文件时,返回值就不用写类的全类名了,哪怕用小写也是可以的.
#配置数据库链接信息:库名、用户名、密码
spring.datasource.url=jdbc:mysql://127.0.0.1:3306/test?useUnicode=true&characterEncoding=UTF-8&serverTimezone=UTC
spring.datasource.password=root
spring.datasource.username=root
#给JavaBean注册别名,这样写sql语句配置文件时,返回值就不用写类的全类名了,哪怕用小写也是可以的
mybatis.type-aliases-package=com.lmy,pojo
5.1.5 配置好之后,本地访问
http://localhost:8080/user/findAll
6 SpringBoot 整合 Redis
很简单,在pom文件中添加redis的依赖,一定要添加正确,不然就会折腾3个多小时才发现问题!
   <dependency>
            <groupId>org.springframework.boot</groupId>
            <artifactId>spring-boot-starter-redis</artifactId>
            <version>1.4.0.RELEASE</version>
   </dependency>
依赖添加完成后,编写业务代码,实现逻辑为:
- 用户发请求查询数据
- 如果redis中存在该数据,则返回该数据
- 如果不存在,则从mysql中查询,查询结果返回之前,还要把结果存到redis中一份
- redis中该数据的键名为:“service的全限定类名+方法名(其实什么名字格式都无所谓,能够唯一标识且每次查询时都能拿到它就行)”
@RestController
public class UserController {
    @Autowired
    private UserService service;
    @Autowired
    private RedisTemplate redisTemplate;

    /**
     * 查询所有用户
     * @return
     */
    @RequestMapping("/user/findAll")
    private List<User> findAll(){
        /**
         * 首先从redis缓存中取数据:key,service接口的全限定名称+方法名称
         * 如果有返回给用户,如果没有从mysql查返回给用户并存到reids
         */

        //redis中的key值(全限定类名+方法名称),value是查询所有用户的结果
        String key = service.getClass().getName() + "findAll";
        //函数返回值,即用户信息
        List<User> users = null;
        //从redis取数据
        users = (List<User>) redisTemplate.boundValueOps(key).get();
        //如果没取到,就是从mysql查数据,并且保存一份到缓存,如果查到了就直接返回
        if(users==null){
            //缓存没数据,去mysql查,结果还是要存一份到redis
            users = service.findAll();
            redisTemplate.boundValueOps(key).set(users);
            System.out.println("从数据库取数据");
        }else {
            System.out.println("从redis缓存中取数据");
        }
        return users;
    }
}
7 SpringBoot 整合定时器
实现步骤
- 在启动类上,开启定时器注解(@EnableScheduling)
- 写定时器方法(@Component + @Scheduled)
/**
 * @EnableScheduling 开启springboot的定时器功能支持
 */

@SpringBootApplication
@EnableScheduling
public class Springboot04MybatisApplication {
    public static void main(String[] args) {
        SpringApplication.run(Springboot04MybatisApplication.class, args);
    }
}
@Component
public class TimerUtils {
//注入service层的接口实现类对象
@Autowired
private UserService service;
/**
* @Scheduled 除了cron表达式属性之外,还能设置当前方法的执行规则
* cron属性:设置通用时间规则
* initialDelay:初始化当前服务之后,延迟多长时间执行
* fixedDelay:上一个任务完成多久之后下一个任务执行
* fixedRate:以一个固定的频率执行,不管上一个任务的执行时间
*/
// 让如下的代码每隔5秒输出一次当前时间
//@Scheduled(cron = "0/5 * * * * ? ")\
//让“显示时间” 任务每隔2秒执行一次,要比cron表达式更友好,弥补了cron表达式可读性差的问题,但是cron表达式功能更强大
@Scheduled(fixedDelay=2000)
public void myTask2(){
//写业务流逻辑
System.out.println(new Date());
}
}8 发送Http请求
发送Http请求使用RestTemplate。
Spring的RestTemplate对基于Http的客户端进行封装,是Rest的HTTP客户端模板工具类。
实现如下功能:访问一个地址后,服务器端向百度发起http请求
- 创建一个springboot的工程
- 配置RestTemplate的对象Bean到Spring容器中
- 在测试类中用@Autowired注入Spring容器中的RestTemplate对象
- 通过RestTemplate对象的getForObject发送get请求
配置RestTemplate的对象Bean到Spring容器中:
@SpringBootApplication
@EnableScheduling
public class Springboot04MybatisApplication {
    public static void main(String[] args) {
        SpringApplication.run(Springboot04MybatisApplication.class, args);
    }
    //注入RestTemplate对象到Spring容器中


    //注入RestTemplate对象到spring容器中,之所以写在启动引导类里面,是因为启动引导类本身也是一个配置类,当然你也可以自己写个配置类
    @Bean
    public RestTemplate restTemplate() {
        return new RestTemplate();
    }
}
接受来自浏览器请求后,服务器端向百度发起请求,响应到浏览器
@RestController
public class HelloController {
    @Autowired
    private RestTemplate restTemplate;

    @RequestMapping("/sendHttp")
    public String sendHttpRequest(){
        /**
         * 不同Http请求方式对应的方法
         * get:getForObject()
         * post:postForObject()
         * delete:delete
         * put:put
         */
        //发送get请求
        String responseBody = restTemplate.getForObject("http://baidu.com/", String.class);
        System.out.println(responseBody);
        return responseBody;
    }
}
9 测试
测试,就是在专门一个类上,用测试相关的注解进行修饰,这样就可以在这个类上进行代码测试了,比较方便。对于SpringBoot2.2以前的版本,测试类需要写2个注解:
- @RunWith(SpringRunner.class) :初始化测试类,springboot2.2版本之后就没有了
- @SpringBootTest:表示当前类是spring的测试类
如下的测试类代码,测试了RestTemplate类的 “”http的get请求” 方法
@RunWith(SpringRunner.class)
@SpringBootTest
public class Springboot04MybatisApplicationTests {

    @Autowired
    private RestTemplate restTemplate;

    /**
     * 测试http的get请求是否能成功,用到了RestTemplate
     */
    @Test
    public void contextLoads() {
        String forObject = restTemplate.getForObject("http://www.baidu.com", String.class);
        System.out.println(forObject);
        System.out.println("你好1aaaa");
    }
}
10 SpringBoot 打包部署
10.1 打成jar包部署
现在打成jar包的方式比较流行(不用自己写一个专门用于部署的类,jar包可以直接执行,不需要自己的Tomcat环境)。
而传统的打包方式是打成war包(要自己写一个类,而且需要用自己的Tomcat运行环境去运行war包)。
SpringBoot项目打成jar包步骤如下:
- 打开IDEA右侧Maven工具包->Lifecycle->package
- 注意项目pom文件的打包类型,默认是jar,或者手动标识为jar:<packaging>jar</packaging>,
- 注意项目pom文件要有maven插件才可以:spring-boot-maven-plugin(将当前SpringBoot项目打成一个可执行的jar包)
- 打包之后,项目的Target文件中有打好的项目jar包,把它复制到一个路径下,比如d盘下
- 打开windows命令行窗口,输入如下启动指令,此时整个项目就启动了。
启动指令3选1
- 基本指令:java -jar target/day01_springboot_demo01-1.0-SNAPSHOT.jar
- 启动时附带指定web端口号:java -jar target/day01_springboot_demo01-1.0-SNAPSHOT.jar --server.port=8081
- 启动时设置项目占用内存(20-80Mb):java -Xmx80m -Xms20m -jar target/day01_springboot_demo01-1.0-SNAPSHOT.jar
注意:第2个指令(部署时直接配置端口号为8081)之所以能配置参数能生效,是因为SpringBoot项目启动引导类的main函数中的run方法调用时传入了参数“args”,否则不生效!
10.2 打成war包部署
打成war包部署是传统的方法(要自己写一个类,而且需要用自己的Tomcat运行环境去运行war包)步骤如下:
- 确定项目pom文件的打包类型为:<packaging>war</packaging>
- 注册启动类,详情如下
- IDEA右侧Maven工具打包项目
- 项目war包拷贝到Tomcat的webapps目录下
- 双击运行Tomcat的bin目录下的startup.bat
- 访问(访问时,访问路径最开始要加webapps目录下该项目war包的名字作为前缀!)
注册启动类
注册启动类是我们自己写的一个类,作为war包程序的入口,放置位置与controller包同级
注册启动类是标准的写法,只需要把 .sources()方法中的参数改成本SpringBoot项目启动引导类的字节码文件对象即可)
/**
* war包,程序的入口
* 相当于 WEB-INF/web.xml配置文件
*/
public class ServletInitializer extends SpringBootServletInitializer {
@Override
protected SpringApplicationBuilder configure(SpringApplicationBuilder builder) {
/**
* 参数:SpringBoot启动引导类的字节码文件
*/
return builder.sources(Springboot02FasterApplication.class);
}
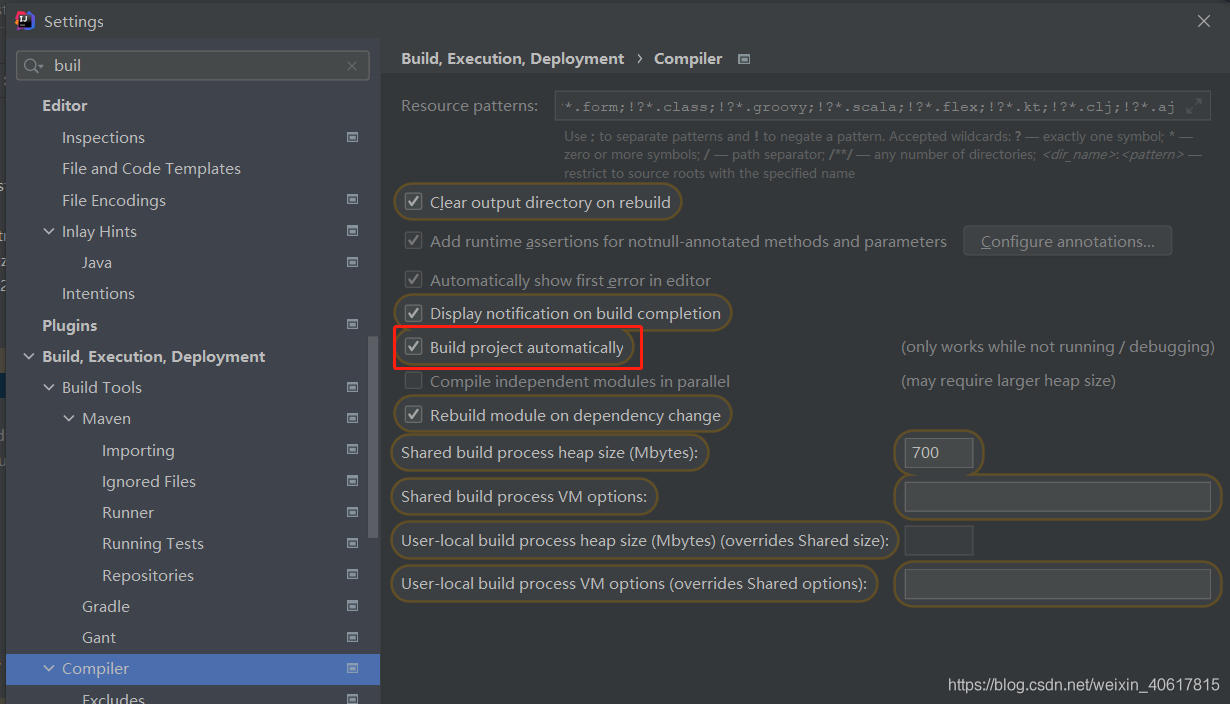
}11 SpringBoot工程热部署
- 项目pom文件中加 spring-boot-devtools 依赖
<dependency>
            <groupId>org.springframework.boot</groupId>
            <artifactId>spring-boot-devtools</artifactId>
            <scope>runtime</scope>
            <optional>true</optional>
</dependency>- 每次修改完代码,点一下“Built Project”那个绿色的锤子
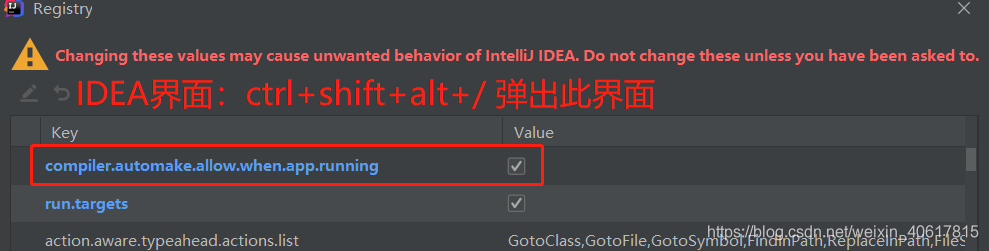
这种方法比每次重启项目要稍微快一点,如果嫌每次点“Built Project”麻烦的话,推荐如下操作可以不用点锤子(灵敏度差,不推荐)
勾选如下两个配置后,就不用再点锤子了,但是这样的做饭不停灵敏,不推荐使用!还是每次修改完代码点一下锤子更稳妥。
12 注意事项
Maven版本最好不要低于3.5,本来我想用自己的仓库,我的maven版本是3.3.9的,可能是版本问题导致pom文件导入时总是出错(尤其是导入redis依赖包的时候),所以我现在用的是默认配置中的本地仓库,后续想换成自己自定义的仓库。


 609
609

 被折叠的 条评论
为什么被折叠?
被折叠的 条评论
为什么被折叠?
 到【灌水乐园】发言


