


 本文详细介绍了针对BraTs医学影像数据集的预处理流程,包括多模态图像标准化、裁剪、切片及Numpy文件保存,旨在解决类别不平衡问题,提升2D网络的分割性能。
本章以BraTs数据集为例子,详细地讲解对于2D网络,医学三维数据且多模态多标签该如何预处理,并用代码实现
预处理方法各种各样,而我的步骤主要以下几步:
1、对各个模态进行标准化
2、对各模态及其GT数据进行裁剪
3、对各模态及其GT数据进行切片,并抛无病灶切片,最后合并各模态的切片,然后保存为Numpy
一、标准化多模态
brats中的四个序列是不同模态的图像,因此图像对比度也不一样,所以采用z-score方式来对每个模态图像进行标准化,即将每个模态的数据标准化为零均值和单位标准差 ,但是GT文件是不需要进行标准化的.函数实现代码如下
        def normalize(slice, bottom=99, down=1):
    """
    normalize image with mean and std for regionnonzero,and clip the value into range
    :param slice:
    :param bottom:
    :param down:
    :return:
    """
    #有点像“去掉最低分去掉最高分”的意思,使得数据集更加“公平”
    b = np.percentile(slice, bottom)
    t = np.percentile(slice, down)
    slice = np.clip(slice, t, b)#限定范围numpy.clip(a, a_min, a_max, out=None)

    #除了黑色背景外的区域要进行标准化
    image_nonzero = slice[np.nonzero(slice)]
    if np.std(slice) == 0 or np.std(image_nonzero) == 0:
        return slice
    else:
        tmp = (slice - np.mean(image_nonzero)) / np.std(image_nonzero)
        # since the range of intensities is between 0 and 5000 ,
        # the min in the normalized slice corresponds to 0 intensity in unnormalized slice
        # the min is replaced with -9 just to keep track of 0 intensities
        # so that we can discard those intensities afterwards when sampling random patches
        tmp[tmp == tmp.min()] = -9 #黑色背景区域
        return tmp
二、裁剪
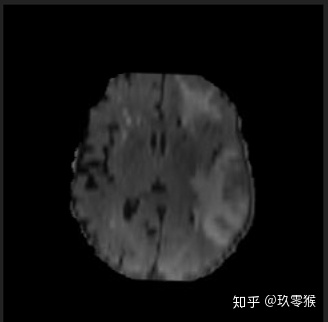
裁剪这个步骤根据自己的数据集进行选择,对于BraTs数据集我觉得是有必要的,下图是一个序列MR图像,其中灰色部分为脑部区域,黑色则为背景,背景信息在整幅图像中的比例较大,而且背景对于分割没有任何帮助。但是要对每一个像素进行分类,图像中肿瘤区域占比非常小,因此会出现严重的数据不平衡。为了提升模型分割的性能,我觉得裁剪有必要。从医生角度来看这个MR图像,会自动过滤掉这个背景信息,把所有目光集中在脑部区域,因此去除脑部区域周围的背景信息是必要的
        def crop_ceter(img,croph,cropw):
    #for n_slice in range(img.shape[0]):
    height,width = img[0].shape
    starth = height//2-(croph//2)
    startw = width//2-(cropw//2)
    return img[:,starth:starth+croph,startw:startw+cropw]
三、切片、抛无病灶切片、合并各模态的切片、保存为Numpy
由于大多数医学图像都是三维数据,所以只有切成2D数据,才能适应2D网络,此外切片中不含有病灶部分的可以舍弃,同样也是为了缓解类别不均衡问题,又由于是多模态,因此要将各模态的切片组合成多通道,最后保存为npy, 而对于其相应的GT切片我是直接保存为npy
        #切片处理,并去掉没有病灶的切片,合并多模态组合多通道
    for n_slice in range(flair_crop.shape[0]):
        if np.max(mask_crop[n_slice,:,:]) != 0:
            maskImg = mask_crop[n_slice,:,:]

            FourModelImageArray = np.zeros((flair_crop.shape[1],flair_crop.shape[2],4),np.float)
            flairImg = flair_crop[n_slice,:,:]
            flairImg = flairImg.astype(np.float)
            FourModelImageArray[:,:,0] = flairImg
            t1Img = t1_crop[n_slice,:,:]
            t1Img = t1Img.astype(np.float)
            FourModelImageArray[:,:,1] = t1Img
            t1ceImg = t1ce_crop[n_slice,:,:]
            t1ceImg = t1ceImg.astype(np.float)
            FourModelImageArray[:,:,2] = t1ceImg
            t2Img = t2_crop[n_slice,:,:]
            t2Img = t2Img.astype(np.float)
            FourModelImageArray[:,:,3] = t2Img
            imagepath = outputImg_path + "\\" + str(pathlgg_list[subsetindex]) + "_" + str(n_slice) + ".npy"
            maskpath = outputMask_path + "\\" + str(pathlgg_list[subsetindex]) + "_" + str(n_slice) + ".npy"
            np.save(imagepath,FourModelImageArray)#(160,160,4) np.float dtype('float64')
            np.save(maskpath,maskImg) # (160, 160) dtype('uint8') 值为0 1 2 4

以BraTs18数据集的预处理为例的完整代码
用 jupyter notebook 执行
https://download.youkuaiyun.com/download/weixin_40519315/12275459
Pytorch怎么读取上面处理好的Numpy文件
外层部分主要是这么干,train_test_split函数是将数据集分成训练集和验证集的
        # Data loading code

img_paths = glob(r'D:\Project\CollegeDesign\dataset\Brats2018FoulModel2D\trainImage\*')

mask_paths = glob(r'D:\Project\CollegeDesign\dataset\Brats2018FoulModel2D\trainMask\*')


train_img_paths, val_img_paths, train_mask_paths, val_mask_paths = train_test_split(img_paths, mask_paths, test_size=0.2, random_state=41)

print("train_num:%s"%str(len(train_img_paths)))

print("val_num:%s"%str(len(val_img_paths)))

train_dataset = Dataset(args, train_img_paths, train_mask_paths, args.aug)

val_dataset = Dataset(args, val_img_paths, val_mask_paths)


train_loader = torch.utils.data.DataLoader(
    train_dataset,
    batch_size=args.batch_size,
    shuffle=True,
    pin_memory=True,
    drop_last=True)

val_loader = torch.utils.data.DataLoader(
    val_dataset,
    batch_size=args.batch_size,
    shuffle=False,
    pin_memory=True,
    drop_last=False)

...

for epoch in range(args.epochs):

    # train for one epoch

    train_log = train(args, train_loader, model, criterion, optimizer, epoch)

    # evaluate on validation set

val_log = validate(args, val_loader, model, criterion)
    ...
由于用到了 Dataset ,需要人工去复现这个类中的 __getitem__函数,代码如下
            def __getitem__(self, idx):
        img_path = self.img_paths[idx]
        mask_path = self.mask_paths[idx]
        #读numpy数据(npy)的代码
        npimage = np.load(img_path)
        npmask = np.load(mask_path)
        npimage = npimage.transpose((2, 0, 1))

        WT_Label = npmask.copy()
        WT_Label[npmask == 1] = 1.
        WT_Label[npmask == 2] = 1.
        WT_Label[npmask == 4] = 1.
        TC_Label = npmask.copy()
        TC_Label[npmask == 1] = 1.
        TC_Label[npmask == 2] = 0.
        TC_Label[npmask == 4] = 1.
        ET_Label = npmask.copy()
        ET_Label[npmask == 1] = 0.
        ET_Label[npmask == 2] = 0.
        ET_Label[npmask == 4] = 1.
        nplabel = np.empty((160, 160, 3))
        nplabel[:, :, 0] = WT_Label
        nplabel[:, :, 1] = TC_Label
        nplabel[:, :, 2] = ET_Label
        nplabel = nplabel.transpose((2, 0, 1))

        nplabel = nplabel.astype("float32")
        npimage = npimage.astype("float32")

        return npimage,nplabel


 2492
2492

 被折叠的 条评论
为什么被折叠?
被折叠的 条评论
为什么被折叠?
 到【灌水乐园】发言


