


-- coding: utf-8 --
Form implementation generated from reading ui file ‘login.ui’
Created by: PyQt5 UI code generator 5.6
WARNING! All changes made in this file will be lost!
from PyQt5 import QtCore, QtGui, QtWidgets
import sys
class Ui_Form(object):
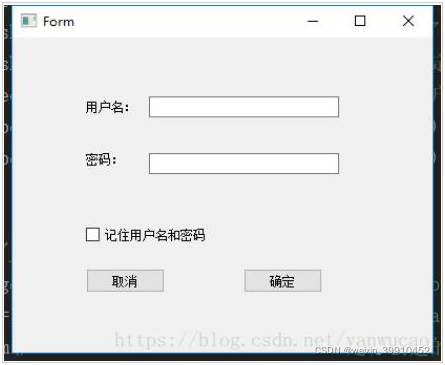
def setupUi(self, Form):
Form.setObjectName(“Form”)
Form.resize(400, 300)
self.pushButton = QtWidgets.QPushButton(Form)
self.pushButton.setGeometry(QtCore.QRect(70, 220, 75, 23))
self.pushButton.setObjectName(“pushButton”)
self.pushButton_2 = QtWidgets.QPushButton(Form)
self.pushButton_2.setGeometry(QtCore.QRect(220, 220, 75, 23))
self.pushButton_2.setObjectName(“pushButton_2”)
self.checkBox = QtWidgets.QCheckBox(Form)
self.checkBox.setGeometry(QtCore.QRect(70, 180, 141, 16))
self.checkBox.setObjectName(“checkBox”)
self.lineEdit = QtWidgets.QLineEdit(Form)
self.lineEdit.setGeometry(QtCore.QRect(130, 56, 181, 20))
self.lineEdit.setObjectName(“lineEdit”)
self.lineEdit_2 = QtWidgets.QLineEdit(Form)
self.lineEdit_2.setGeometry(QtCore.QRect(130, 110, 181, 20))
self.lineEdit_2.setObjectName(“lineEdit_2”)
self.label = QtWidgets.QLabel(Form)
self.label.setGeometry(QtCore.QRect(70, 60, 54, 12))
self.label.setObjectName(“label”)
self.label_2 = QtWidgets.QLabel(Form)
self.label_2.setGeometry(QtCore.QRect(70, 110, 54, 12))
self.label_2.setObjectName(“label_2”)
self.retranslateUi(Form)
QtCore.QMetaObject.connectSlotsByName(Form)
def retranslateUi(self, Form):
_translate = QtCore.QCoreApplication.translate
Form.setWindowTitle(_translate(“Form”, “Form”))
self.pushButton.setText(_translate(“Form”, “取消”))
self.pushButton_2.setText(_translate(“Form”, “确定”))
self.checkBox.setText(_translate(“Form”, “记住用户名和密码”))
self.label.setText(_translate(“Form”, “用户名:”))
self.label_2.setText(_translate(“Form”, “密码:”))
if name == “main”:
app = QtWidgets.QApplication(sys.argv) # 创建一个QApplication,也就是你要开发的软件app
MainWindow = QtWidgets.QMainWindow() # 创建一个QMainWindow,用来装载你需要的各种组件、控件
ui = Ui_Form() # ui是你创建的ui类的实例化对象
ui.setupUi(MainWindow) # 执行类中的setupUi方法,方法的参数是第二步中创建的QMainWindow
MainWindow.show() # 执行QMainWindow的show()方法,显示这个QMainWindow
sys.exit(app.exec_()) # 使用exit()或者点击关闭按钮退出QApplication


 6181
6181

 被折叠的 条评论
为什么被折叠?
被折叠的 条评论
为什么被折叠?
 到【灌水乐园】发言


