


 本文介绍如何使用Nginx的http_auth_basic_module模块和Tomcat的JDBCRealm进行用户认证配置。Nginx模块允许仅授权用户访问特定web内容,而Tomcat则通过数据库实现BASIC认证,支持MD5加密。
转自:
nginx用户认证配置( Basic HTTP authentication) - 运维生存时间 http://www.ttlsa.com/nginx/nginx-basic-http-authentication/
HTTP使用BASIC认证的原理及实现方法-atlantisholic-ITPUB博客 http://blog.itpub.net/23071790/viewspace-709367/
nginx用户认证配置( Basic HTTP authentication)
nginx_http_auth_basic_module模块实现让访问着,只有输入正确的用户密码才允许访问web内容。web上的一些内容不想被其他人知道,但是又想让部分人看到。nginx的http auth模块以及Apache http auth都是很好的解决方案。
默认情况下nginx已经安装了ngx_http_auth_basic_module模块,如果不需要这个模块,可以加上 --without-http_auth_basic_module 。
语法: auth_basic string | off;
默认值: auth_basic off;
配置段: http, server, location, limit_except
默认表示不开启认证,后面如果跟上字符,这些字符会在弹窗中显示。
语法: auth_basic_user_file file;
默认值: —
配置段: http, server, location, limit_except
用户密码文件,文件内容类似如下:
ttlsauser1:password1

ttlsauser2:password2:comment
server{

      server_name www.ttlsa.comttlsa.com;


       index index.html index.php;

       root /data/site/www.ttlsa.com;


       location/

       {

               auth_basic "nginx basic http test for ttlsa.com";

               auth_basic_user_file conf/htpasswd;

               autoindex on;

       }

}
备注:一定要注意auth_basic_user_file路径,否则会不厌其烦的出现403。
生成密码
可以使用htpasswd,或者使用openssl
# printf "ttlsa:$(openssl passwd -crypt 123456)\n" >>conf/htpasswd

# cat conf/htpasswd

ttlsa:xyJkVhXGAZ8tM
账号:ttlsa
密码:123456
reload nginx
# /usr/local/nginx-1.5.2/sbin/nginx -s reload效果如下:
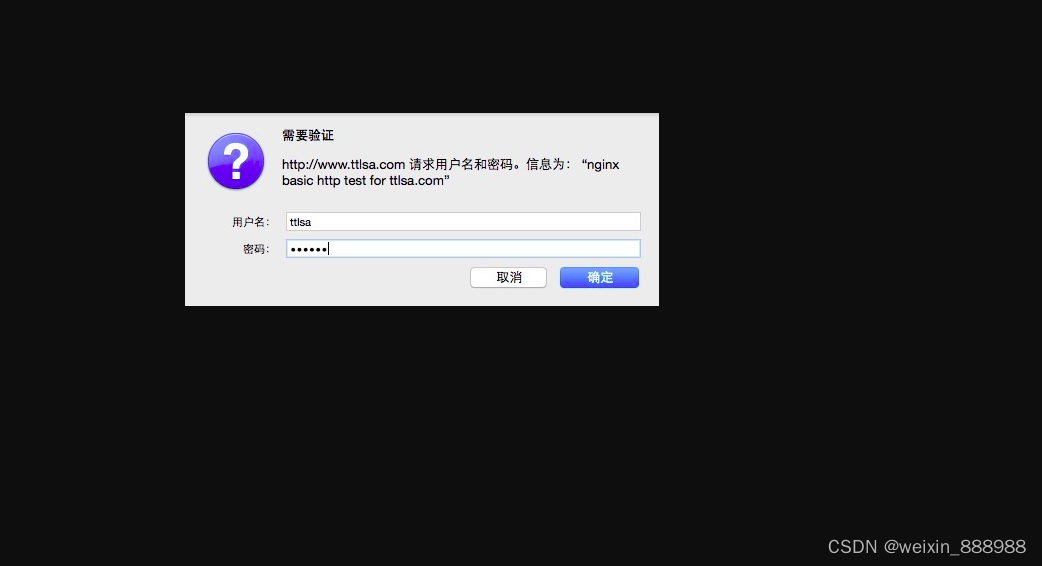
http_auth_basic_module
完成
tomcat启用 BASIC authentication,使用数据库身份认证,口令MD5加密
原文:https://blog.youkuaiyun.com/berryreload/article/details/52849693
准备数据库:
表名
users
列名 值
username user11
password 698d51a19d8a121ce581499d7b701668
是口令111的MD5 32位 http://md5jiami.51240.com/
表名
users-roles
列名 值
username user11
rolename roles22
===================================================================================
修改apache的配置文件,启用JDBC数据库Realm,支持MD5 digest加密口令
D:\apache-tomcat-7.0.62\conf\context.xml
<Realm className="org.apache.catalina.realm.JDBCRealm"
driverName="com.mysql.jdbc.Driver"
connectionURL="jdbc:mysql://xxxxxx:3306/spiis"
connectionName="root" connectionPassword="1q2w3e4r"
userTable="users" userNameCol="usercode"
userCredCol="password"
userRoleTable="users-roles"
digest="MD5"
roleNameCol="rolename"/>
修改apache的例子应用examples,使用 BASIC身份认证,角色roles22的用户可以访问/jsp/security/protected/* 资源
web.xml 修改为BASIC,role改一个为roles22
<auth-constraint>
<!-- Anyone with one of the listed roles may access this area -->
<role-name>tomcat</role-name>
<role-name>roles22</role-name>
</auth-constraint>
</security-constraint>
<!-- Default login configuration uses form-based authentication -->
<login-config>
<auth-method>BASIC</auth-method>
<realm-name>Example Form-Based Authentication Area</realm-name>
</login-config>
<!-- Security roles referenced by this web application -->
<security-role>
<role-name>roles22</role-name>
</security-role>
<security-role>
<role-name>tomcat</role-name>
</security-role>
copy mysql-connector-java-5.1.34-bin.jar to
D:\apache-tomcat-7.0.62-authentication-mysql\lib
浏览器访问URL,输入用户名口令user11/111进行身份认证
http://localhost:8088/examples/jsp/security/protected/


 718
718

 被折叠的 条评论
为什么被折叠?
被折叠的 条评论
为什么被折叠?
 到【灌水乐园】发言


