


前言
用Python开发时,经常会用到Django框架,本地跑项目还是比较简单能跑起来,但在云服务器部署时,踩了不少坑,本文将记录部署的全过程,避免再踩同样的坑。文末附上打包好的完整docker镜像
正文
安装Ubuntu
我是用docker部署的,部署完成后可将docker容器打包成镜像,方便以后重复使用。
先部署个ubuntu系统。
# 拉取ubuntu镜像
docker pull ubuntu
# 配置端口,映射路径运行容器
docker run -itd --name ubuntu  -v /c/learn/ubuntu/data/:/data  -p 8500:8500 ubuntu
# 更新apt-get
apt-get update
安装Python
apt-get -y install python-dev
apt-get -y install pip
安装django
# -i 指定指定清华镜像源,下载速度更快。
pip -y install Django -i https://pypi.tuna.tsinghua.edu.cn/simple
安装uwsgi
pip -y install uwsgi
测试uwsgi
在测试目录下新建test.py文件
# test.py
def application(env, start_response):
    start_response('200 OK', [('Content-Type','text/html')])
    return ["Hello World"] # python2
    #return [b"Hello World"] # python3
执行shell命令
uwsgi --http :9501 --plugin python --wsgi-file test.py
浏览器访问:http://127.0.01:9501,显示Hello World表示正常
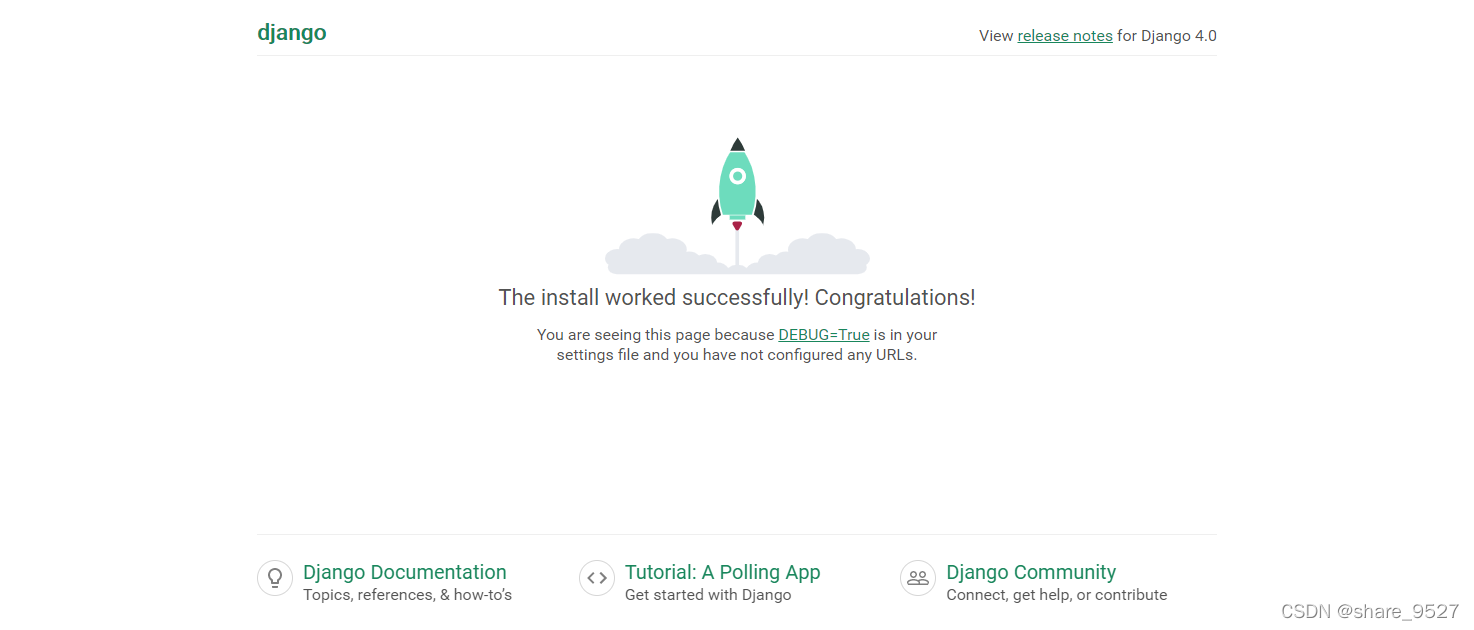
测试Django
先测试Django项目正常运行,浏览器访问http://127.0.01:9501
# 创建项目helloworld
django-admin startproject helloworld
 # 运行启动
python manage.py runserver 0.0.0.0:9501
用uwsgi启动,浏览器访问http://127.0.01:9501
uwsgi --http :9501 --plugin python --module helloworld.wsgi
配置文件启动uwsgi
在django项目目录下新建uwsgi.ini
[uwsgi]
# Django-related settings
# nginx方式使用socket,不用nginx可使用http,启动后可直接访问
socket = :9501

# the base directory (full path)
chdir           = /www/helloworld

# Django s wsgi file
module          = helloworld.wsgi

# process-related settings
# master
master          = true

# maximum number of worker processes
processes       = 4

# ... with appropriate permissions - may be needed
# chmod-socket    = 664
# clear environment on exit
vacuum          = true

daemonize      = /var/log/web_helloworld.log
shell 执行
uwsgi --ini uwsgi.ini
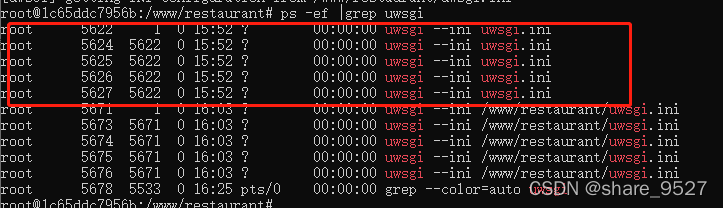
查看启动的进程
ps -ef | grep uwsgi
可看到uwsgi有一个主进程和4个子进程。
安装nginx
apt-get -y install nginx
在目录 /etc/nginx/conf.d 新建配置文件helloworld.conf
server {
    # the port your site will be served on
    listen      9501;
    # the domain name it will serve for
    server_name 127.0.0.1; # substitute your machine's IP address or FQDN
    charset     utf-8;

    # max upload size
    client_max_body_size 75M;   # adjust to taste

    # Django media
    location /media  {
        alias /www/helloworld/media;  # your Django project's media files - amend as required
    }

    location /static {
        alias /www/helloworld/static; # your Django project's static files - amend as required
    }

    # Finally, send all non-media requests to the Django server.
    location / {
        include     uwsgi_params; # the uwsgi_params file you installed
        uwsgi_pass 127.0.0.1:9502; # 端口号与和uwsgi.ini 一致
    }
}
启动nginx
nginx -t
nginx -s reload
浏览器访问:http://127.0.0.1:9502
多个项目配置
通过nginx配置指定域名blog.com项目。
新建django项目blog
django-admin startproject blog
配置项目域名,在/www/blog/setting.py文件中,ALLOWED_HOSTS加上域名:blog.com
ALLOWED_HOSTS = ["restaurant.com"]
在新建项目/www/blog下新建uwsgi.ini
[uwsgi]
# Django-related settings
# nginx方式使用socket,不用nginx可使用http,启动后可直接访问
# 指定不同端口
socket = :9503

# the base directory (full path)
chdir           = /www/blog

# Django s wsgi file
module          = blog.wsgi

# process-related settings
# master
master          = true

# maximum number of worker processes
processes       = 4

# ... with appropriate permissions - may be needed
# chmod-socket    = 664
# clear environment on exit
vacuum          = true

daemonize      = /var/log/web_blog.log
shell 执行
uwsgi --ini /www/blog/uwsgi.ini
新增nginx配置/etc/nginx/conf.d/blog.conf
server {
    # the port your site will be served on
    listen      9501;
    # the domain name it will serve for
    server_name blog.com; # 指定域名
    charset     utf-8;

    # max upload size
    client_max_body_size 75M;   # adjust to taste

    # Django media
    location /media  {
        alias /www/blog/media;  # your Django project's media files - amend as required
    }

    location /static {
        alias /www/blog/static; # your Django project's static files - amend as required
    }

    # Finally, send all non-media requests to the Django server.
    location / {
        include     uwsgi_params; # the uwsgi_params file you installed
        uwsgi_pass 127.0.0.1:9503; #/www/blog/uwsgi.ini的端口一致
    }
}
重启nginx
nginx -t
nginx -s reload
本地配置HOST
127.0.0.1 blog.com
浏览器访问:http://blog.com:9501/,nginx指定80端口,访问就不用加端口了.
大功告成!
docker镜像获取
docker pull 1720lin/nginx_uwsgi


 685
685

 被折叠的 条评论
为什么被折叠?
被折叠的 条评论
为什么被折叠?
 到【灌水乐园】发言


