上两篇文章主要是记录了SpringBoot增删改查项目里的一些细节的地方,这几天忙着其他的事情,所以没有时间记录,但还是要继续学习呢!这篇文章如果有什么错误的地方,希望大家能够指出~
目录
- 错误处理机制
- 配置嵌入式Servlet容器
一、错误处理机制
- SpringBoot默认处理机制
- 默认效果:
①如果是浏览器,则返回一个错误页面

②如果是客户端进行访问,则返回一个json数据

- 怎么进行浏览器和客户端的区分
主要是通过发送请求的请求头进行区分
①浏览器

②其他客户端

- 原理:
SpringBoot的错误处理的自动配置:autoConfigure-web-error-ErrorMvcAutoConfifiguration
ErrorMvcAutoConfifiguration给容器中添加了以下组件和进行错误处理的步骤:
① ErrorPageCustomizer:一旦系统出现4xx或者5xx的错误,ErrorPageCustomizer就会生效(定制错误的响应规则),就会来到/error请求;
//系统出现错误之后来到error请求进行处理;类似于web的xml配置文件中注册的错误页面规则
@Value("${error.path:/error}")
private String path = "/error";
② BasicErrorController:然后会被BasicErrorController进行处理,会有两种情况:
//这个组件的作用就是用来处理/error请求
@Controller
@RequestMapping({"${server.error.path:${error.path:/error}}"})

//产生html数据,浏览器发送的来到这格方法进行处理
 @RequestMapping(
        produces = {"text/html"}
    )
    public ModelAndView errorHtml(HttpServletRequest request, HttpServletResponse response) {
        HttpStatus status = this.getStatus(request);
        Map<String, Object> model = Collections.unmodifiableMap(this.getErrorAttributes(request, this.isIncludeStackTrace(request, MediaType.TEXT_HTML)));
        response.setStatus(status.value());

        //去哪个页面作为错误页面,返回值包含页面地址和页面内容
        ModelAndView modelAndView = this.resolveErrorView(request, response, status, model);
        return modelAndView != null ? modelAndView : new ModelAndView("error", model);
    }

  //resolveErrorView方法
  //在这个方法中知道响应页面去到哪个页面是由DefaultErrorViewResolver解析得到的
 protected ModelAndView resolveErrorView(HttpServletRequest request, HttpServletResponse response, HttpStatus status, Map<String, Object> model) {
        Iterator var5 = this.errorViewResolvers.iterator();
        ModelAndView modelAndView;
        do {
            if (!var5.hasNext()) {
                return null;
            }
            ErrorViewResolver resolver = (ErrorViewResolver)var5.next();
            //所有的ErrorViewResolver 得到modelAndView
            modelAndView = resolver.resolveErrorView(request, status, model);
        } while(modelAndView == null);

        return modelAndView;
    }
}


//产生json数据,其他客户端产生的数据来到这个方法进行处理
    @RequestMapping
    public ResponseEntity<Map<String, Object>> error(HttpServletRequest request) {
        HttpStatus status = this.getStatus(request);
        if (status == HttpStatus.NO_CONTENT) {
            return new ResponseEntity(status);
        } else {
            Map<String, Object> body = this.getErrorAttributes(request, this.isIncludeStackTrace(request, MediaType.ALL));
            return new ResponseEntity(body, status);
        }
    }
③ DefaultErrorViewResolver
@Override
public ModelAndView resolveErrorView(HttpServletRequest request, HttpStatus status,
Map<String, Object> model) {
ModelAndView modelAndView = resolve(String.valueOf(status), model);
if (modelAndView == null && SERIES_VIEWS.containsKey(status.series())) {
modelAndView = resolve(SERIES_VIEWS.get(status.series()), model);
}
return modelAndView;
}
private ModelAndView resolve(String viewName, Map<String, Object> model) {
//默认SpringBoot可以去找到一个页面? error/404
String errorViewName = "error/" + viewName;
//模板引擎可以解析这个页面地址就用模板引擎解析
TemplateAvailabilityProvider provider =
this.templateAvailabilityProviders .getProvider(errorViewName, this.applicationContext);
if (provider != null) {
//模板引擎可用的情况下返回到errorViewName指定的视图地址
return new ModelAndView(errorViewName, model);
}
//模板引擎不可用,就在静态资源文件夹下找errorViewName对应的页面 error/404.html
return resolveResource(errorViewName, model);
}
④DefaultErrorAttributes:跳转了页面之后这个组件帮我们在页面显示信息
public Map<String, Object> getErrorAttributes(WebRequest webRequest, boolean includeStackTrace) {
    Map<String, Object> errorAttributes = new LinkedHashMap();
    errorAttributes.put("timestamp", new Date());
    this.addStatus(errorAttributes, webRequest);
    this.addErrorDetails(errorAttributes, webRequest, includeStackTrace);
    this.addPath(errorAttributes, webRequest);
    return errorAttributes;
}
//页面能够显示的信息
timestamp:时间戳
status:状态码
error:错误提示
exception:异常对象
message:异常消息
errors:JSR303数据校验的错误都在这里
2. 如何自定义错误响应
①定制错误的页面
- 有模板引擎的情况下:
error/状态码
精确命令:将错误页面命名为 状态码.html然后放在模板引擎文件夹下的error文件夹下;发生此状态码的错误就会来到对应的页面。
我们也可以使用4xx或者5xx来进行错误页面的命名,就可以匹配这一类型的错误;但是还是精确命名优先,就是会优先去寻找精确命名的错误码.html。
- 没有模板引擎(模板引擎找不到这个错误页面):
静态资源文件夹下找;
- 以上都没有错误页面:
就是默认来到SpringBoot默认的错误提示页面;
②定制错误的json数据
- 自定义异常处理返回json数据
利用SpringMVC的ExceptionHandler机制捕获到这个异常之后,将需要写的json数据存入集合中利用@ResponseBody显示在页面上
这种方式的缺点是:不能自适应,浏览器和客户端返回的都是json数据
@ControllerAdvice
public class MyExceptionHandler {
    @ResponseBody
    //自定义的异常类
    @ExceptionHandler(UserNotExitException.class)
    public Map<String,Object> handlerException(Exception e){
        Map<String,Object> map = new HashMap<>();
        map.put("code","user.notexit");
        map.put("message",e.getMessage());
        return map;
    }
}- 转发到error进行自适应响应效果处理
@ExceptionHandler(UserNotExistException.class)
 public String handleException(Exception e, HttpServletRequest request){
    Map<String,Object> map = new HashMap<>();
 //传入我们自己的错误状态码 4xx 5xx,否则就不会进入定制错误页面的解析流程
/*** Integer statusCode = (Integer) request.getAttribute("javax.servlet.error.status_code"); */
   request.setAttribute("javax.servlet.error.status_code",500);
   map.put("code","user.notexist");
   map.put("message",e.getMessage());
//转发到/error
 return "forward:/error";
}- 将我们的定制数据携带出去
出现错误以后,会来到/error请求,会被BasicErrorController处理,响应出去可以获取的数据是由 getErrorAttributes得到的(是AbstractErrorController(ErrorController)规定的方法);
完全来编写一个ErrorController的实现类【或者是编写AbstractErrorController的子类】,放在容器中;
页面上能用的数据,或者是json返回能用的数据都是通过errorAttributes.getErrorAttributes得到;
容器中DefaultErrorAttributes.getErrorAttributes();默认进行数据处理的;
自定义ErrorAttributes
//在容器中加入我们自己定义的errorAttributes
@Component
public class MyErrorAttributes extends DefaultErrorAttributes {
    @Override
    public Map<String, Object> getErrorAttributes(WebRequest webRequest, boolean includeStackTrace) {
        Map<String, Object> map = super.getErrorAttributes(webRequest, includeStackTrace);
        map.put("company","wudandan");
        Map<String,Object> ext = (Map<String, Object>) webRequest.getAttribute("ext", 0);
        map.put("ext",ext);
        return map;
    }
}
最终的效果:响应是自适应的,可以通过定制ErrorAttributes改变需要返回的内容,

二、配置嵌入式Servlet容器
SpringBoot是使用内置的Tomcat,可以查看pom文件的依赖树,可以在spring-boot-starter-web下的spring-boot-starter-tomcat中看到内置的Tomcat版本
1.如何定制和修改内置Servlet容器的配置
①可以在application.propertites文件中通过server来修改;点进server中会发现他是ServerProperties类,里面有很多属性可以进行设置。

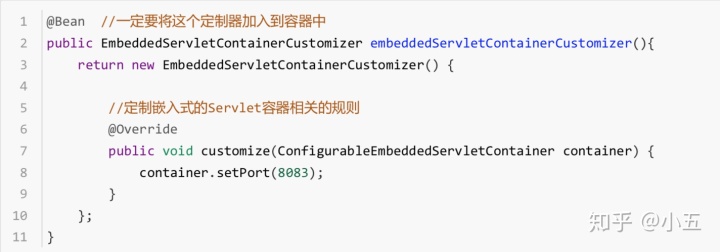
②可以通过添加EmbeddedServletContainerCustomizer :嵌入式的servlet的容器定制器来进修改配置,在myConfig中添加这个组件
在SpringBoot中会有非常多的xxxConfigurer帮助我们进行扩展配置
在SpringBoot中会有很多的xxxCustomizer帮助我们进行定制配置

2.注册三大组件
由于SpringBoot默认是以jar包的形式来启动嵌入式的Servlet容器,所有没有web.xml文件,需要注册以下三大组件
ServletRegistrationBean
"/myServlet"是访问路径,由自己创建的myServlet(Servlet)来进行请求的响应

FilterRegistrationBean
public class myFilter implements Filter {
    @Override
    public void init(FilterConfig filterConfig) throws ServletException {

    }

    @Override
    public void doFilter(ServletRequest servletRequest, ServletResponse servletResponse, FilterChain filterChain) throws IOException, ServletException {
        System.out.println("filter success");
        filterChain.doFilter(servletRequest,servletResponse);
    }

    @Override
    public void destroy() {

    }
}

@Bean
    public FilterRegistrationBean filterRegistrationBean(){
        FilterRegistrationBean<Filter> filterFilterRegistrationBean = new FilterRegistrationBean<>();
        //设置一个filter
        filterFilterRegistrationBean.setFilter(new myFilter());
        //设置拦截的请求
        filterFilterRegistrationBean.setUrlPatterns(Arrays.asList("/hello","/myServlet"));
        return filterFilterRegistrationBean;
    }
ServletListenerRegistrationBean
public class myListener implements ServletContextListener{

    public  void contextInitialized(ServletContextEvent sce) {
        System.out.println("start");
    }

   public  void contextDestroyed(ServletContextEvent sce) {
       System.out.println("end");
    }
}

@Bean
    public ServletListenerRegistrationBean servletListenerRegistrationBean(){
        ServletListenerRegistrationBean servletListenerRegistrationBean = new ServletListenerRegistrationBean(new myListener());
        return servletListenerRegistrationBean;
    }
SpringBoot帮我们注册SpringMVC的时候,自动的注册DispatchServlet前端控制器
DispatcherServletAutoConfiguration中:
@Bean(name=DEFAULT_DISPATCHER_SERVLET_REGISTRATION_BEAN_NAME)
@ConditionalOnBean(value=DispatcherServlet.class,name= DEFAULT_DISPATCHER_SERVLET_BEAN_NAME)
public ServletRegistrationBean dispatcherServletRegistration(DispatcherServlet dispatcherServlet) {
    ServletRegistrationBean registration = new ServletRegistrationBean(
 dispatcherServlet, this.serverProperties.getServletMapping());
//默认拦截: / 所有请求;包静态资源,但是不拦截jsp请求; /*会拦截jsp
//可以通过server.servletPath来修改SpringMVC前端控制器默认拦截的请求路径
    registration.setName(DEFAULT_DISPATCHER_SERVLET_BEAN_NAME);
registration.setLoadOnStartup(
          this.webMvcProperties.getServlet().getLoadOnStartup());
   if (this.multipartConfig != null) {
       registration.setMultipartConfig(this.multipartConfig);    }
    return registration; }
3.SpringBoot还可以使用那些内置的Servlet容器

默认支持:
Tomcat(默认使用)
    <dependency>
       <groupId>org.springframework.boot</groupId>
       <artifactId>spring‐boot‐starter‐web</artifactId>
       引入web模块默认就是使用嵌入式的Tomcat作为Servlet容器;
 </dependency>
jetty
    <!‐‐ 引入web模块 ‐‐>
  <dependency>
     <groupId>org.springframework.boot</groupId>
      <artifactId>spring‐boot‐starter‐web</artifactId>
       <exclusions>
        <exclusion>
            <artifactId>spring‐boot‐starter‐tomcat</artifactId>
            <groupId>org.springframework.boot</groupId>
        </exclusion>
      </exclusions>
  </dependency>
 <!‐‐引入其他的Servlet容器‐‐>
    <dependency>
     <artifactId>spring‐boot‐starter‐jetty</artifactId>
     <groupId>org.springframework.boot</groupId>
<dependency>
undertow
    <!‐‐ 引入web模块 ‐‐>
<dependency>
    <groupId>org.springframework.boot</groupId>
    <artifactId>spring‐boot‐starter‐web</artifactId>
<exclusions>
       <exclusion>
           <artifactId>spring‐boot‐starter‐tomcat</artifactId>
           <groupId>org.springframework.boot</groupId>
       </exclusion>
 </exclusions>
 </dependency>
4.使用外置的Servlet容器
- 嵌入式Servlet容器:jar包的形式
优点:简单便捷
缺点:默认不支持jsp,优化配置比较麻烦
- 外置的Servlet容器--在外部安装Tomcat,应用war的形式打包
如果是war的话,可以在pom文件中看到<packing>war</packing>就代表是war包打包
步骤:
①必须创建一个war项目,springboot项目创建好的时候是没有Webapp目录的,需要自己去创建,project structure-modules-web resource directories-点击创建-deployment descriptors用来生成web.xml文件的-点击右边的+号,注意目录,要生成在我们刚刚创建好的Webapp下WEB-INF下
②使用的时候可以打成war包也可以将Tomcat配置到我们的idea中
war包:
maven-packing
配置:
run-edit configuration-左上角的+号-Tomcat server-local-添加本地的Tomcat信息-deployment-右边+号-Artifacts-项目名:war exploded
③在pom文件中将嵌入式的Tomcat指定为provided
    <dependency>
        <groupId>org.springframework.boot</groupId>
        <artifactId>spring‐boot‐starter‐tomcat</artifactId>
        <scope>provided</scope>
 </dependency>
④必须编写一个SpringBootServletInitializer的子类,并调用configure方法
   public class ServletInitializer extends SpringBootServletInitializer{
   @Override
 protected SpringApplicationBuilder configure(SpringApplicationBuilder application) { //传入SpringBoot应用的主程序
            return application.sources(SpringBoot04WebJspApplication.class);
 }
⑤启动服务器就可以使用了
这篇文章到这里就结束了,其实SpringBoot Web开发这里还有很多深挖的,比如说嵌入式Servlet的启动原理和修改配置的原理等等一些原理看源码的内容,等有时间了会再记录一下,下篇会记录SpringBoot的数据访问,那可能就是SpringBoot的最后一篇文章了,如果你喜欢我的文章,就请关注我吧~


 本文介绍SpringBoot中的错误处理机制及自定义错误响应方法,并详细讲解如何配置嵌入式Servlet容器,包括定制配置、注册三大组件及支持的内置容器。


 3388
3388

 被折叠的 条评论
为什么被折叠?


