


文章目录
前言
好记性不如烂笔头,做记录亦是复习。加油
笔记:
Spring介绍与核心思想(IOC/AOP)
自定义注解实现IOC容器笔记
IOC介绍与源码剖析
一、Spring AOP介绍
AOP本质:在不改变原有业务逻辑的情况下增强横切逻辑,横切逻辑代码往往是权限校验代码、日志代码、事务控制代码、性能监控代码。
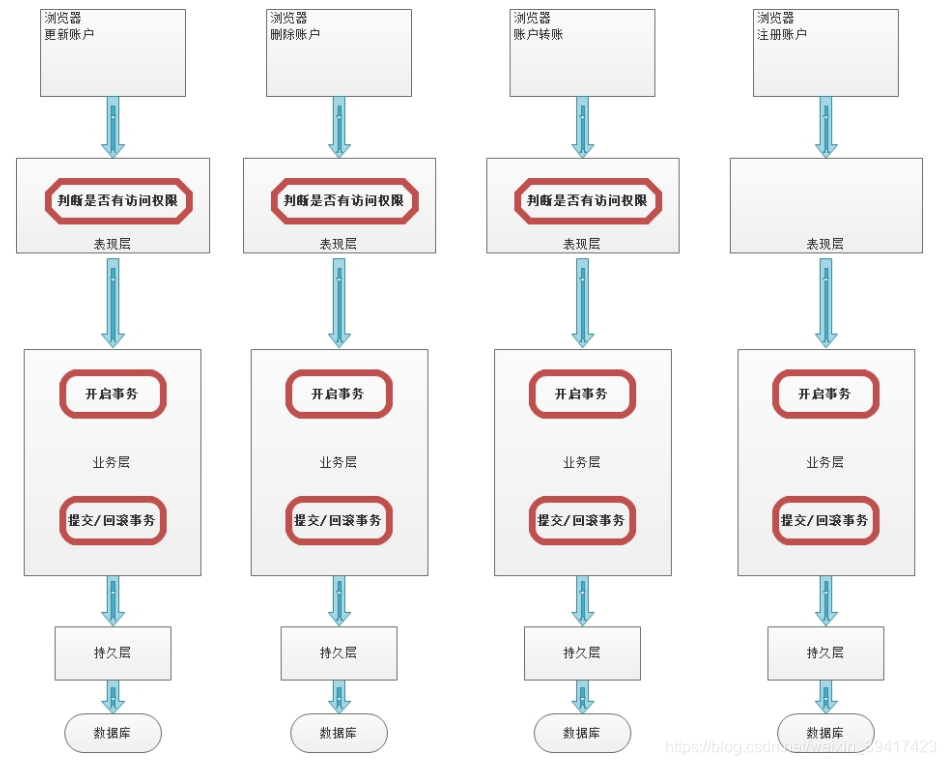
上图描述的就是未采用AOP思想设计的程序,当红色框中圈定的方法时,会带来大量的重复劳动。
程序中充斥着大量的重复代码,使程序的独立性很差。而下图中是采用了AOP思想设计的程序,它把红框部分的代码抽取出来的同时,运用动态代理技术,在运行期对需要使用的业务逻辑方法进行增强。
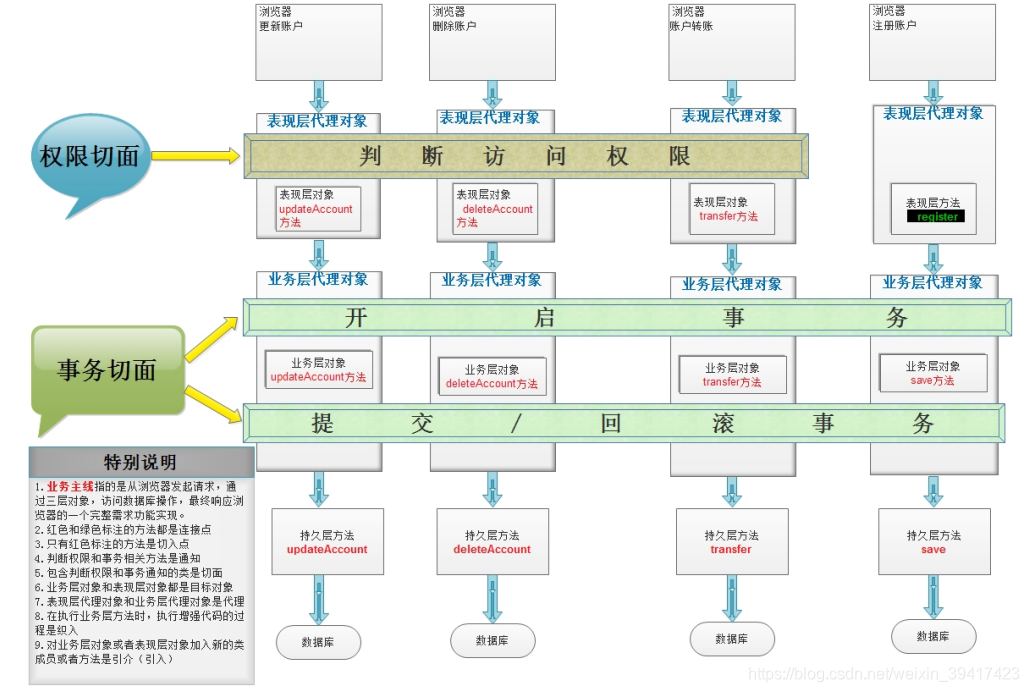
Spring 实现AOP思想使用的是动态代理技术,默认情况下Spring会根据被代理对象是否实现接口来选择使用JDK还是CGLIB。当被代理对象没有实现任何接口时,Spring会选择CGLIB。当被代理对象实现了接口,Spring会选择JDK官方的代理技术,不过可以通过配置的方式,让Spring强制使用CGLIB。
二、Spring AOP源码剖析
好处: 提高培养代码架构思维、深入理解框架
原则:
定焦原则:抓主线
宏观原则:站在上帝视角,关注源码结构和业务流程(淡化具体某行代码的编写细节)读源码的方法和技巧
断点(观察调用栈)
反调(Find Usages)
经验(spring框架中doXXX,做具体处理的地方)
Spring源码构建步骤:
1.从github下载源码
2.安装gradle 5.6.3(类似于maven) Idea 2019.1 Jdk 11.0.5
3.导入(耗费⼀定时间)
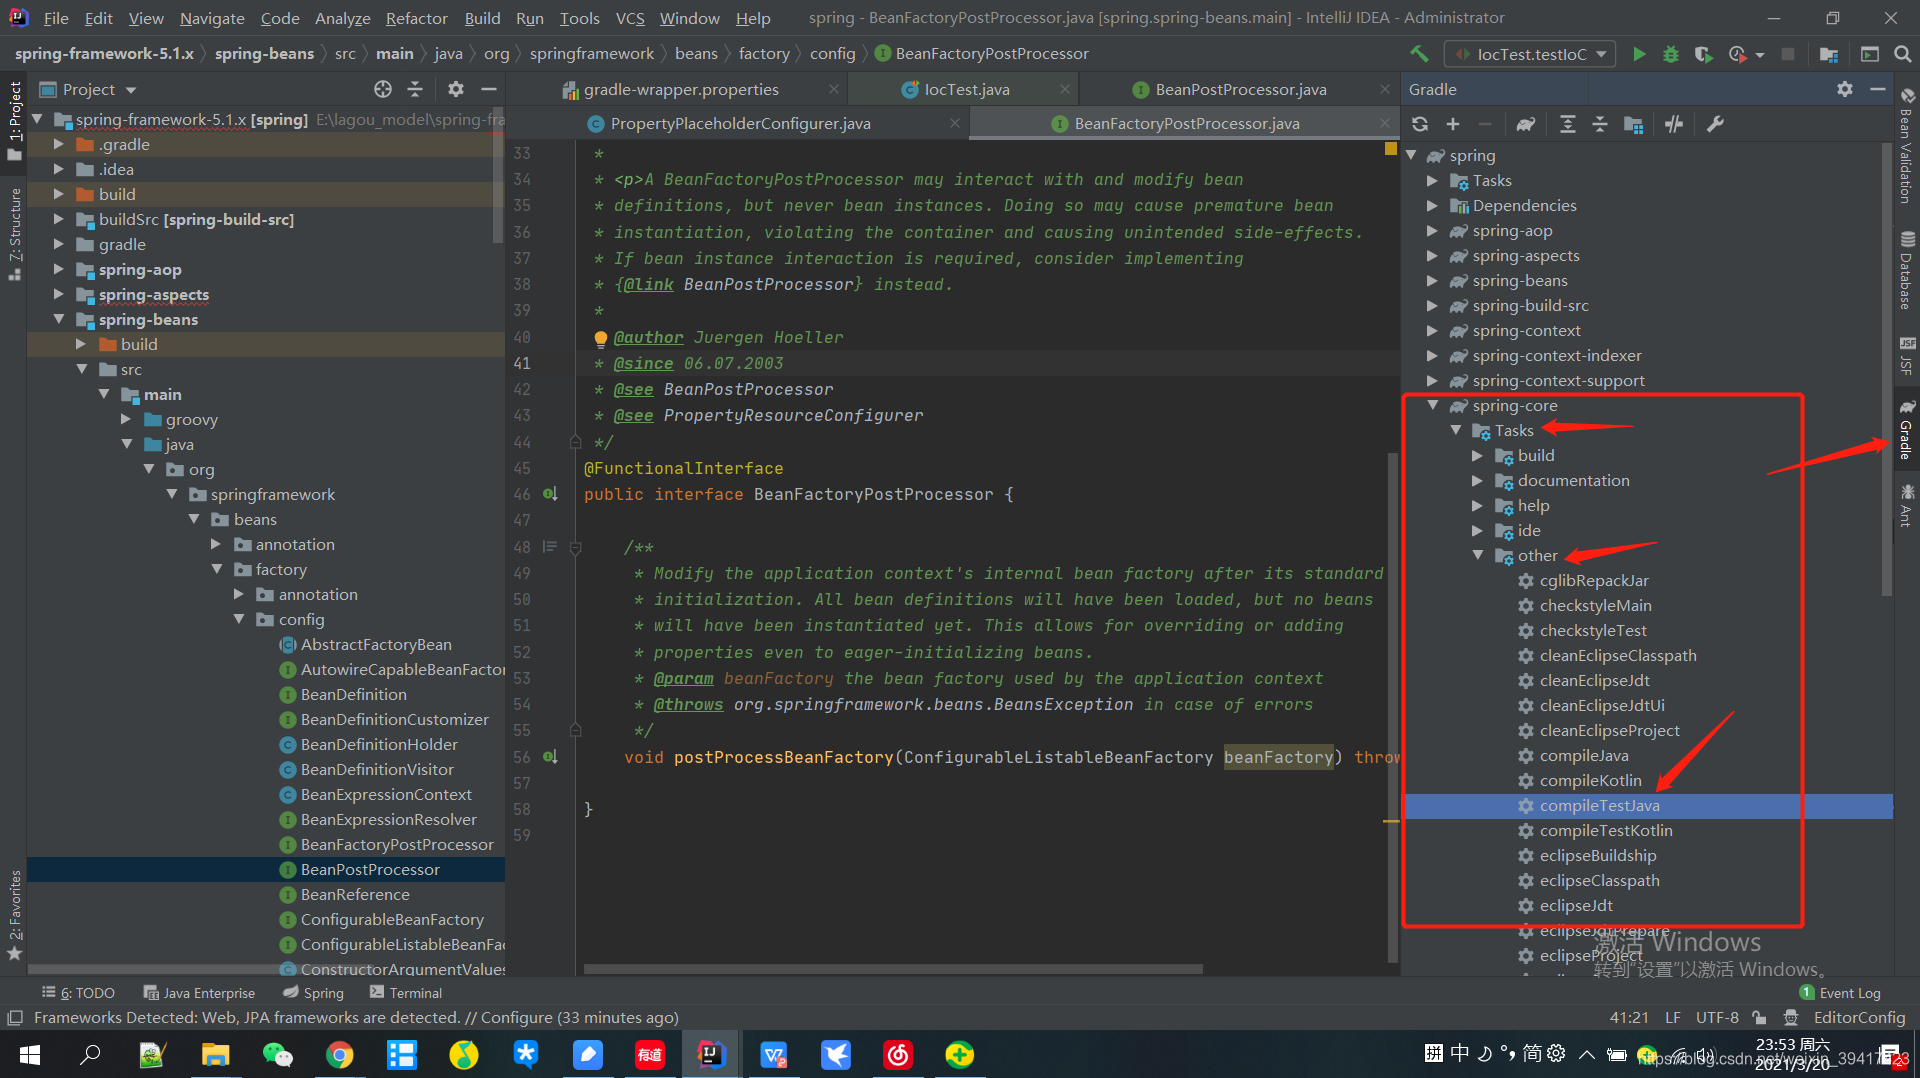
4.编译工程(顺序:core-oxm-context-beans-aspects-aop)工程—>Tasks—>other—>compileTestJava
1.代理对象创建
1.1 Spring AOP基础用例准备
Bean定义
	@Component
    public class LagouBean {
        public void tech() {
            System.out.println("java learning......");
        }
    }
Aspect定义
	@Component
    @Aspect
    public class LagouAspect {
        @Pointcut("execution(* com.lagou.*.*(..))")
        public void pointcut() {
        }

        @Before("pointcut()")
        public void before() {
            System.out.println("before method ......");
        }
    }
测试用例
	/**
     * 测试⽤例:Aop 代理对象创建
     */
    @Test
    public void testAopProxyBuild() {
        ApplicationContext applicationContext = new
                AnnotationConfigApplicationContext(SpringConfig.class);
        LagouBean lagouBean = applicationContext.getBean(LagouBean.class);
        lagouBean.tech();
    }
1.2 时机点分析
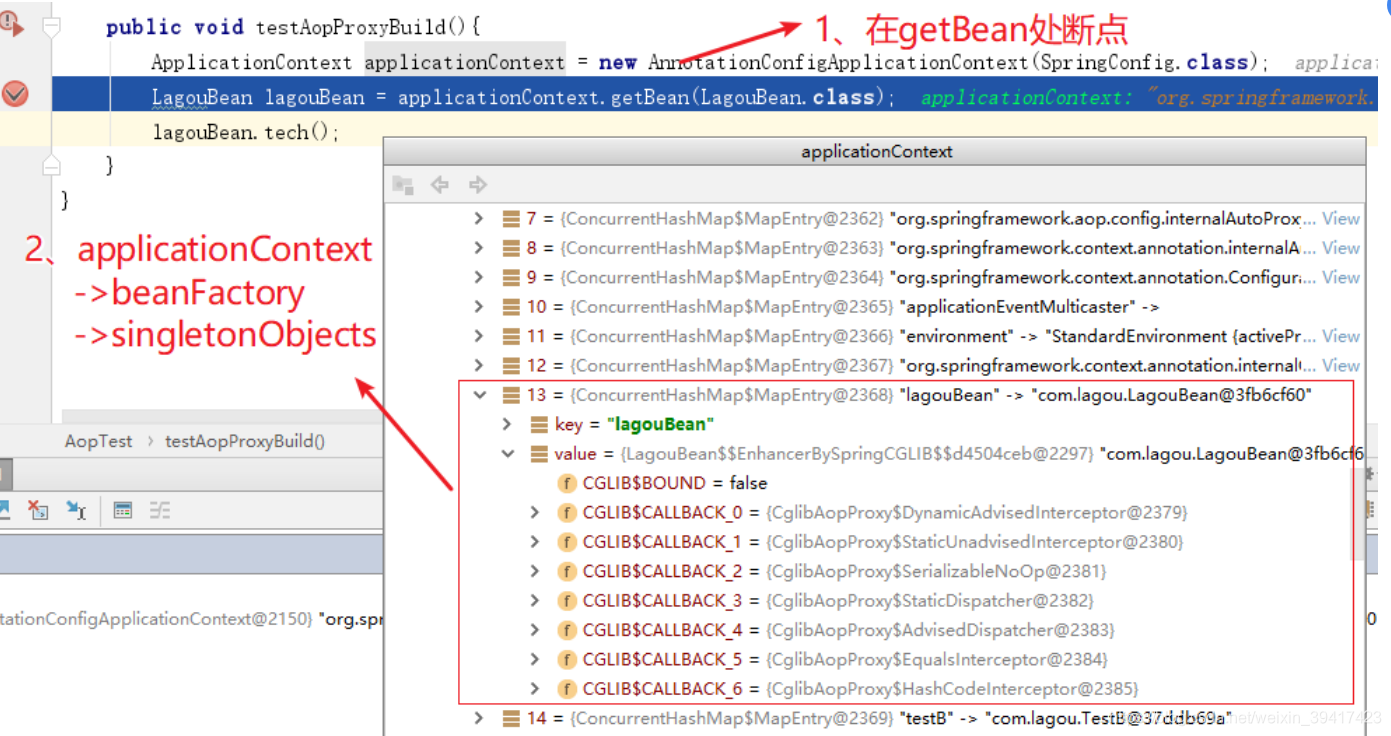
可以在 getBean 之前,LagouBean对象已经产生(即在第一行初始化代码中完成),而且该对象是一个代理对象(Cglib代理对象),所以可以断定,容器初始化过程中目标Bean已经完成了代理,返回了代理对象。
1.3 代理对象创建流程
AbstractAutowireCapableBeanFactory#initializeBean(java.lang.String, java.lang.Object,
org.springframework.beans.factory.support.RootBeanDefinition)
	/**
     * 初始化Bean
     * 包括Bean后置处理器初始化
     * Bean的⼀些初始化⽅法的执⾏init-method
     * Bean的实现的声明周期相关接⼝的属性注⼊
     */
    protected Object initializeBean(final String beanName, final Object bean,
                                    @Nullable RootBeanDefinition mbd) {
        // 执⾏所有的AwareMethods
        if (System.getSecurityManager() != null) {
            AccessController.doPrivileged((PrivilegedAction<Object>) () -> {
                invokeAwareMethods(beanName, bean);
                return null;
            }, getAccessControlContext());
        } else {
            invokeAwareMethods(beanName, bean);
        }
        Object wrappedBean = bean;
        if (mbd == null || !mbd.isSynthetic()) {
            // 执⾏所有的BeanPostProcessor#postProcessBeforeInitialization 初始化之前的处理器⽅法
                    wrappedBean = applyBeanPostProcessorsBeforeInitialization(wrappedBean,
                    beanName);
        }
        try {
            // 这⾥就开始执⾏afterPropertiesSet(实现了InitializingBean接⼝)⽅法和initMethod
            invokeInitMethods(beanName, wrappedBean, mbd);
        } catch (Throwable ex) {
            throw new BeanCreationException((mbd != null ? mbd.getResourceDescription() : null),
                    beanName, "Invocation of init method failed", ex);
        }
        if (mbd == null || !mbd.isSynthetic()) {
            // 整个Bean初始化完成,执⾏后置处理器⽅法
            wrappedBean = applyBeanPostProcessorsAfterInitialization(wrappedBean, beanName);
        }
        return wrappedBean;
    }
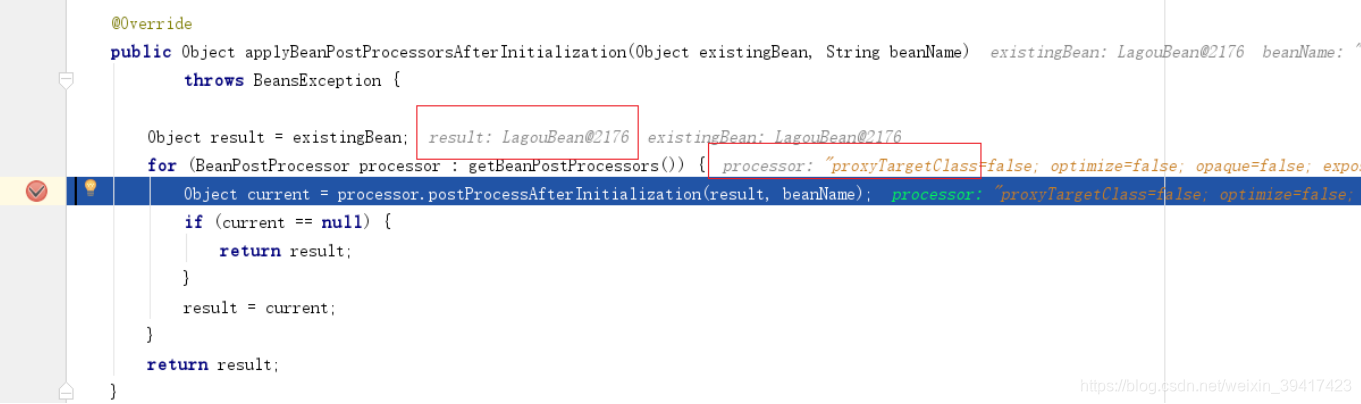
AbstractAutowireCapableBeanFactory#applyBeanPostProcessorsAfterInitialization
	@Override
    public Object applyBeanPostProcessorsAfterInitialization(Object existingBean, String beanName)
            throws BeansException {
        Object result = existingBean;
        // 循环执⾏后置处理器
        for (BeanPostProcessor processor : getBeanPostProcessors()) {
            Object current = processor.postProcessAfterInitialization(result, beanName);
            if (current == null) {
                return result;
            }
            result = current;
        }
        return result;
    }
创建代理对象的后置处理器AbstractAutoProxyCreator#postProcessAfterInitialization
/**
     * Create a proxy with the configured interceptors if the bean is
     * identified as one to proxy by the subclass.
     *
     * @see #getAdvicesAndAdvisorsForBean
     */
    @Override
    public Object postProcessAfterInitialization(@Nullable Object bean, String
            beanName) {
        if (bean != null) {
            // 检查下该类是否已经暴露过了(可能已经创建了,⽐如A依赖B时,创建A时候,就会先去创建B。
            // 当真正需要创建B时,就没必要再代理⼀次已经代理过的对象),避免重复创建
            Object cacheKey = getCacheKey(bean.getClass(), beanName);
            if (this.earlyProxyReferences.remove(cacheKey) != bean) {
                return wrapIfNecessary(bean, beanName, cacheKey);
            }
        }
        return bean;
    }
AbstractAutoProxyCreator#wrapIfNecessary
/**
     * Wrap the given bean if necessary, i.e. if it is eligible for being
     * proxied.
     *
     * @param bean     the raw bean instance
     * @param beanName the name of the bean
     * @param cacheKey the cache key for metadata access
     * @return a proxy wrapping the bean, or the raw bean instance as-is
     */
    protected Object wrapIfNecessary(Object bean, String beanName, Object
            cacheKey) {
        // targetSourcedBeans包含,说明前⾯创建过
        if (StringUtils.hasLength(beanName) &&
                this.targetSourcedBeans.contains(beanName)) {
            return bean;
        }
        if (Boolean.FALSE.equals(this.advisedBeans.get(cacheKey))) {
            return bean;
        }
        if (isInfrastructureClass(bean.getClass()) || shouldSkip(bean.getClass(),
                beanName)) {
            this.advisedBeans.put(cacheKey, Boolean.FALSE);
            return bean;
        }
        // Create proxy if we have advice.
        // 得到所有候选Advisor,对Advisors和bean的⽅法双层遍历匹配,最终得到⼀个
        List<Advisor>,即specificInterceptors
        Object[] specificInterceptors =
                getAdvicesAndAdvisorsForBean(bean.getClass(), beanName, null);
        if (specificInterceptors != DO_NOT_PROXY) {
            this.advisedBeans.put(cacheKey, Boolean.TRUE);
            // 重点,创建代理对象
            Object proxy = createProxy(
                    bean.getClass(), beanName, specificInterceptors, new
                            SingletonTargetSource(bean));
            this.proxyTypes.put(cacheKey, proxy.getClass());
            return proxy;
        }
        this.advisedBeans.put(cacheKey, Boolean.FALSE);
        return bean;
    }
AbstractAutoProxyCreator#createProxy
/**
     * Create an AOP proxy for the given bean.
     * 为指定 bean 创建代理对象
     */
    protected Object createProxy(Class<?> beanClass, @Nullable String beanName, @Nullable Object[] specificInterceptors, TargetSource targetSource) {
        if (this.beanFactory instanceof ConfigurableListableBeanFactory) {
            AutoProxyUtils.exposeTargetClass((ConfigurableListableBeanFactory)
                    this.beanFactory, beanName, beanClass);
        }
        // 创建代理的⼯作交给ProxyFactory
        ProxyFactory proxyFactory = new ProxyFactory();
        proxyFactory.copyFrom(this);
        // 根据⼀些情况判断是否要设置proxyTargetClass=true
        if (!proxyFactory.isProxyTargetClass()) {
            if (shouldProxyTargetClass(beanClass, beanName)) {
                proxyFactory.setProxyTargetClass(true);
            } else {
                evaluateProxyInterfaces(beanClass, proxyFactory);
            }
        }
        // 把指定和通⽤拦截对象合并, 并都适配成Advisor
        Advisor[] advisors = buildAdvisors(beanName, specificInterceptors);
        proxyFactory.addAdvisors(advisors);
        // 设置参数
        proxyFactory.setTargetSource(targetSource);
        customizeProxyFactory(proxyFactory);
        proxyFactory.setFrozen(this.freezeProxy);
        if (advisorsPreFiltered()) {
            proxyFactory.setPreFiltered(true);
        }
        // 上⾯准备做完就开始创建代理
        return proxyFactory.getProxy(getProxyClassLoader());
    }
接着跟进到ProxyFactory中
public class ProxyFactory extends ProxyCreatorSupport {
        public Object getProxy(ClassLoader classLoader) {
            // ⽤ProxyFactory创建AopProxy, 然后⽤AopProxy创建Proxy, 所以这⾥重要的是看获取的
            AopProxy
            // 对象是什么,
            // 然后进去看怎么创建动态代理, 提供了两种:jdk proxy, cglib
            return createAopProxy().getProxy(classLoader);
        }
}
public class ProxyCreatorSupport extends AdvisedSupport {
        private AopProxyFactory aopProxyFactory;

        public ProxyCreatorSupport() {
            this.aopProxyFactory = new DefaultAopProxyFactory();
        }

        protected final synchronized AopProxy createAopProxy() {
            if (!this.active) {
                activate();
            }
            //先获取创建AopProxy的⼯⼚, 再由此创建AopProxy
            return getAopProxyFactory().createAopProxy(this);
        }

        public AopProxyFactory getAopProxyFactory() {
            return this.aopProxyFactory;
        }
}
流程就是用AopProxyFactory创建AopProxy, 再用AopProxy创建代理对象,这里的AopProxyFactory默认是DefaultAopProxyFactory,看他的createAopProxy方法
 public class DefaultAopProxyFactory implements AopProxyFactory, Serializable {
        @Override
        public AopProxy createAopProxy(AdvisedSupport config) throws
                AopConfigException {
            if (config.isOptimize() || config.isProxyTargetClass() ||
                    hasNoUserSuppliedProxyInterfaces(config)) {
                Class<?> targetClass = config.getTargetClass();
                if (targetClass == null) {
                    throw new AopConfigException("TargetSource cannot determine target
                    class: "
                            + "Either an interface or a target is required for proxy
                    creation.");
                }
                if (targetClass.isInterface()) {
                    return new JdkDynamicAopProxy(config);
                }
                return new ObjenesisCglibAopProxy(config);
            } else {
                return new JdkDynamicAopProxy(config);
            }
        }
		/**
		 * Determine whether the supplied {@link AdvisedSupport} has only the
		 * {@link org.springframework.aop.SpringProxy} interface specified (or no
		 * proxy interfaces specified at all).
		 */
		private boolean hasNoUserSuppliedProxyInterfaces(AdvisedSupport config) {
		    Class<?>[] interfaces = config.getProxiedInterfaces();
		    return (interfaces.length == 0 || (interfaces.length == 1 &&
		            SpringProxy.class.equals(interfaces[0])));
		}
}
这里决定创建代理对象是用JDK Proxy还是用Cglib,最简单的从使用方面来说:设置proxyTargetClass=true强制使用Cglib 代理,什么参数都不设并且对象类实现了接口则默认用JDK 代理,如果没有实现接口则也必须用Cglib
ProxyFactory#getProxy(java.lang.ClassLoader)
CglibAopProxy#getProxy(java.lang.ClassLoader)
 @Override
    public Object getProxy(@Nullable ClassLoader classLoader) {
        if (logger.isTraceEnabled()) {
            logger.trace("Creating CGLIB proxy: " + this.advised.getTargetSource());
        }
        try {
            Class<?> rootClass = this.advised.getTargetClass();
            Assert.state(rootClass != null, "Target class must be available for creating a CGLIB proxy");
            Class<?> proxySuperClass = rootClass;
            if (ClassUtils.isCglibProxyClass(rootClass)) {
                proxySuperClass = rootClass.getSuperclass();
                Class<?>[] additionalInterfaces = rootClass.getInterfaces();
                for (Class<?> additionalInterface : additionalInterfaces) {
                    this.advised.addInterface(additionalInterface);
                }
            }
            // Validate the class, writing log messages as necessary.
            validateClassIfNecessary(proxySuperClass, classLoader);
            // 配置 Cglib 增强
            Enhancer enhancer = createEnhancer();
            if (classLoader != null) {
                enhancer.setClassLoader(classLoader);
                if (classLoader instanceof SmartClassLoader &&
                        ((SmartClassLoader)
                                classLoader).isClassReloadable(proxySuperClass)) {
                    enhancer.setUseCache(false);
                }
            }
            enhancer.setSuperclass(proxySuperClass);

            enhancer.setInterfaces(AopProxyUtils.completeProxiedInterfaces(this.advised));
            enhancer.setNamingPolicy(SpringNamingPolicy.INSTANCE);
            enhancer.setStrategy(new
                    ClassLoaderAwareUndeclaredThrowableStrategy(classLoader));
            Callback[] callbacks = getCallbacks(rootClass);
            Class<?>[] types = new Class<?>[callbacks.length];
            for (int x = 0; x < types.length; x++) {
                types[x] = callbacks[x].getClass();
            }
            // fixedInterceptorMap only populated at this point, after getCallbacks call above
            enhancer.setCallbackFilter(new ProxyCallbackFilter(
                    this.advised.getConfigurationOnlyCopy(), this.fixedInterceptorMap,
                    this.fixedInterceptorOffset));
            enhancer.setCallbackTypes(types);
            // ⽣成代理类,并且创建⼀个代理类的实例
            return createProxyClassAndInstance(enhancer, callbacks);
        } catch (CodeGenerationException | IllegalArgumentException ex) {
            throw new AopConfigException("Could not generate CGLIB subclass of " +
                    this.advised.getTargetClass() +
                    ": Common causes of this problem include using a final class or a non - visible class ",
                    ex);
        } catch (Throwable ex) {
            // TargetSource.getTarget() failed
            throw new AopConfigException("Unexpected AOP exception", ex);
        }
    }
1.4 AOP源码分析类方法调用关系过程
org.springframework.beans.factory.support.AbstractAutowireCapableBeanFactory#initializeBean
调用
org.springframework.beans.factory.support.AbstractAutowireCapableBeanFactory#applyBeanPostProcessorsAfterInitialization
调用
org.springframework.aop.framework.autoproxy.AbstractAutoProxyCreator#postProcessAfterInitialization(后置处理器AbstractAutoProxyCreator完成bean代理对象创建)
调用
org.springframework.aop.framework.autoproxy.AbstractAutoProxyCreator#wrapIfNecessary
调用
org.springframework.aop.framework.autoproxy.AbstractAutoProxyCreator#createProxy (在这一步把委托对象的aop增强和通用拦截进行合并,最终给代理对象)
调用
org.springframework.aop.framework.DefaultAopProxyFactory#createAopProxy
调用
org.springframework.aop.framework.CglibAopProxy#getProxy(java.lang.ClassLoader)
2.Spring声明式事务控制
@EnableTransactionManagement @Transactional
2.1 @EnableTransactionManagement
@Target(ElementType.TYPE)
@Retention(RetentionPolicy.RUNTIME)
@Documented
@Import(TransactionManagementConfigurationSelector.class)
public @interface EnableTransactionManagement {
@EnableTransactionManagement 注解使用 @Import 标签引入了TransactionManagementConfigurationSelector类,这个类又向容器中导入了两个重要的组件
2.2 加载事务控制组件
(1) AutoProxyRegistrar
AutoProxyRegistrar 类的 registerBeanDefinitions 方法中又注册了一个组件
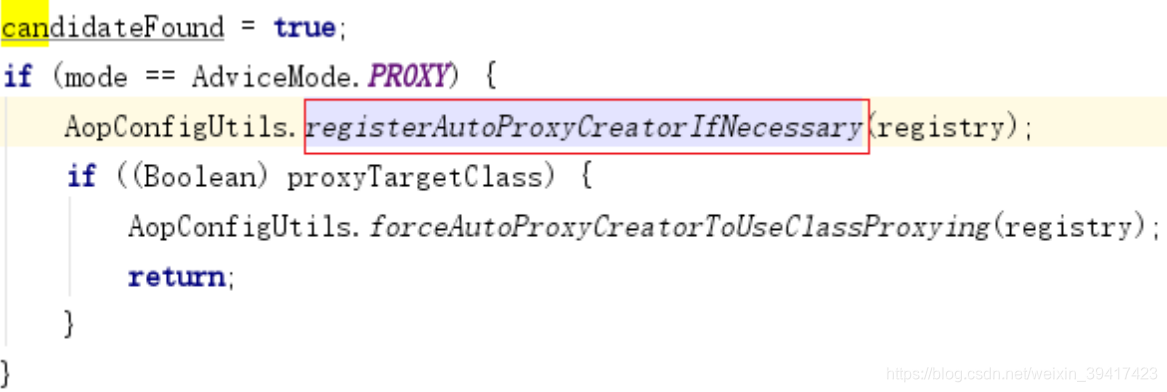
进入 AopConfigUtils.registerAutoProxyCreatorIfNecessary 方法
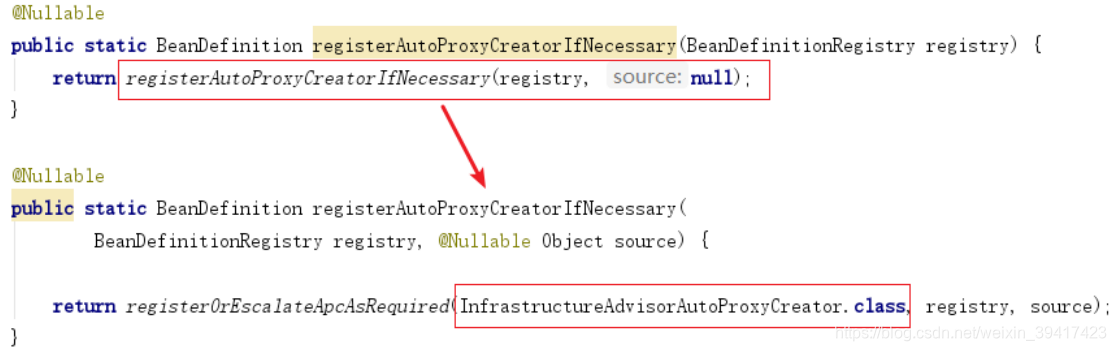
发现最终注册了一个叫做 InfrastructureAdvisorAutoProxyCreator 的 Bean,而这个类是AbstractAutoProxyCreator 的子类,实现了 SmartInstantiationAwareBeanPostProcessor 接口
public class InfrastructureAdvisorAutoProxyCreator extends AbstractAdvisorAutoProxyCreator
public abstract class AbstractAdvisorAutoProxyCreator extends AbstractAutoProxyCreator
public abstract class AbstractAutoProxyCreator extends ProxyProcessorSupport
implements SmartInstantiationAwareBeanPostProcessor, BeanFactoryAware
继承体系结构图如下
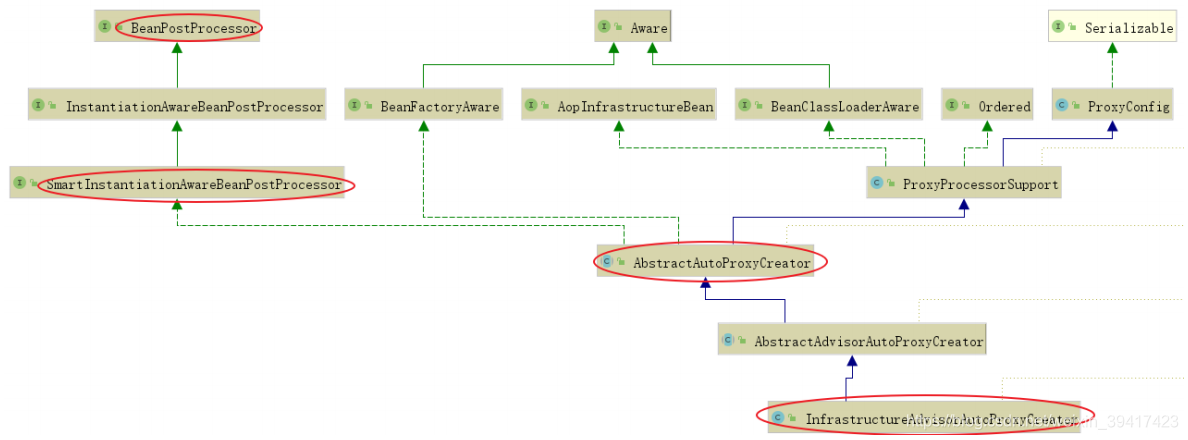
它实现了SmartInstantiationAwareBeanPostProcessor,说明这是一个后置处理器,而且跟spring AOP 开启@EnableAspectJAutoProxy 时注册的AnnotationAwareAspectJProxyCreator实现的是同一个接口,所以说声明式事务是 springAOP 思想的⼀种应用
(2) ProxyTransactionManagementConfiguration 组件
/*
* Copyright 2002-2017 the original author or authors.
*
* Licensed under the Apache License, Version 2.0 (the "License");
* you may not use this file except in compliance with the License.
* You may obtain a copy of the License at
*
* https://www.apache.org/licenses/LICENSE-2.0
*
* Unless required by applicable law or agreed to in writing, software
* distributed under the License is distributed on an "AS IS" BASIS,
* WITHOUT WARRANTIES OR CONDITIONS OF ANY KIND, either express or
implied.
* See the License for the specific language governing permissions and
* limitations under the License.
*/
package org.springframework.transaction.annotation;

import org.springframework.beans.factory.config.BeanDefinition;
import org.springframework.context.annotation.Bean;
import org.springframework.context.annotation.Configuration;
import org.springframework.context.annotation.Role;
import org.springframework.transaction.config.TransactionManagementConfigUtils;
import org.springframework.transaction.interceptor.BeanFactoryTransactionAttributeSourceAdvisor;
import org.springframework.transaction.interceptor.TransactionAttributeSource;
import org.springframework.transaction.interceptor.TransactionInterceptor;

/**
 * {@code @Configuration} class that registers the Spring infrastructure
 * beans
 * necessary to enable proxy-based annotation-driven transaction
 * management.
 *
 * @author Chris Beams
 * @see EnableTransactionManagement
 * @see TransactionManagementConfigurationSelector
 * @since 3.1
 */
@Configuration
public class ProxyTransactionManagementConfiguration extends
        AbstractTransactionManagementConfiguration {
    @Bean(name =
            TransactionManagementConfigUtils.TRANSACTION_ADVISOR_BEAN_NAME)
    @Role(BeanDefinition.ROLE_INFRASTRUCTURE)
    public BeanFactoryTransactionAttributeSourceAdvisor transactionAdvisor() {
        // 事务增强器
        BeanFactoryTransactionAttributeSourceAdvisor advisor = new
                BeanFactoryTransactionAttributeSourceAdvisor();
        // 向事务增强器中注⼊ 属性解析器 transactionAttributeSource
        advisor.setTransactionAttributeSource(transactionAttributeSource());
        // 向事务增强器中注⼊ 事务拦截器 transactionInterceptor
        advisor.setAdvice(transactionInterceptor());
        if (this.enableTx != null) {
            advisor.setOrder(this.enableTx.<Integer>getNumber("order"));
        }
        return advisor;
    }

    @Bean
    @Role(BeanDefinition.ROLE_INFRASTRUCTURE)
    // 属性解析器 transactionAttributeSource
    public TransactionAttributeSource transactionAttributeSource() {
        return new AnnotationTransactionAttributeSource();
    }

    @Bean
    @Role(BeanDefinition.ROLE_INFRASTRUCTURE)
    // 事务拦截器 transactionInterceptor
    public TransactionInterceptor transactionInterceptor() {
        TransactionInterceptor interceptor = new TransactionInterceptor();

        interceptor.setTransactionAttributeSource(transactionAttributeSource());
        if (this.txManager != null) {
            interceptor.setTransactionManager(this.txManager);
        }
        return interceptor;
    }
}
ProxyTransactionManagementConfiguration是⼀个容器配置类,注册了⼀个组件transactionAdvisor,称为事务增强器,然后在这个事务增强器中又注入了两个属性:transactionAttributeSource,即属性解析器transactionAttributeSource 和 事务拦截器transactionInterceptor
属性解析器 AnnotationTransactionAttributeSource 部分源码如下
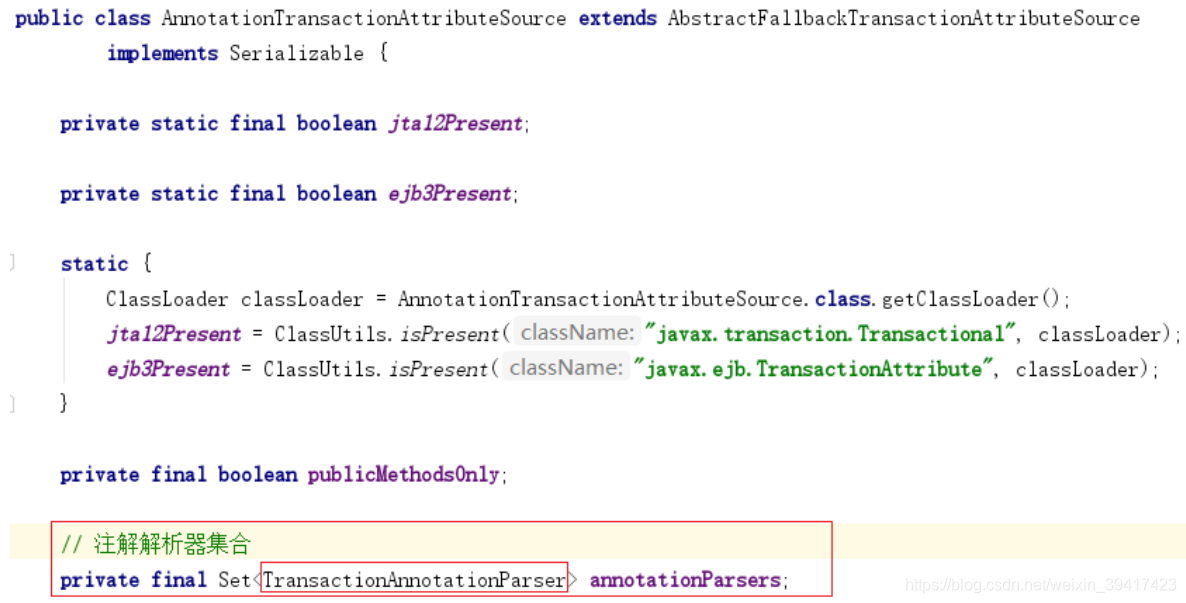
属性解析器有一个成员变量是annotationParsers,是一个集合,可以添加多种注解解析器(TransactionAnnotationParser),这里关注 Spring 的注解解析器,部分源码如下
属性解析器的作用之一就是用来解析@Transaction注解
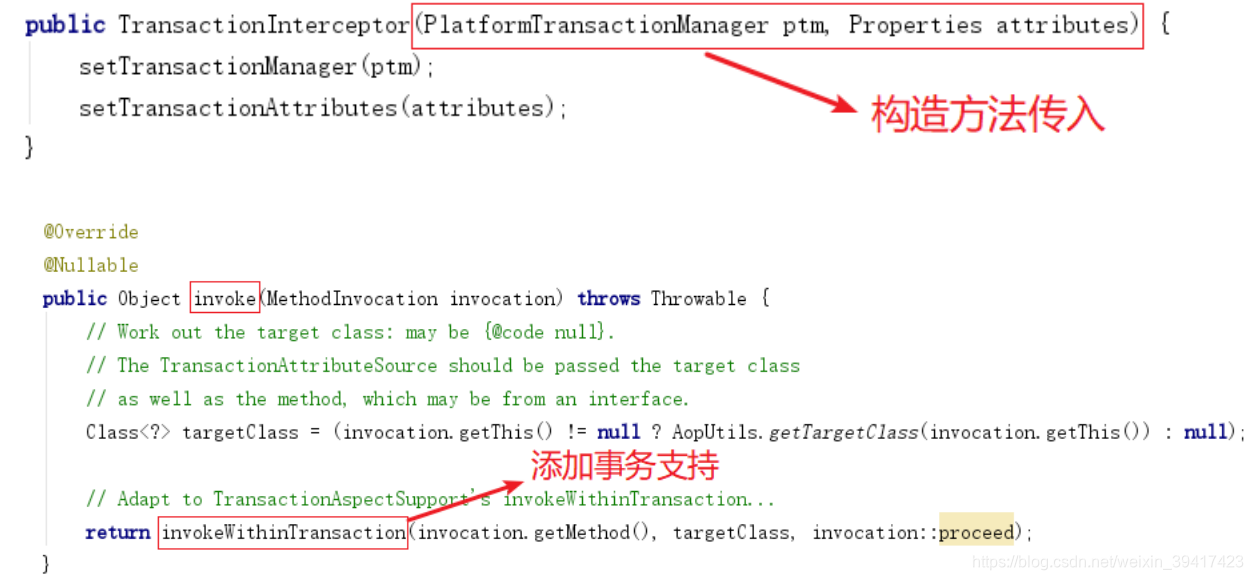
TransactionInterceptor 事务拦截器,部分源码如下
(3) 上述组件如何关联起来的
- 事务拦截器实现了MethodInterceptor接口,追溯上面提到的InfrastructureAdvisorAutoProxyCreator后置处理器,它会在代理对象执行目标方法的时候获取其拦截器链,而拦截器链就是这个TransactionInterceptor,这就把这两个组件联系起来;
- 构造方法传入PlatformTransactionManager(事务管理器)、TransactionAttributeSource(属性解析器),但是追溯上面贴的ProxyTransactionManagementConfiguration的源码,在注册事务拦截器的时候并没有调用这个带参构造方法,而是调用的无参构造方法,然后再调用set方法注入这两个属性,效果一样。
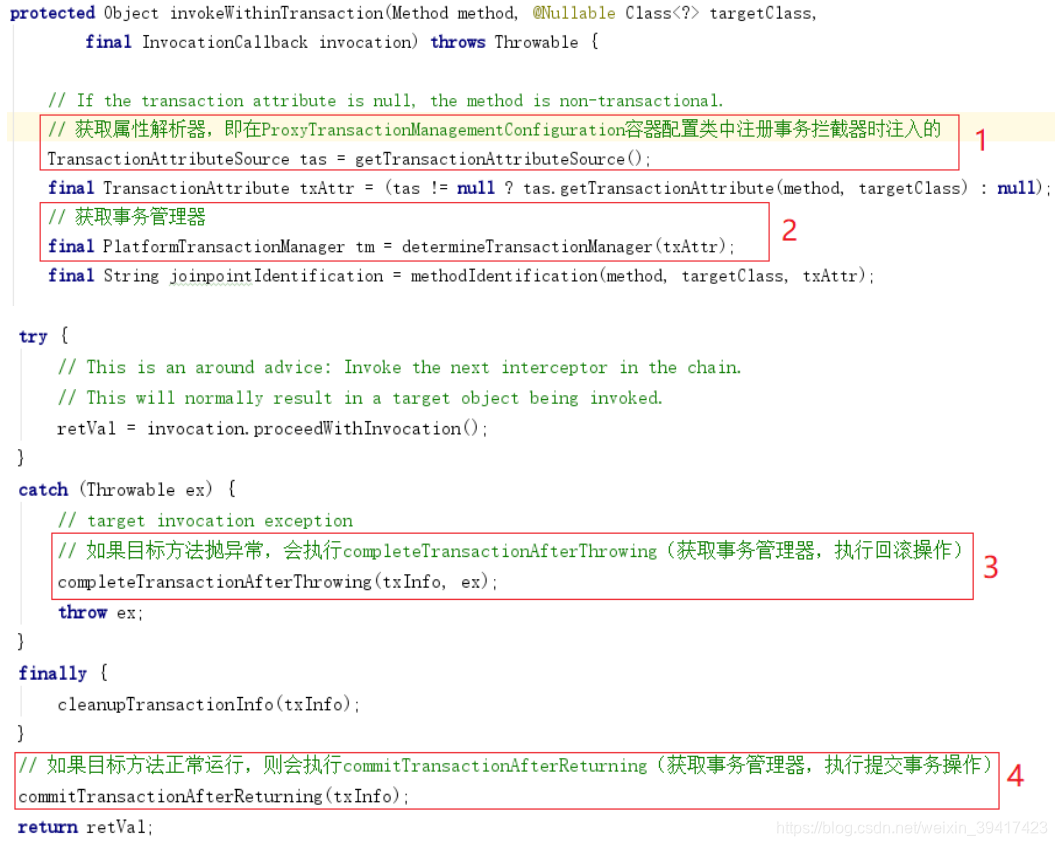
(4) invokeWithinTransaction 方法,部分源码如下(关注1、2、3、4 处)
(5) 声明式事务分析过程
@EnableTransactionManagement 注解
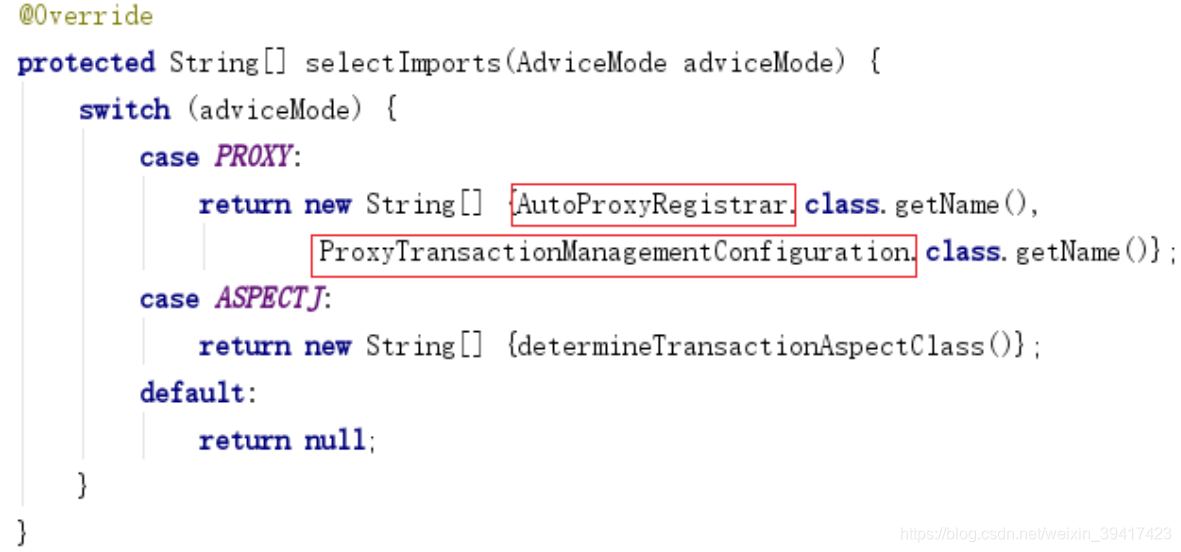
1.通过@import引入了TransactionManagementConfigurationSelector类,
它的selectImports⽅法导入了另外两个类:AutoProxyRegistrar和 ProxyTransactionManagementConfiguration
2.AutoProxyRegistrar类分析方法registerBeanDefinitions中,引入了其他类,
通过AopConfigUtils.registerAutoProxyCreatorIfNecessary(registry)引入
InfrastructureAdvisorAutoProxyCreator,它继承了AbstractAutoProxyCreator,是一个后置处理器类
3.ProxyTransactionManagementConfiguration 是一个添加了@Configuration注解的配置类
(注册bean)
注册事务增强器(注入属性解析器、事务拦截器)
属性解析器:AnnotationTransactionAttributeSource,内部持有了一个解析器集合
Set<TransactionAnnotationParser> annotationParsers;
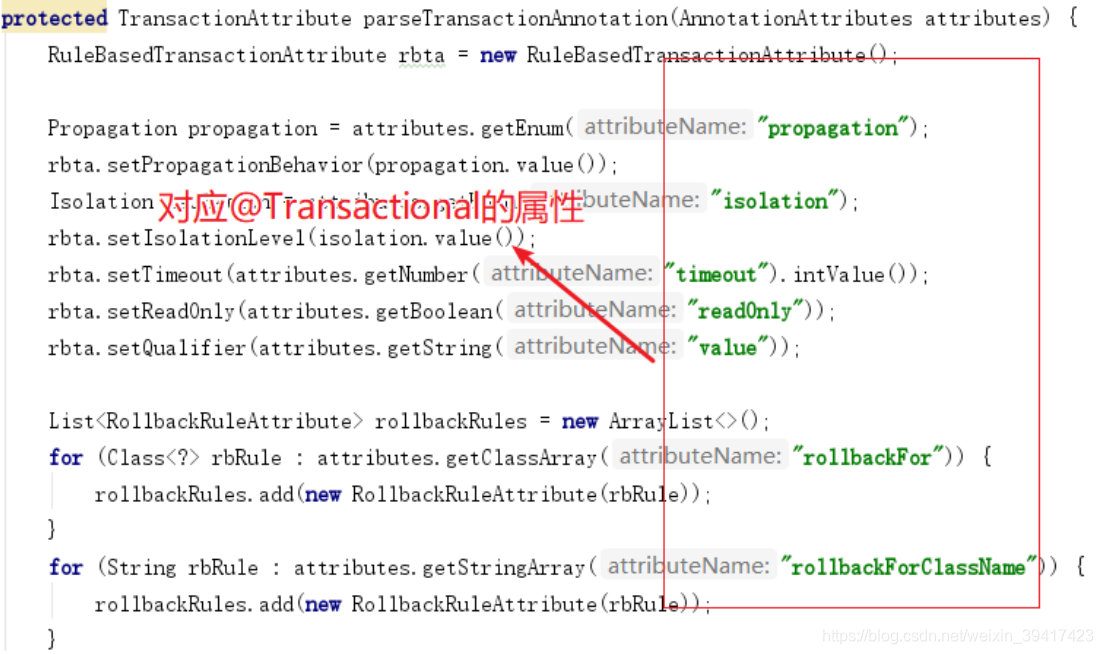
具体使用的是SpringTransactionAnnotationParser解析器,用来解析@Transactional的事务属性
事务拦截器:TransactionInterceptor实现了MethodInterceptor接口,
该通用拦截会在产生代理对象之前和aop增强合并,最终一起影响到代理对象TransactionInterceptor
的invoke方法中invokeWithinTransaction会触发原有业务逻辑调用(增强事务)


 1805
1805

 被折叠的 条评论
为什么被折叠?
被折叠的 条评论
为什么被折叠?
 到【灌水乐园】发言


