一、前端常用地址:
vue3:官方文档地址 https://cn.vuejs.org/guide/quick-start.html
vue3-element-ui:官方文档地址:https://element-plus.org/zh-CN/
iconfont矢量图标官方地址: https://www.iconfont.cn/
vscode配置项及font字体:
链接: https://pan.baidu.com/s/1Z1eFO_WJ8OMz_8m0PovtXg 提取码: 1e8b
二、创建Vue3项目
1、指定目录进入cmd并输入下面指令(本地预先安装node最新环境)
npm create vue@latest

2、安装组件支持name标签写法查询
npm i vite-plugin-vue-setup-extend -D

在vite.config.ts 中引入配置

3、在入口文件index.html修改icon


4、在main.ts中引入初始样式common.css 和 font字体


初始样式common.css:
/* 先删除默认的内外边距 */
* {
    margin:0;
    padding:0;
    box-sizing:border-boox;
  }
  /* 默认html的font-size是16px,即1rem=16px
  rem就是将根节点html的font-size的值作为整个页面的基准尺寸*/
  html {
      font-size: 62.5%;  /* 设置过根节点的文字大小后,所有子节点的文字大小全部相对于根节点计算,html为10px */
      /* 根节点指的是html标签,设置html标签的大小,其他的元素相关尺寸设置用rem,
      这样,所有元素都有了统一的参照标准,改变html文字的大小,就会改变所有元素用rem设置的尺寸大小。 */
      min-width: 320px;
    }

  body, input, button, a, textarea, select {
      margin: 0;
      font-family: "Helvetica Neue", Helvetica, "Hiragino Sans GB", "Microsoft YaHei", Arial, sans-serif;
      font-size: 1.4rem;
      color: #333;
    }
    a,
    u,
    s {
      text-decoration: none;
      color: #333;
    }
    a:hover, a:focus {
      text-decoration: none;
    }
    a:hover {
      filter: alpha(opacity=90);
      opacity: .9;
    }
    ol, ul {
      list-style: none;
  }
    input button select {
      outline: none;
    }
    fieldset, img, iframe {
      border: 0;
    }
    img {
      max-width: 100%;
      height: auto;
    }
    i, em {
      font-style: normal;
    }

    label {
      font-weight: normal;
    }

    h2, h3, h4, p, dl, dt, dd {
      margin: 0;
      padding: 0;
    }
    img {
      width: 100%;
      margin: 0;
      padding: 0;
    }

    body, input, button, a, textarea, select, dl, ul, ol, li, h2, h3, h4, p, dl, dt, dd, span, div {
      -webkit-box-sizing: border-box;
      -moz-box-sizing: border-box;
      box-sizing: border-box;
    }

    /* css3过渡动画效果 */
    .trans {
      -webkit-transition: all 0.3s;
      -moz-transition: all 0.3s;
      -o-transition: all 0.3s;
      transition: all 0.3s;
    }

    /* 文本对齐 */
    .fn-textcenter {
      text-align: center;
      }
      .fn-textright {
          text-align: right;
      }
      .fn-textleft {
          text-align: left;
      }

    /* 去掉浏览器focus默认外边框 */
    a:focus, button:focus, input:focus {
      outline: none;
    }

    /* 单行文字溢出省略号 */
    .ell {
      overflow: hidden;
      text-overflow: ellipsis;
      white-space: nowrap;
      word-break: keep-all;
      word-wrap: normal;
    }

    /* 清理浮动 */
    .fn-clear {
      zoom: 1;
      /* for IE6 IE7 */
    }
    .fn-clear:after {
      visibility: hidden;
      display: block;
      font-size: 0;
      content: " ";
      clear: both;
      height: 0;
    }
5、修改App.vue文件渲染路由视图,并配置路由

配置路由:

6、删除其他没用的文件,并运行


运行效果如下:

7、若项目报错>>>无法找到模块“./App.vue”的声明文件,可以在env.d.ts文件中加如下配置
declare module "*.vue" {
    import type { DefineComponent } from "vue"
    const vueComponent: DefineComponent<{}, {}, any>
    export default vueComponent
}

三、工程打包配置
1、执行下面指令并进行如下配置
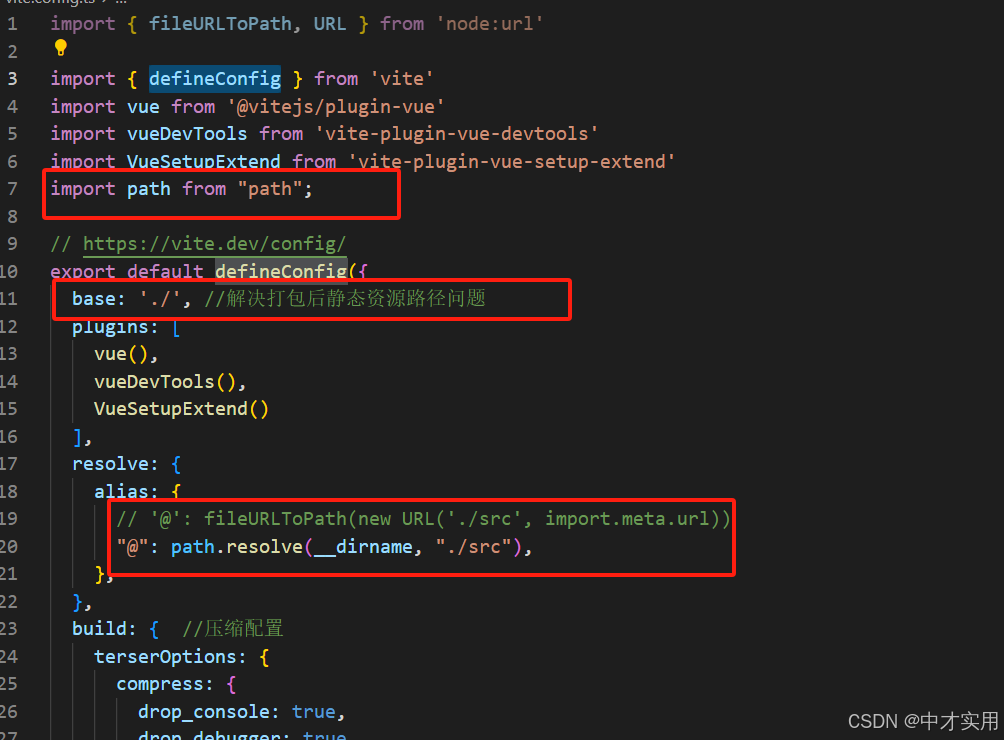
npm i path
2、在vite.config.ts 中加入如下配置


build: {  //压缩配置
    terserOptions: {
      compress: {
        drop_console: true,
        drop_debugger: true,
      },
    },
    // chunkSizeWarningLimit: 1500,大文件报警阈值设置,不建议使用
    rollupOptions: {
      output: { //静态资源分类打包
        chunkFileNames: 'assets/js/[name]-[hash].js',
        entryFileNames: 'assets/js/[name]-[hash].js',
        assetFileNames: 'assets/[ext]/[name]-[hash].[ext]',
        manualChunks(id) { //静态资源分拆打包
          if (id.includes('node_modules')) {
            return id.toString().split('node_modules/')[1].split('/')[0].toString();
          }
        }
      }
    }
  },
3、修改路由为createWebHashHistory

4、重启打包


 被折叠的 条评论
为什么被折叠?


