


一、NestJS使用crypto加密
使用NodeJS内置的加密模块crypto,使用 AES(高级加密系统)'aes-256-ctr' 算法 CTR 加密方式。
1、在.env.development配置文件中配置
#CRYPTO
CRYPTO_KEY=d05c11de4bec30f8cc195d21e9d9dcb7
CRYPTO_IV=1234567890123456
2、在项目中添加一个utils模块,并手动添加一个crypto.service.ts
nest g module utilscrypto.service.ts文件内容,并从utils模块中导出CryptoService
import { Injectable } from '@nestjs/common';
import { ConfigService } from '@nestjs/config';
import { createCipheriv, createDecipheriv, scrypt } from 'crypto';
import { promisify } from 'util';

@Injectable()
export class CryptoService {
  private readonly iv: Buffer
  private readonly key: Buffer
  constructor(private readonly configService: ConfigService) {
    this.iv = Buffer.alloc(16, this.configService.get<string>("CRYPTO_IV"), 'hex')
    this.key = Buffer.alloc(32, this.configService.get<string>("CRYPTO_KEY"), 'hex')

  }
  async encryption(source: string): Promise<string> {
    const key = (await promisify(scrypt)(this.key, 'salt', 32)) as Buffer;
    const cipher = createCipheriv('aes-256-ctr', key, this.iv)
    let encrypted = cipher.update(source, 'utf8', 'hex')
    encrypted += cipher.final('hex')
    return encrypted
  }

  async decryption(encrypted: string): Promise<string> {
    const key = (await promisify(scrypt)(this.key, 'salt', 32)) as Buffer;
    const decipher = createDecipheriv('aes-256-ctr', key, this.iv)
    let decrypted = decipher.update(encrypted, 'hex', 'utf8')
    decrypted += decipher.final('utf8')
    return decrypted
  }
}
3、在app.controller.ts中使用加密,解密。添加以下方法:
先注入CryptoService
 constructor(
    private readonly appService: AppService,
    private readonly configService: ConfigService,
    private readonly cryptoService: CryptoService
  ) {}
再加入加密解密方法
 @Public()
  @Get('encryption/:encryption')
  encryption(@Param('encryption') encryption: string) {
    return this.cryptoService.encryption(encryption)
  }

  @Public()
  @Get('decryption/:decryption')
  decryption(@Param('decryption') decryption: string) {
    return this.cryptoService.decryption(decryption)
  }
这里顺带修改一下前面我们创建的user表,新增时,把密码加密,修改user.service.ts文件中,create(createUserDto: CreateUserDto)方法,把密码加密:
首先修改user.module.ts,在providers中加入CryptoService,
在user.service.ts中注入CryptoService
  constructor(
    @InjectRepository(User)
    private readonly userRepository: Repository<User>,
    private readonly cryptoService: CryptoService) {}
添加加密密码的动作
async create(createUserDto: CreateUserDto) {
    try {
      createUserDto.password = await this.cryptoService.encryption(createUserDto.password)
      return this.userRepository.save({ ...createUserDto })
    } catch (error) {
      throw new HttpException({
        status: HttpStatus.INTERNAL_SERVER_ERROR,
        error: 'This is a service error message',
      }, HttpStatus.INTERNAL_SERVER_ERROR, {
        cause: error
      });
    }
  }
二、NestJS使用JWT认证
文档地址:
pnpm install --save @nestjs/jwt2、添加AuthModule,AuthService,AuthController
nest g module auth
nest g service auth
nest g controller auth
在auth.module.ts中,导入JwtModule
import { Module } from '@nestjs/common';
import { AuthService } from './auth.service';
import { AuthController } from './auth.controller';
import { UserModule } from 'src/user/user.module';
import { JwtModule } from '@nestjs/jwt';
import { ConfigService } from '@nestjs/config';
import { CryptoService } from 'src/utils/crypto.service';

@Module({
  imports: [UserModule,
    JwtModule.registerAsync({
      global: true,
      inject: [ConfigService],
      useFactory: (configService: ConfigService) => ({
        secret: configService.get<string>('JWT_SECRET'),
        signOptions: { expiresIn: '3600s' },
      }),
    }),
  ],
  providers: [AuthService, CryptoService],
  controllers: [AuthController],
  exports: [AuthService]
})
export class AuthModule {}
在auth.service.ts中添加登录生成token的方法,这里做了一下数据正确性验证。
import { BadRequestException, HttpException, Injectable, UnauthorizedException } from '@nestjs/common';
import { JwtService } from '@nestjs/jwt';
import { I18nService } from 'nestjs-i18n';
import { I18nTranslations } from 'src/generated/i18n.generated';
import { UserService } from 'src/user/user.service';
import { CryptoService } from 'src/utils/crypto.service';

@Injectable()
export class AuthService {
  constructor(
    private readonly userService: UserService,
    private readonly jwtService: JwtService,
    private readonly cryptoService: CryptoService,
    private readonly i18n: I18nService<I18nTranslations>
  ) {}

  async signIn(
    account: string,
    password: string,
    captcha: string
  ): Promise<{ access_token: string }> {
    //先固定,后面再处理
    if (captcha != "1234")
      throw new BadRequestException(this.i18n.t('user.LoginValid.CAPTCHA_ERROR'));

    const user = await this.userService.findOneByAccount(account);
    if (user == null || user == undefined)
      throw new BadRequestException(this.i18n.t('user.LoginValid.ACCOUNT_ERROR'));

    if (await this.cryptoService.decryption(user.password) !== password)
      throw new BadRequestException(this.i18n.t('user.LoginValid.PASSWORD_ERROR'));

    const payload = { sub: user.id, account: user.account };
    return {
      access_token: await this.jwtService.signAsync(payload),
    };
  }
}
在auth.controller.ts中添加对外暴露的接口:
import {
  Body,
  Controller,
  Get,
  HttpCode,
  HttpStatus,
  Post,
  Request,
  UseGuards
} from '@nestjs/common';
import { AuthGuard } from './auth.guard';
import { AuthService } from './auth.service';
import { Public } from './public.decorator';
import { LoginInDto } from './dto/auth.login.dto';
import { ApiOperation } from '@nestjs/swagger';

@Controller('auth')
export class AuthController {
  constructor(private authService: AuthService) {}

  @Public()
  @HttpCode(HttpStatus.OK)
  @Post('login')
  @ApiOperation({ summary: '登录' })
  signIn(@Body() signInDto: LoginInDto) {
    return this.authService.signIn(signInDto.account, signInDto.password, signInDto.captcha);
  }

  @UseGuards(AuthGuard)
  @Get('profile')
  @ApiOperation({ summary: '获取当前登录人' })
  getProfile(@Request() req) {
    return req.user;
  }
}
这里我们创建了一个DTO,代码如下(也是进行了i18n国际化):
import { ApiProperty } from "@nestjs/swagger"
import { IsNotEmpty, Length } from "class-validator"
import { i18nValidationMessage } from 'nestjs-i18n'
import { I18nTranslations } from "src/generated/i18n.generated"

export class LoginInDto {
  @IsNotEmpty({ message: i18nValidationMessage<I18nTranslations>('user.UserValid.NOT_EMPTY') })
  @Length(6, 30, { message: i18nValidationMessage<I18nTranslations>('user.UserValid.LENGTH') })
  @ApiProperty()
  account: string

  @IsNotEmpty({ message: i18nValidationMessage<I18nTranslations>('user.UserValid.NOT_EMPTY') })
  @Length(8, 16, { message: i18nValidationMessage<I18nTranslations>('user.UserValid.LENGTH') })
  @ApiProperty()
  password: string

  @IsNotEmpty({ message: i18nValidationMessage<I18nTranslations>('user.UserValid.NOT_EMPTY') })
  @Length(4, 4, { message: i18nValidationMessage<I18nTranslations>('user.UserValid.LENGTH') })
  @ApiProperty()
  captcha: string
}
至此我们src/i18n/xxx/user.json,结构如下(其他语言包user.json也要添加LoginValid):
{
  "UserValid": {
    "NOT_EMPTY": "{property} cannot be empty",
    "INVALID_EMAIL": "{property} email is invalid",
    "INVALID_BOOLEAN": "{property} is not a boolean",
    "MIN": "{property} with value: \"{value}\" needs to be at least {constraints.0}",
    "MAX": "{property} with value: \"{value}\" needs to be less than {constraints.0}",
    "LENGTH": "{property} length needs bigger than and equals to {constraints.0} and Less than or equal to {constraints.1}",
    "DATE": "{property} with value: \"{value}\" must can convert to Date"
  },
  "LoginValid": {
    "PASSWORD_ERROR": "password is wrong",
    "ACCOUNT_ERROR": "account is wrong",
    "CAPTCHA_ERROR": "verification code is wrong"
  }
}
3、因为真实项目肯定要全局验证是否登录,以保护自己的资源的安全性,所有我们需要全局应用token验证,这里我们添加一个AuthGuard,并设置成全局作用域。
添加auth.guard.ts文件,并创建AuthGuard守卫
import { CanActivate, ExecutionContext, Injectable, UnauthorizedException } from "@nestjs/common";

import { JwtService } from '@nestjs/jwt';
import { Request } from 'express';
import { Reflector } from "@nestjs/core";
import { IS_PUBLIC_KEY } from "./public.decorator";
import { ConfigService } from "@nestjs/config";

@Injectable()
export class AuthGuard implements CanActivate {
  constructor(private jwtService: JwtService
    , private reflector: Reflector
    , private configService: ConfigService) {}
  async canActivate(context: ExecutionContext): Promise<boolean> {

    const isPublic = this.reflector.getAllAndOverride<boolean>(IS_PUBLIC_KEY, [
      context.getHandler(),
      context.getClass(),
    ]);
    if (isPublic) {
      return true;
    }

    const request = context.switchToHttp().getRequest()
    const token = this.extractTokenFromHeader(request)
    if (!token)
      throw new UnauthorizedException()

    try {
      const payload = await this.jwtService.verifyAsync(token, {
        secret: this.configService.get<string>('JWT_SECRET')
      })
      request['user'] = payload
    } catch {
      throw new UnauthorizedException()
    }
    return true
  }
  private extractTokenFromHeader(request: Request): string | undefined {
    console.log(request)
    console.log(request.headers)
    const [type, token] = request.headers.authorization?.split(' ') ?? [];
    return type === 'Bearer' ? token : undefined;
  }
}
这里可以看到我们从请求头部获取到Bearer Token,解析token,并把信息放到request.user中,这样我们就可以知道是谁访问了接口。
设置AuthGuard全局作用域(在app.module.ts文件中providers中添加代码)
{
      provide: APP_GUARD,
      useClass: AuthGuard,
    },
4、此时我们就全局应用了token认证了。如果调用接口不传token,会返回401状态码(默认)。
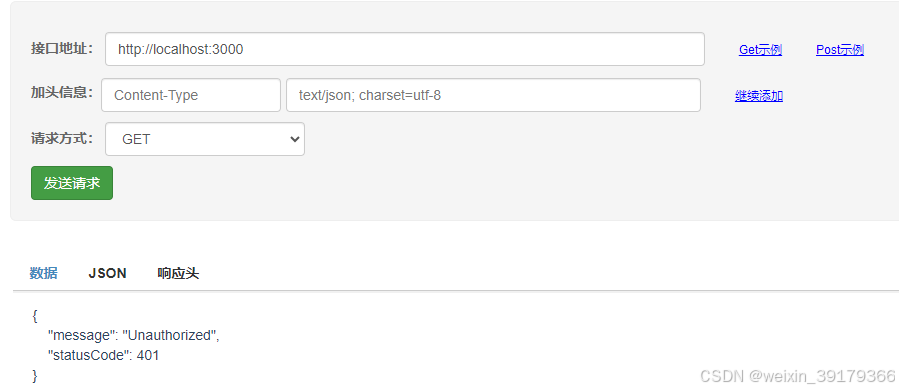
5、在AuthGuard守卫具体代码中我们可以看到,有时候我们需要一些不用token认证的接口,那么这些接口就需要过滤掉不进行token认证。这里我们创建了一个装饰器@Public(),用装饰器控制接口是否需要token认证
import { SetMetadata } from '@nestjs/common';

export const IS_PUBLIC_KEY = 'isPublic';
export const Public = () => SetMetadata(IS_PUBLIC_KEY, true);
我们设置了一个元数据isPublic,并且设置成true,在AuthGuard中获取到这个元数据,如果为true就不进行token解析认证。
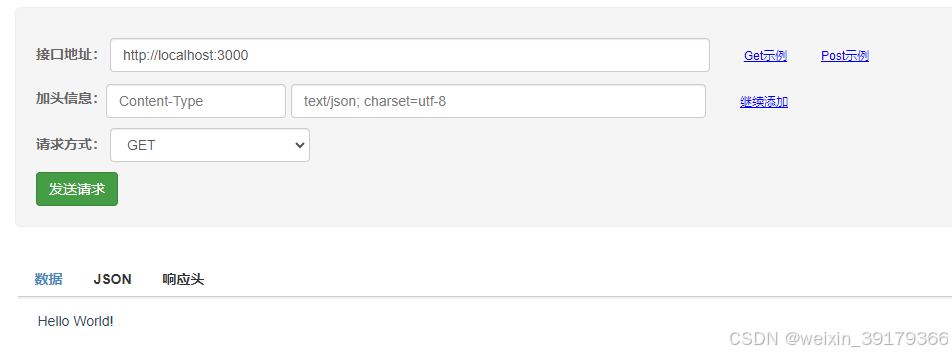
现在对于不需要token的接口,我们在方法上添加这个装饰器就可以了,我们在app.controller.ts的getHello()方法添加装饰器:
@Public()
  @Get()
  getHello(): string {
    return this.appService.getHello();
  }
这时候再调用刚才的地址:
6、对于需要token的接口我们先调用/auth/login方法获取token
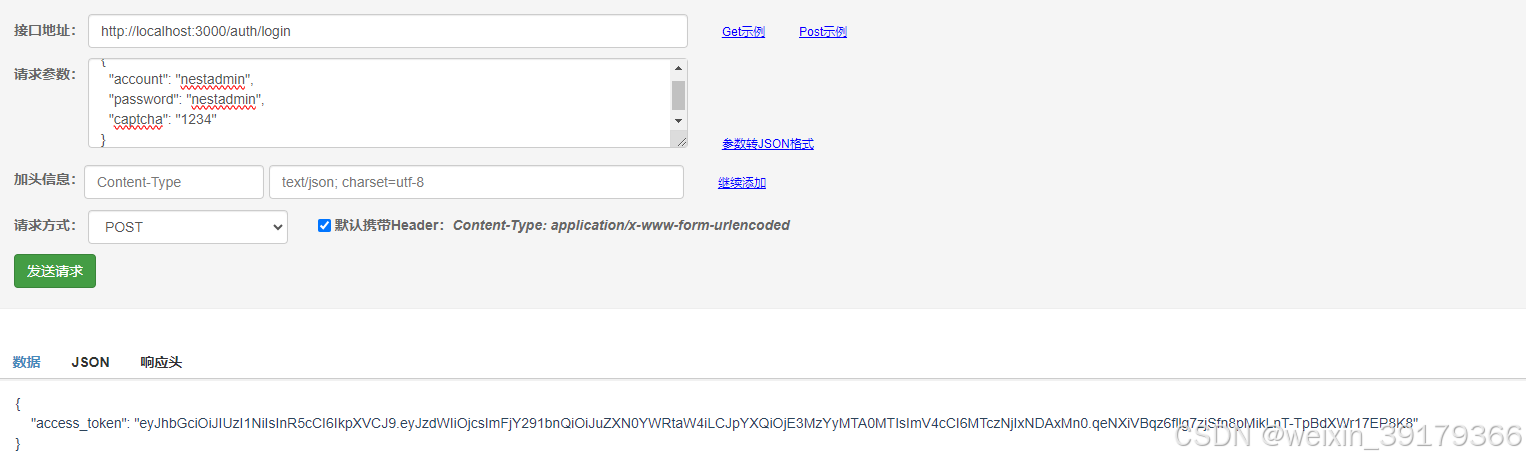
接下来我们就可以使用我们的token了。
三、NestJS配置swagger开启加密认证
1、在main.ts中, 修改DocumnetBuilder,添加.addBearerAuth()
  const config = new DocumentBuilder()
    .setTitle('Nest Example')
    .setDescription('The Nest API description')
    .setVersion('1.0')
    .addTag('Nest')
    .addBearerAuth()
    .build()
2、在需要验证的controller,或者 controller中的方法添加装饰器 @ApiBearerAuth(),
 @ApiBearerAuth()
  @ApiOperation({ summary: '获取所有用户' })
  @Get()
  findAll() {
    return this.userService.findAll();
  }
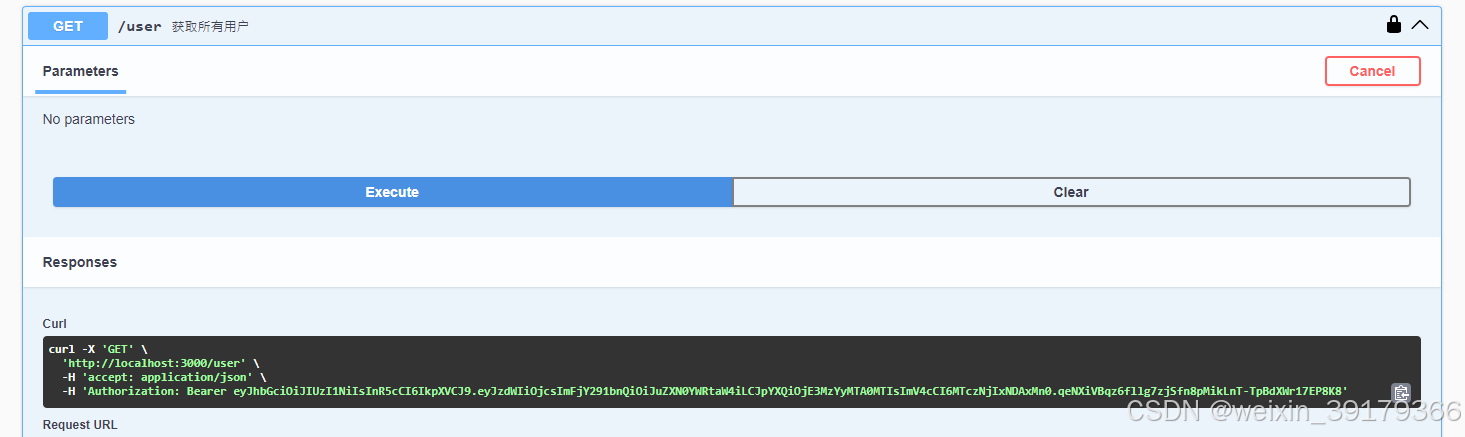
3、携带token访问
此时swagger会在此方法,右侧添加一个锁的图标,点击锁图标添加生成的token字符串,点击Authorize,这时候我们的token就设置好了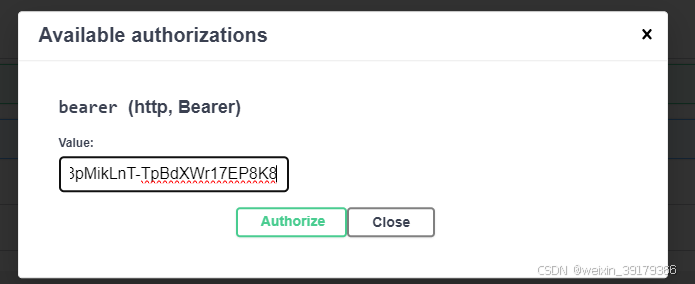
4、调用接口
此时我们点击执行,会自动在headers中添加Authorization,这样在后端就可以拿到这个值了(不在方法或者控制器添加装饰器,是不会自动在headers中添加这个属性的)。


 3286
3286

 被折叠的 条评论
为什么被折叠?
被折叠的 条评论
为什么被折叠?
 到【灌水乐园】发言


