


SpringBoot启动过程深度解析–概述
文章使用 spring 相关版本信息:
spring-boot 2.3.4.RELEASE
spring-core 5.2.9.RELEASE
spring-context 5.2.9.RELEASE
spring-web 5.2.9.RELEASE
前言
spring和springboot有什么关系?
springBoot是基于spring框架开发的,springBoot主要用spring的IOC的流程进行扩展开发

spring框架解决的问题:
	1.IOC 依赖注入和控制反转(把相互依赖的Bean对象,通过注解/xml的配置依赖关系,交给spring帮我们创建、注入和管理这些Bean)
	2.在spring处理Bean对象的各个环节中,提供了很多扩展方法,方便在Bean创建过程执行一些自定义的操作(代理,类型转换,解析自定义注解等等)
	3.是一个运行和部署简单的框架

springBoog框架解决的问题:
	1.自动装配 (通过@Configuration / spring.factories文件,都可以加载配置类,用于注册自定义满足条件的Bean)
	2.快速引入依赖,快速使用依赖( 引入对应依赖 spring-boot-starter-XXXX包,一般就能使用了,也是用自动装配的功能实现的)
	3.丰富的依赖包选择
spring和springboot启动的几种方式
spring启动的方式:
	1.通过XXXXXApplicationContext.refresh()启动

springBoot启动方式:
	1.通过XXXXXApplicationContext.refresh()启动
	2.通过启动
springboot如何开启自动装配的方式
1.在启动类/配置类 使用注解@EnableAutoConfiguration(通常通过组合注解使用@SpringBootApplication)
一、SpringBoot启动过程深度解析
接下来的文章就以SpringApplication.run的启动方式讲解
@SpringBootApplication
public class Main {
    public static void main(String[] args) {
        new SpringApplication(Main.class).run();
    }
}
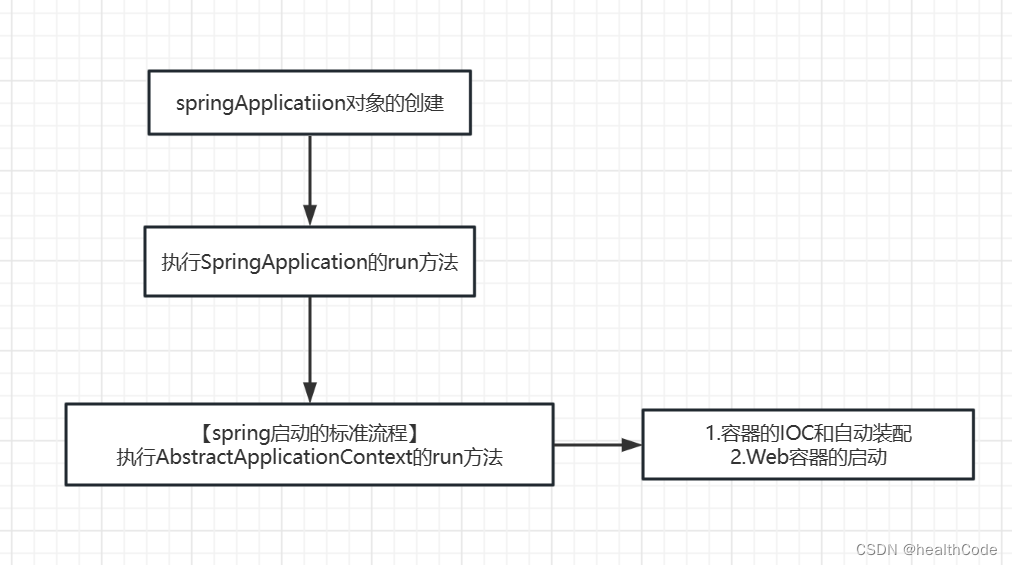
SpringApplication.run启动的主要脉络流程图:
1.SpringApplication的创建:
SpringApplication对象创建过程,只加载一些简单的配置:
	1.根据环境计算当前应该创建的Web类型
	2.从"META-INF/spring.factories"读取ApplicationContextInitializer类的实例
	3.从"META-INF/spring.factories"读取ApplicationListener类的实例
	4.通过当前调用栈,获取Main方法所在类
/**
	可以通过此类快速启动一个spring应用,可以传入一些加载的配置类来引导启动
**/
public class SpringApplication {

	public SpringApplication(ResourceLoader resourceLoader, Class<?>... primarySources) {
		this.resourceLoader = resourceLoader;
		Assert.notNull(primarySources, "PrimarySources must not be null");

		//记录传入的配置文件
		this.primarySources = new LinkedHashSet<>(Arrays.asList(primarySources));

		//根据环境计算当前应该创建的Web类型
		this.webApplicationType = WebApplicationType.deduceFromClasspath();

        /**
        	 解析这些ApplicationContextInitializer的作用请看【详细链接:】
	         设置应用上线文初始化器,从"META-INF/spring.factories"读取ApplicationContextInitializer类的实例。(默认一共7个)
	         org.springframework.boot.autoconfigure.SharedMetadataReaderFactoryContextInitializer
	         org.springframework.boot.autoconfigure.logging.ConditionEvaluationReportLoggingListener
	         org.springframework.boot.context.ConfigurationWarningsApplicationContextInitializer
	         org.springframework.boot.context.ContextIdApplicationContextInitializer
	         org.springframework.boot.context.config.DelegatingApplicationContextInitializer
	         org.springframework.boot.rsocket.context.RSocketPortInfoApplicationContextInitializer
	         org.springframework.boot.web.context.ServerPortInfoApplicationContextInitializer
        **/
		setInitializers((Collection) getSpringFactoriesInstances(ApplicationContextInitializer.class));

        /**
            解析这些ApplicationListener的作用请看【详细链接:】
            设置监听器,从"META-INF/spring.factories"读取ApplicationListener类的实例。(一共11个)
            org.springframework.boot.autoconfigure.BackgroundPreinitializer
            org.springframework.boot.ClearCachesApplicationListener
            org.springframework.boot.builder.ParentContextCloserApplicationListener
            org.springframework.boot.cloud.CloudFoundryVcapEnvironmentPostProcessor
            org.springframework.boot.context.FileEncodingApplicationListener
            org.springframework.boot.context.config.AnsiOutputApplicationListener
            org.springframework.boot.context.config.ConfigFileApplicationListener
            org.springframework.boot.context.config.DelegatingApplicationListener
            org.springframework.boot.context.logging.ClasspathLoggingApplicationListener
            org.springframework.boot.context.logging.LoggingApplicationListener
            org.springframework.boot.liquibase.LiquibaseServiceLocatorApplicationListener
        **/
		setListeners((Collection) getSpringFactoriesInstances(ApplicationListener.class));

		//推断主入口应用类,通过当前调用栈,获取Main方法所在类,并赋值给mainApplicationClass
		this.mainApplicationClass = deduceMainApplicationClass();
	}

}
2.SpringApplication.run的执行:
1.创建并启动计时监控StopWatch
2.设置系统属性“java.awt.headless”的值【建议在缺少显示屏、键盘或者鼠标的应用开启】
3.从SpringFactories文件加载SpringApplicationRunListener实现类
4.发布事件:ApplicationStartingEvent
5.解析run方法入参命令【类似于 --foo=bar 】
6.准备环境变量,发布事件:ApplicationEnvironmentPreparedEvent
7.设置参数spring.beaninfo.ignore默认TRUE
8.打印Banner
9.根据不同的应用类型初始化不同的上下文类Context
10.从SpringFactories文件加载SpringBootExceptionReporter异常报告器
11.加载BeanDefinition【包括自动装配的扫描】
12.执行spring的标准初始化过程【AbstractApplicationContext.refresh() 】
13.应用上下文刷新后置处理,做一些扩展功能
14.停止计时监控
15.发布应用上下文启动监听事件 ApplicationStartedEvent
16.执行所有的Runner运行器
17.发布应用上下文就绪事件 ApplicationReadyEvent
public ConfigurableApplicationContext run(String... args) {
    //开启记录启动过程的秒表器
    //允许对多个任务进行计时,公开每个命名任务的总运行时间和运行时间,从Spring Framework 5.2开始,运行时间以纳秒为单位进行跟踪和报告
  	StopWatch stopWatch = new StopWatch();

    //秒表器开始计时
  	stopWatch.start();

    //声明spring容器
  	ConfigurableApplicationContext context = null;
    //声明spring异常报告器
  	Collection<SpringBootExceptionReporter> exceptionReporters = new ArrayList<>();

    // 设置java.awt.headless变量
    // 1、如果设置headless模式为true,则程序是无显示器模式
    // 2、为了提高计算效率和适配性我们可以使用这种模式,关闭图形显示等功能可以大大节省设备的计算能力
    // 3、通常B/S型Web应用运行于无显示设备、驱动的服务器端环境中,但是有使用AWT绘图接口的可能(例如:用Images、Fonts接口生成图片验证码)
    //    所以给Tomcat、Weblogic附加参数-Djava.awt.headless=true,强制使用Headless版本的AWT实现类,就能避免图形环境缺失所导致的程序出错
  	configureHeadlessProperty();

    //读取META-INF/spring.factories接口SPI的实现类配置,初始化SpringApplicationRunListener实现类
    //SpringApplicationRunListener是springApplication启动过程的监听器
  	SpringApplicationRunListeners listeners = getRunListeners(args);

    //SpringApplicationRunListener发布开始启动事件
  	listeners.starting();
  	try {
      //解析启动命令封装到 applicationArguments对象
  		ApplicationArguments applicationArguments = new DefaultApplicationArguments(args);

      //初始化所有环境变量,SpringApplicationRunListener发布环境准备完成事件【详细链接...】
  		ConfigurableEnvironment environment = prepareEnvironment(listeners, applicationArguments);

      /**设置spring.beaninfo.ignore
          1.如果启动过程不需要对Bean信息的重复访问(Introspector.getBeanInfo(Class)调用),请设置为true,否则启动过程将变得昂贵**/
  		configureIgnoreBeanInfo(environment);

      //打印Banner【详细链接...】
  		Banner printedBanner = printBanner(environment);

      /**根据web类型创建对应的ConfigurableApplicationContext
      !!!父类AnnotationConfigServletWebServerApplicationContext无参构造会做以下两件事
        ** 1.创建一个注解BeanDefinition读取器AnnotatedBeanDefinitionReader并且注册一些用于注册Bean的自带增强器到BeanDefinitionRegistry中
            -- 1.DefaultListableBeanFactory设置依赖顺序比较器:AnnotationAwareOrderComparator
            -- 2.DefaultListableBeanFactory设置是否能注入当前Bean的判断器:ContextAnnotationAutowireCandidateResolver
            -- 3.注入Bean:ConfigurationClassPostProcessor
            -- 4.注入Bean:AutowiredAnnotationBeanPostProcessor
            -- 5.如果满足JSR-250规范的话(判断是否存在javax.annotation.Resource),注入Bean:CommonAnnotationBeanPostProcessor
            -- 6.如果满足(判断是否存在javax.persistence.EntityManagerFactory),注入Bean:PersistenceAnnotationBeanPostProcessor
            -- 7.注入Bean:EventListenerMethodProcessor
            -- 8.注入Bean:DefaultEventListenerFactory
        ** 2.创建一个类路径BeanDefinition扫描器ClassPathBeanDefinitionScanner并且添加一些需要被创建Bean的注解到ClassPathBeanDefinitionScanner的需要的过滤器中
            -- 本步骤主要是添加过滤器,对 includeFilters 赋值。 注册过滤器 @Component,@Controller @Service、 @Repository 也会被添加进去。也会注册添加 JSR-250 的 @ManagedBean 和 JSR-330 的 @Named 注解。**/
  		context = createApplicationContext();

      //通过META-INF/spring.factories初始化SpringBootExceptionReporter实现类
  		exceptionReporters = getSpringFactoriesInstances(SpringBootExceptionReporter.class,
  				new Class[] { ConfigurableApplicationContext.class }, context);

      /**准备和填充ApplicationContext上下文属性【详细链接...】
      1. 设置环境对象
      2. 增强上下文
         ** 1.如果有配置,则注册BeanName构造器Bean对象
         ** 2.如果有配置,则设置资源加载器resourceLoader对象
         ** 3.如果有配置,则设置属性ConversionService
      3. 执行所有ApplicationContextInitializer实现类的initialize方法【详细链接...】
      4. SpringApplicationRunListener发布上下文准备完成事件
      5. 打印profile环境
      6. 注册单例Bean:springApplicationArguments
      7. 注册单例Bean:springBootBanner
      8. 如果是DefaultListableBeanFactory,设置是否允许BeanDefinition重写
      9. 是否懒加载,是的话注册一个BeanFactory增强处理器LazyInitializationBeanFactoryPostProcessor
      10. 获取应用程序源【应用程序源:用于创建应用程序上下文的其他源。源可以是:类名、包名或 XML 资源位置】
      11. 根据应用程序源, 用BeanDefinitionLoader进行加载程序源的BeanDefinition【详细链接...】
          ** 程序源是类: AnnotatedBeanDefinitionReader#doRegisterBean通过注解进行加载BeanDefinition
          ** 1.根据程序源类@Conditional 判断是否跳过此程序源的扫描
          ** 2.程序源的abd设置InstanceSupplier(创建Bean实例的回调)
          ** 3.程序源的abd设置程序源类@Scope配置的Bean作用域,代理模式(默认单例模式+无代理)
          ** 4.扫描程序源类上的直接注解,按照注解设置Bean别名
          ** 5.处理程序源类上的公共注解AnnotationConfigUtils.processCommonDefinitionAnnotations(abd)
              -- 1.是否懒加载@Lazy
              -- 2.是否@Primary
              -- 3.是否依赖加载@DependsOn
              -- 4.设置角色@Role
              -- 5.设置描述@Description
          ** 6.执行BeanDefinitionCustomizer实现类的customize方法(用于自定义给定Bean定义的回调,用于扩展)
          ** 7.包装abd成BeanDefinitionHolder对象 //带有名称和别名的 BeanDefinition 的持有者
          ** 8.根据@Scope代理方式,进行BeanDefinition的修改定义
          ** 9.注册程序源的BeanDefinition到BeanDefinitionRegistry
      12. SpringApplicationRunListener发布上下文加载完成事件**/
  		prepareContext(context, environment, listeners, applicationArguments, printedBanner);

      /** 刷新容器refreshContext【Spring容器启动公共逻辑!!重要】【详细链接...】
          1.此处额外执行操作:  将创建一个钩子线程SpringContextShutdownHook,注册到Java虚拟机的关闭挂钩线程集合中,用于java虚拟机关闭时调用执行关闭spring容器方法
          (org.springframework.context.support.AbstractApplicationContext#doClose)**/
  		refreshContext(context);

      //刷新容器之后执行的扩展方法afterRefresh【详细链接...】
  		afterRefresh(context, applicationArguments);

      //stopWatch秒表停止记录spring启动过程
  		stopWatch.stop();

  		if (this.logStartupInfo) {
      //打印spring已经启动的日志包含启动事件
  			new StartupInfoLogger(this.mainApplicationClass).logStarted(getApplicationLog(), stopWatch);
  		}

    //SpringApplicationRunListener发布spring已经启动完成的事件
  		listeners.started(context);

    //执行一些运行器: ApplicationRunner实现类和 CommandLineRunner实现类【扩展点】
  		callRunners(context, applicationArguments);
  	}
  	catch (Throwable ex) {
  		handleRunFailure(context, ex, exceptionReporters, listeners);
  		throw new IllegalStateException(ex);
  	}

  	try {
    //SpringApplicationRunListener发布spring正在运行的事件
  		listeners.running(context);
  	}
  	catch (Throwable ex) {
  		handleRunFailure(context, ex, exceptionReporters, null);
  		throw new IllegalStateException(ex);
  	}
  	return context;
  }
3.AbstractApplicationContext.refresh的执行:
1.容器刷新前的准备工作(记录启动时间、容器状态、环境变量对象、准备监听器和事件的集合对象)
2.创建容器对象:DefaultListableBeanFactory
3.beanFactory的准备工作,对各种属性进行填充
4.beanFactory扩展工作
5.调用各种beanFactory处理器
6.注册bean处理器
7.为上下文初始化message源,即不同语言的消息体,国际化处理
8.初始化事件监听多路广播器
【Web容器的创建】
9.在所有注册的bean中查找listener bean,注册到消息广播器中
10.初始化剩下的单实例(非懒加载的)
11.完成刷新过程,通知生命周期处理器lifecycleProcessor刷新过程,同时发出ContextRefreshEvent事件
12.最终清除一些缓存
		public void refresh() throws BeansException, IllegalStateException {
		synchronized (this.startupShutdownMonitor) {
			// Prepare this context for refreshing.
			/**
			 * 容器刷新前的准备工作(记录启动时间、容器状态、环境变量对象、准备监听器和事件的集合对象)
			 */
			prepareRefresh();

			// Tell the subclass to refresh the internal bean factory.
			// 创建容器对象:DefaultListableBeanFactory
			ConfigurableListableBeanFactory beanFactory = obtainFreshBeanFactory();

			// Prepare the bean factory for use in this context.
			// beanFactory的准备工作,对beanFactory各种属性进行填充
			prepareBeanFactory(beanFactory);

			try {
				// Allows post-processing of the bean factory in context subclasses.
				// 子类覆盖方法做额外的处理,子类扩展方法
				postProcessBeanFactory(beanFactory);

				// Invoke factory processors registered as beans in the context.
				// 调用各种beanFactory处理器
				invokeBeanFactoryPostProcessors(beanFactory);

				// Register bean processors that intercept bean creation.
				// 注册bean处理器,这里只是注册功能,真正调用的是getBean方法
				registerBeanPostProcessors(beanFactory);

				// Initialize message source for this context.
				// 为上下文初始化message源,即不同语言的消息体,国际化处理
				initMessageSource();

				// Initialize event multicaster for this context.
				// 初始化事件监听多路广播器
				initApplicationEventMulticaster();

				// Initialize other special beans in specific context subclasses.
				// 留给子类来初始化其他的bean
				// 【Web容器的创建】
				onRefresh();

				// Check for listener beans and register them.
				// 在所有注册的bean中查找listener bean,注册到消息广播器中
				registerListeners();

				// Instantiate all remaining (non-lazy-init) singletons.
				// 初始化剩下的单实例(非懒加载的)
				finishBeanFactoryInitialization(beanFactory);

				// Last step: publish corresponding event.
				// 完成刷新过程,通知生命周期处理器lifecycleProcessor刷新过程,同时发出ContextRefreshEvent通知别人
				finishRefresh();
			}

			catch (BeansException ex) {
				if (logger.isWarnEnabled()) {
					logger.warn("Exception encountered during context initialization - " +
							"cancelling refresh attempt: " + ex);
				}

				// Destroy already created singletons to avoid dangling resources.
				// 为防止bean资源占用,在异常处理中,销毁已经在前面过程中生成的单件bean
				destroyBeans();

				// Reset 'active' flag.
				// 重置active标志
				cancelRefresh(ex);

				// Propagate exception to caller.
				throw ex;
			}

			finally {
				// Reset common introspection caches in Spring's core, since we
				// might not ever need metadata for singleton beans anymore...
				// 释放各种缓存
				resetCommonCaches();
			}
		}
	}


 738
738

 被折叠的 条评论
为什么被折叠?
被折叠的 条评论
为什么被折叠?
 到【灌水乐园】发言


