创建一个Mock
@Mock: 创建一个Mock.
@InjectMocks: 创建一个实例,其余用@Mock(或@Spy)注解创建的mock将被注入到用该实例中。
注意:必须使用@RunWith(MockitoJUnitRunner.class) 或 Mockito.initMocks(this)进行mocks的初始化和注入。

@RunWith(MockitoJUnitRunner.class)
public class Test {
    @InjectMocks
    private SomeHandler someHandler;

    @Mock
    private OneDependency oneDependency; // 此mock将被注入到someHandler
    // ...
}
mockito-初始化注解
如果想使用@Mock, @Spy, @InjectMocks等注解时,需要进行初始化后才能使用。 初始化的方法有3种:
1,在Junit的类上面使用@RunWith(MockitoJUnitRunner.class)注解。
但如果你使用的是Spring的话,可能你会使用Spring的测试类(@RunWith(SpringJUnit4ClassRunner.class))
这样的话,你就没有办法使用上面的@RunWith(SpringJUnit4ClassRunner.class)。你还可以使用下面的方法。
2,在测试方法被调用之前,使用MockitoAnnotations.initMocks(this);。例如:
    @Before
    public void initMocks(){
        MockitoAnnotations.initMocks(this);
    }
    @Before保证了在被测试的方法被调用之前,调用@Before所注解的方法,可以用来把@Test的数据初始化
3,使用MockitoRule。如下:
@Rule
public MockitoRule rule = MockitoJUnit.rule();
这个方法会调用validateMockitoUsage方法。这个方法有一些好处,具体什么好处还不太清楚。
Mock和Spy
项目中,有些函数需要处理某个服务的返回结果,而在对函数单元测试的时候,又不能启动那些服务,这里就可以利用Mockito工具。Mockito中的Mock和Spy都可用于拦截那些尚未实现或不期望被真实调用的对象和方法,并为其设置自定义行为。二者的区别在于:
1、Mock声明的对象,对函数的调用均执行mock(即虚假函数),不执行真正部分。
2、Spy声明的对象,对函数的调用均执行真正部分。
例:

public class Main {

    public void fun(String s) {
        System.out.println(s + " : fun");
        fun1(s);
        fun2(s);
    }

    public void fun1(String s) {
        System.out.println(s + " : fun1");
    }

    private void fun2(String s) {
        System.out.println(s + " : fun2");
    }

    public int getVal(){
        return 5;
    }
}
Mock使用实例
1、使用doCallRealMethod().when()调用函数真正部分。
2、使用when().thenReturn自定义函数返回值。
import static org.mockito.ArgumentMatchers.anyString;
import static org.mockito.Mockito.doCallRealMethod;
import static org.mockito.Mockito.when;

import org.junit.Before;
import org.junit.Test;
import org.mockito.Mock;
import org.mockito.MockitoAnnotations;

public class MainTest {

    @Mock
    Fun mockFun ;

    @Before
    public void init() {
        MockitoAnnotations.initMocks(this);
    }

    public class Fun {
        public void fun(String s) {
            System.out.println(s + " : fun");
            funone(s);
            funtow(s);
            funthree(s);
        }

        public void funone(String s) {
            System.out.println(s + " : fun1public");
        }

        protected  void funtow(String s){
            System.out.println(s + ": fun2protected");

        }

        private void funthree(String s) {
            System.out.println(s + " : fun3Private");
        }


        public int getVal(){
            return 10;
        }
    }


    @Test
    public void testFun() {
        // 执行mock,而不是真正部分,所以没有打印任何信息
        mockFun.fun("mock test One");
        // doCallRealMethod声明后,执行真正部分
        // 如果是public和protected函数则进行mock,如果是private函数则执行真正部分
        // 但是Mock只能对public(fun1)和protected函数进行mock
        // 对private函数(fun2)仍执行真正部分
        // 所以输出fun和fun3Private
        doCallRealMethod().when(mockFun).fun(anyString());
        mockFun.fun("mock test Two");
        // 执行mock,输出int的默认值0,而不是10
        System.out.println("val: " + mockFun.getVal());
        // when声明后,既不走真正部分,也不走mock,直接返回thenReturn()中定义的值
        // 注意:该值的类型需要和when中函数返回值类型一致
        when(mockFun.getVal()).thenReturn(20);
        System.out.println("val: " + mockFun.getVal());
    }
}
运行结果:
mock test Two : fun
mock test Two : fun3Private
val: 0
val: 20
Process finished with exit code 0
Spy使用实例
    @Spy
    Fun spyFun;

    @Test
    public void testspyFun() {
        // 执行真正部分
        spyFun.fun("mock test One");
        // 执行真正部分
        System.out.println("val: " + spyFun.getVal());
        // 自定义返回值
        when(spyFun.getVal()).thenReturn(20);
        System.out.println("val: " + spyFun.getVal());
    }
运行结果:
mock test One : fun
mock test One : fun1public
mock test One: fun2protected
mock test One : fun3Private
val: 10
val: 20
Process finished with exit code 0
Mockito when(…).thenReturn(…)和doReturn(…).when(…)的区别
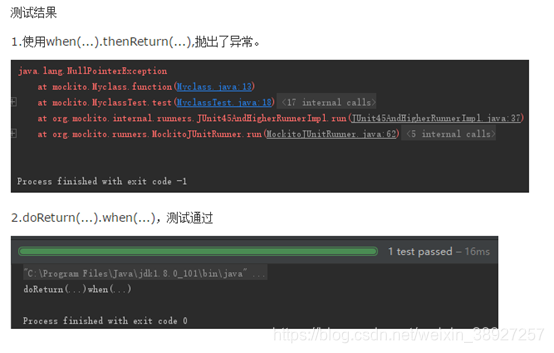
在Mockito中打桩(即stub)有两种方法when(…).thenReturn(…)和doReturn(…).when(…)。这两个方法在大部分情况下都是可以相互替换的,但是在使用了Spies对象(@Spy注解),而不是mock对象(@Mock注解)的情况下他们调用的结果是不相同的(目前我只知道这一种情况,可能还有别的情形下是不能相互替换的)。
● when(…) thenReturn(…)会调用真实的方法,如果你不想调用真实的方法而是想要mock的话,就不要使用这个方法。
● doReturn(…) when(…) 不会调用真实方法
public class Myclass {
    public String methodToBeTested(){
        return function();
    }

    public String function(){
        throw  new NullPointerException();
    }
}
@RunWith(MockitoJUnitRunner.class)
public class MyclassTest {
    @Spy
    private Myclass myclass;

    @Test
    public void test(){
       // when(myclass.methodToBeTested()).thenReturn("when(...)thenReturn(...)");
        doReturn("doReturn(...)when(...)").when(myclass).methodToBeTested();

        String str = myclass.methodToBeTested();
        System.out.println(str);
    }
}

 Mockito框架详解:Mock与Spy的实战


 本文深入探讨Mockito测试框架,讲解如何创建Mock对象,使用@Mock、@Spy和@InjectMocks注解。重点阐述Mock和Spy的区别,以及在实际应用中的示例,包括Mock对象的when().thenReturn()与doReturn().when()的不同行为。


 211
211

 被折叠的 条评论
为什么被折叠?


