


 本文详细介绍了如何使用Spring Cloud构建微服务架构,包括创建ParentMoudle管理项目,配置Eureka Server作为注册中心,创建provider服务并注册到Eureka,以及建立Feign Client进行服务调用。在Eureka Server中配置了Eureka的客户端地址,并通过@EnableEurekaServer注解启动服务。provider服务引入了Eureka Client并配置了注册地址,启用@EnableEurekaClient。Feign Client项目则引入了Eureka Client和Feign相关依赖,配置了Sentinel Dashboard地址,启用@EnableEurekaClient和@EnableFeignClients。同时,创建了FallbackService作为服务降级处理,并在Controller中使用Feign调用服务。文章最后提到了Sentinel Dashboard的流控规则配置。
1、首先创建一个ParentMoudle的java pom文件项目进行服务项目管理,其中要注意的是需要将配置成如下的dependencyManagement格式,否则子项目会报错;
<dependencyManagement>
        <dependencies>
            <dependency>
                <groupId>org.springframework.cloud</groupId>
                <artifactId>spring-cloud-dependencies</artifactId>
                <version>Greenwich.RELEASE</version>
                <type>pom</type>
                <scope>import</scope>
            </dependency>
        </dependencies>
</dependencyManagement>
2、依次创建eurekaServer、provider、feignClient(主要是对外暴露),每个项目的parent设置成如下格式
   <parent>
        <groupId>com.yangfan</groupId>
        <artifactId>springcloud_feign_parent</artifactId>
        <version>0.0.1-SNAPSHOT</version>
</parent>- 创建eurekaserver项目
1⃣️pom文件中引入spring-cloud-starter-netflix-eureka-server
<dependencies>
        <dependency>
            <groupId>org.springframework.cloud</groupId>
            <artifactId>spring-cloud-starter-netflix-eureka-server</artifactId>
            <version>2.1.0.RELEASE</version>
        </dependency>
</dependencies>
2⃣️ 配置yml文件:核心是设置eurekaClient的注册中心的地址
server:
  port: 9010

spring:
  application:
    name: eureka-server

eureka:
  client:
    service-url:
      #eureka 服务地址,如果是集群的话;需要指定其他集群eureka地址
      defaultZone: http://127.0.0.1:9010/eureka
      # 不注册自己
    registry-with-eureka: false
    #不拉服务
    fetch-registry: false
3⃣️在启动类中开启@EnableEurekaServer注解,开启eurekaServer服务
@SpringBootApplication
@EnableEurekaServer
public class EurekaServerApplication {

    public static void main(String[] args) {
        SpringApplication.run(EurekaServerApplication.class, args);
    }

}- 创建provider项目
1⃣️项目引入spring-boot-starter-web项目、spring-cloud-starter-netfix-eureka-client依赖
 <dependencies>
        <dependency>
            <groupId>org.springframework.boot</groupId>
            <artifactId>spring-boot-starter-web</artifactId>
        </dependency>
        <!--eureka客户端依赖-->
        <dependency>
            <groupId>org.springframework.cloud</groupId>
            <artifactId>spring-cloud-starter-netflix-eureka-client</artifactId>
            <version>2.1.0.RELEASE</version>
        </dependency>
</dependencies>2⃣️设置eurekaServer的注册地址为:http://127.0.0.1:9010/eureka
server:
  port: 9011

spring:
  application:
    name: sentinel-feign-provider

eureka:
  client:
    service-url:
      #eureka 服务地址,如果是集群的话;需要指定其他集群eureka地址
      defaultZone: http://127.0.0.1:9010/eureka #需要注册到注册中心的地址
      # 不注册自己
3⃣️在启动类中开启@EnableEurekaClient注解,表示开启Eureka客户端发现功能
@EnableEurekaClient //开启Eureka客户端发现功能
@SpringBootApplication
public class SentinelFeignProviderApplication {

    public static void main(String[] args) {
        SpringApplication.run(SentinelFeignProviderApplication.class, args);
    }

}- 创将feign项目
1⃣️项目中引入spring-cloud-starter-netfix-eureka-client依赖、feign的起步依赖spring-cloud-starter-openfeign、sentinel依赖spring-cloud-starter-alibaba-sentinel
 <dependencies>

        <dependency>
            <groupId>org.springframework.boot</groupId>
            <artifactId>spring-boot-starter-web</artifactId>
        </dependency>

        <!--eureka客户端依赖-->
        <dependency>
            <groupId>org.springframework.cloud</groupId>
            <artifactId>spring-cloud-starter-netflix-eureka-client</artifactId>
            <version>2.1.0.RELEASE</version>
        </dependency>

        <!--feign的起步依赖-->
        <dependency>
            <groupId>org.springframework.cloud</groupId>
            <artifactId>spring-cloud-starter-openfeign</artifactId>
            <version>2.1.0.RELEASE</version>
        </dependency>

        <dependency>
            <groupId>com.alibaba.cloud</groupId>
            <artifactId>spring-cloud-starter-alibaba-sentinel</artifactId>
            <version>2.1.0.RELEASE</version>
        </dependency>
    </dependencies>
2⃣️yml文件配置:开启sentinel对feign的支持、设置sentinel本地的dashboard地址、向eureka注册中心注册feign服务
server:
  port: 9012

spring:
  application:
    name: sentinel-feign-client
  cloud:
    sentinel:
      transport:
        dashboard: localhost:9000 #开启 sentinel对feign的支持
#激活sentinel的支持
feign:
  sentinel:
    enabled: true

eureka:
  client:
    service-url:
      #eureka 服务地址,如果是集群的话;需要指定其他集群eureka地址
      defaultZone: http://127.0.0.1:9010/eureka #需要注册到注册中心的地址
      # 不注册自己
3⃣️开启@EnableEurekaClient 注解表示向注册中心注册自己@EnableFeignClients表示开启FeignClient服务
@SpringBootApplication
@EnableEurekaClient
@EnableFeignClients
public class SentinelFeignClientApplication {
public static void main(String[] args) {
SpringApplication.run(SentinelFeignClientApplication.class, args);
}
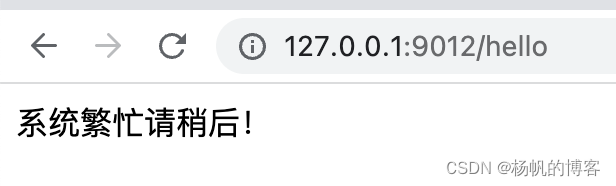
}4⃣️创建一个FallbackService实现自FeignAgent并实现hello方法
@Component
public class FallbackService implements FeignAgent {
    @Override
    public String hello() {
        return "系统繁忙请稍后!";
    }
}
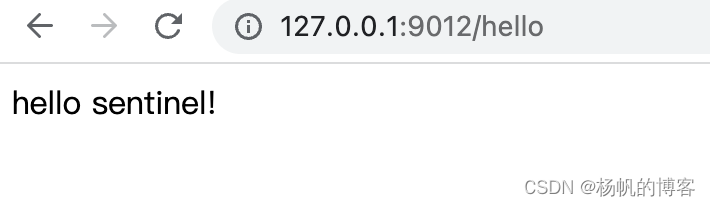
5⃣️在Feign中新建一个Controller,并引入FeignClient,在hello方法中调用feign的hello方法
@RestController
public class TestController {
@Autowired
private FeignAgent feignAgent;
@GetMapping("/hello")
public String hello(){
return feignAgent.hello();
}
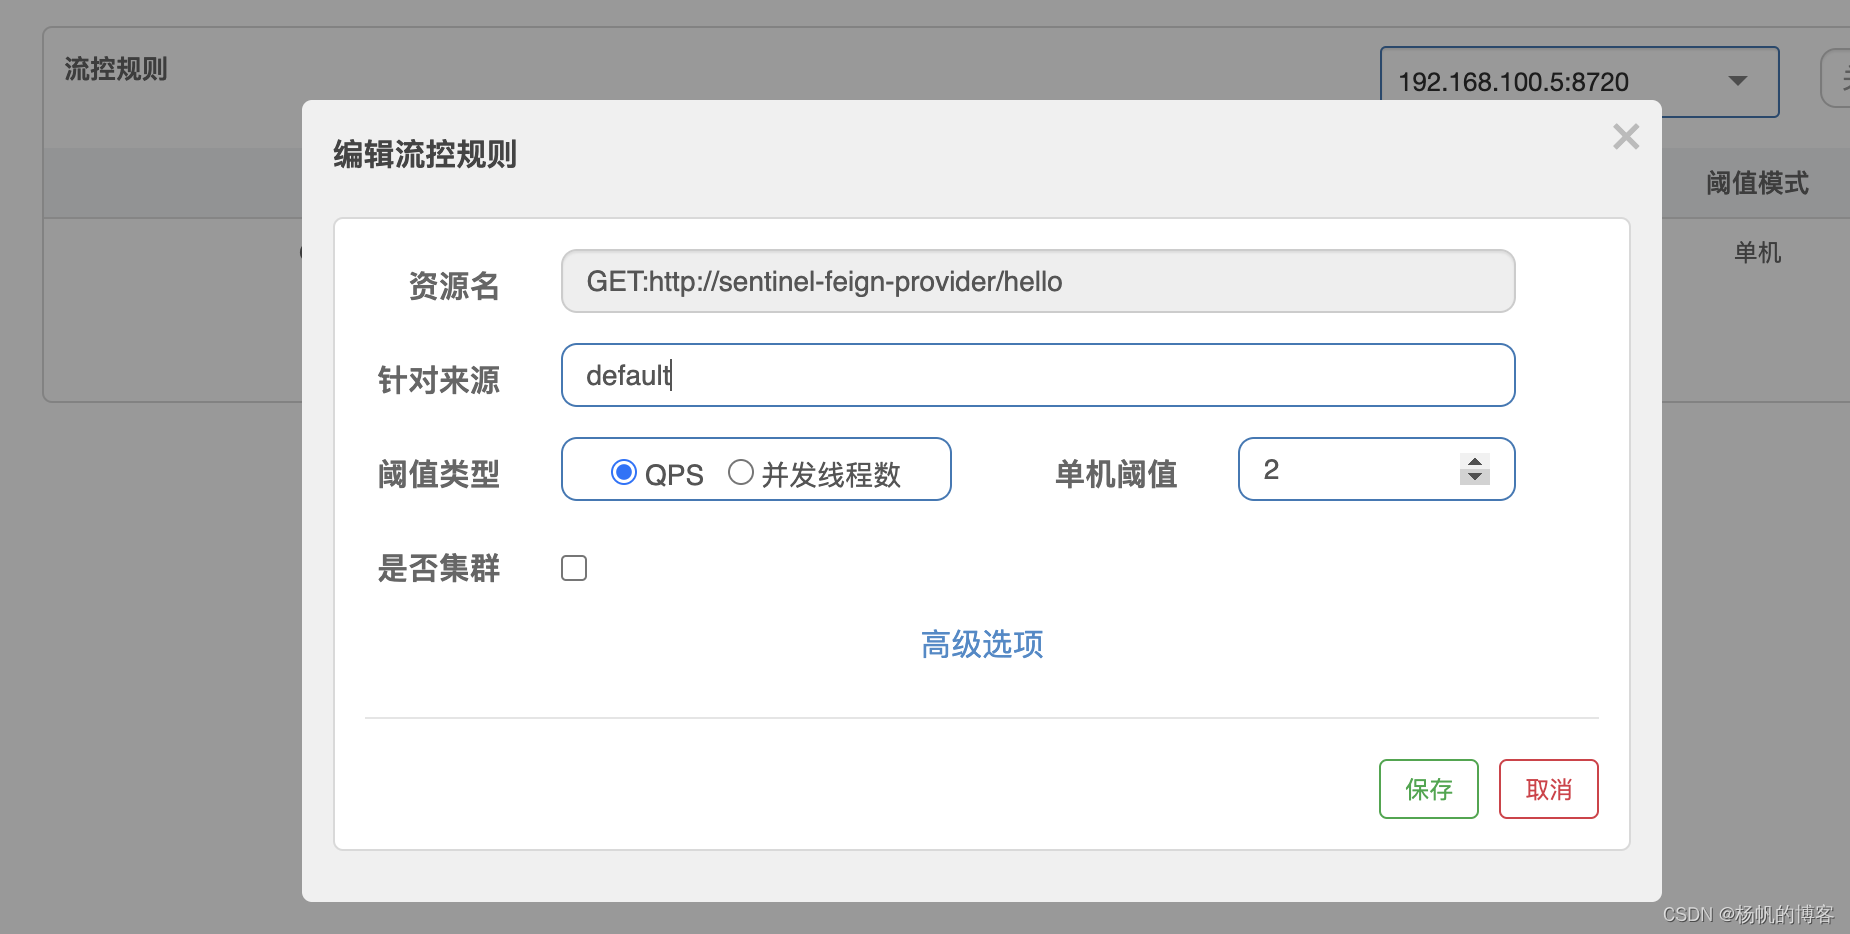
}6⃣️配置sentinel dashboard的流控规则,流控规则的编写形式为:http:请求方式:协议://服务名/请求路径跟参数 (GET:http://sentinel-feign-provider/hello)
最终效果如下


 1012
1012

 被折叠的 条评论
为什么被折叠?
被折叠的 条评论
为什么被折叠?
 到【灌水乐园】发言


