


 本文详细介绍如何在SpringBoot项目中整合Ueditor富文本编辑器,包括下载源码包、配置自定义上传接口、实现上传功能及测试步骤。关键在于自定义上传接口的正确设置与返回参数。
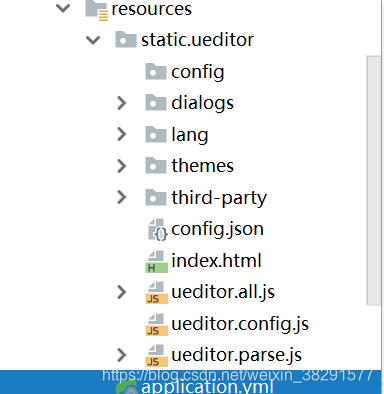
1、下载ueditor的jsp源码包,将文件拷贝到项目资源目录中,如下图
2、 编辑ueditor.config.js文件,修改服务器统一接口路径,为自定义路径。

3、实现第二步中,自定义路径对应的接口方法
@RestController
@RequestMapping("ueditor")
public class UEditroController {
    @Autowired
    private HttpServletRequest request;

    @Value("classpath:static/ueditor/config.json")
    private Resource config;

    @RequestMapping("/config")
    public String getUEditorConfig(HttpServletResponse response) throws IOException {
        return FileCopyUtils.copyToString(new FileReader(config.getFile()));
    }

}
4、在使用UEditor的界面,重写上传接口为自定义上传接口
    var ue = UE.getEditor('editor');
    UE.Editor.prototype._bkGetActionUrl = UE.Editor.prototype.getActionUrl;
    UE.Editor.prototype.getActionUrl = function(action) {
        if (action == 'uploadimage' || action == 'uploadscrawl' || action == 'uploadimage') {
            return 'http://localhost:8080/uploadImg';
        } else {
            return this._bkGetActionUrl.call(this, action);
        }
    }
5、实现自定义上传接口
    @PostMapping("/uploadImg")
    @ResponseBody
    public UploadResult upload(HttpServletRequest request) throws IOException {
        UploadResult result = new UploadResult();
        //将当前上下文初始化给  CommonsMutipartResolver (多部分解析器)
        CommonsMultipartResolver multipartResolver=new CommonsMultipartResolver(
                request.getSession().getServletContext());
        //检查form中是否有enctype="multipart/form-data"
        if(multipartResolver.isMultipart(request)) {
            //将request变成多部分request
            MultipartHttpServletRequest multiRequest = (MultipartHttpServletRequest) request;
            //获取multiRequest 中所有的文件名
            Iterator iter = multiRequest.getFileNames();

            while (iter.hasNext()) {
                //一次遍历所有文件
                MultipartFile file = multiRequest.getFile(iter.next().toString());
                if (file != null) {
                    //上传服务器文件名uuid
                    String uuid = UUID.randomUUID().toString();
                    //文件类型
                    String type = FilenameUtils.getExtension(file.getOriginalFilename());
                    //上传文件绝对路径
                    String distPath = getUploadPath()+"/"+uuid+"."+type;
                    file.transferTo(new File(distPath));
                    result.setSize(Long.toString(file.getSize()));
                    result.setOriginal(file.getOriginalFilename());
                    result.setUrl(getAccessUrl(distPath));
                    result.setType(type);
                    result.setTitle(file.getName());
                    result.setState("SUCCESS");
                }
            }
        }
        return result;
    }
6、启动服务器,测试成功
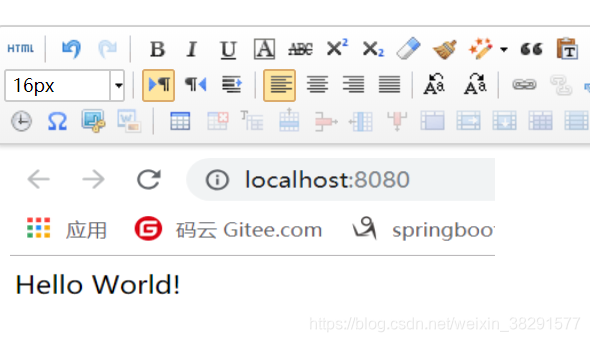
到此,Spring Boot整合Ueditor完成。需要注意的是自定义上传接口返回的参数。status必须为大写的“SUCCESS”,url为图片上传后的访问路径,一定是要能访问到的。
源代码已上传到https://gitee.com/jiansx/ueditor_demo。


 4万+
4万+

 被折叠的 条评论
为什么被折叠?
被折叠的 条评论
为什么被折叠?
 到【灌水乐园】发言


