


 本文详细介绍如何使用Python从头构建简单网络,然后将其权重转换为wts格式,并通过C++ API创建TensorRT模型模板,避免依赖额外的模型文件。作者提供了从权重文件构建引擎、推理过程和基本模板的详细步骤。
好久没写一篇关于使用C++ API搭建构建Tensorrt的文章了,而本篇文章该说些什么了,也不想像很多博客介绍Tensorrt的C++API,直接来几个步骤,然后如何搭建网络,构造engine,需要前提logger等。
为此,本篇博客为了减少下载什么pth,根据什么onnx等不必要麻烦,我们将从torch构建一个简单网络, 并将其转换wts格式,然后通过C++API调用wts(权重)建立如何构建tensorrt的网络的一个模板。
至于简单使用tensorrt搭建实列,可参考“使用tensorRT C++ API搭建MLP网络详解”文章,该篇文章简单介绍了visual studio环境搭建。、
一.python搭建网络,得到权重wts
因其搭建简单网络,我将不在介绍,直接根据代码可实现网络搭建,也不必要训练,直接保存pth,构建wts即可,以下为python构建wts代码。


from torch import nn
import torch
import struct
from torchsummary import summary
import numpy as np
import cv2


class TRY(nn.Module):
    def __init__(            self    ):
        super(TRY, self).__init__()
        self.cov1=nn.Conv2d(3,64,3,1)
        self.r1=nn.ReLU(inplace=True)
        self.conv2=nn.Conv2d(64,2,3,1)


    def forward(self, x) :
        x = self.cov1(x)
        x = self.r1(x)
        x = self.conv2(x)
        return x

def transform(img):
    img = img.astype('float32')
    img -= 127.5
    img *= 0.0078125
    img = np.transpose(img, (2, 0, 1))
    img = np.expand_dims(img, axis=0)

    return img


def infer(img=None):

    net = torch.load('./try.pth')
    net = net.cuda()
    net = net.eval()
    print('model: ', net)
    # print('state dict: ', net.state_dict().keys())
    if img is None:
        tmp = torch.ones(1, 3, 224, 224).cuda()
    else:
        if isinstance(img, str):
            img = cv2.imread(img)
        tmp = transform(img)
        tmp = torch.from_numpy(tmp).cuda()

    print('input: ', tmp)
    out = net(tmp)
    out_index = torch.argmax(out).cpu().numpy()
    print('output_index:', out_index)

    summary(net, (3, 224, 224))
    # return
    f = open("try.wts", 'w')
    f.write("{}\n".format(len(net.state_dict().keys())))
    for k, v in net.state_dict().items():
        print('key: ', k)
        print('value: ', v.shape)
        vr = v.reshape(-1).cpu().numpy()
        f.write("{} {}".format(k, len(vr)))
        for vv in vr:
            f.write(" ")
            f.write(struct.pack(">f", float(vv)).hex())
        f.write("\n")


def main_createnet():
    print('cuda device count: ', torch.cuda.device_count())
    net = TRY()
    net = net.eval()
    net = net.cuda()
    print(net)
    tmp = torch.ones(2, 3, 224, 224).cuda()

    out = net(tmp)
    print('out:', out.shape)
    torch.save(net, "./try.pth")


if __name__ == '__main__':
    # main_createnet()
    infer(img='../dog.png')
以上代码可获得wts文件,基于此文件,我们将继续搭建tensorrt网络模板。
二.构建tensorrt网络模板
本次使用tensorrt版本为8.2左右。
搭建tensorrt网络模板前,我先推荐大神git上的code,建议读者拜读,可点击code查阅。
我将通过网络图重点介绍某些功能,具体说明已在代码中给出注释。
①构建logger信息,简单构建可用以下代码,来源于官网,不必纠结。
class Logger : public ILogger
{
    void log(Severity severity, const char* msg) noexcept override
    {
        // suppress info-level messages
        if (severity <= Severity::kWARNING)
            std::cout << msg << std::endl;
    }
} gLogger;
②createEngine实际内部调用torch构建网络转换为wts加载,搭建网络,并创造了engine,此时想用engine依然可以进行推理,后续将不需要转序列化/反序列化再次构建引擎engine了,但每次推理需构建引擎会很耗时间,教程将不会推荐,我也强烈建议
engine序列化方法。然我将说明无需序列化的推理,便于加深理解。具体细节如下图。
为防止读者误解,我将贴出修改后的主函数,其所有方法函数将在下面代码里。
int main() {
bool serialize = false;
std::string engine_path = "./model.engine";
if (serialize) {
//将模型序列化
IHostMemory* modelStream{ nullptr };
modelStream = engine2serialize(); //构建引擎与保存
}
else {
//加载引擎,预测图片
std::string path = "./2.jpg";
cv::Mat img = cv::imread(path);
if (img.empty()) {
std::cout << "input images error!" << std::endl;
return 0;
}
cv::Mat imgInput;
cv::resize(img, imgInput, cv::Size(INPUT_W, INPUT_H), 0, 0, cv::INTER_LINEAR);
vector<cv::Mat> InputImage;
InputImage.push_back(imgInput);
InputImage.push_back(imgInput);
float input[BatchSize * 3 * INPUT_H * INPUT_W];
float output[BatchSize * 2 * INPUT_H * INPUT_W];
ProcessImage(InputImage,input);
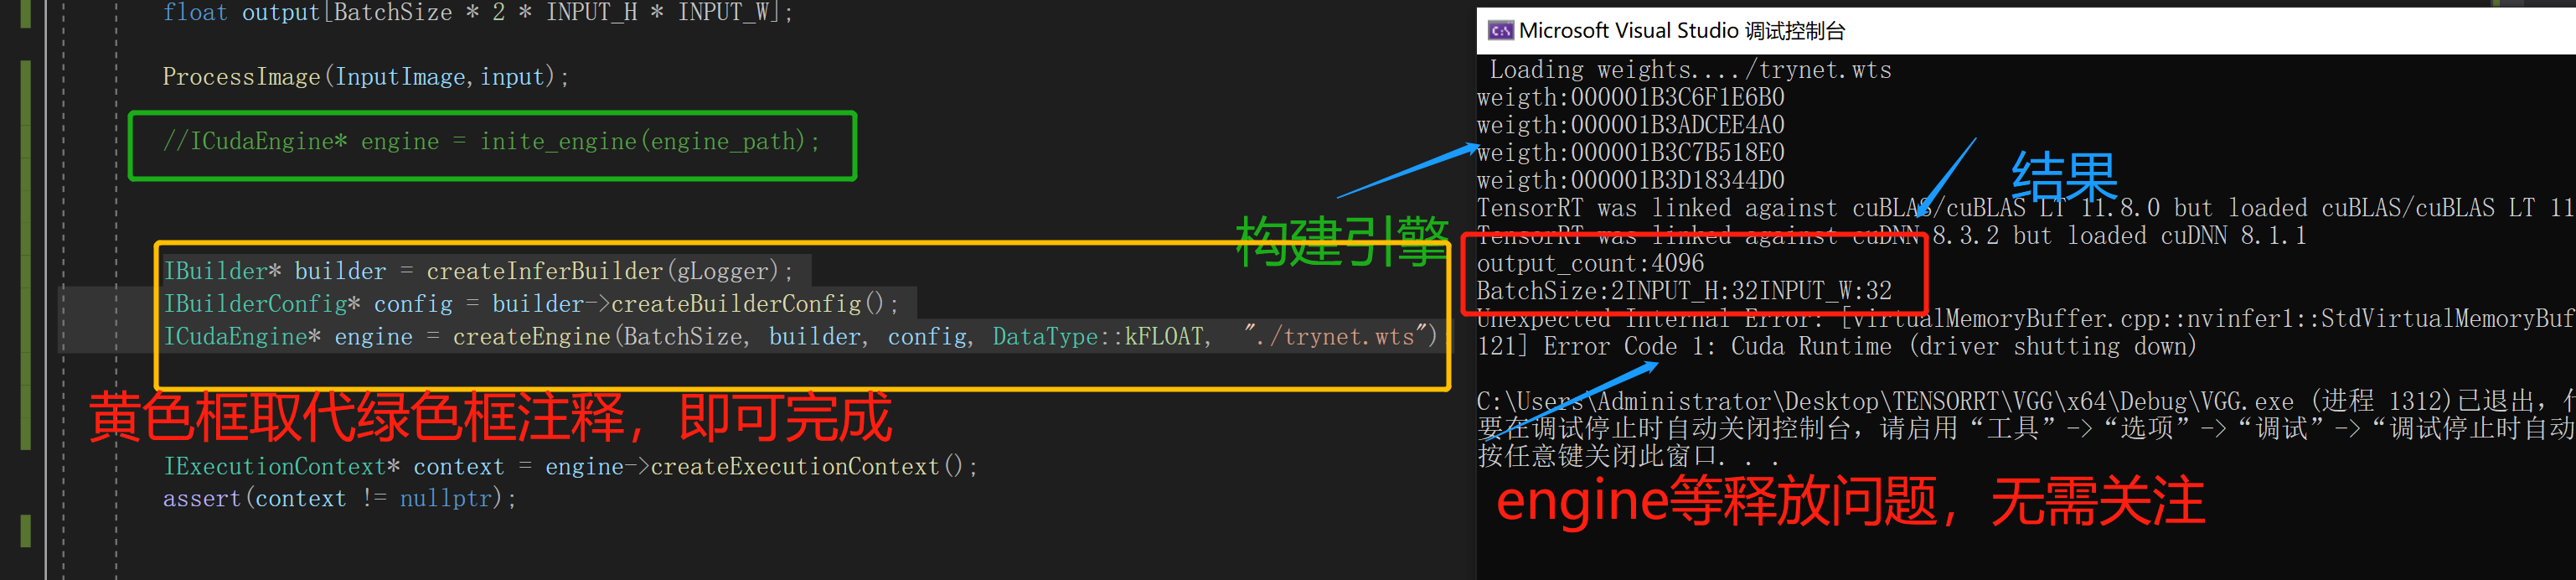
//ICudaEngine* engine = inite_engine(engine_path);
IBuilder* builder = createInferBuilder(gLogger);
IBuilderConfig* config = builder->createBuilderConfig();
ICudaEngine* engine = createEngine(BatchSize, builder, config, DataType::kFLOAT, "./trynet.wts");
IExecutionContext* context = engine->createExecutionContext();
assert(context != nullptr);
doInference(*context, input, output, 2);
cout << "output_count:" << sizeof(output) / sizeof(output[0]) << endl;
cout << "BatchSize:" << BatchSize << "INPUT_H:" << INPUT_H << "INPUT_W:" << INPUT_W << endl;
//for (int i = 0; i < BatchSize * 2 * INPUT_H * INPUT_W; i++) {
// cout << i << *output << endl;
//}
}
}
③完成引擎构建,实际可以使用IExecutionContext* context = engine->createExecutionContext();进行推理,而使用CUDA推理需将输入输出转到cuda上,因此需要数据转换,此时可用模板doInference函数,也来源别人框架。
④ APIToMode/createEngine/doInference等函数,属于基本默认方法,APIToMode函数集成并将其序列化;createEngine主要搭建网络并将其转为engine,其中搭建网络很重要;doinference函数属于如何推理,并将输入输出在
host与cuda内存传输,主要稍微修改输入输出,其它可复制。
⑤ 我已验证,若构建引擎可使用batch为1,而推理可使用batch为n,构建好的引擎的序列化,推理宽高batch可任意修改。dt构建输入float32或half等数据。
以下为具体实习tensrrt C++API基本模板。


#include "NvInferRuntimeCommon.h"
#include <cassert>
#include "NvInfer.h" // TensorRT library
#include "iostream" // Standard input/output library
#include <map> // for weight maps
#include <fstream> // for file-handling
#include <chrono> // for timing the execution<br>
#include <assert.h>
#include "NvInfer.h"
#include "cuda_runtime_api.h"
#include<opencv2/core/core.hpp>
#include<opencv2/highgui/highgui.hpp>
#include <opencv2/opencv.hpp>
#include<vector>
using namespace nvinfer1;
using namespace std;
static const int INPUT_H = 32;
static const int INPUT_W = 32;
static const int INPUT_C = 3;
const char* INPUT_NAME = "data";
const char* OUTPUT_NAME = "pred";
static const int BatchSize = 2;
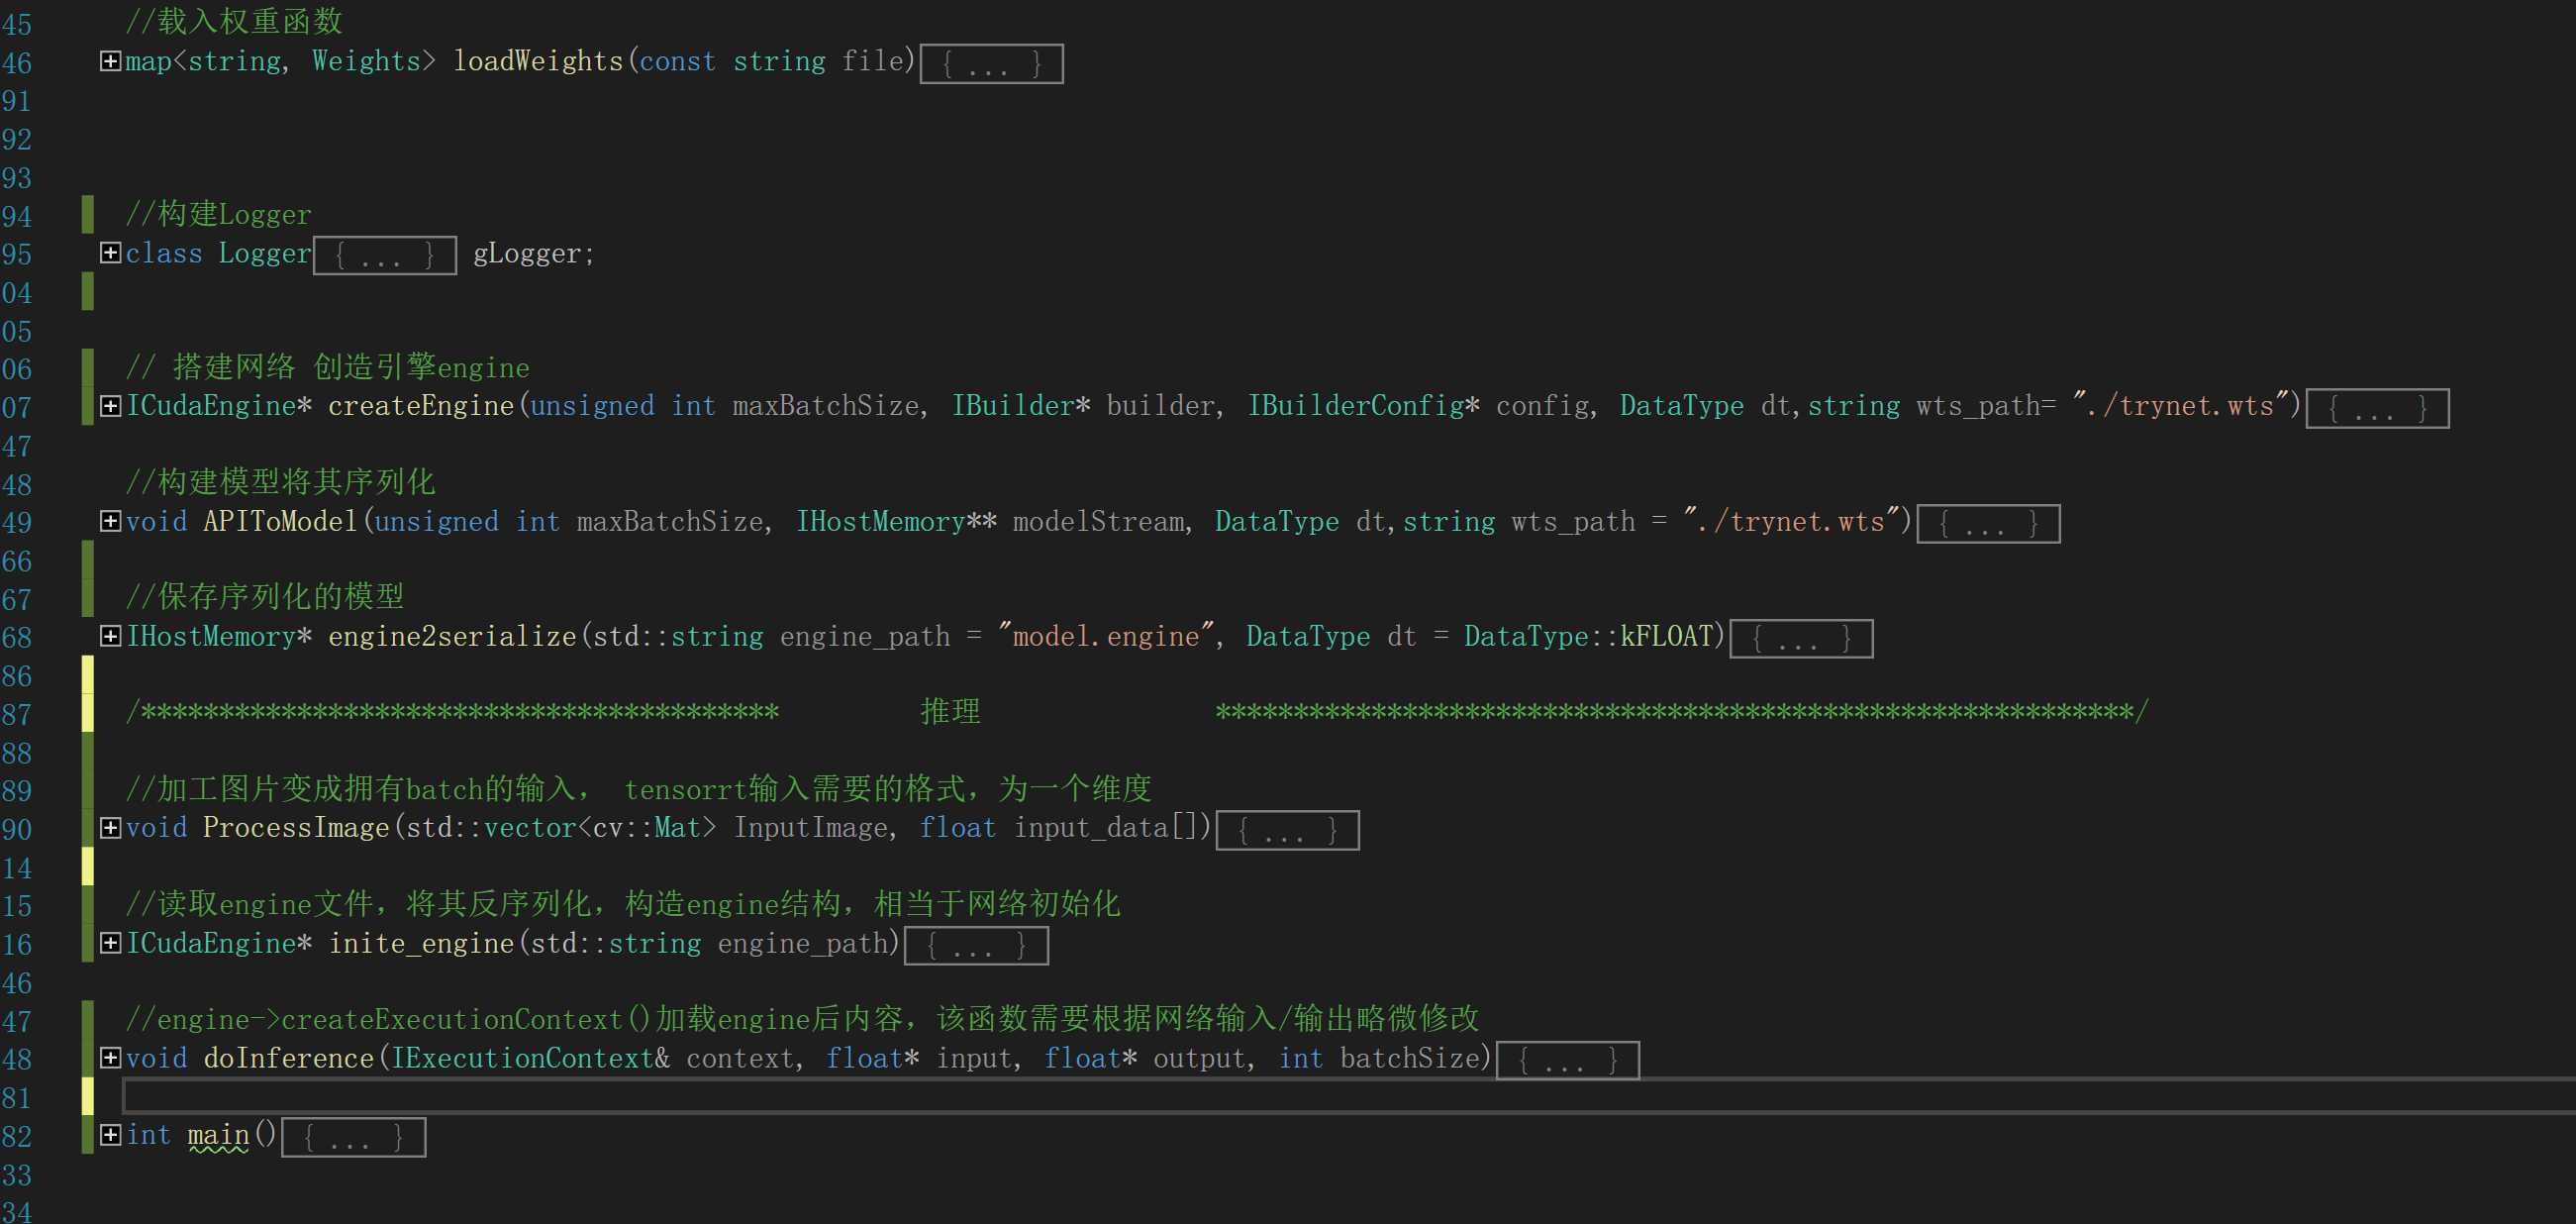
//载入权重函数
map<string, Weights> loadWeights(const string file) {
/*
* Parse the .wts file and store weights in dict format.
* @param file path to .wts file
* @return weight_map: dictionary containing weights and their values
*/
std::cout << " Loading weights..." << file << std::endl;
std::map<string, Weights> weightMap; //定义声明
// Open Weight file
ifstream input(file);
assert(input.is_open() && "[ERROR]: Unable to load weight file...");
int32_t count;
input >> count;//右移获得第一个数据,得到有多少个权重
assert(count > 0 && "Invalid weight map file.");
// Loop through number of line, actually the number of weights & biases
while (count--) {
// TensorRT weights
Weights wt{ DataType::kFLOAT, nullptr, 0 };
uint32_t size;
// Read name and type of weights
std::string w_name;
input >> w_name >> std::dec >> size;
wt.type = DataType::kFLOAT;
uint32_t* val = reinterpret_cast<uint32_t*>(malloc(sizeof(uint32_t) * size));
for (uint32_t x = 0, y = size; x < y; ++x) {
// Change hex values to uint32 (for higher values)
input >> std::hex >> val[x]; //hex为16进制
}
wt.values = val;
wt.count = size;
cout << "weigth:" << val << endl;
// Add weight values against its name (key)
weightMap[w_name] = wt; //将权重结果保存此处
}
return weightMap;
}
//构建Logger
class Logger : public ILogger
{
void log(Severity severity, const char* msg) noexcept override
{
// suppress info-level messages
if (severity <= Severity::kWARNING)
std::cout << msg << std::endl;
}
} gLogger;
#define CHECK(status) \
do\
{\
auto ret = (status);\
if (ret != 0)\
{\
std::cerr << "Cuda failure: " << ret << std::endl;\
abort();\
}\
} while (0)
// 搭建网络 创造引擎
ICudaEngine* createEngine(unsigned int maxBatchSize, IBuilder* builder, IBuilderConfig* config, DataType dt,string wts_path= "./trynet.wts")
{
INetworkDefinition* network = builder->createNetworkV2(0U);
// Create input tensor of shape { 1, 32, 32 } with name INPUT_BLOB_NAME
ITensor* data = network->addInput(INPUT_NAME, dt, Dims3{ 3, INPUT_H, INPUT_W });
assert(data);
std::map<std::string, Weights> weightMap = loadWeights(wts_path);
IConvolutionLayer* conv1 = network->addConvolutionNd(*data, 64, DimsHW{ 3, 3 }, weightMap["cov1.weight"], weightMap["cov1.bias"]);
assert(conv1);
conv1->setName("cov1");//设置名字
conv1->setPaddingNd(DimsHW{ 1, 1 });
conv1 = network->addConvolutionNd(*conv1->getOutput(0), 2, DimsHW{ 3, 3 }, weightMap["cov2.weight"], weightMap["cov2.bias"]);
conv1->setPaddingNd(DimsHW{ 1, 1 });
conv1->setName("cov2");//设置名字
conv1->getOutput(0)->setName(OUTPUT_NAME);
network->markOutput(*conv1->getOutput(0));
// 构建引擎,其它网络都可以使用这个
builder->setMaxBatchSize(maxBatchSize);
config->setMaxWorkspaceSize(1 << 20);
ICudaEngine* engine = builder->buildEngineWithConfig(*network, *config);
network->destroy();// Don't need the network any more 释放内存
// Release host memory
for (auto& mem : weightMap)
{
free((void*)(mem.second.values));
}
return engine;
}
//构建模型将其序列化
void APIToModel(unsigned int maxBatchSize, IHostMemory** modelStream, DataType dt,string wts_path = "./trynet.wts")
{
// Create builder
IBuilder* builder = createInferBuilder(gLogger);
IBuilderConfig* config = builder->createBuilderConfig();
// Create model to populate the network, then set the outputs and create an engine
ICudaEngine* engine = createEngine(maxBatchSize, builder, config, dt,wts_path=wts_path);
assert(engine != nullptr);
// Serialize the engine
(*modelStream) = engine->serialize();
// Close everything down
engine->destroy();
builder->destroy();
}
//保存序列化的模型
IHostMemory* engine2serialize(std::string engine_path = "model.engine", DataType dt = DataType::kFLOAT)
{
IHostMemory* modelStream{ nullptr };
APIToModel(1, &modelStream, dt); //batchsize
assert(modelStream != nullptr);
std::ofstream p(engine_path, std::ios::binary);
if (!p)
{
std::cerr << "could not open plan output file" << std::endl;
}
p.write(reinterpret_cast<const char*>(modelStream->data()), modelStream->size());
modelStream->destroy();
return modelStream;
}
/***************************************** 推理 ***********************************************************/
//加工图片变成拥有batch的输入, tensorrt输入需要的格式,为一个维度
void ProcessImage(std::vector<cv::Mat> InputImage, float input_data[]) {
int ImgCount = InputImage.size();
assert(ImgCount == BatchSize);
//float input_data[BatchSize * 3 * INPUT_H * INPUT_W];
for (int b = 0; b < ImgCount; b++) {
cv::Mat img = InputImage.at(b);
int w = img.cols;
int h = img.rows;
int i = 0;
for (int row = 0; row < h; ++row) {
uchar* uc_pixel = img.data + row * img.step;
for (int col = 0; col < INPUT_W; ++col) {
input_data[b * 3 * INPUT_H * INPUT_W + i] = (float)uc_pixel[2] / 255.0;
input_data[b * 3 * INPUT_H * INPUT_W + i + INPUT_H * INPUT_W] = (float)uc_pixel[1] / 255.0;
input_data[b * 3 * INPUT_H * INPUT_W + i + 2 * INPUT_H * INPUT_W] = (float)uc_pixel[0] / 255.0;
uc_pixel += 3;
++i;
}
}
}
}
//读取engine文件,将其反序列化,构造engine结构,相当于网络初始化
ICudaEngine* inite_engine(std::string engine_path) {
char* trtModelStream{ nullptr }; //指针函数,创建保存engine序列化文件结果
size_t size{ 0 };
// read model from the engine file
std::ifstream file(engine_path, std::ios::binary);
if (file.good()) {
file.seekg(0, file.end);
size = file.tellg();
file.seekg(0, file.beg);
trtModelStream = new char[size];
assert(trtModelStream);
file.read(trtModelStream, size);
file.close();
}
// create a runtime (required for deserialization of model) with NVIDIA's logger
IRuntime* runtime = createInferRuntime(gLogger); //反序列化方法
assert(runtime != nullptr);
// deserialize engine for using the char-stream
ICudaEngine* engine = runtime->deserializeCudaEngine(trtModelStream, size, nullptr);
assert(engine != nullptr);
/*
一个engine可以有多个execution context,并允许将同一套weights用于多个推理任务。
可以在并行的CUDA streams流中按每个stream流一个engine和一个context来处理图像。
每个context在engine相同的GPU上创建。
*/
runtime->destroy();
return engine;
};
//engine->createExecutionContext()加载engine后内容,该函数需要根据网络输入/输出略微修改
void doInference(IExecutionContext& context, float* input, float* output, int batchSize)
{
const ICudaEngine& engine = context.getEngine();
// Pointers to input and output device buffers to pass to engine.
// Engine requires exactly IEngine::getNbBindings() number of buffers.
assert(engine.getNbBindings() == 2);
void* buffers[2];
// In order to bind the buffers, we need to know the names of the input and output tensors.
// Note that indices are guaranteed to be less than IEngine::getNbBindings()
const int inputIndex = engine.getBindingIndex(INPUT_NAME);
const int outputIndex = engine.getBindingIndex(OUTPUT_NAME);
// Create GPU buffers on device
CHECK(cudaMalloc(&buffers[inputIndex], batchSize * 3 * INPUT_H * INPUT_W * sizeof(float))); //CHECK 核对校验 也可不使用
cudaMalloc(&buffers[outputIndex], batchSize * 2 * INPUT_H * INPUT_W * sizeof(float));
// Create stream
cudaStream_t stream;
cudaStreamCreate(&stream);
// DMA input batch data to device, infer on the batch asynchronously, and DMA output back to host
cudaMemcpyAsync(buffers[inputIndex], input, batchSize * 3 * INPUT_H * INPUT_W * sizeof(float), cudaMemcpyHostToDevice, stream);
context.enqueue(batchSize, buffers, stream, nullptr);//通常TensorRT的执行是异步的,因此将kernels加入队列放在CUDA stream流上
cudaMemcpyAsync(output, buffers[outputIndex], batchSize * 2 * INPUT_H * INPUT_W * sizeof(float), cudaMemcpyDeviceToHost, stream);
cudaStreamSynchronize(stream);
// Release stream and buffers
cudaStreamDestroy(stream);
cudaFree(buffers[inputIndex]);
cudaFree(buffers[outputIndex]);
}
int main() {
bool serialize = false;
std::string engine_path = "./model.engine";
if (serialize) {
//将模型序列化
IHostMemory* modelStream{ nullptr };
modelStream = engine2serialize(); //构建引擎与保存
}
else {
//加载引擎,预测图片
std::string path = "./2.jpg";
cv::Mat img = cv::imread(path);
if (img.empty()) {
std::cout << "input images error!" << std::endl;
return 0;
}
cv::Mat imgInput;
cv::resize(img, imgInput, cv::Size(INPUT_W, INPUT_H), 0, 0, cv::INTER_LINEAR);
vector<cv::Mat> InputImage;
InputImage.push_back(imgInput);
InputImage.push_back(imgInput);
float input[BatchSize * 3 * INPUT_H * INPUT_W];
float output[BatchSize * 2 * INPUT_H * INPUT_W];
ProcessImage(InputImage,input);
ICudaEngine* engine = inite_engine(engine_path);
IExecutionContext* context = engine->createExecutionContext();
assert(context != nullptr);
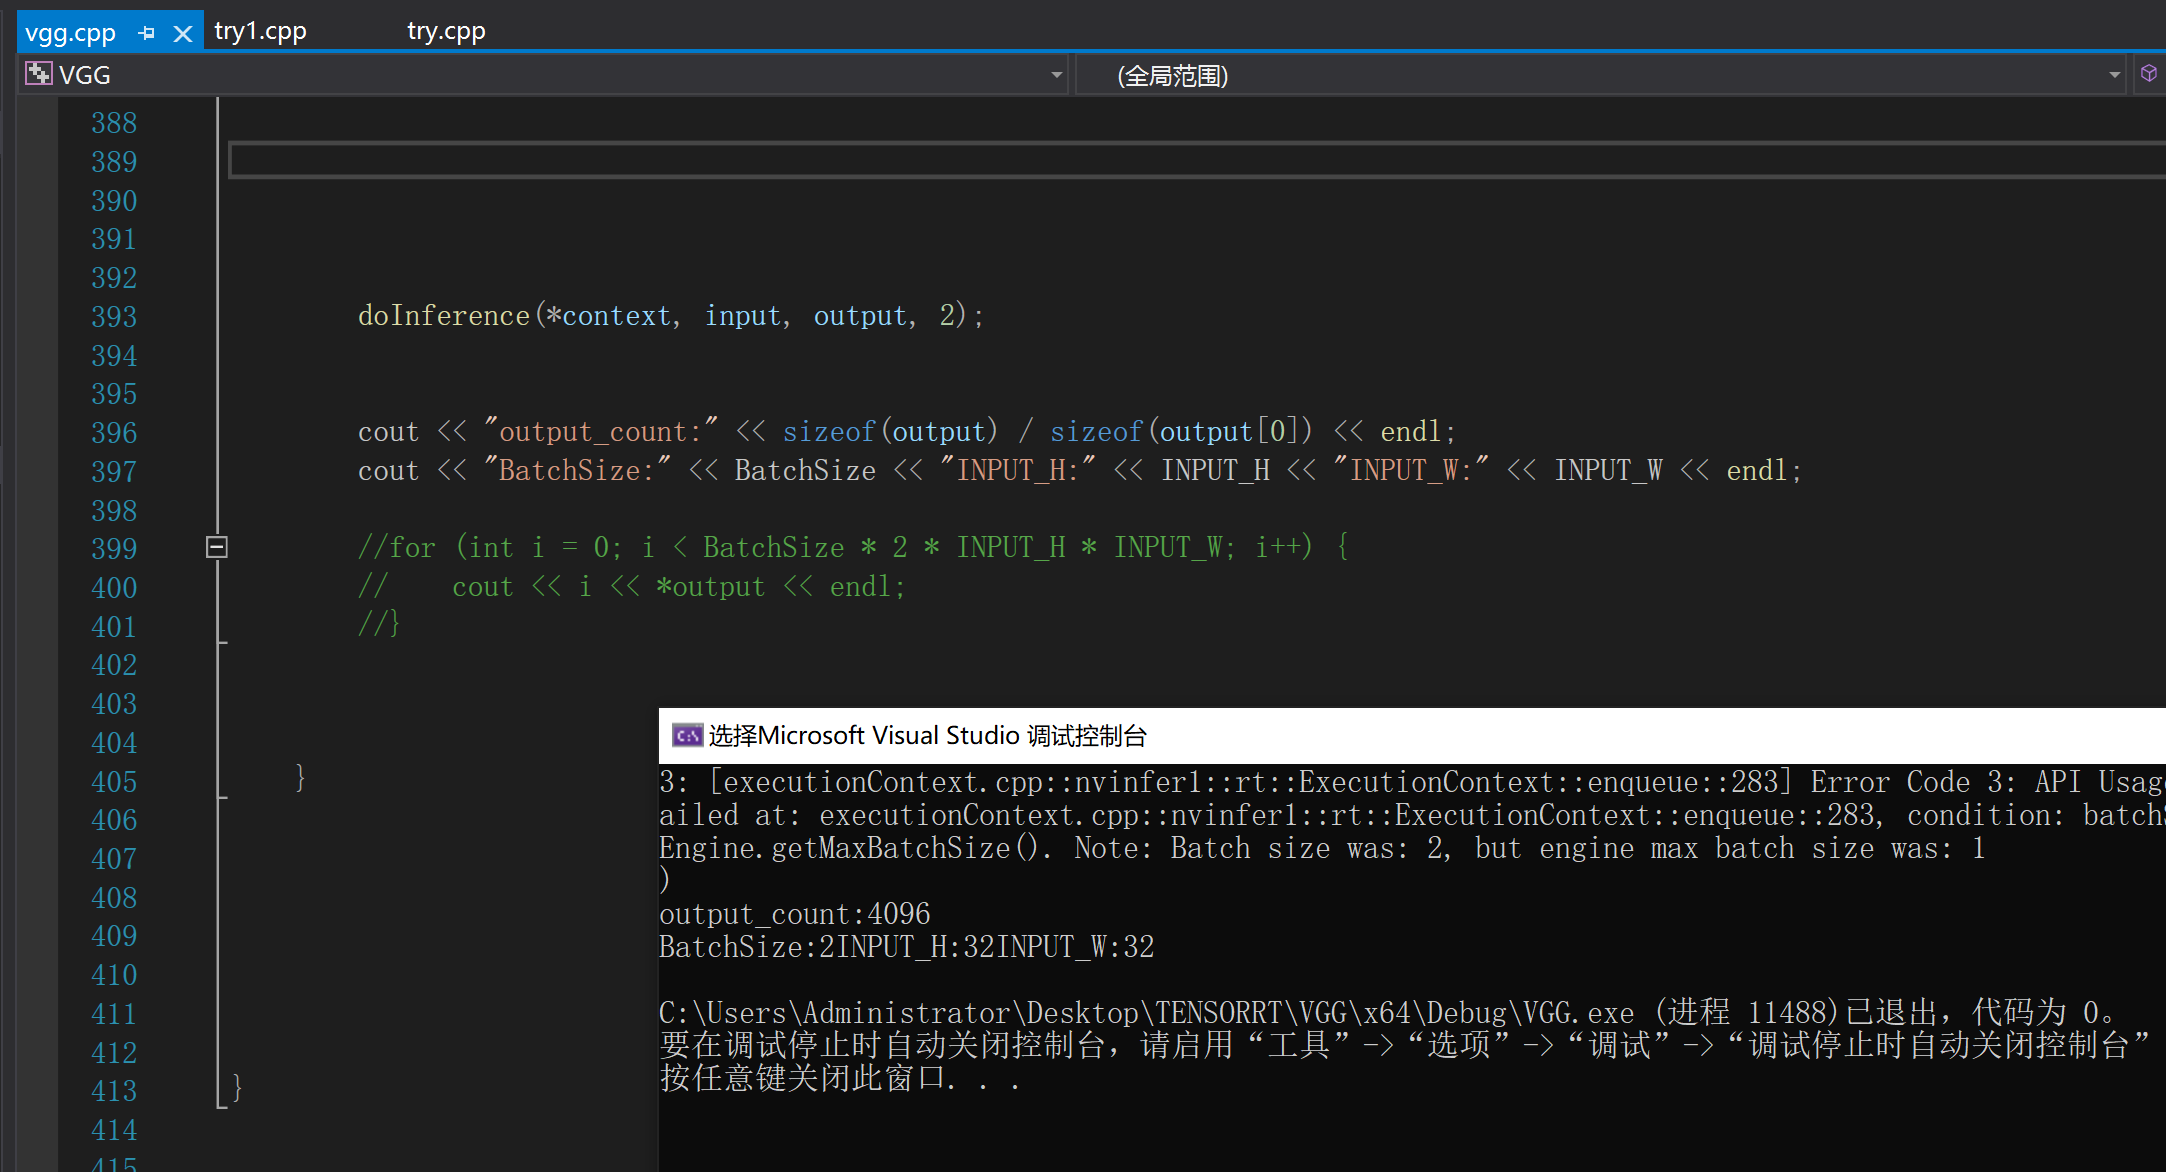
doInference(*context, input, output, 2);
cout << "output_count:" << sizeof(output) / sizeof(output[0]) << endl;
cout << "BatchSize:" << BatchSize << "INPUT_H:" << INPUT_H << "INPUT_W:" << INPUT_W << endl;
//for (int i = 0; i < BatchSize * 2 * INPUT_H * INPUT_W; i++) {
// cout << i << *output << endl;
//}
}
}
结果展示:
以上为本次进一步理解和实现tensorrt的过程,若有问题,欢迎指正。
下次我将使用onnx搭建网络解析。
最后无需复制啥,只需按照以下配置(照猫画虎)即可完成windows10的visual tudio的环境配置:
电脑环境path配置:
E:\InstallPackage\TensorRT-8.4.0.6\lib
E:\InstallPackage\opencv\build\x64\vc15\bin
说明:engine无需电脑环境配置
包含目录:
C:\Program Files\NVIDIA GPU Computing Toolkit\CUDA\v11.1\include
E:\InstallPackage\eigen-3.4.0
E:\InstallPackage\opencv\build\include\opencv2
E:\InstallPackage\opencv\build\include
E:\InstallPackage\TensorRT-8.4.0.6\include

库目录:
C:\Program Files\NVIDIA GPU Computing Toolkit\CUDA\v11.1\lib\x64
E:\InstallPackage\opencv\build\x64\vc15\lib
E:\InstallPackage\TensorRT-8.4.0.6\lib

链接器-->附加依赖:
opencv_world455d.lib
nvinfer.lib
nvinfer_plugin.lib
nvonnxparser.lib
nvparsers.lib
cuda.lib
cudart.lib


 1202
1202

 被折叠的 条评论
为什么被折叠?
被折叠的 条评论
为什么被折叠?
 到【灌水乐园】发言


