


 本文深入解析了BIO(BlockingIO)和NIO(non-blockingIO)两种IO模型的特点与工作原理,对比了它们在Java中的实现方式,包括BIO的线程阻塞机制与NIO的基于缓冲区、通道和选择器的非阻塞机制。
IO相关知识学习
IO模型
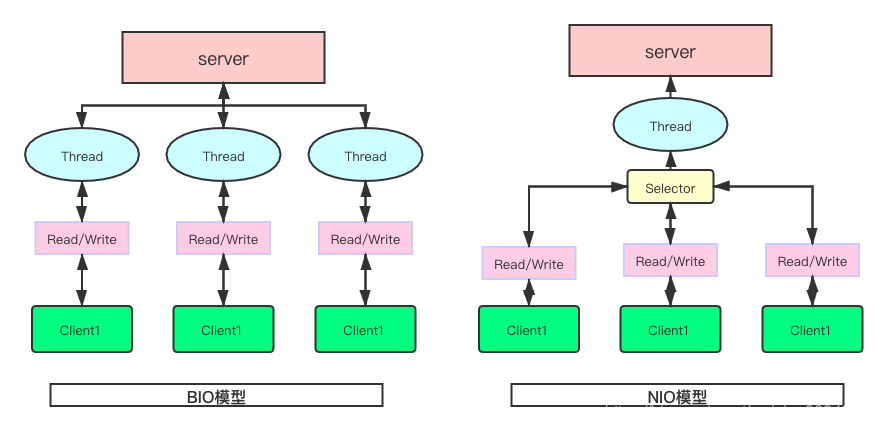
如上图所示,大致可以总结出BIO与NIO两种IO模型的特点。
1. BIO(Blocking IO)
- 传统的IO模型,所有类与接口在java.io包下。
- 同步阻塞:一:等待连接,二:等待响应,线程会在这两点出阻塞中,同事一,二是同步进行,进一步降低了效率。
- JDK1.4及其以前版本的唯一选择,程序简单易于理解。
- 适用于连接数少且固定的架构中,并发局限于项目内部。
BIO工作机制
- server端创建SocketServer,并创建线程来维持通讯。
- client端创建socket,并与server端进行连接。
- 连接过程中,若无(空闲)线程,则会等待。
- 若有线程,且有响应则会等待响应,若无响应则会直接返回。这也就是阻塞的原因。
简单来讲
- 每一个连接都会创建一个线程:这里会导致高并发下,需要创建大量线程,这样会占用大量系统资源。
- 当连接生成时,线程即被创建,但是Read,业务,Write等操作是同步进行,若无数据返回,线程会阻塞在Read处,线程一直被占用,导致系统资源浪费。
BIO示例代码
package com.floatcloud.netty;

import java.io.IOException;
import java.io.InputStream;
import java.net.ServerSocket;
import java.net.Socket;
import java.nio.charset.Charset;
import java.util.concurrent.ExecutorService;
import java.util.concurrent.Executors;

import lombok.SneakyThrows;

/**
 * @author floatcloud
 */
public class BlockingIO {


	public static void main(String[] args) {
		ExecutorService threadPool = Executors.newFixedThreadPool(10);
		try {
		    System.out.println("等待连接ing。。。。"); // BIO阻塞的地方
			ServerSocket serverSocket = new ServerSocket(6666); // 创建服务端连接
			System.out.println("应用启动");
			while (true) {
				Socket socket = serverSocket.accept(); // 获取连接
				System.out.println("建立连接");
				threadPool.execute(new Runnable() {
					@SneakyThrows
					@Override
					public void run() {
						InputStream inputStream = socket.getInputStream();
						System.out.println("线程id"+ Thread.currentThread().getName());
						byte[] bytes = new byte[1024];
						String msg;
						int num = 0;
						System.out.println("等待读取ing。。。。"); // 线程阻塞
						while ((num = inputStream.read(bytes)) >= 0) {
							msg = new String(bytes, Charset.forName("UTF-8"));
							System.out.println(msg);
						}
					}
				});
			}
		} catch (IOException e) {
			e.printStackTrace();
		}
	}

}
2. NIO(non-blocking IO)
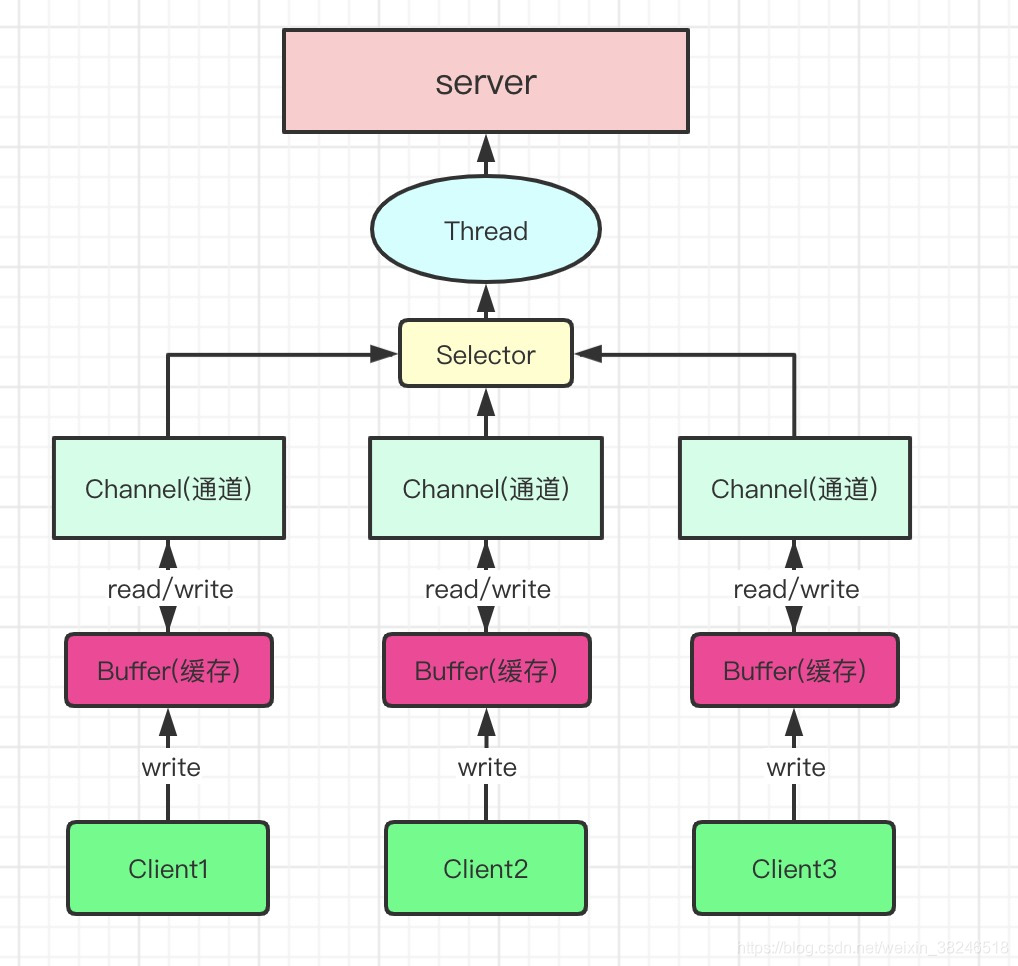
通俗的语言总结下上图:
- 每一个Buffer对应一个Channel。
- Selector会创建一个线程与自身绑定,并管理多个Channel。
- Buffer底层数据结构为数组(内存块【连续的内存存储空间】)。
- Selector根据不同事件(Event)在Channel之间切换。
- Buffer不同于BIO,该流是双向的,即可读也可写,使用flip();方法进行读写之间切换。
- Channel与Buffer之间读写也是双向的。
特性
- 同步非阻塞
- 基于jdk1.4版本及其以上
- 面向缓存
- 三大核心部分:Channel(通道),Buffer(缓存),Selector(选择器)。
Buffer(缓存)
Buffer的子类
ByteBuffer, CharBuffer, DoubleBuffer, FloatBuffer, IntBuffer, LongBuffer, ShortBuffer(除了boolean类型外的所有基本数据类型的buffer)
Buffer类的核心属性
// Invariants: mark <= position <= limit <= capacity
// 标志位
private int mark = -1;
// 下一次读取/写入的位置
private int position = 0;
// 最大读取/写入位置
private int limit;
// 数组容量
private int capacity;
Buffer代码示例
public static void read(){
	// 创建一个IntBuffer,长度为5个字节
	IntBuffer intBuffer = IntBuffer.allocate(5);
	for (int i = 0; i < intBuffer.capacity(); i++) {
		// 存入数据
		intBuffer.put(i);
	}
	// buffer 读写切换
	intBuffer.flip();
	// 判断是否还有数据
	while (intBuffer.hasRemaining()){
		// intBuffer.get(); 方法会依次将数据输出。
		System.out.println(intBuffer.get());
	}
}
Buffer的注意事项
- ByteBuffer支持类型化的put和get方法,即put什么数据类型的数据,就要使用对应数据类型的get方法获取,否则会抛出BufferUnderflowException异常。
/**
 * ByteBuffer的类型化put、get
 */
public static void putGetByType(){
	ByteBuffer byteBuffer = ByteBuffer.allocate(3);
	byteBuffer.putChar('a');
	byteBuffer.putInt(12);
	byteBuffer.putLong((long)0.89);
	byteBuffer.flip();
	char aChar = byteBuffer.getChar();
	// 这里报错
	char bChar = byteBuffer.getChar();
	long aLong = byteBuffer.getLong();
}
- 可以通过asReadOnlyBuffer方法,将buffer转化为一个只读的buffer
ByteBuffer readOnlyBuffer = byteBuffer.asReadOnlyBuffer();
- NIO提供MappedByteBuffer,可以使文件直接在内存(堆外内存【物理内存】)中修改,同步到文件也由NIO来完成。
    /**
	 * 使用MappedByteBuffer对文件在物理内存中进行修改,并同步。(JVM外内存)
	 */
	public static void mappedBufferRW(){
		try {
			// 文件modefied.md,拥有读写权限
			RandomAccessFile randomAccessFile = new RandomAccessFile("modefied.md","rw");
			FileChannel channel = randomAccessFile.getChannel();
			/*
			* MapMode.READ_WRITE :表示MappedByteBuffer拥有读写权限
			* position 0 :表示可以修改的起始位置(数组下标)
			* size 10 :表示从可以修改的下标开始,往后可修改字节的最大大小为10
			* 可以修改范围的计算公式为:[position,size+position)
			*/
			MappedByteBuffer mappedByteBuffer = channel.map(MapMode.READ_WRITE, 0, 10);
			mappedByteBuffer.put(0, (byte) 'a');
			mappedByteBuffer.put(7, (byte) 'b');
			mappedByteBuffer.put(8, (byte) 'b');
			mappedByteBuffer.put(9, (byte) 'b');
		} catch (FileNotFoundException e) {
			e.printStackTrace();
		} catch (IOException e) {
			e.printStackTrace();
		}
	}
- NIO还支持多个Buffer进行数据的读写操作。
Channel(通道)
核心代码如下
- FileChannel fileChannel = fileInputStream.getChannel(); 获取输入流绑定的FileChannel。
- ByteBuffer byteBuffer = ByteBuffer.allocate(1024); 创建buffer
- fileChannel.read(byteBuffer); 通道读取buffer中的数据。
从核心代码可以看出,输入流和输出流与Channel绑定,而流数据的读取采用的是Buffer的形式。
代码示例
/**
	 * FileChannel读取文件内容
	 */
	public static void fileChannel(){

		File file = new File("/Users/floatcloud/Downloads/java/aaa.txt");
		FileInputStream fileInputStream = null;
		try {
			fileInputStream = new FileInputStream(file);
			FileChannel fileChannel = fileInputStream.getChannel();
			ByteBuffer byteBuffer = ByteBuffer.allocate(1024);
			int read = 0;
			byteBuffer.clear();
			while ((read = fileChannel.read(byteBuffer)) >= 0) {
				System.out.println(new String(byteBuffer.array()));
			}
			fileChannel.close();
		} catch (FileNotFoundException e) {
			e.printStackTrace();
		} catch (IOException e) {
			e.printStackTrace();
		} finally {
			if (fileInputStream != null){
				try {
					fileInputStream.close();
				} catch (IOException e) {
					e.printStackTrace();
				}
			}
		}
	}


	/**
	 * FileChannel向本地文件写入数据
	 */
	public static void writeFileChannel(){
		File file = new File("/Users/floatcloud/Downloads/java/aaa.txt");
		FileOutputStream fileOutputStream = null;
		Scanner scanner = new Scanner(System.in);
		String line = "";
		String goOn = "y";
		StringBuilder stringBuilder = new StringBuilder();
		while (!"n".equalsIgnoreCase(goOn)){
			System.out.println("请输入写入的值:");
			line = scanner.nextLine();
			stringBuilder.append(line);
			System.out.println("是否继续输入?停止输入:输入n/N,继续输入");
			goOn = scanner.nextLine();
		}
		try {
			fileOutputStream = new FileOutputStream(file);
			FileChannel fileChannel = fileOutputStream.getChannel();
			byte[] bytes = stringBuilder.toString().getBytes("UTF-8");
			ByteBuffer byteBuffer = ByteBuffer.allocate(bytes.length);
			byteBuffer.put(bytes);
			byteBuffer.flip();
			fileChannel.write(byteBuffer);
			fileChannel.close();
		} catch (FileNotFoundException e) {
			e.printStackTrace();
		} catch (IOException e) {
			e.printStackTrace();
		} finally {
			if (fileOutputStream != null){
				try {
					fileOutputStream.close();
				} catch (IOException e) {
					e.printStackTrace();
				}
			}
		}
	}


	/**
	 * 使用FileChannel复制文件
	 */
	public static void copyFile(){
		FileOutputStream fileOutputStream = null;
		FileInputStream fileInputStream = null;
		File file = new File("/Users/floatcloud/Downloads/java/aaa.txt");
		File copyFile = new File("copy.md");
		try {
			if (!copyFile.exists()){
				copyFile.createNewFile();
			}
			ByteBuffer byteBuffer = ByteBuffer.allocate(1024);
			fileOutputStream = new FileOutputStream(copyFile);
			fileInputStream = new FileInputStream(file);
			FileChannel inputStreamChannel = fileInputStream.getChannel();
			FileChannel outputStreamChannel = fileOutputStream.getChannel();
			int read = 0;
			do {
				byteBuffer.flip();
				outputStreamChannel.write(byteBuffer);
				// byteBuffer标志位的清空
				byteBuffer.clear();
			} while ((read = inputStreamChannel.read(byteBuffer)) > 0 );
			inputStreamChannel.close();
			outputStreamChannel.close();
		} catch (FileNotFoundException e) {
			e.printStackTrace();
		} catch (IOException e) {
			e.printStackTrace();
		} finally {
			if (fileInputStream != null){
				try {
					fileInputStream.close();
				} catch (IOException e) {
					e.printStackTrace();
				}
			}
			if (fileOutputStream != null){
				try {
					fileOutputStream.close();
				} catch (IOException e) {
					e.printStackTrace();
				}
			}
		}
	}

	/**
	 * 复制照片--通过transferFrom方法进行复制
	 */
	public static void copyPicture(){
		FileInputStream fileInputStream = null;
		FileOutputStream fileOutputStream = null;
		File file = new File("/Users/floatcloud/Downloads/java/WechatIMG16.png");
		File copyFile = new File("WechatIMG16.png");
		try {
			fileInputStream = new FileInputStream(file);
			fileOutputStream = new FileOutputStream(copyFile);
			FileChannel inputStreamChannel = fileInputStream.getChannel();
			FileChannel outputStreamChannel = fileOutputStream.getChannel();
			outputStreamChannel.transferFrom(inputStreamChannel, 0, inputStreamChannel.size());
			inputStreamChannel.close();
			outputStreamChannel.close();
		} catch (FileNotFoundException e) {
			e.printStackTrace();
		} catch (IOException e) {
			e.printStackTrace();
		} finally {
			ioClose(fileInputStream, fileOutputStream);
		}
	}
Selector(选择器)
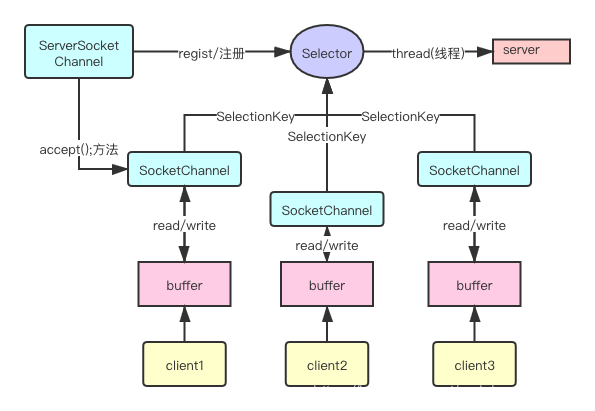
- Chennal注册到Selector中,并生成SelectionKey,Selector根据SelectionKey来获取注册的Chennal以及该Chennal的事件,并根据事件类型执行对应的业务逻辑。
- 实现了一个线程管理多个连接(Chennal)。
- 单线程也避免了因为不同连接而切换线程的消耗(BIO)。
Selector常用方法
- selectNow(); // 非阻塞,立刻获取所有信息
- select(); // 阻塞,获取所有返回Selection
- select(long timeout); // 指定时间内返回所有Selection
- wakeup(); // 唤醒阻塞的想成。
示例代码
package com.floatcloud.netty.utils;

import java.io.IOException;
import java.net.InetSocketAddress;
import java.nio.ByteBuffer;
import java.nio.channels.*;
import java.util.Iterator;
import java.util.Set;

/**
 * @author floatcloud
 */
public class LocalSockerServer {

	/**
	 * 根据nio写一个服务端,实现非阻塞的网络传输
	 */
	public static void server(){
		try {
			// 1.服务端创建 ServerSocketChannel
			ServerSocketChannel serverSocketChannel = ServerSocketChannel.open();
			// 2.创建selector
			Selector selector = Selector.open();
			// serverSocketChannel监听的端口6666
			serverSocketChannel.socket().bind(new InetSocketAddress(6666));
			// 设置为非阻塞
			serverSocketChannel.configureBlocking(false);
			// 3.将ServerSocketChannel注册到selector;事件为SelectionKey.OP_ACCEPT
			serverSocketChannel.register(selector, SelectionKey.OP_ACCEPT);
			// 监听(轮询)是否有连接生成
			do {
				// 是否存在连接(通道)
				int selectNum = selector.select(1000);
				if (selectNum == 0){
					System.out.println("无客户端连接");
					continue;
				}
				// 4.获取所有的SelectionKey
				Set<SelectionKey> selectionKeys = selector.selectedKeys();
				// 遍历selectionKeys
				Iterator<SelectionKey> keyIterator = selectionKeys.iterator();
				while (keyIterator.hasNext()){
					// 获取selectionKey
					SelectionKey selectionKey = keyIterator.next();
					// 新连接(通道)
					if(selectionKey.isAcceptable()){
						// 5.首次:根据ServerSocketChannel获取对应的SocketChannel
						try {
							SocketChannel accept = serverSocketChannel.accept();
							// 将accept通道设置为不阻塞
							accept.configureBlocking(false);
							// 6.将SocketChannel注册到Selector
							SelectionKey register = accept.register(selector, SelectionKey.OP_READ, ByteBuffer.allocate(1024));
							System.out.println("启动的新通道的key为"+ register);
						} catch (IOException e) {
							e.printStackTrace();
						}
					}
					// Chennal:读取事件
					if(selectionKey.isReadable()) {
						// 7.根据selectionKey反向获取对应的SocketChannel
						SocketChannel channel = (SocketChannel) selectionKey.channel();
						// 8.根据key获取对应的buffer
						ByteBuffer byteBuffer = (ByteBuffer) selectionKey.attachment();
						// 9.通道读取bytebuffer数据
						try {
							channel.read(byteBuffer);
						} catch (IOException e) {
							e.printStackTrace();
						}
						System.out.println("读取数据读取成功!" + new String(byteBuffer.array()));
					}
					// 防止多线程并发下,导致使用该selectionKey重复操作
					keyIterator.remove();
				}
			} while (true);
		} catch (IOException e) {
			e.printStackTrace();
		}
	}

	public static void main(String[] args) {
		server();
	}
}
客户端调用代码
package com.floatcloud.netty.utils;

import java.io.IOException;
import java.net.InetSocketAddress;
import java.nio.ByteBuffer;
import java.nio.channels.SocketChannel;
import java.nio.charset.Charset;

/**
 * 客户端调用测试
 * @author floatcloud
 */
public class LocalSocketClient {

	public static void main(String[] args) {
		try {
			SocketChannel socketChannel = SocketChannel.open();
			socketChannel.configureBlocking(false);
			InetSocketAddress inetSocketAddress = new InetSocketAddress("127.0.0.1", 6666);
			if (!socketChannel.connect(inetSocketAddress)){
				while (!socketChannel.finishConnect()) {
					System.out.println("连接中。。。。非阻塞");
				}
			}
			String sendStr = "张三+1111222255";
			ByteBuffer byteBuffer = ByteBuffer.wrap(sendStr.getBytes(Charset.forName("UTF-8")));
			socketChannel.write(byteBuffer);
			// 保持连接,线程在此处停止。
			System.in.read();
		} catch (IOException e) {
			e.printStackTrace();
		}
	}
}
SelectionKey API
属性
// 事件类型
// 读操作
public static final int OP_READ = 1 << 0;
// 写操作
public static final int OP_WRITE = 1 << 2;
// 连接已建成
public static final int OP_CONNECT = 1 << 3;
// 有新的连接生成
public static final int OP_ACCEPT = 1 << 4;
方法
// 获取与其绑定的SocketChennal
public abstract SelectableChannel channel();
// 获取与其绑定的Selector
public abstract Selector selector();
// 判断selectionKey是否有效
public abstract boolean isValid();
// 改变selectionKey的事件
public abstract SelectionKey interestOps(int ops);
// 事件类型为读操作
public final boolean isReadable() {
    return (readyOps() & OP_READ) != 0;
}
// 事件类型为写操作
public final boolean isWritable() {
    return (readyOps() & OP_WRITE) != 0;
}
// 事件类型为已连接
public final boolean isConnectable() {
    return (readyOps() & OP_CONNECT) != 0;
}
// 事件类型为新建连接
public final boolean isAcceptable() {
    return (readyOps() & OP_ACCEPT) != 0;
}
ServerSocket API
方法
// 绑定地址、端口
public void bind(SocketAddress endpoint) throws IOException {
        bind(endpoint, 50);
}
// 获取连接地址信息-SocketAddress
public SocketAddress getLocalSocketAddress() {
    if (!isBound())
        return null;
    return new InetSocketAddress(getInetAddress(), getLocalPort());
}
// 获取对应的Socket
public Socket accept() throws IOException {
    if (isClosed())
        throw new SocketException("Socket is closed");
    if (!isBound())
        throw new SocketException("Socket is not bound yet");
    Socket s = new Socket((SocketImpl) null);
    implAccept(s);
    return s;
}
SocketChennal API
// 获取一个SocketChannel
 public static SocketChannel open(SocketAddress remote)
        throws IOException
    {
        SocketChannel sc = open();
        try {
            sc.connect(remote);
        } catch (Throwable x) {
            try {
                sc.close();
            } catch (Throwable suppressed) {
                x.addSuppressed(suppressed);
            }
            throw x;
        }
        assert sc.isConnected();
        return sc;
}
//  连接服务端
public abstract boolean connect(SocketAddress remote) throws IOException;
// 上方法连接失败后,会调用的方法(结束连接)。
public abstract boolean finishConnect() throws IOException;
// 从通道中读数据
public abstract int read(ByteBuffer dst) throws IOException;
// 往通道中写数据
public abstract int write(ByteBuffer src) throws IOException;
// 设置模式:阻塞、非阻塞
public final SelectableChannel configureBlocking(boolean block)
// 向selector中注册,并设置监听事件
public final SelectionKey register(Selector sel,int ops,Object att)
throws ClosedChannelException
ServerSocketChennal API
// 得到一个ServerSocketChannel通道
public static ServerSocketChannel open() throws IOException {
        return SelectorProvider.provider().openServerSocketChannel();
}
// AbstractSelectableChannel类中设置是否阻塞、非阻塞模式
public final SelectableChannel configureBlocking(boolean block) throws IOException {
    synchronized (regLock) {
        if (!isOpen())
            throw new ClosedChannelException();
        if (blocking == block)
            return this;
        if (block && haveValidKeys())
            throw new IllegalBlockingModeException();
        implConfigureBlocking(block);
        blocking = block;
    }
    return this;
}
// 向Selector中注册一个Chennal,并设置其监听事件
public final SelectionKey register(Selector sel, int ops) throws ClosedChannelException {
    return register(sel, ops, null);
}
// 绑定地址、端口
public final ServerSocketChannel bind(SocketAddress local)
    throws IOException
{
    return bind(local, 0);
}
// 获取新建连接的通道SocketChannel
public abstract SocketChannel accept() throws IOException;


 1065
1065

 被折叠的 条评论
为什么被折叠?
被折叠的 条评论
为什么被折叠?
 到【灌水乐园】发言


