


 本文介绍了Spring Boot的Web开发,包括使用Spring Initializer创建项目、静态资源映射、Thymeleaf模板引擎的使用,以及Spring Boot的错误处理机制。详细讲解了如何自定义错误响应和配置嵌入式Servlet容器,同时探讨了外置Servlet容器的使用场景和配置方法。
1. 使用Spring Boot(三步走)
- 用Spring Initializer创建Spring Boot应用,选中需要的模块
- Spring Boot默认将这些场景自动配置(xxxAutoConfiguration注入组件+xxxProperties封装配置),只需要在主配置文件中指定少量配置就可以运行
- 编写业务逻辑代码
2. RESTful-CRUD实例
2.1 准备
2.1.1 使用Spring Initializer快速创建自带web模块的Spring Boot项目
2.1.2 Spring Boot对静态资源的映射规则
//用来设置和静态资源有关的参数,如缓存时间等
@ConfigurationProperties(prefix = "spring.resources",ignoreUnknownFields = false)
public class ResourceProperties implements ResourceLoaderAware, InitializingBean
//org.springframework.boot.autoconfigure.web.WebMvcAutoConfiguration

//静态资源处理器
public void addResourceHandlers(ResourceHandlerRegistry registry) {
            if (!this.resourceProperties.isAddMappings()) {
                logger.debug("Default resource handling disabled");
            } else {
                Integer cachePeriod = this.resourceProperties.getCachePeriod();
                //规则一:localhost:8080/webjars/jquery/3.2.1/jquery.js
                if (!registry.hasMappingForPattern("/webjars/**")) {
                    this.customizeResourceHandlerRegistration(registry.addResourceHandler(new String[]{"/webjars/**"}).addResourceLocations(new String[]{"classpath:/META-INF/resources/webjars/"}).setCachePeriod(cachePeriod));
                }
				//规则二:去ResourceProperties里配置拿staticLocation,这是一个常量数组RESOURCE_LOCATIONS={"/","classpath:/META-INF/resources","classpath:/resources/","classpath:/static/","classpathL/public/"},这些位置就是存放静态资源的位置
                String staticPathPattern = this.mvcProperties.getStaticPathPattern();
                if (!registry.hasMappingForPattern(staticPathPattern)) {
                    this.customizeResourceHandlerRegistration(registry.addResourceHandler(new String[]{staticPathPattern}).addResourceLocations(this.resourceProperties.getStaticLocations()).setCachePeriod(cachePeriod)); //staicLocation->ResourceProperty#RESOURCE_LOCATIONS,是一个常量数组
                }

            }
        }
-
规则一:所有匹配/webjars/**的资源请求都去 classpath:/META-INF/resources/webjars/ 找资源。
【webjars】:以jar包的方式引入静态资源:https://www.webjars.org/ ,可以查询到所需资源的对应版本并将dependency引入pom.xml,如jquery。<dependency> <groupId>org.webjars</groupId> <artifactId>jquery</artifactId> <version>3.2.1</version> </dependency>导入后的jar包目录结构

只需要写wejars下面的资源路径即可,访问路径举例:localhost:8080/webjars/jquery/3.2.1/jquery.js -
/** 访问当前项目的任何资源,如果没有处理,将从以下静态资源文件夹中查找
classpath:/META-INF/resources/
classpath:/resources/
classpath:/static/
classpath:/public/
/ (即当前项目的根路径)
注意,上面的静态资源文件夹的名字不在访问路径中出现,访问路径举例:localhost:8080/assets/js/Chart.min.js
//配置欢迎页映射
@Bean
public WebMvcAutoConfiguration.WelcomePageHandlerMapping welcomePageHandlerMapping(ResourceProperties resourceProperties) {
			//底层调用返回的是,第一个“存在的index.html”的Resource对象,与getStaticPathPattern()返回的/**映射
            return new WebMvcAutoConfiguration.WelcomePageHandlerMapping(resourceProperties.getWelcomePage(), this.mvcProperties.getStaticPathPattern());
}
/*底层的核心调用
private String[] getStaticWelcomePageLocations() {
        String[] result = new String[this.staticLocations.length];

        for(int i = 0; i < result.length; ++i) {
            String location = this.staticLocations[i];
            if (!location.endsWith("/")) {
                location = location + "/";
            }
			//将静态资源文件夹的路径都拼接上index.html,返回{/index.html,classpath:/META-INF/resource/index.html,classpath:/resource/index.html,classpath:/static/index.html,classpath:/public/index.html}
            result[i] = location + "index.html";
        }
*/
- 欢迎页:静态资源文件夹下的所有index.html页面;被/**映射。 访问路径举例:localhost:8080/ => index.html
//配置图标
@Configuration
@ConditionalOnProperty(value = {"spring.mvc.favicon.enabled"},matchIfMissing = true)
public static class FaviconConfiguration {
    private final ResourceProperties resourceProperties;

    public FaviconConfiguration(ResourceProperties resourceProperties) {
       this.resourceProperties = resourceProperties;
}

@Bean
public SimpleUrlHandlerMapping faviconHandlerMapping() {
      SimpleUrlHandlerMapping mapping = new SimpleUrlHandlerMapping();
      mapping.setOrder(-2147483647);
  	  //将所有**/favicon.ico映射给faviconRequestHandler,底层核心调用resourceProperties.getFaviconLocations()中,还是拿静态资源文件夹的路径来取得图标路径
      mapping.setUrlMap(Collections.singletonMap("**/favicon.ico",
                                             this.faviconRequestHandler()));
       return mapping;
}
/*底层核心调用
  List<Resource> getFaviconLocations() {
        List<Resource> locations = new ArrayList(this.staticLocations.length + 1);
        if (this.resourceLoader != null) {
            String[] var2 = this.staticLocations;
            int var3 = var2.length;

            for(int var4 = 0; var4 < var3; ++var4) {
                String location = var2[var4];
                locations.add(this.resourceLoader.getResource(location));
            }
        }
*/
- 所有的**/favicon.ico都是在静态资源文件夹下找
- 通过在主配置文件中修改spring.resources.static-locations(就是前面源码中ResourcePropeties一直在用的staticLocations)自定义静态资源文件夹(配置之后,之前默认的静态资源文件夹路径都不可用),可以定义多个,因为上面看到了它本身是一个数组(用逗号分隔)。
2.2 Spring Boot默认不支持JSP => 推荐模板引擎(ViewResolver)Thymeleaf
2.2.1 引入Thymeleaf-starter
<dependency>
	<groupId>org.springframework.boot</groupId>
	<artifactId>spring-boot-starter-thymeleaf</artifactId>
</dependency>

<!--默认引用2.1.6,过低,需要切换3.x。在当前工程pom.xml抽取的<properties>中加入如下配置来覆盖父依赖-->
<thymeleaf.version>3.0.2.RELEASE</thymeleaf.version>
<!--布局功能的支持程序,thymeleaf3主程序,layout2以上版本-->
<thymeleaf-layout-dialect.version>2.1.1</thymeleaf-layout-dialect.version>
2.2.2 使用
- 只要把html页面置于classpath:/templates/中,thymeleaf便能自动渲染。
- 在h5页面的<html>中导入thymeleaf的命名空间以获取语法提示。
<html lang="en" xmlns:th="http://www.thymeleaf.org"> - Thymeleaf配置封装ThymeleafProperties
@ConfigurationProperties(
    prefix = "spring.thymeleaf"
)
public class ThymeleafProperties {
    private static final Charset DEFAULT_ENCODING = Charset.forName("UTF-8");
    private static final MimeType DEFAULT_CONTENT_TYPE = MimeType.valueOf("text/html");

  	//只要把HTML页面置于classpath:/templates/中,thymeleaf便能自动渲染
    public static final String DEFAULT_PREFIX = "classpath:/templates/";
    public static final String DEFAULT_SUFFIX = ".html";


    private boolean checkTemplate = true;
    private boolean checkTemplateLocation = true;
    private String prefix = "classpath:/templates/";
    private String suffix = ".html";
    private String mode = "HTML5";
    private Charset encoding;
    private MimeType contentType;
    private boolean cache;
    private Integer templateResolverOrder;
    private String[] viewNames;
    private String[] excludedViewNames;
    private boolean enabled;
}
2.2.3 语法(详见Thymeleaf官网pdf)
-
th:text 替换当前元素内的文本内容
==推广至==>“th:任意属性” 可以对html原生对应属性进行替换(只有经过模板引擎渲染的访问才会发生属性替换,直接访问单纯的静态 html不会替换)。 -
属性解析的优先级

-
表达式
Simple Expression 简单表达式 Variable Expression 变量表达式 ${} 底层是OGNL表达式,OGNL功能
内置Basic Object:
#ctx: the context object
#vars: the context variables
#locale: the context locale
#request: HttpServletRequest
#response: HttpServeltResponse
#session: HttpSession
#servletContext: ServletContext
内置工具对象:
#execInfo: information about the template being processed.
#message: methods for obtaining externalized messages inside variables expression, in the same way as they would be obtained using #{…}
#uris: methods for escaping parts of URLs/URIs
#conversions: methods for executingthe configured conversion service(if any)
#dates: methods for java.util.Date objects: formatting, component extraction…
#calendars: analogous to #date, but for java.util.Calendar objects
#numbers: methods for formatting numeric objects
#strings: methods for String objects: contains, startWith, prepending/appending…
#objects: methods for objects in general
#bools: method for boolean evaluation
#arrays: method for arrays
#lists
#sets
#maps
#aggregates: methods for creating aggregates on array of collection
#ids: methods for dealing with id attributes that might be repeatedSelecting Variable Expression 选择表达式 基本功能和${}一样,但补充了功能:配合th:object进行使用,在外层div属性th:object指定对象后,可以直接在内部元素直接使用*{字段名}取到其内部属性值 Message Expression 国际化表达式 #{},获取国际化内容 Link URL Expression @{},定义URL,th:href
@{/order/process(execId=${execId},execType=‘FAST’)},execId和execType是传递的两个参数,用逗号隔开,可以套用${}动态取参数Fragment Expression 文档片段表达式 ~{…} 字面量表达式,数学表达式,布尔表达式,运算符表达式、条件运算等与OGNL一致
【Special tokes 特殊表达式(表示无操作,如在三元运算中):_】 -
常见场景实例
	<body>
   	success!
   	<!-- th:text 将div内的文本内容设置为指定值-->
   	<div th:text="${hello}"></div>
   	<div th:utext="${hello}"></div>
   	<hr/>
   	<!--与增强foreach相似的遍历th:each, 每次遍历都会生成当前标签-->
   	<h4 th:text="${user}" th:each="user:${users}"></h4>
   	<hr>
   	<h4>
   	  	<!--[[]]与th:text等价,[()]与th:utext等价 -->
   	    <span th:each="user:${users}">[[${user}]]</span>
   	</h4>
   	</body>
2.3 底层 SpringMVC 自动配置WebMvcAutoConfiguration
Spring Boot provides auto-configuration for Spring MVC that works well with most applications.
The auto-configuration adds the following features on top of Spring’s defaults:
- Inclusion of ContentNegotiatingViewResolver and BeanNameViewResolver beans.
(自动配置视图解析器ViewResolver。ContentNegotiatingViewResolver将获取容器中所有的ViewResolver。=>只要在配置类中向容器注入ViewResolver的实现类对象,就可以被ContentNegotiatingViewResolver自动组合进来。)
- Support for serving static resources, including support for WebJars (see below).
- Static index.html support.
- Custom Favicon support (see below).
(对webjars、静态资源文件夹、首页、图标等支持)
- Automatic registration of Converter, GenericConverter, Formatter beans.
(自动配置了映射绑定时的类型转换Converter和数据格式化Formatter=>只要在配置类中向容器注入Converter或Formatter的实现类对象,就可以添加自定义转换器)
- Support for HttpMessageConverters (see below).
(自动配置对JSON和POJO的转换器=>只要在配置类中注入HttpMessageConverter,就可以添加自定义HttpMessageConverter)
- Automatic registration of MessageCodesResolver (see below).
定义错误代码生成规则,如JSR303数据校验
- Automatic use of a ConfigurableWebBindingInitializer bean (see below).
(自动配置ConfigurableWebBindingInitializer用来初始化WebDataBinder=>只要在配置类中注入ConfigurableWebBindingInitializer,就可以自定义WebDataBinder来替换默认的)
- 自动配置视图解析器ViewResolver
//WebMVCAutoConfiguration.java //1.1 ContentNegotiatingViewResolver:组合所有的视图解析器 @Bean @ConditionalOnBean({ViewResolver.class}) @ConditionalOnMissingBean(name = {"viewResolver"},value = {ContentNegotiatingViewResolver.class}) public ContentNegotiatingViewResolver viewResolver(BeanFactory beanFactory) { ContentNegotiatingViewResolver resolver = new ContentNegotiatingViewResolver(); resolver.setContentNegotiationManager((ContentNegotiationManager)beanFactory .getBean(ContentNegotiationManager.class)); resolver.setOrder(-2147483648); return resolver; } //ContentNegotiatingViewResolver.java //1.1.1 ContentNegotiatingViewResolver的核心方法:解析最佳视图实现 public View resolveViewName(String viewName, Locale locale) throws Exception { RequestAttributes attrs = RequestContextHolder.getRequestAttributes(); Assert.state(attrs instanceof ServletRequestAttributes, "No current ServletRequestAttributes"); List<MediaType> requestedMediaTypes = this.getMediaTypes(((ServletRequestAttributes)attrs).getRequest()); if (requestedMediaTypes != null) { //获取候选的View对象 List<View> candidateViews = this.getCandidateViews(viewName, locale, requestedMediaTypes); /* 底层getCadidateViews()的核心代码 private List<View> getCandidateViews(String viewName, Locale locale, List<MediaType> requestedMediaTypes) throws Exception { List<View> candidateViews = new ArrayList(); Iterator var5 = this.viewResolvers.iterator(); //遍历所有的ViewResolver进行解析 while(var5.hasNext()) { ViewResolver viewResolver = (ViewResolver)var5.next(); View view = viewResolver.resolveViewName(viewName, locale); if (view != null) { candidateViews.add(view); } Iterator var8 = requestedMediaTypes.iterator(); while(var8.hasNext()) { MediaType requestedMediaType = (MediaType)var8.next(); List<String> extensions = this.contentNegotiationManager.resolveFileExtensions(requestedMediaType); Iterator var11 = extensions.iterator(); while(var11.hasNext()) { String extension = (String)var11.next(); String viewNameWithExtension = viewName + '.' + extension; view = viewResolver.resolveViewName(viewNameWithExtension, locale); if (view != null) { candidateViews.add(view); } } } } }*/ //从候选View中选出最佳View对象后返回 View bestView = this.getBestView(candidateViews, requestedMediaTypes, attrs); if (bestView != null) { return bestView; } } //... ... } //1.1.2 ContentNegotiatingViewResolver如何获取所有的视图解析器ViewResolver? //如何自定义视图解析器?给容器注入自定义ViewResolver实现类,ContentanargotiatingViewResolver自动组合进来 protected void initServletContext(ServletContext servletContext) { //用BeanFacotryUtils工具获取容器中所有ViewResolver的实现类,这就是candidateViewResolvers Collection<ViewResolver> matchingBeans = BeanFactoryUtils .beansOfTypeIncludingAncestors(this.getApplicationContext(), ViewResolver.class) .values(); if (this.viewResolvers == null) { this.viewResolvers = new ArrayList(matchingBeans.size()); Iterator var3 = matchingBeans.iterator(); while(var3.hasNext()) { ViewResolver viewResolver = (ViewResolver)var3.next(); if (this != viewResolver) { this.viewResolvers.add(viewResolver); } } } else { for(int i = 0; i < this.viewResolvers.size(); ++i) { if (!matchingBeans.contains(this.viewResolvers.get(i))) { String name = ((ViewResolver)this.viewResolvers.get(i)).getClass().getName() + i; this.getApplicationContext().getAutowireCapableBeanFactory().initializeBean(this.viewResolvers.get(i), name); } } } - 自动配置类型转换器Converter与格式化器Formatter ===> ConverterFormatter
//WebMvcAutoConfiguration.java //2.1 DateFormatter @Bean @ConditionalOnProperty(prefix = "spring.mvc",name = {"date-format"})//需要在配置文件中指定日期格式化规则 public Formatter<Date> dateFormatter() { return new DateFormatter(this.mvcProperties.getDateFormat()); } //2.2 HttpMessageConverters从容器中获取所有的HttpMessageConverter(只有一个有参构造器,所有的参数值都从容器中取出) //如何自定义HttpMessageConverter?给容器注入自定义HttpMessageConverter实现类 public WebMvcAutoConfigurationAdapter(ResourceProperties resourceProperties, WebMvcProperties mvcProperties, ListableBeanFactory beanFactory, @Lazy HttpMessageConverters messageConverters, ObjectProvider<WebMvcAutoConfiguration.ResourceHandlerRegistrationCustomizer> resourceHandlerRegistrationCustomizerProvider); /* * //是HttpMessageConverter的可变数组或集合 * public class HttpMessageConverters implements Iterable<HttpMessageConverter<?>> */ //2.3 添加格式化器 //如何自定义格式化转换器?给容器注入自定义Converter实现类 public void addFormatters(FormatterRegistry registry) { //核心调用getBeansOfType,从beanFactory容器中获取所有的Coverter返回 Iterator var2 = this.getBeansOfType(Converter.class).iterator(); while(var2.hasNext()) { Converter<?, ?> converter = (Converter)var2.next(); //Spring关键字registry registry.addConverter(converter); } var2 = this.getBeansOfType(GenericConverter.class).iterator(); while(var2.hasNext()) { GenericConverter converter = (GenericConverter)var2.next(); registry.addConverter(converter); } var2 = this.getBeansOfType(Formatter.class).iterator(); while(var2.hasNext()) { Formatter<?> formatter = (Formatter)var2.next(); registry.addFormatter(formatter); } } - 自动初始化数据绑定器WebDataBinder
//如何自定义绑定器?给容器注入自定义ConfigurableWebDataBindingInitializer
protected ConfigurableWebBindingInitializer getConfigurableWebBindingInitializer() {
            try {
                //又是从容器中取出ConfigurableWebBindingInitializer实现
                return (ConfigurableWebBindingInitializer)this.beanFactory.getBean(ConfigurableWebBindingInitializer.class);
            } catch (NoSuchBeanDefinitionException var2) {
                //在容器中没找到,调用super创建默认的ConfigurableWebBindingInitialier,来初始化WebDataBinder
                return super.getConfigurableWebBindingInitializer();
            }
}

//ConfiguratbleWebBindingInitializer用来初始化WebDataBinder的核心方法
//public void initBinder(WebDataBinder binder, WebRequest request);
Spring Boot对于Web组件的自动配置不止上述功能(上面只是WebMvcAutoConfiguration),所有Web的自动配置都在org.springframework
boot.autoconfigure.web下的xxxAutoConfiguration中。
2.4 扩展SpringMVC(interceptors等)
If you want to keep Spring Boot MVC features, and you just want to add additional MVC configuration (interceptors, formatters, view controllers etc.) you can add your own @Configuration class of type WebMvcConfigurerAdapter, but without @EnableWebMvc.
If you wish to provide custom instances of RequestMappingHandlerMapping, RequestMappingHandlerAdapter or ExceptionHandlerExceptionResolver you can declare a WebMvcRegistrationsAdapter instance providing such components.
If you want to take complete control of Spring MVC, you can add your own @Configuration annotated with @EnableWebMvc.
※编写一个配置类@Configuration,继承WebMvcConfigurerAdapter重写需要自定义配置的方法,且不标注@EnableWebMvc :既保留了SpringBoot对SpringMVC所有的自动配置,也能添加额外的自定义扩展配置
//使用WebMvcCofigurerAdapter来扩展SpringMVC的功能,重写需要自定义配置的方法
@Configuration
public class MyMvcConfig extends WebMvcConfigurerAdapter {
    @Override
    public void addInterceptors(InterceptorRegistry registry) {
        //super.addInterceptors(registry);
        registry.addInterceptor(new HandlerInterceptor() {
            @Override
            public boolean preHandle(HttpServletRequest httpServletRequest, HttpServletResponse httpServletResponse, Object o) throws Exception {
                return true;
            }

            @Override
            public void postHandle(HttpServletRequest httpServletRequest, HttpServletResponse httpServletResponse, Object o, ModelAndView modelAndView) throws Exception {

            }

            @Override
            public void afterCompletion(HttpServletRequest httpServletRequest, HttpServletResponse httpServletResponse, Object o, Exception e) throws Exception {

            }
        }).addPathPatterns("/hello");
    }
}
【原理】
(1)WebMvcAutoConfiguration是SpringMVC的自动配置类。
(2)在这个自动配置类中,同样使用WebMvcConfigurerAdapter重写抽象类提供的方法,将组件注入到容器中。
@Configuration
@Import({WebMvcAutoConfiguration.EnableWebMvcConfiguration.class})
@EnableConfigurationProperties({WebMvcProperties.class, ResourceProperties.class})
    public static class WebMvcAutoConfigurationAdapter extends WebMvcConfigurerAdapter{...}
(3)在做其他自动配置时会导入:@Import({EnableWebMvcConfiguration.class}),它会添加RequestMappingHandlerMapping,RequestMappingHandlerAdapter等等。
同时继承DelegatingWebMvcConfiguration中的核心方法setConfigurures,从容器中获取所有的WebMvcConfigurer(WebMvcConfigurerAdapter所实现的接口)实现,这也就包括SpringBoot自动配置类和用户所自定义的扩展配置类。
//EnableWebMvcConfiguration
@Configuration
public static class EnableWebMvcConfiguration extends DelegatingWebMvcConfiguration

//DelegatingWebMvcConfiguration的核心方法
//从容器中获取所有WebMvcConfigurer实现并绑定给configures
@Autowired(required = false)
public void setConfigurers(List<WebMvcConfigurer> configurers) {
    if (!CollectionUtils.isEmpty(configurers)) {
        this.configurers.addWebMvcConfigurers(configurers);
}

/* 参考一个配置方法addViewControllers的调用实现,将所有的WebMvConfigurer的addViewControllers都调用一遍
public void addViewControllers(ViewControllerRegistry registry) {
	//拿到所有的WebMvcConfigurer
    Iterator var2 = this.delegates.iterator();
	//遍历并调用所有WebMvcConfigurer的同一个方法
    while(var2.hasNext()) {
        WebMvcConfigurer delegate = (WebMvcConfigurer)var2.next();
         delegate.addViewControllers(registry);
    }
}*/
2.5 全面接管SpringMVC(不推荐)
在配置类上标注@EnableWebMvc,舍弃Spring Boot对SpringMVC的所有自动配置,所有SpringMVC配置都需要自己从头配置。
【原理】
(1)@EnableWebMvc核心
@Import({DelegatingWebMvcConfiguration.class})
public @interface EnableWebMvc
(2)DelegatingWebMvcConfiguration本质
//自动导入的WebMvcConfigurationSupport(DelegatingWebMvcConfiguration)只有基本设置,相当于之前<mvc:annotation-driven/>
public class DelegatingWebMvcConfiguration extends WebMvcConfigurationSupport
(3)而WebMvcAutoConfiguration启用的条件
//只有容器中没有WebMvcConfigurationSupport时,该自动配置类才生效,也就是说一旦某配置类@EnableWebMvc之后,WebMvcConfigurationSupport的实现被加入容器中,自动配置类失效
@ConditionalOnMissingBean({WebMvcConfigurationSupport.class})
@AutoConfigureOrder(-2147483638)
@AutoConfigureAfter({DispatcherServletAutoConfiguration.class, ValidationAutoConfiguration.class})
public class WebMvcAutoConfiguration
(4)一句话总结,@EnableWebMvc导入了WebMvcConfigurationSupport,违反了WebMvcAutoConfiguration的生效条件。
2.6 RESTful CRUD实验
2.6.1 访问首页
方法一:访问URL,Controller返回"index"跳至模板引擎渲染目录template下的index.html渲染
方法二:在自定义配置类(extends WebMvcConfigurerAdapter)中实现addControllerView
@Configuration
public class MyMvcConfig extends WebMvcConfigurerAdapter {

  	@Override
    public void addViewControllers(ViewControllerRegistry registry) {
        registry.addViewController("/").setViewName("login");
        registry.addViewController("/index.html").setViewName("login");
    }

   //或 在当前配置类中向容器再注入另一个WebMvcConfigurerAdapter,以使WebMvcAutoConfiguration连带一起使用(因为在源码中看到所有的WebMvcConfigurer都会被获取,然后遍历调用某个配置方法)
    @Bean
    public WebMvcConfigurerAdapter webMvcConfigurerAdapter(){
        return new WebMvcConfigurerAdapter() {
            @Override
            public void addViewControllers(ViewControllerRegistry registry) {
                registry.addViewController("/").setViewName("login");
                registry.addViewController("/index.html").setViewName("login");
            }
        };
}
2.6.2 修改资源引用(webjars)
<!--1. 在pom.xml导入对应webjars的依赖-->

<!--2. 在html导入thymeleaf提示命名空间-->
<html lang="en" xmlns:th="http://www.thymeleaf.org">

<!--3. 使用th:href配合@{}进行资源覆盖,类似${pageContext.request.contextPath}-->
<!-- Bootstrap core CSS -->
<link href="asserts/css/bootstrap.min.css" th:href="@{/webjars/bootstrap/4.0.0/css/bootstrap.css}" rel="stylesheet">
<!-- Custom styles for this template -->
<link href="asserts/css/signin.css"  th:href="@{asserts/css/signin.css}" rel="stylesheet">
2.6.3 国际化
-
原生SpringMVC使用步骤
编写国际化配置文件properties
向IOC容器注册ResourceBundleMessageSource,以管理国际化资源文件
在页面使用fmt:message取出当前Locale对应的内容
使用_locale指定切换目标 -
Spring Boot中使用
(1)编写国际化配置文件,抽取页面需要显示的国际化消息

Tip:IDEA检测国际化配置文件properties,会切换到国际化视图,按照基名basename进行分组(如Resource Bundle ‘login’,右键New时直接选择Add Property Files to Resource Bundle,在弹出的窗口中点击“+”输入“语言代码_国家代码”),而且在具体Locale对应的配置文件中可以使用ResourceBuddle视图(打开文件后在底部,与yml分块提示的位置一致)进行批量添加与更改(在左侧添加一个property,在右测输入这个property在创建的Locale下应该显示的信息)

#login.properties,默认配置,没有在国际化文件中配置的信息都会用此处不带语言和国家代码的默认配置
login.btn=登录~
login.password=密码~
login.remember=记住我~
login.tip 请登录~
login.username=用户名~

#login_zh_CN.properties
login.btn=登录
login.password=密码
login.remember=记住我
login.tip=请登录
login.username=用户名

#login.en_US.properties
login.btn=Sign in
login.password=Password
login.remember=RememberMe
login.tip=Please sign in
login.username=UserName
(2)Spring Boot自动配置好ResourceBundleMessageSource组件,开发人员只要在全局配置文件中指定基名
#包名.基名。如果不指定包名,将从classpath根路径下解析
spring.messages.basename=i18n.login
【原理】
@ConfigurationProperties(prefix = "spring.messages")
public class MessageSourceAutoConfiguration {
//...
  private String basename = "messages";	//基名默认值是messages,可以直接放在类路径下叫message.properties
//...
	//注入一个ResourceBundleMessageSource
    @Bean
    public MessageSource messageSource() {
        ResourceBundleMessageSource messageSource = new ResourceBundleMessageSource();
        if (StringUtils.hasText(this.basename)) {
       	  //设置国际化资源文件组的基名(去掉语言代码_国际代码)
          messageSource.setBasenames(StringUtils.
        		commaDelimitedListToStringArray(StringUtils.                                                                           trimAllWhitespace(this.basename)));
        }

        if (this.encoding != null) {
            messageSource.setDefaultEncoding(this.encoding.name());
        }

        messageSource.setFallbackToSystemLocale(this.fallbackToSystemLocale);
        messageSource.setCacheSeconds(this.cacheSeconds);
        messageSource.setAlwaysUseMessageFormat(this.alwaysUseMessageFormat);
        return messageSource;
    }
}
(3)到页面获取国际化的值:使用“th:对应属性”以替换
<img class="mb-4" src="asserts/img/bootstrap-solid.svg" th:src="@{asserts/img/bootstrap-solid.svg}" alt="" width="72" height="72">

<h1 class="h3 mb-3 font-weight-normal" th:text="#{login.tip}">Please sign in</h1>

<label class="sr-only" th:text="#{login.username}">Username</label>

<input type="text" class="form-control" th:placeholder="#{login.username}" placeholder="Username" required="" autofocus="">

<label class="sr-only" th:text="#{login.password}">Password</label>

<input type="password" class="form-control" th:placeholder="#{login.password}" placeholder="Password" required="">

<!-- 行内表达式 -->
<input type="checkbox" value="remember-me"> [[#{login.remember}]]

<button class="btn btn-lg btn-primary btn-block" type="submit" th:text="#{login.btn}">Sign in</button>
(4)语言切换(不再根据浏览器的语言设置自动选择)
原生SpringMVC原理:国际化依赖Locale -> LocaleResolver(获取区域信息对象)
<1> Spring Boot自动配置AcceptHeaderLocaleResolver:默认情况根据请求头中的区域信息获取Locale进行国际化//WebMvcAutoConfiguration.java @Bean @ConditionalOnMissingBean @ConditionalOnProperty(prefix = "spring.mvc",name = {"locale"}) public LocaleResolver localeResolver() { //如果再WebMvcProperties配置固定LocaleResolver就注入固定的 if (this.mvcProperties.getLocaleResolver() == org.springframework.boot.autoconfigure.web.WebMvcProperties.LocaleResolver.FIXED) { return new FixedLocaleResolver(this.mvcProperties.getLocale()); } else { //否则,注入“接受请求头”的LocaleResolver,底层核心调用resolveLocale方法,通过request.getLocale()从请求头中获取区域对象。 AcceptHeaderLocaleResolver localeResolver = new AcceptHeaderLocaleResolver(); localeResolver.setDefaultLocale(this.mvcProperties.getLocale()); return localeResolver; } }<2>自定义LocaleResolver并注入容器替换默认AcceptHeaderLocaleResolver以实现点击切换国际化需求
<!-- 在前台以点击链接的方式切换Locale,在thymeleaf中,传递参数使用() -->
<a class="btn btn-sm" th:href="@{/index.html(locale='zh_CN')}">中文</a>

<a class="btn btn-sm" th:href="@{/index.html(locale='en_US')}">English</a>
//自定义组件LocaleResolver,在URL中携带表示区域的参数 public class MyLocaleResolver implements LocaleResolver{ @Override public Locale resolveLocale(HttpServletRequest httpServletRequest) { String localeStr = httpServletRequest.getParameter("locale"); //获取系统默认的Locale(Locale是最终返回的目标) Locale locale=Locale.getDefault(); //使用SpringFramework的StringUtils来判断参数值是否为空,若为空则使用默认 if(!StringUtils.isEmpty(localeStr)){ //分割得到语言和国家代码并使用Locale构造器创建Locale String[] split = localeStr.split("_"); locale=new Locale(split[0],split[1]); System.out.println(split[0]+"_"+split[1]); } return locale; } @Override public void setLocale(HttpServletRequest httpServletRequest, HttpServletResponse httpServletResponse, Locale locale) { } } //在配置类中向IOC容器注入 @Bean public LocaleResolver localeResolver(){ return new MyLocaleResolver(); }
2.6.4 登录与拦截器
-
实现登录基本要点:
(1)为体现RESTful风格,映射注解可以使用@GetMapping、@PostMapping、@PutMapping、@Deletemapping以取代之前对应的@RequestMapping
(2)使页面在程序运行期间修改实时生效
<1>由于模板引擎的缓存功能,当修改静态页面时,不会立即更新,需要在主配置文件中禁用spring.thymeleaf.cache=false<2>IDEA Tips:在运行期间,当静态页面发生改变时,并不会立即编译刷新。在禁用缓存的前提下,使用 ctrl+F9 强制编译刷新。
(4)登录错误消息的显示(优先级与工具类的使用)<!-- 判断,th:if的优先级是3(优先级参考pdf文档第10章),当判断为true时,html的元素才会显示,并且从4开始的优先级才会执行th替换 --> <p style="color: red" th:text="${msg}" th:if="${not #strings.isEmpty(msg)}"/>(5)防止刷新重复提交表单最好登录验证通过后在进行重定向redirect。=>需要在自定义WebMvcConfigurerAdapter中的addViewController方法中配置登录后的URL与页面映射。=>但会导致登录没有意义,因为viewController的配置的页面映射不会经过后台,只要请求的URL是配置的映射,就会进入配置的页面。=>添加自定义拦截器用于登录检查是否登录。
(6)注意:想要被引擎动态渲染,必须解析请求映射至某模板视图(xxx.html->xxx->/templates/xxx.html),否则将在直接在静态资源文件夹下查找返回未渲染模板 -
登录检查拦截器要点:
(1)实现自定义Interceptor//登录检查 public class LoginHandlerInterceptor implements HandlerInterceptor { @Override public boolean preHandle(HttpServletRequest httpServletRequest, HttpServletResponse httpServletResponse, Object o) throws Exception { HttpSession session = httpServletRequest.getSession(); Object loginUser = session.getAttribute("loginUser"); if(loginUser == null){ //未登录,返回登录页面 httpServletRequest.setAttribute("msg","没有操作全限,请先登录"); httpServletRequest.getRequestDispatcher("/index.html").forward(httpServletRequest,httpServletResponse); }else{ //已经登录,放行 return true; } return false; } @Override public void postHandle(HttpServletRequest httpServletRequest, HttpServletResponse httpServletResponse, Object o, ModelAndView modelAndView) throws Exception { } @Override public void afterCompletion(HttpServletRequest httpServletRequest, HttpServletResponse httpServletResponse, Object o, Exception e) throws Exception { } }(2)向自定义配置类中添加该拦截器
Spring Boot已经做好静态资源映射,不会被拦截器拦截/* 使用addPathPatterns设置当前拦截器所能拦截的URL。/**即Ant表示所有层级 使用excludePathPatterns设置需要排除的请求,可变参数列表。显然,登录页与登录请求需要排除 */ @Override public void addInterceptors(InterceptorRegistry registry) { //Spring Boot 已经做好静态资源映射,不会被拦截器拦截 registry.addInterceptor(new LoginHandlerInterceptor()).addPathPatterns("/**") .excludePathPatterns("/index.html","/","/user/login"); }
2.6.5 CRUD与原生SpringMVC的Controller操作一致,只记录前台thymeleaf的使用
- thymeleaf 公共页面元素抽取与引入
<!--1. 抽取公共片段--> <div th:fragment="copy"> © 2011 The Good Thymes Virtual Grocery </div> <!-- 2.引入公共片段 --> <div th:insert="~{footer::copy}"/> <!-- 两种规则: ~{templatename::selector} 模板名::选择器 ~{templatename::fragmentname} 模板名::片段名 模板名不带前后缀,thymeleaf会自动拼串解析(路径还是从templates下开始) --> <!-- 默认效果:被insert的功能片段被套入div --> <!-- 三种引入公共片段的方法将导致不一样的效果 <div th:insert="~{footer::selector}"/>,将公共片段整个插入至指定声明引入元素中 <div th:replace="~{footer::selector}"/>,声明引入的元素被替换为公共片段 <div th:include="~{footer::selector}"/>,将被引入的片段的内容包含进声明引入的元素中,拆除最外部标签 若使用属性进行引入,可以不用写~{}; 若使用行内引入,则必须写[[~{}]],[(~{})] --> - 动态条目高亮:参数化的片段签名
<!--抽取时在需要选择的元素中指定th:class,在其中使用三元判断表达式进行变量判断。这里activeUri即为自定义参数--> th:class="${activeUri=='emps'?'nav-link active':'nav-link'}" <!--引用时传入参数键值对--> <!-- commons/bar::sidebar => 模板名::ID选择器 --> <div th:replace="commons/bar::sidebar(activeUri='main.html')"></div> - 列表迭代与格式化
<tbody> <!-- 被th:each标记的行迭代一次创建该元素一次 --> <tr th:each="emp:${emps}"> <td th:text="${emp.id}"></td> <td>[[${emp.lastName}]]</td> <td th:text="${emp.email}"></td> <td th:text="${emp.gender==0}?'女':'男'"></td> <td th:text="${emp.department.departmentName}"></td> <td th:text="${#dates.format(emp.birth,'yyyy-MM-dd HH:mm')}"></td> <td> <a class="btn btn-sm btn-primary" href="@{/emp/}+${emp.id}">编辑</button> <a class="btn btn-sm btn-danger" href="@{/emp/}+${emp.id}+">删除</button> </td> </tr> </tbody> - 下拉列表的时候需要对子标签<option>进行th:each迭代
<select> <option th:each="dept:${depts}" th:text="${dept.departmentName}" value="${dept.deptid}"></option> </select> - 日期型数据格式化,在WebMvcAutoConfiguration中自动配置的DateFormatter默认使用的yyyy/MM/dd的格式,可以在配置文件中指定spring.mvc.date-format=yyyy-MM-dd改变格式化类型为yyyy-MM-dd
- 更新/删除操作时,需要传递id,但注意@{}与${}是两种表达式,需要"+"号拼接
- 回显时,text类型使用<input>属性th:value进行置值;
radio类型使用th:checked=true/false进行选择,当然需要判断th:checked=${emp.gender==1};
option类型使用th:selected=true/false进行判断,判断th:checked=${dept.id==emp.department.id} - 添加/更新两个操作使用同一个页面时,也需要使用三元表达式判断如${emp!=null}?${emp.lastName}
- HiddenHttpMethodFilter由Spring Boot自动配置,同样需要进行判断以决定是否添加隐藏域
<input type="hidden" name="_method" value="PUT" th:if="${emp!=null}"/> - 指定属性th:attr=“key1=val1,key2=val2”,可以为标签添加自定义属性
3. Spring Boot错误处理机制
3.1 默认的效果表现
- 浏览器返回一个默认错误页面
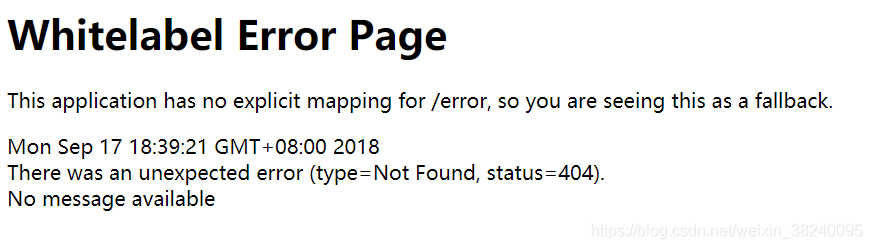
请求头:识别了这是来自浏览器的请求。

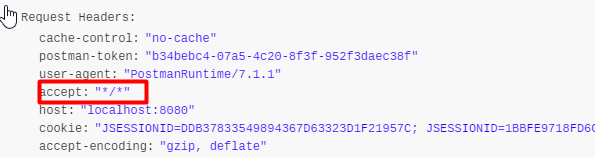
- 通过Postman查看其他设备客户端返回情况:默认返回JSON
请求头:识别了这是索取JSON数据的请求。{ "timestamp": 1537180989124, "status": 404, "error": "Not Found", "message": "No message available", "path": "/abc" }
3.2 原理
参照错误处理的自动配置类ErrorMvcAutoConfiguration,给容器添加了四个组件(它们都是@ConditionalOnMissingBean):
(1)DefaultErrorAttributes,
(2)BaseErrorController,
(3)ErrorPageCustomizer,
(4)DefaultErrorViewResolver。
具体的调用过程参考3.3小节。
3.2.1 DefaultErrorAttributes
//设置Model,传递Error页面显示信息
public Map<String, Object> getErrorAttributes(RequestAttributes requestAttributes, boolean includeStackTrace) {
        Map<String, Object> errorAttributes = new LinkedHashMap();
        errorAttributes.put("timestamp", new Date());
        this.addStatus(errorAttributes, requestAttributes);
        this.addErrorDetails(errorAttributes, requestAttributes, includeStackTrace);
        this.addPath(errorAttributes, requestAttributes);
        return errorAttributes;
    }

private void addStatus(Map<String, Object> errorAttributes, RequestAttributes requestAttributes) {
       Integer status = (Integer)this.getAttribute(requestAttributes, "javax.servlet.error.status_code");
       if (status == null) {
           errorAttributes.put("status", Integer.valueOf(999));
           errorAttributes.put("error", "None");
       } else {
           errorAttributes.put("status", status);

           try {
               errorAttributes.put("error", HttpStatus.valueOf(status.intValue()).getReasonPhrase());
           } catch (Exception var5) {
               errorAttributes.put("error", "Http Status " + status);
           }

       }
   }

private void addErrorDetails(Map<String, Object> errorAttributes, RequestAttributes requestAttributes, boolean includeStackTrace) {           		  Throwable error = this.getError(requestAttributes);
       if (error != null) {
           while(true) {
               if (!(error instanceof ServletException) || error.getCause() == null) {
                   errorAttributes.put("exception", error.getClass().getName());
                   this.addErrorMessage(errorAttributes, error);
                   if (includeStackTrace) {
                       this.addStackTrace(errorAttributes, error);
                   }
                   break;
               }

               error = ((ServletException)error).getCause();
           }
       }

       Object message = this.getAttribute(requestAttributes, "javax.servlet.error.message");
       if ((!StringUtils.isEmpty(message) || errorAttributes.get("message") == null) && !(error instanceof BindingResult)) {
           errorAttributes.put("message", StringUtils.isEmpty(message) ? "No message available" : message);
       }

   }

private void addErrorMessage(Map<String, Object> errorAttributes, Throwable error) {
	 //BindingResult=>JSR303校验
      BindingResult result = this.extractBindingResult(error);
       if (result == null) {
           errorAttributes.put("message", error.getMessage());
       } else {
           if (result.getErrorCount() > 0) {
               errorAttributes.put("errors", result.getAllErrors());
               errorAttributes.put("message", "Validation failed for object='" + result.getObjectName() + "'. Error count: " + result.getErrorCount());
           } else {
               errorAttributes.put("message", "No errors");
           }

       }
}
3.2.2 BasicErrorController:处理默认/error请求
   //本质就是一个普通的Controller
   @Controller
   //先去拿配置项server.error.path,拿不到再去找配置项error.path,再拿不到就是默认/error
   @RequestMapping({"${server.error.path:${error.path:/error}}"})
   public class BasicErrorController extends AbstractErrorController{
     //...

     //处理浏览器发送的请求,产生html型响应
      @RequestMapping(produces = {"text/html"})
       public ModelAndView errorHtml(HttpServletRequest request, HttpServletResponse response) {
           HttpStatus status = this.getStatus(request);
           Map<String, Object> model = Collections.unmodifiableMap(this.getErrorAttributes(request, this.isIncludeStackTrace(request, MediaType.TEXT_HTML)));
           response.setStatus(status.value());
          //决定去向,即去哪个页面作为错误页面:包含页面地址和页面内容(ErrorAttribute)
           ModelAndView modelAndView = this.resolveErrorView(request, response, status, model);
           //如果解析不到ModelAndView,返回的是null,就会使用名字为error的defaultErrorView(这是一个SpelView)。
           return modelAndView != null ? modelAndView : new ModelAndView("error", model);
       }

      //处理其他客户端发送的请求,产生JSON型响应(@ResponseBody)
       @RequestMapping
       @ResponseBody
       public ResponseEntity<Map<String, Object>> error(HttpServletRequest request) {
           Map<String, Object> body = this.getErrorAttributes(request, this.isIncludeStackTrace(request, MediaType.ALL));
           HttpStatus status = this.getStatus(request);
           return new ResponseEntity(body, status);
       }

     //...
   }
3.2.3 ErrorPageCustomizer
   public void registerErrorPages(ErrorPageRegistry errorPageRegistry) {
   //getPath()返回的就是/error
   	ErrorPage errorPage = new ErrorPage(this.properties.getServletPrefix() + this.properties.getError().getPath());
   	errorPageRegistry.addErrorPages(new ErrorPage[]{errorPage});
   }


   //系统出现错误以后,默认发送/error请求进行处理,类似原生在web.xml中的注册的异常映射
   @Value("${error.path:/error}")
   private String path = "/error";
3.2.4 DefaultErrorViewResolver
   public ModelAndView resolveErrorView(HttpServletRequest request, HttpStatus status, Map<String, Object> model) {
           ModelAndView modelAndView = this.resolve(String.valueOf(status), model);
           if (modelAndView == null && SERIES_VIEWS.containsKey(status.series())) {
           	   //传入的视图名,是用状态码status得到的
               modelAndView = this.resolve((String)SERIES_VIEWS.get(status.series()), model);
           }

           return modelAndView;
       }

       private ModelAndView resolve(String viewName, Map<String, Object> model) {
          //默认SpringBoot去找一个页面,如error/404
           String errorViewName = "error/" + viewName;

           TemplateAvailabilityProvider provider = this.templateAvailabilityProviders.getProvider(errorViewName, this.applicationContext);

          //若模板引擎可以解析这个页面地址就用该模板引擎完成解析,返回errorViewName指定的视图地址如error/404.html;否则在静态资源文件夹(底层核心调用getStaticLocations)下找errorViewName对应的页面
           return provider != null ? new ModelAndView(errorViewName, model) : this.resolveResource(errorViewName, model);
       }
3.2.5 流程
这4个组件的作用流程总结
一旦发生4xx或5xx错误:
ErrorPageCustomizer 生效,它定制了错误的响应规则(默认发送/error请求进行处理,类似原生在web.xml中的注册的错误页面定制规则)。
 ⬇
BaseErrorController 接受默认的/error请求,由@RequestMapping(produce="xxx")来决定如何产生针对不同设备的数据(ModelandView或JSON)。

情况一(返回html响应页面):在errorHtml方法中调用resolveErrorView方法,遍历所有的ErrorViewResolver得到ModelAndView,这就包括了DefaultErrorViewResolver,由它的resovleErrorView方法解析到去哪个页面View,而这个View需要的Model就是DefaultErrorAttribute。
   protected ModelAndView resolveErrorView(HttpServletRequest request, HttpServletResponse response, HttpStatus status, Map<String, Object> model) {
   	Iterator var5 = this.errorViewResolvers.iterator();
      //遍历所有的ErrorViewResolver得到ModelAndView
       ModelAndView modelAndView;
       do {
           if (!var5.hasNext()) {
               return null;
           }

           ErrorViewResolver resolver = (ErrorViewResolver)var5.next();
           modelAndView = resolver.resolveErrorView(request, status, model);
       } while(modelAndView == null);

       return modelAndView;
    }
   }
3.3 如何自定义错误响应
3.3.1 如何定制html错误页面
| 情况 | 效果 |
|---|---|
| 配置过模板引擎 | (1)当发生错误代码为statusCode的错误出现时,查找template/error/{statusCode}.html页面,如templates/error/404.html会显示404错误; (2)Spring Boot还提供了4xx,5xx系列通用配置,即可以创建templates/error/4xx.html处理400系的错误,如403,404,405…但优先寻找精确的${statusCode}.html (3)可以在页面获取的值${}:timestamp, status, error, exception, message, errors(JSR303校验的错误) |
| 没有模板引擎(模板引擎下找不到error/{statusCode}.html) | 查找静态资源文件夹,但无法获取动态信息 |
| 以上都没有错误页面 | 转到Spring Boot默认的错误页面error (自动配置类注入到容器中的defaultErrorView,使用SpEL形成的页面) |
3.3.2 如何定制JSON的错误数据
| 方法 | 说明 |
|---|---|
| 使用SpringMVC原生注解编写一个异常处理器 | @ControllerAdvice, @ExceptionHandler, @ResponseBody 但请求设备自适应被取消,不管是浏览器(应该返回html)还是其他设备都会返回自定义JSON |
| 向SpringMVC原生HttpServletRequest域中填充数据和状态码,转发给/error(forward:/error)即使用BasicErrorController再处理一次 | 参见方法二, 如果仅定制信息可达到基本自适应,问题在于状态码非4xx/5xx错误,而是200OK(因为转发请求是成功的),这就导致resolveErrorView底层getStatus(request)只能拿到200的状态码,就解析不到错误视图。 需要在HttpServletRequest中置入setAttribute一个javax.servlet.error.status_code以解决该问题 但只能传递自定义Exception,但在自定义ControllerAdvice中定制的临时消息map.put(…)并没有被传递 |
| 将自定义ControllerAdvice中的临时消息进行返回 | 在方法二的基础上参见方法三, 【原理】出现错误后,会发/error请求,被BasicErrorController处理,响应传递出去的内容Model,不论返回的形式是什么,都是由getErrorAttribute()得到(由BaseErrorController父类AbstractErrorController声明,且AbstractErrorController实现了ErrorController接口): 因此: (1)【过于复杂】实现ErrorController/继承AbstractErrorController,重写部分方法,注入到容器中替换掉默认BaseErrorController(因为@ConditionalOnMissingBean) (2)页面上能得到的数据/JSON能返回的数据,都是通过ErrorAttributes.getErrorAttributes()得到,默认使用DefaultErrorAttributes,同样是@ConditionalOnMissingBean |
   //方法2
   @ControllerAdvice
   public class MyExceptionHandler {
       @ExceptionHandler(UserNotExistException.class)
       public String handleException(Exception e, HttpServletRequest request){
           Map<String,Object> map=new HashMap<>();
           map.put("code","usernotexists");
           map.put("message",e.getMessage());
           request.setAttribute("javax.servlet.error.status_code",400);
           return "forward:/error";
       }
   }

   /*
   底层支持:
   HttpStatus status = this.getStatus(request);

   protected HttpStatus getStatus(HttpServletRequest request) {
           Integer statusCode = (Integer)request.getAttribute("javax.servlet.error.status_code");
           ...
   }
   */
   //方法3.1
   /*
   直接实现接口ErrorController或继承BasicErrorController并注入的底层支持:
   @Bean
   @ConditionalOnMissingBean(value = {ErrorController.class},search = SearchStrategy.CURRENT)
   public BasicErrorController basicErrorController(ErrorAttributes errorAttributes) {
           return new BasicErrorController(errorAttributes, this.serverProperties.getError(), this.errorViewResolvers);
       }
   */

   /*
   实现ErrorAttributes并注入的底层支持:
   @Bean
   @ConditionalOnMissingBean(value = {ErrorAttributes.class},search = SearchStrategy.CURRENT)
       public DefaultErrorAttributes errorAttributes() {
           return new DefaultErrorAttributes();
   }
   */
   //方法3.2
   //向容器中注入MyErrorAttributes
   @Component
   public class MyErrorAttributes extends DefaultErrorAttributes {
   @Override
   //返回的Map即页面和JSON所能获取的全部键值对
   public Map<String, Object> getErrorAttributes(RequestAttributes requestAttributes, boolean includeStackTrace) {
           Map<String, Object> map = super.getErrorAttributes(requestAttributes, includeStackTrace);
           //设置自定义的键值对
           map.put("flag","0");
           map.put("emmm","emmmm");

           /*RequestAttributes包装了HttpServletRequest,
           故能够联动ControllerAdvice,
           但必须在ExceptionHandlerHandlerd的方法中request.setAttribute()
           注意:第二参数代表域的范围,0-request,1-session...
           */
           Map<String,Object> ext=requestAttributes.getAttribute("extra",0);
     	   map.put("extra",ext);
           return map;
       }
   }
4. 嵌入式(embeded)Servlet容器
4.1 Spring Boot默认使用Tomcat作为嵌入式Servlet容器

4.2 问题
- 如何定制和修改Servlet容器的相关配置?
- Spring Boot切换其他的Servlet容器实现(如Jetty等)?
4.3 对应的解决方案
- 定制和修改Servlet容器相关配置有两个方案(底层同一原理):
(1)在全局配置文件中修改与server有关的配置(绑定映射的是ServerProperties)server.port=8081 server.context-path=/crud server.tomcat.uri-encoding=UTF-8 #通用的Servlet容器设置:server.xxx=yyy #配置Tomcat的设置:server.tomcat.xxx=yyy #配置Jetty的设置:server.jetty.xxx=yyy ...
(2)或者 自定义一个EmbeddedContainerCustomizer(第一种方法绑定映射的ServerProperties本就是一个EmbededContainerCustomizer)@ConfigurationProperties(prefix = "server",ignoreUnknownFields = true) public class ServerProperties implements EmbeddedServletContainerCustomizer, EnvironmentAware, Ordered{ private Integer port; private InetAddress address; private String contextPath; private String displayName = "application"; @NestedConfigurationProperty private ErrorProperties error = new ErrorProperties(); private String servletPath = "/"; private final Map<String, String> contextParameters = new HashMap(); private Boolean useForwardHeaders; private String serverHeader; private int maxHttpHeaderSize = 0; private int maxHttpPostSize = 0; private Integer connectionTimeout; private ServerProperties.Session session = new ServerProperties.Session(); @NestedConfigurationProperty private Ssl ssl; @NestedConfigurationProperty private Compression compression = new Compression(); @NestedConfigurationProperty private JspServlet jspServlet; //持有复杂类型的属性,也就可以级联设置 private final ServerProperties.Tomcat tomcat = new ServerProperties.Tomcat(); private final ServerProperties.Jetty jetty = new ServerProperties.Jetty(); private final ServerProperties.Undertow undertow = new ServerProperties.Undertow(); private Environment environment; //... }//在自定义WebMvcConfigurureAdapter中注入 @Bean public EmbeddedServletContainerCustomizer embeddedServletContainerCustomizer(){ return new EmbeddedServletContainerCustomizer() { //定制嵌入式的Servlet容器的相关规则 @Override public void customize(ConfigurableEmbeddedServletContainer configurableEmbeddedServletContainer) { configurableEmbeddedServletContainer.setPort(8083); } }; } - 替换为其他Servlet容器实现(配置方法还是和之前的一致)
Spring Boot默认支持三类容器:Tomcat,Jetty(擅长P2P长连接),Undertow(擅长高并发但不支持JSP)
以Jetty为例,在pom.xml的spring-boot-starter-web中排除默认的Tomcat容器依赖(spring-boot-starter-tomcat在引入web模块时被自动添加),然后添加spring-boot-starter-jetty依赖<dependency> <groupId>org.springframework.boot</groupId> <artifactId>spring-boot-starter-web</artifactId> <exclusions> <exclusion> <artifactId>spring-boot-starter-tomcat</artifactId> <groupId>org.springframework.boot</groupId> </exclusion> </exclusions> </dependency> <dependency> <groupId>spring-boot-starter-jetty</groupId> <artifactId>org.springframework.boot</artifactId> </dependency>
4.4 注册自定义Servlet,Filter,Listener
由于Spring Boot默认通过jar包启动嵌入式Servlet容器来启动Spring Boot的WebApplication,没有web.xml,只能在配置类中注入三大组件对应的RegistrationBean并完成配置
-
注册ServletRegistrationBean
@Bean public ServletRegistrationBean myServlet(){ //public ServletRegistrationBean(Servlet servlet, String... urlMappings) ServletRegistrationBean servletRegistrationBean = new ServletRegistrationBean(new MyServlet(),"/myServlet"); return servletRegistrationBean; } -
注册FilterRegistrationBean
@Bean public FilterRegistrationBean myFilter(){ FilterRegistrationBean filterRegistrationBean = new FilterRegistrationBean(); filterRegistrationBean.setFilter(new MyFilter()); filterRegistrationBean.setUrlPatterns(Arrays.asList("/hello","/myServlet")); return filterRegistrationBean; } -
注册ServletListenerRegistrationBean
public ServletListenerRegistrationBean myListener(){ ServletListenerRegistrationBean<MyListener> servletListenerRegistrationBean = new FilterRegistrationBean<>(new MyListener()); return servletListenerRegistrationBean; } -
Spring Boot自动注册了SpringMVC的分发控制器DispatcherServlet
//DispatcherServletAutoConfiguration

@Bean(name = {"dispatcherServletRegistration"})
@ConditionalOnBean(value = {DispatcherServlet.class},name = {"dispatcherServlet"})
public ServletRegistrationBean dispatcherServletRegistration(DispatcherServlet dispatcherServlet) {
            ServletRegistrationBean registration = new ServletRegistrationBean(dispatcherServlet, new String[]{this.serverProperties.getServletMapping()});
		    //private String servletPath = "/";
		    //默认拦截"/"即所有请求:包含静态资源请求,但不拦截JSP请求
		    //配置映射ServerProperties,可以在配置文件中指定server.servletPath来修改SpringMVC的DispatchServlet拦截的请求路径
            registration.setName("dispatcherServlet");
            registration.setLoadOnStartup(this.webMvcProperties.getServlet().getLoadOnStartup());
            if (this.multipartConfig != null) {
                registration.setMultipartConfig(this.multipartConfig);
            }

            return registration;
        }
    }
4.5 嵌入式Servlet容器“自动配置”原理
-
EmbededServletContainerAutoConfiguration
@AutoConfigureOrder(-2147483648) @Configuration @ConditionalOnWebApplication //BeanPostProcessorsRegistrar是“修改配置”原理的核心 @Import({EmbeddedServletContainerAutoConfiguration.BeanPostProcessorsRegistrar.class}) public class EmbeddedServletContainerAutoConfiguration{ @Configuration //【核心】判断当前是否引入了Tomcat依赖。 //通过这个注解,由导入的依赖判断该注入哪个容器的工厂 @ConditionalOnClass({Servlet.class, Tomcat.class}) //【核心】判断当前容器中没有自定义EmbededServletContainerFactory(用来创建嵌入式Servlet容器) @ConditionalOnMissingBean(value = {EmbeddedServletContainerFactory.class},search = SearchStrategy.CURRENT) public static class EmbeddedTomcat { public EmbeddedTomcat() {} //默认注入的是TomcatEmbededServletContainerFactory,它来创建的嵌入式容器就是Tomcat @Bean public TomcatEmbeddedServletContainerFactory tomcatEmbeddedServletContainerFactory() { return new TomcatEmbeddedServletContainerFactory(); } } } -
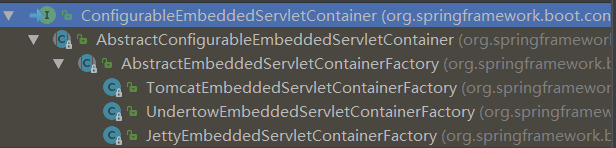
EmbeddedServletContainerFactory接口
public interface EmbeddedServletContainerFactory {
	//获取嵌入式Servlet容器
    EmbeddedServletContainer getEmbeddedServletContainer(ServletContextInitializer... var1);
}
实现类:

以TomcatEmbeddedServletContainerFactory为例:
//重写的核心方法 public EmbeddedServletContainer getEmbeddedServletContainer(ServletContextInitializer... initializers) { //创建一个Tomcat Tomcat tomcat = new Tomcat(); //====配置Tomcat的基本环节==== File baseDir = this.baseDirectory != null ? this.baseDirectory : this.createTempDir("tomcat"); tomcat.setBaseDir(baseDir.getAbsolutePath()); Connector connector = new Connector(this.protocol); tomcat.getService().addConnector(connector); this.customizeConnector(connector); tomcat.setConnector(connector); tomcat.getHost().setAutoDeploy(false); this.configureEngine(tomcat.getEngine()); Iterator var5 = this.additionalTomcatConnectors.iterator(); while(var5.hasNext()) { Connector additionalConnector = (Connector)var5.next(); tomcat.getService().addConnector(additionalConnector); } this.prepareContext(tomcat.getHost(), initializers); //========== //传递Tomcat,返回TomcatEmbeddedServletContainer,并且启动Tomcat启动 return this.getTomcatEmbeddedServletContainer(tomcat); } -
EmbeddedServletContainer接口(逻辑上,EmbeddedSerletContainerFactory创建了EmbeddedServletContainer)

以TomcatEmbeddedServletContainer(由TomcatEmbeddedServletContainerFactory创建)为例//TomcatEmbeddedServletContainerFactory返回时调用的构造器 //autoStart,判断端口号>=0 public TomcatEmbeddedServletContainer(Tomcat tomcat, boolean autoStart) { this.monitor = new Object(); this.serviceConnectors = new HashMap(); Assert.notNull(tomcat, "Tomcat Server must not be null"); this.tomcat = tomcat; this.autoStart = autoStart; this.initialize(); } private void initialize() throws EmbeddedServletContainerException { logger.info("Tomcat initialized with port(s): " + this.getPortsDescription(false)); Object var1 = this.monitor; synchronized(this.monitor) { try { this.addInstanceIdToEngineName(); try { final Context context = this.findContext(); context.addLifecycleListener(new LifecycleListener() { public void lifecycleEvent(LifecycleEvent event) { if (context.equals(event.getSource()) && "start".equals(event.getType())) { TomcatEmbeddedServletContainer.this.removeServiceConnectors(); } } }); //【核心】启动 this.tomcat.start(); this.rethrowDeferredStartupExceptions(); try { ContextBindings.bindClassLoader(context, this.getNamingToken(context), this.getClass().getClassLoader()); } catch (NamingException var5) { ; } this.startDaemonAwaitThread(); } catch (Exception var6) { containerCounter.decrementAndGet(); throw var6; } } catch (Exception var7) { this.stopSilently(); throw new EmbeddedServletContainerException("Unable to start embedded Tomcat", var7); } } }
4.6 嵌入式Servlet容器“修改配置”(EmbeddedServletContainerCustomizer)原理——EmbeddedServletContainerCustomizerBeanPostProcessor
//BeanPostProcessorsRegistrar,给容器导入一些组件,最重要的是导入EmbeddedServletContainerCustomizerBeanPostProcessor
//后置处理器:在Bean初始化前后(构造器调用完成后,setter还没有置值前)执行前后置初始化逻辑
public void registerBeanDefinitions(AnnotationMetadata importingClassMetadata, BeanDefinitionRegistry registry) {
            if (this.beanFactory != null) {
                this.registerSyntheticBeanIfMissing(registry, "embeddedServletContainerCustomizerBeanPostProcessor", EmbeddedServletContainerCustomizerBeanPostProcessor.class);
                this.registerSyntheticBeanIfMissing(registry, "errorPageRegistrarBeanPostProcessor", ErrorPageRegistrarBeanPostProcessor.class);
            }
}

//===============
//EmbeddedServletContainerCustomizerBeanPostProcessor中的核心方法

public Object postProcessBeforeInitialization(Object bean, String beanName) throws BeansException {
  		//如果当前初始化的是一个ConfigurableEmbeddedServletContainer
        if (bean instanceof ConfigurableEmbeddedServletContainer) {
        //【调用】
            this.postProcessBeforeInitialization((ConfigurableEmbeddedServletContainer)bean);
        }

        return bean;
}

private void postProcessBeforeInitialization(ConfigurableEmbeddedServletContainer bean) {
        Iterator var2 = this.getCustomizers().iterator();
	    //获取所有的定制器,调用每一个定制器的customize()来给Servlet容器设置属性
        while(var2.hasNext()) {
            EmbeddedServletContainerCustomizer customizer = (EmbeddedServletContainerCustomizer)var2.next();
            customizer.customize(bean);
        }
}

private Collection<EmbeddedServletContainerCustomizer> getCustomizers() {
        if (this.customizers == null) {
            this.customizers = new ArrayList(
 			//【核心】从IOC容器中获取所有EmbeddedServletContainerCustomizer定制Servlet容器属性,这也就是为什么可以通过给容器中自定义一个EmbeddedServletContainerCustomizer完成嵌入式Servlet的配置
			this.beanFactory.getBeansOfType(EmbeddedServletContainerCustomizer.class,
                                              false,
                                              false).values());
            Collections.sort(this.customizers, AnnotationAwareOrderComparator.INSTANCE);
            this.customizers = Collections.unmodifiableList(this.customizers);
        }

        return this.customizers;
    }
- 整个流程:
(1)Spring Boot根据导入的依赖给容器中添加相应的EmbeddedServletContainerFactory(默认的是TomcatEmbeddedServletContainerFactory)。
(2)容器中某个组件被创建就会触发后置处理器EmbeddedServletContainerCustomizerBeanPostProcessor,判断是否为ConfigurableEmbeddedServletContainer(XXXEmbeddedServletContainerFactory们的父接口)。
(3)如果不是,直接返回。否则,从容器中获取所有的EmbeddedServletContainerCustomizer,遍历调用重写的customize(),返回包装后的bean。
4.6 嵌入式Servlet容器启动原理(创建EmbeddedServletContainerFactory的时机以及创建EmbeddedServletContainer的时机)
- Spring Boot应用运行主方法run()启动,刷新IoC容器refreshContext(context)
创建IoC容器并初始化(创建每一个该加入容器的组件)。在容器的选择上,如果是Web应用,创建AnnotationConfigEmbeddedWebApplicationContext,否则创建AnnotationConfigApplicationContext。 - refresh(context);刷新刚才创建好的IoC容器。在Web环境下,
容器刷新的一步核心调用onRefresh()由EmbeddedWebApplicationContext重写,调用createEmbeddedServletContainer()。
而createEmbeddedServletContainer()的第一步,从容器中获取EmbeddedServletContainerFactory。protected void onRefresh() { super.onRefresh(); try { this.createEmbeddedServletContainer(); } catch (Throwable var2) { throw new ApplicationContextException("Unable to start embedded container", var2); } }
TomcatEmbeddedServletContainerFactory被创建,后置处理器被触发,获取所有的EmbeddedServletContainerCustomizer的Servlet容器相关配置。EmbeddedServletContainerFactory containerFactory = this.getEmbeddedServletContainerFactory(); - 使用得到的EmbeddedServletContainerFactory.getEmbeddedServletContainer获取相应的嵌入式Servlet容器。
- 嵌入式Servlet容器被创建且启动。
- 先启动嵌入式Servlet容器,再将IoC容器中剩下没被创建的组件创建出来(因为onRefresh后面还有其他调用如finishBeanFactoryInitialization)。
5. 使用外置Servlet容器
- 嵌入式Servlet容器:应用打包为jar
优点:简单、便携。
缺点:默认不支持JSP, 深层次的优化和定制比较复杂。
使用定制器[ServerProperties/自定义EmbeddedServletContainerCustomizer];
自己编写嵌入式Servlet容器的创建工厂[EmbeddedServletContainerFactory],这种方法使当前项目不再局限于Tomcat/Jetty/Undertow的选择,任何种类的Servlet容器都可以创建使用。 - 使用外置Servlet容器来支持JSP:应用打包为war
(1)必须创建一个war项目(利用IDEA创建好目录结构:web.xml和webapp)。
(2)在pom.xml中将spring-boot-starter-tomcat依赖的scope指定为provided。(如果使用Spring Initializer创建的项目,则该步骤已经被自动完成了)
(3)必须编写一个SpringBootServletInitializer的子类,重写configure方法(固定写法return application.sources(@SpringBootApplication标注的主配置类.class)),如果使用Spring Initializer创建的项目,则该步骤已经被自动完成了。
(4)配置好外部的服务器,部署项目,启动服务器(不能运行SpringBoot的主配置类的main来启动),服务器启动SpringBoot应用。public class ServletInitializer extends SpringBootServletInitializer { @Override protected SpringApplicationBuilder configure(SpringApplicationBuilder application) { //传入SpringBoot应用的主程序才能正常启动 return application.sources(SpringBootWebOutApplication.class); } } - 由Spring Initializer快速创建的war项目需要在IDEA中进行一些的准备
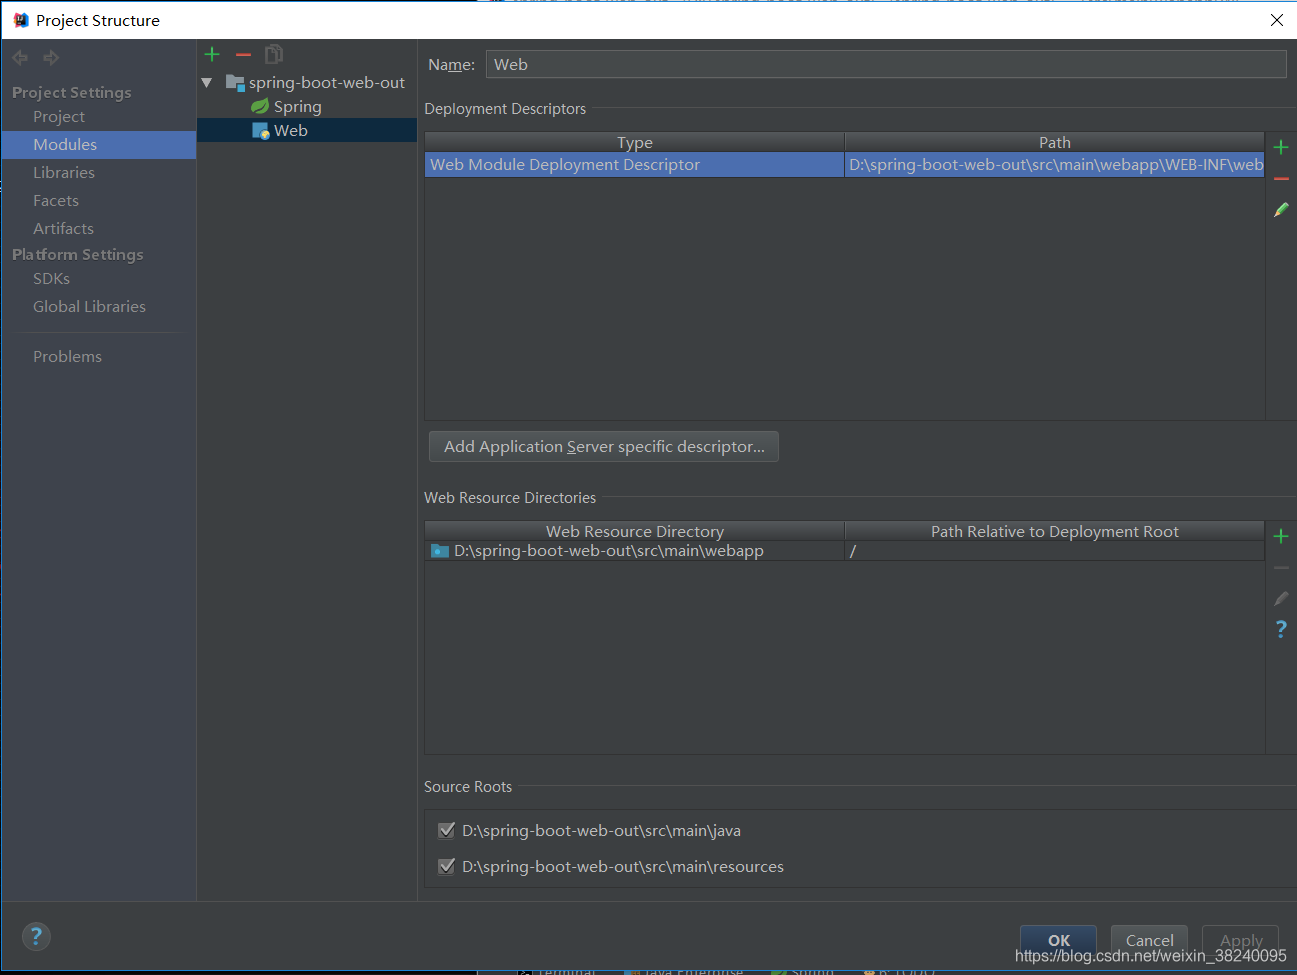
(1)IDEA中如何生成Web目录结构即文件夹webapp+部署描述符web.xml?
打开ProjectStructure,在Module页下的Web模块进行创建与路径指定(Deployment Descriptors部署描述符/src/main/WEB-INF/web.xml以及WebResourceDirectories目录结构/src/main/webapp)。
(2)IDEA添加外部服务器并配置,再将工程war进行部署(在Deployement选项卡)。
- 服务器启动Spring Boot应用(SpringBootServletInitializer)的原理
-
servlet3.1规范-8.2.4 Shared libraries / runtimes pluggablity章节定义了规则:
(1)Web应用启动,会创建当前Web应用里面每一个jar里的SerletContainerInitializer实例。
(2)所有ServletContainerInitializer实现的全限类名放在jar包的META-INF/services目录下的一个名为javax.servlet.ServletContainerInitializer的文件中。
(3)可以使用@HandlesTypes,在Web应用启动的时候加载被选中的类。 -
流程:
(1)启动Tomcat,web.xml被加载,web应用启动 。
(2)SpringFramework的web包中存在文件org\springframework\spring-web\4.3.19.RELEASE\spring-web-4.3.19.RELEASE.jar!\META-INF\services\javax.servlet.ServletContainerInitializer,其内容为org.springframework.web.SpringServletContainerInitializer。
(3)SpringServletContainerInitializer将所有标注了@HandlesTypes(WebApplicationInitializer.class)的“类型”(接口、抽象类、实现类)传入到onStartup方法的第一个参数Set<Class<?>>)中,创建符合要求(非接口、非抽象类)的WebApplicationInitializer实现的实例。

(4)每一个WebApplicationInitializer实例都调用自己的onStartup()。继承关系如上图,显然SpringBootServletInitializer子类(也就是我们创建的ServletInitializer extends SpringBootServletInitialier)会被创建实例,并调用onStartup()。
(5)【核心】在调用onStartup()时,createRootApplicationContext创建“父容器”。protected WebApplicationContext createRootApplicationContext(ServletContext servletContext) { //1.创建SpringApplicationBuilder SpringApplicationBuilder builder = this.createSpringApplicationBuilder(); builder.main(this.getClass()); ApplicationContext parent = this.getExistingRootWebApplicationContext(servletContext); if (parent != null) { this.logger.info("Root context already created (using as parent)."); servletContext.setAttribute(WebApplicationContext.ROOT_WEB_APPLICATION_CONTEXT_ATTRIBUTE, (Object)null); builder.initializers(new ApplicationContextInitializer[]{new ParentContextApplicationContextInitializer(parent)}); } builder.initializers(new ApplicationContextInitializer[]{new ServletContextApplicationContextInitializer(servletContext)}); builder.contextClass(AnnotationConfigEmbeddedWebApplicationContext.class); //=====【核心调用】===== //2.调用configure(),由子类重写了(自定义Servlet容器调用的是自己的condigure())返回了 SpringBoot的主配置类 builder = this.configure(builder); //=========== builder.listeners(new ApplicationListener[]{new SpringBootServletInitializer.WebEnvironmentPropertySourceInitializer(servletContext, null)}); //3. 使用Builder创建Spring应用 SpringApplication application = builder.build(); //=========== if (application.getSources().isEmpty() && AnnotationUtils.findAnnotation(this.getClass(), Configuration.class) != null) { application.getSources().add(this.getClass()); } Assert.state(!application.getSources().isEmpty(), "No SpringApplication sources have been defined. Either override the configure method or add an @Configuration annotation"); if (this.registerErrorPageFilter) { application.getSources().add(ErrorPageFilterConfiguration.class); } //4. 启动Spring应用 return this.run(application); }(6)Spring应用被启动【由run()创建IoC容器】
	public ConfigurableApplicationContext run(String... args) {
        StopWatch stopWatch = new StopWatch();
        stopWatch.start();
        ConfigurableApplicationContext context = null;
        FailureAnalyzers analyzers = null;
        this.configureHeadlessProperty();
        SpringApplicationRunListeners listeners = this.getRunListeners(args);
        listeners.starting();

        try {
            ApplicationArguments applicationArguments = new DefaultApplicationArguments(args);
            ConfigurableEnvironment environment = this.prepareEnvironment(listeners, applicationArguments);
            Banner printedBanner = this.printBanner(environment);
            context = this.createApplicationContext();
            new FailureAnalyzers(context);
            this.prepareContext(context, environment, listeners, applicationArguments, printedBanner);
            //【核心调用】刷新IoC容器
            this.refreshContext(context);
            this.afterRefresh(context, applicationArguments);
            listeners.finished(context, (Throwable)null);
            stopWatch.stop();
            if (this.logStartupInfo) {
                (new StartupInfoLogger(this.mainApplicationClass)).logStarted(this.getApplicationLog(), stopWatch);
            }

            return context;
        } catch (Throwable var9) {
            this.handleRunFailure(context, listeners, (FailureAnalyzers)analyzers, var9);
            throw new IllegalStateException(var9);
        }
    }
-


 2492
2492

 被折叠的 条评论
为什么被折叠?
被折叠的 条评论
为什么被折叠?
 到【灌水乐园】发言


