


 本文介绍了MySQL基于binlog的主从复制原理,详细讲解了如何配置一主一从的复制环境,包括在主服务器和从服务器上的具体操作步骤。同时,针对主服务器已有数据的情况,提供了数据迁移的方法。还探讨了主从复制延迟的产生原因和解决策略,包括硬件升级、优化线程设置以及使用GTID等技术。
MySQL主从复制原理
MySQL基于binlog的主从复制原理
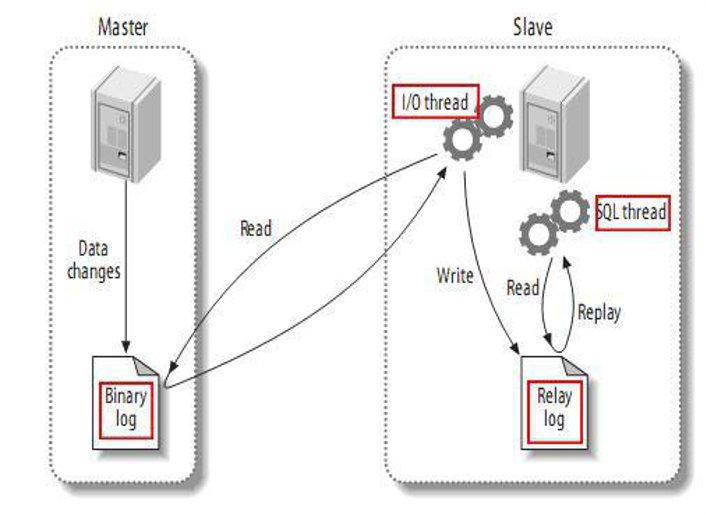
- master将操作记录到二进制日志(binary log)中(这些记录叫做二进制日志事件,binary log events)
- Slave通过I/O Thread异步将master的binary log events拷贝到它的中继日志(relay log);
- Slave执行relay日志中的事件,匹配自己的配置 将需要执行的数据,在slave服务上执行一遍从 而达到复制数据的目的。
MySQL配置主从复制
一主一从
场景描述:
主数据库服务器:192.168.12.66,MySQL5.7已经安装,已正常启动。
从数据库服务器:192.168.12.88,MySQL5.7已经安装,已正常启动。
Master操作:
192.168.12.66机器如下操作
1.接入mysql并创建主从复制的用户
create user m2ssync identified by 'Qq123!@#';
2.给新建的用户赋权
GRANT REPLICATION SLAVE ON *.* TO 'm2ssync'@'%' IDENTIFIED BY 'Qq123!@#';
3.指定服务ID,开启binlog日志记录,在/etc/my.cnf中加入
server-id=66							#一般定义成host主机名
log-bin=db_store_binlog		#master生成的binlog文件名称
binlog-do-db=db_store			#binlog要记录的表名称
4.重启mysql服务
[root@localhost software]# /etc/init.d/mysqld restart
Shutting down MySQL.. SUCCESS!
Starting MySQL.... SUCCESS!
5.通过SHOW MASTER STATUS;查看Master db状态.
mysql> show master status\G;
*************************** 1. row ***************************
             File: db_store_binlog.000001
         Position: 154
     Binlog_Do_DB: db_store
 Binlog_Ignore_DB:
Executed_Gtid_Set:
1 row in set (0.00 sec)
记录下 File及Position 的值,在后面进行从服务器操作的时候需要用到。
Slave操作:
192.168.12.88机器如下操作
1.指定服务器ID,指定同步的binlog存储位置,在/etc/my.cnf中加入
server-id=88							#一般定义成host主机名,确保唯一
relay-log=slave-relay-bin
relay-log-index=slave-relay-bin.index
read_only=1								#Salve配置为只读
replicate_do_db=db_store				#指定Salve要从binlog日志中复制的数据库名称
2.接入slave的mysql服务,并配置如下
mysql> change master to master_host='192.168.12.66',master_port=3306,master_user='m2ssync',master_password='Qq123!@#',master_log_file='db_store_binlog.000001',master_log_pos=154;
Query OK, 0 rows affected, 2 warnings (0.04 sec)
3.start slave;
mysql> start slave;
Query OK, 0 rows affected (0.00 sec)
4.show slave status\G ;查看slave服务器状态
mysql> show slave status\G
*************************** 1. row ***************************
               Slave_IO_State: Waiting for master to send event
                  Master_Host: 192.168.12.66
                  Master_User: m2ssync
                  Master_Port: 3306
                Connect_Retry: 60
              Master_Log_File: db_store_binlog.000001
          Read_Master_Log_Pos: 154
               Relay_Log_File: slave-relay-bin.000003
                Relay_Log_Pos: 326
        Relay_Master_Log_File: db_store_binlog.000001
             Slave_IO_Running: Yes					#两个Yes证明主从配置成功(若这一个为NO,参考https://blog.youkuaiyun.com/mqsyoung/article/details/78361469)
            Slave_SQL_Running: Yes					#两个Yes证明主从配置成功
              Replicate_Do_DB: db_store
          Replicate_Ignore_DB:
           Replicate_Do_Table:
       Replicate_Ignore_Table:
      Replicate_Wild_Do_Table:
  Replicate_Wild_Ignore_Table:
                   Last_Errno: 0
                   Last_Error:
                 Skip_Counter: 0
          Exec_Master_Log_Pos: 154
              Relay_Log_Space: 533
              Until_Condition: None
               Until_Log_File:
                Until_Log_Pos: 0
           Master_SSL_Allowed: No
           Master_SSL_CA_File:
           Master_SSL_CA_Path:
              Master_SSL_Cert:
            Master_SSL_Cipher:
               Master_SSL_Key:
        Seconds_Behind_Master: 0					#判断主从复制是否延迟,0为不延迟
Master_SSL_Verify_Server_Cert: No
                Last_IO_Errno: 0
                Last_IO_Error:
               Last_SQL_Errno: 0
               Last_SQL_Error:
  Replicate_Ignore_Server_Ids:
             Master_Server_Id: 66
                  Master_UUID: c1cae36a-eb17-11e8-8de5-000c298b6847
             Master_Info_File: /data/mysql/master.info
                    SQL_Delay: 0
          SQL_Remaining_Delay: NULL
      Slave_SQL_Running_State: Slave has read all relay log; waiting for more updates
           Master_Retry_Count: 86400
                  Master_Bind:
      Last_IO_Error_Timestamp:
     Last_SQL_Error_Timestamp:
               Master_SSL_Crl:
           Master_SSL_Crlpath:
           Retrieved_Gtid_Set:
            Executed_Gtid_Set:
                Auto_Position: 0
         Replicate_Rewrite_DB:
                 Channel_Name:
           Master_TLS_Version:
1 row in set (0.00 sec)
其中Slave_IO_Running 与 Slave_SQL_Running 的值都必须为YES,才表明状态正常。
如果主服务器已经存在应用数据,则在进行主从复制时,需要做以下处理:
(1)主数据库进行锁表操作,不让数据再进行写入动作
mysql> FLUSH TABLES WITH READ LOCK;
Query OK, 0 rows affected (0.01 sec)
(2)查看主数据库状态
mysql> show master status;
#省略
(3)记录下 FILE 及 Position 的值。
将主服务器的数据文件(整个/opt/mysql/data目录)复制到从服务器,建议通过tar归档压缩后再传到从服务器解压。
(4)取消主数据库锁定
mysql> UNLOCK TABLES;
Query OK, 0 rows affected (0.01 sec)
主从复制延迟问题
延迟是怎么产生的
-
当master tps高于slave的sql线程所能承受的范围
-
网络原因
-
磁盘读写耗时
判断延迟?
-
show slave status \G;
sends_behind_master 0等于0时不延迟 -
mk-heartbeat timestamp进行时间戳的判断
我们怎么解决延迟问题
-
配置更高的硬件资源
-
把IOthread 改变成 多线程的方式
mysql5.6 库进行多线程的方式
GTID进行多线程的方式
-
应用程序自己去判断(mycat有这么方案)


 被折叠的 条评论
为什么被折叠?
被折叠的 条评论
为什么被折叠?
 到【灌水乐园】发言


