


 本文介绍如何在Spring Cloud项目中使用Hystrix断路器,并通过具体示例展示了如何配置依赖、编写控制器及客户端代码来实现服务降级与熔断。
一,概念
强烈推荐各位阅读官网,官网介绍写的非常好!!!
hystrix官网:https://github.com/Netflix/Hystrix/wiki
二,hystrix的实际使用
接着第二章节我们创建了j-cloud-consumer-feign,本章节介绍如何使用hystrix
没看过上文的,请先查看相关文章:
springcloud教程 -- 1.快速搭建入门级demo,看这一篇就够了
springcloud教程 -- 2.feign的使用实践,优雅的发送请求
1. 在j-cloud下添加moudle:j-cloud-consumer-feign-hystrix
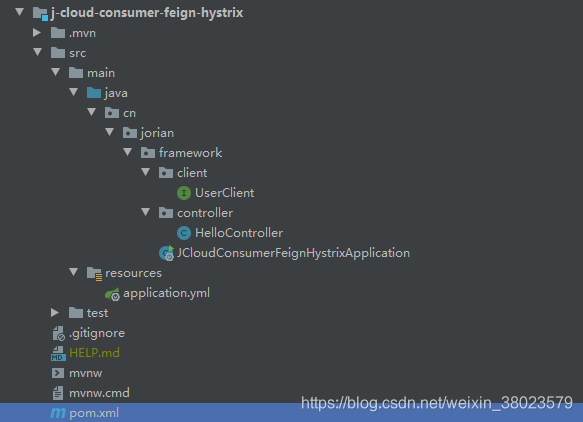
2.项目结构如下:
3.pom.xml文件内容如下:
<?xml version="1.0" encoding="UTF-8"?>
<project xmlns="http://maven.apache.org/POM/4.0.0" xmlns:xsi="http://www.w3.org/2001/XMLSchema-instance"
         xsi:schemaLocation="http://maven.apache.org/POM/4.0.0 https://maven.apache.org/xsd/maven-4.0.0.xsd">
    <modelVersion>4.0.0</modelVersion>
    <groupId>cn.jorian.framework</groupId>
    <artifactId>j-cloud-consumer-feign-hystrix</artifactId>
    <version>1.0.0</version>
    <name>j-cloud-consumer-feign-hystrix</name>
    <description>Demo project for Spring Boot</description>

    <parent>
        <groupId>org.springframework.boot</groupId>
        <artifactId>spring-boot-starter-parent</artifactId>
        <version>1.5.4.RELEASE</version>
        <relativePath /> <!-- lookup parent from repository -->
    </parent>
    <properties>
        <project.build.sourceEncoding>UTF-8</project.build.sourceEncoding>
        <project.reporting.outputEncoding>UTF-8</project.reporting.outputEncoding>
        <java.version>1.8</java.version>
        <cloud.version>Dalston.SR1</cloud.version>
    </properties>
    <dependencies>
        <!-- hystrix断路器 -->
        <dependency>
            <groupId>org.springframework.cloud</groupId>
            <artifactId>spring-cloud-starter-hystrix</artifactId>
        </dependency>
        <!-- hystrix断路器仪表盘 -->
        <dependency>
            <groupId>org.springframework.cloud</groupId>
            <artifactId>spring-cloud-starter-hystrix-dashboard</artifactId>
        </dependency>

        <!-- eureka 服务注册中心 -->
        <dependency>
            <groupId>org.springframework.cloud</groupId>
            <artifactId>spring-cloud-starter-eureka</artifactId>
        </dependency>
        <!-- fegin -->
        <dependency>
            <groupId>org.springframework.cloud</groupId>
            <artifactId>spring-cloud-starter-feign</artifactId>
        </dependency>
        <!-- boot-web -->
        <dependency>
            <groupId>org.springframework.boot</groupId>
            <artifactId>spring-boot-starter-web</artifactId>
        </dependency>
        <dependency>
            <groupId>org.springframework.boot</groupId>
            <artifactId>spring-boot-test</artifactId>
            <version>2.2.4.RELEASE</version>
            <scope>test</scope>
        </dependency>
        <dependency>
            <groupId>junit</groupId>
            <artifactId>junit</artifactId>
            <version>4.11</version>
            <scope>test</scope>
        </dependency>
        <!--LOMBOK-->
        <dependency>
            <groupId>org.projectlombok</groupId>
            <artifactId>lombok</artifactId>
            <version>1.16.20</version>
            <scope>provided</scope>
        </dependency>
    </dependencies>

    <!-- dependency management -->
    <dependencyManagement>
        <dependencies>
            <dependency>
                <groupId>org.springframework.cloud</groupId>
                <artifactId>spring-cloud-dependencies</artifactId>
                <version>${cloud.version}</version>
                <type>pom</type>
                <scope>import</scope>
            </dependency>
        </dependencies>
    </dependencyManagement>
</project>
3.控制器HelloController代码如下:
注意方法上的@HystrixCommand注解,此注解指向请求超时或者失败时需要执行的方法
package cn.jorian.framework.controller;

import cn.jorian.framework.client.UserClient;
import com.netflix.hystrix.contrib.javanica.annotation.HystrixCommand;
import org.springframework.beans.factory.annotation.Autowired;
import org.springframework.web.bind.annotation.GetMapping;
import org.springframework.web.bind.annotation.RestController;

/**
 *
 * @author jorian
 *
 */
@RestController
public class HelloController {

	@Autowired
	public UserClient feignClient;

	/**
	 * 此处的mapping是一级controller,
	 * 调用方法里边绑定了二级的conroller,相当于用http完成一次转发
	 * @return
	 */
	@GetMapping("/hello")
	@HystrixCommand(fallbackMethod = "helloFallback")//失败时调用默认返回,
	public String hello(){
		return feignClient.hello();
	}

	@GetMapping("/hi")
	@HystrixCommand(fallbackMethod = "hiFailBack") //失败时调用默认返回,demo中现在我们的客户端调用的接口实际是不存在,所以这个接口会返回下方的默认值
	public String hi(){
		return feignClient.sayHi();
	}

	@GetMapping("/haha")
	@HystrixCommand(fallbackMethod = "hahaFailBack")//失败时调用默认返回,demo中现在我们的客户端调用的接口实际是不存在,所以这个接口会返回下方的默认值
	public String haha(){
		return feignClient.sayHaha();
	}


	/**
	 *
	 *  对应上面的方法,参数必须一致,当访问失败时,hystrix直接回调用此方法
	 * @return 失败调用时,返回默认值:
	 */
	public String helloFallback(){
		return "您请求的数据没拿到,我是hystrix返回的默认数据--helloxxxx";
	}

	public String hiFailBack(){
		return "您请求的数据没拿到,我是hystrix返回的默认数据--hixxxx";
	}

	public String hahaFailBack(){
		return "您请求的数据没拿到,我是hystrix返回的默认数据--hahaxxxx";
	}

}
4.feign客户端FeignClient代码如下:
package cn.jorian.framework.client;


import org.springframework.cloud.netflix.feign.FeignClient;
import org.springframework.web.bind.annotation.RequestMapping;
import org.springframework.web.bind.annotation.RequestMethod;

/**
 * @author: jorian
 * @date: 2020/2/27 10:51
 * @description: this is  description for the class
 */
@FeignClient("provider-user")
public interface UserClient {
    /**
     * @FeignClient(value="provider-user") 应用名称
     * Feign中没有原生的@GetMapping/@PostMapping/@DeleteMapping/@PutMapping,要指定需要用method进行
     *
     * 定义方法,方法上部使用 @RequestMapping(value="/sayHello",method= RequestMethod.GET)
     * 映射转发请求
     */
    @RequestMapping(value="/user/sayHello",method= RequestMethod.GET)
    String hello();

    @RequestMapping(value="/sayHi",method=RequestMethod.GET)
    String sayHi();

    @RequestMapping(value="/sayHaha",method=RequestMethod.GET)
    String sayHaha();


}
5.应用启动器代码:
package cn.jorian.framework;

import org.springframework.boot.SpringApplication;
import org.springframework.cloud.client.SpringCloudApplication;
import org.springframework.cloud.netflix.eureka.EnableEurekaClient;
import org.springframework.cloud.netflix.feign.EnableFeignClients;
import org.springframework.cloud.netflix.hystrix.dashboard.EnableHystrixDashboard;
import org.springframework.context.ConfigurableApplicationContext;
import org.springframework.core.env.Environment;

import java.net.InetAddress;
import java.net.UnknownHostException;
import lombok.extern.slf4j.Slf4j;

@Slf4j
@SpringCloudApplication
@EnableEurekaClient
@EnableFeignClients
@EnableHystrixDashboard //开启仪表盘
public class JCloudConsumerFeignHystrixApplication {

    public static void main(String[] args) throws UnknownHostException {
        ConfigurableApplicationContext application = SpringApplication.run(JCloudConsumerFeignHystrixApplication.class, args);
        Environment env = application.getEnvironment();
        String ip = InetAddress.getLocalHost().getHostAddress();
        String port = env.getProperty("server.port");
        String path = env.getProperty("server.servlet.context-path");
        log.info("\n----------------------------------------------------------\n\t" +
                "Application  is running! Access URLs:\n\t" +
                "Local: \t\thttp://localhost:" + port + path + "/\n\t" +
                "External: \thttp://" + ip + ":" + port + path + "/\n\t" +
                "swagger-ui: \t\thttp://" + ip + ":" + port + path + "/doc.html\n" +
                "HystrixDashboard: \t\thttp://" + ip + ":" + port + path + "/hystrix\n" +
                "----------------------------------------------------------");

    }

}
6.依次启动j-cloud-server,j-cloud-provider1,j-cloud-provider2,j-cloud-consumer-feign-hystrix
7.在注册中心查看各个服务是否上线
9.测试,
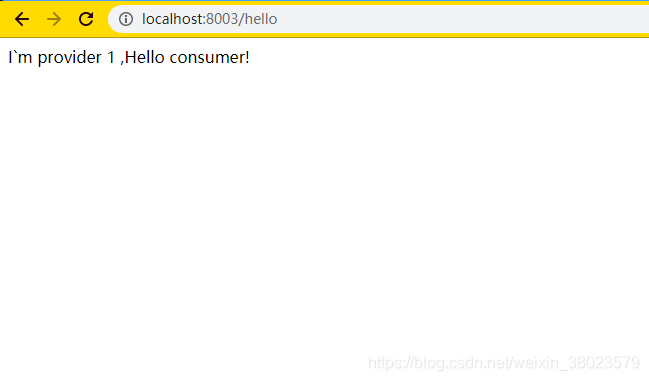
①先访问j-cloud-consumer-feign-hystrix中相应接口:http://localhost:8003/hello 可以看到正确的返回响应结果
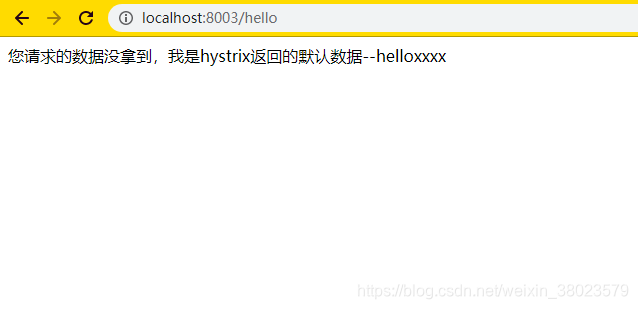
②关闭j-cloud-provider1,j-cloud-provider2,此时服务提供者挂掉后在请求-cloud-consumer-feign-hystrix中相应接口http://localhost:8003/hello
此时接口直接返回了fallback方法中预设的结果
至此,hystrix的学习已经完成,
您可以继续查看下一章:springcloud教程 -- 4.网关zuul的使用详解
或者在github下载完整demo工程:若对您有用,请star,谢谢


 2733
2733

 被折叠的 条评论
为什么被折叠?
被折叠的 条评论
为什么被折叠?
 到【灌水乐园】发言


