


目录
1设计模式概述
作用:
面向对象系统的分析和设计实际上在追求两点:高内聚(Cohesion)和低耦合(Coupling)。因此,无论是封装、继承、多态还是设计模式都是为了这两个目标在努力。
设计模式体现的是一种思想,而思想是指导行为的一切,设计模式可以指导程序员设计和开发。
常用的设计模式(由简到难):
AbstractFactory 模式、Adapater 模式、Composite 模式、Decorator 模式、Factory 模式、Observer 模式、Strategy 模式、Template 模式等。
设计模式分类:
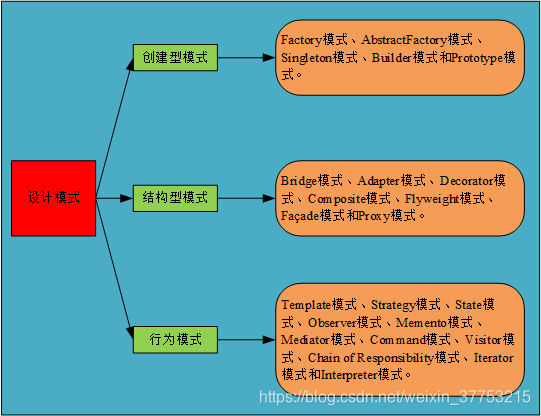
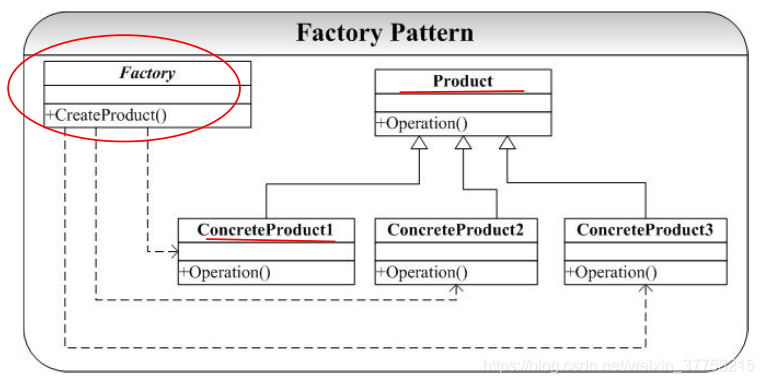
2 工厂模式
两个最重要的功能:
1)定义创建对象的接口,封装对象的创建;
2)使得具体化类的工作延迟到子类中。
应用:买车,不需要知道车是怎么造出来的、要哪个产品工厂给哪个产品,不需要知道产品怎么制造。
#include<stdio.h>
#include<iostream>

using namespace std;

class Product{
public:
	virtual void Do()=0;  //纯虚函数
	virtual ~Product()    //虚析构
        {
		cout<<"Product is destructed!"<<endl;
	}
};

class ProductA:public Product{   //公有继承,每个子类中都有Do成员方法
public:
	void Do(){
		cout<<"正在制造ProductA!"<<endl;
	}
};

class ProductB:public Product{  //公有继承
public:
	void Do(){
		cout<<"正在制造ProductB!"<<endl;
	}
};

class ProductC:public Product{  //公有继承
public:
	void Do(){
		cout<<"正在制造ProductC!"<<endl;
	}
};

class Factory{          //工厂类
private:
	Product *product;     //私有的工厂类指针
public:
	Factory(int n)        //Factory有参构造
        {
	     switch(n){       //switch-case语句确定构造哪个产品对象
                case1: product=new ProductA();
	           break;
                case2: product=new ProductB();
	           break;
                case3: product=new ProductC();
	           break;
	     }
	}
	void send()      //调用Do函数
	{
		product->Do();
	}
	~Factory(){      //析构
		delete product;
	}
};

int main()
{
	Factory *factory=new Factory(2);
	factory->send();
	return 0;
}
代码说明:示例代码给出的是Factory模式解决父类不知道具体实例化哪一个具体子类的问题,让其子类实现工厂接口,返回的也是一个抽象的产品。
将Factory的有参构造中的switch-case语句变为Product类指针。
#include<stdio.h>
#include<iostream>

using namespace std;

class Product{
public:
	virtual void Do()=0;
	virtual ~Product(){
		cout<<"Product is destructed!"<<endl;
	}
};

class ProductA:public Product{
public:
	void Do(){
		cout<<"正在制造ProductA!"<<endl;
	}
};

class ProductB:public Product{
public:
	void Do(){
		cout<<"正在制造ProductB!"<<endl;
	}
};

class ProductC:public Product{
public:
	void Do(){
		cout<<"正在制造ProductC!"<<endl;
	}
};

class Factory{
private:
	Product *product;
public:
	Factory(Product *t){
		product=t;
	}
	void send()
	{
		product->Do();
	}
	~Factory(){
		delete product;
	}
};

int main(void)
{
	Factory *factory=new Factory(new ProductB());
	factory->send();
	return 0;
}
增加多个Factory和Product类:
#include<stdio.h>
#include<iostream>

using namespace std;

class Product{
public:
	virtual void Do()=0;
	virtual ~Product(){
		cout<<"Product is destructed!"<<endl;
	}
};

class ProductA:public Product{
public:
	void Do(){
		cout<<"正在制造ProductA!"<<endl;
	}
};

class ProductB:public Product{
public:
	void Do(){
		cout<<"正在制造ProductB!"<<endl;
	}
};

class ProductC:public Product{
public:
	void Do(){
		cout<<"正在制造ProductC!"<<endl;
	}
};

class Factory{
protected:
	Product *product;
public:
	virtual void send()=0;
	virtual ~Factory(){}
};

class FactoryA: public Factory{
public:
	FactoryA(Product *t)
	{
		product=t;
	}
	void send()
	{
		product->Do();
	}
};

class FactoryB: public Factory{
public:
	FactoryB(Product *t)
	{
		product=t;
	}
	void send()
	{
		product->Do();
	}
};

class FactoryC: public Factory{
public:
	FactoryC(Product *t)
	{
		product=t;
	}
	void send()
	{
		product->Do();
	}
};

int main(void)
{
	Factory *factory=new Factory(new PruductA());
	factory->send();
	return 0;
}工厂模式的优点:1)面向接口编程,体现了面向对象的思想;2)将创建对象的工作转移到了工厂类。
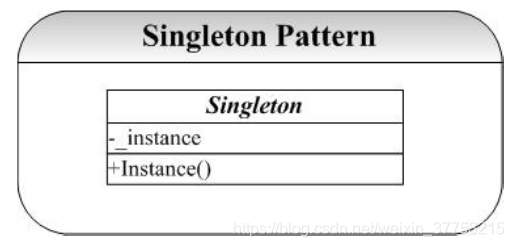
3单例模式
目的:创建唯一一个对象实例。
通过维护一个static的成员变量来记录这个唯一的对象实例,通过提供一个static的接口instance来获得这个唯一的实例。
举例:一个国家的主席、一个班的班主任等。
#include<iostream>
using namespace std;

class Singleton{
private:
	static Singleton *Instance;         //静态变量
	Singleton(){
		cout<<"Singleton"<<endl;
	}
public:
	static Singleton *Create(){
		if(!Instance)
			Instance=new Singleton();
		return Instance;
	}
};

Singleton *Singleton::Instance=NULL;      //静态变量在类外赋值(注意加作用域)

int main(void)
{
	Singleton *p;
	p=Singleton::Create();         //注意加作用域
}注意:1)单例类只能有一个实例;
2)单例类必须自己创建自己的唯一实例;
3)单例类必须给所有其他对象提供这一实例。
4原型模式
原型模式(Prototype Pattern)用于创建重复的对象,同时又能保证性能,提供了一种创建对象的最佳方法。
举例:孙悟空拔猴毛变成自己的样子打妖怪、细胞分裂等。
#include<iostream>

using namespace std;

class Prototype{
protected:
	int x,y;
public:
	virtual Prototype *Clone()=0;
	virtual void Print()=0;
};

class ConcretePrototype:public Prototype{
public:
	ConcretePrototype(){
		x=0;
		y=0;
	}
	ConcretePrototype(int x,int y){
		this->x=x;
		this->y=y;
	}
	ConcretePrototype(ConcretePrototype &t)
	{
		*this=t;
	}
	Prototype *Clone(){
		return new ConcretePrototype(*this);
	}
	void Print(){
		cout<<x<<endl;
		cout<<y<<endl;
	}
};

int main(void)
{
	Prototype *p1=new ConcretePrototype(3,5);
	Prototype *p2=p1->Clone();
	p2->Print();
	return 0;
}
注意:
Prototype模式和Builder模式、AbstractFactory模式都是通过一个类(对象实例)来专门负责对象的创建工作(工厂对象),它们之间的区别是:Builder模式重在复杂对象的一步步创建(并不直接返回对象),AbstractFactory模式重在产生多个互相依赖的对象,而Prototype模式重在从自身复制自己创建新类。
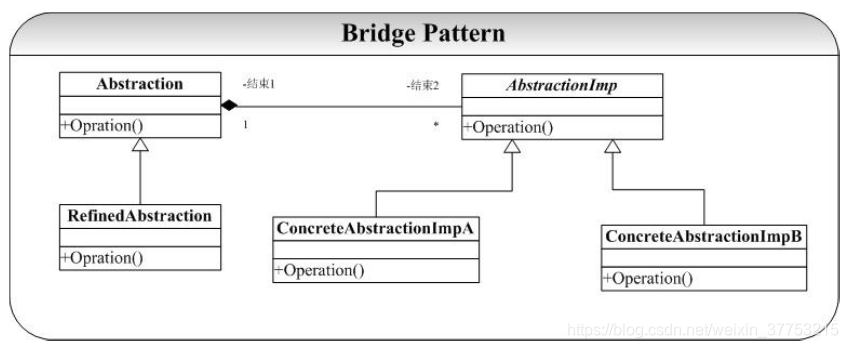
5桥接模式
桥接(Bridge)是用于把抽象化与实现化解耦,使得二者可以独立变化。这种类型的设计模式属于结构型模式,它通过提供抽象化和实现化之间的桥接结构,来实现二者的解耦。
举例:墙上的开关、灵魂和肉体、在不同的系统上画不同的形状。
#include<iostream>
using namespace std;
class Shape{
public:
virtual void Drawing()=0;
virtual ~Shape(){
cout<<"Shape's destructed"<<endl;
}
};
class circle:public Shape{
public:
void Drawing(){
cout<<"circle's class"<<endl;
}
};
class triangle:public Shape{
public:
void Drawing(){
cout<<"triangle's class"<<endl;
}
};
class rectangle:public Shape{
public:
void Drawing(){
cout<<"rectangle's class"<<endl;
}
};
class OS{
private:
Shape *ps;
public:
OS(Shape *t){ps=t;}
virtual void method(){ps->Drawing();}
virtual ~OS(){cout<<"OS's destructed"<<endl;}
};
class Linux:public OS{
public:
Linux(Shape *t):OS(t){}
void method(){
cout<<"On Linux"<<endl;
OS::method();
}
};
class Windows:public OS{
public:
Windows(Shape *t):OS(t){}
void method(){
cout<<"On Windows"<<endl;
OS::method();
}
};
class Mac:public OS{
public:
Mac(Shape *t):OS(t){}
void method(){
cout<<"On Mac"<<endl;
OS::method();
}
};
int main(void)
{
circle *pc=new circle();
OS *pros=new Linux(pc);
pros->method();
delete pc;
delete pros;
return 0;
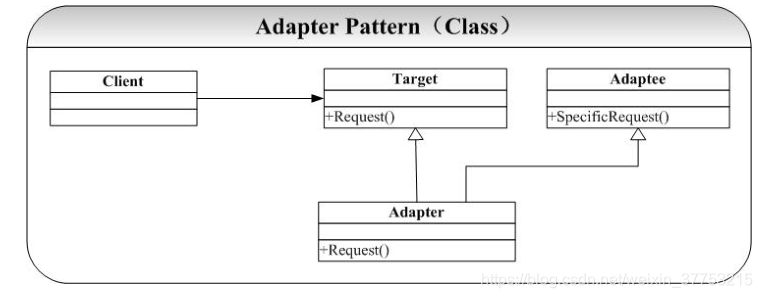
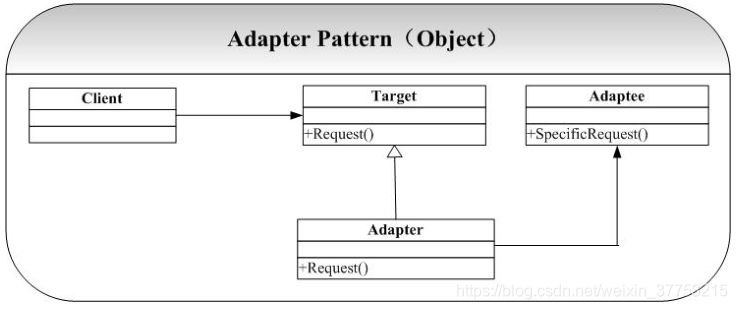
}6适配器模式
适配器模式(Adapter Pattern)是作为两个不兼容的接口之间的桥梁。这种类型的设计模式属于结构型模式,它结合了两个独立接口的功能,该模式提供了将一个类(第三方库)的接口转化为客户(购买使用者)希望的接口。
在适配器模式的两种模式中,有一个很重要的概念就是接口继承和实现继承的区别和联系。接口继承指的是通过继承,子类获得了父类的接口,而实现继承指的是通过继承子类获得了父类的实现。在C++中的public继承既是接口继承又是实现继承,因为子类在继承了父类后既可以对外提供父类的接口操作,又可以获得父类的接口实现。
举例:读卡器是作为内存卡和笔记本之间的适配器。
优点: 1、可以让任何两个没有关联的类一起运行。 2、提高了类的复用。 3、增加了类的透明度。 4、灵活性好。
对象适配(对象实现)
#include<iostream>
using namespace std;

class Adaptee{
public:
	void Adapteepro(){
		cout<<"Adaptee class"<<endl;    //实现
	}
	~Adaptee(){
		cout<<"Adaptee is destructed"<<endl;
	}
};

class Adapter{
private:
	Adaptee objAdaptee;
public:
	void Adapterpro(){
		objAdaptee.Adapteepro();
	}
	~Adapter(){
		cout<<"Adapter is destructed"<<endl;
	}
};

int main()
{
	Adapter objAdapter;
	objAdapter.Adapterpro();
	return 0;
}
对象适配(指针实现)
#include<iostream>
using namespace std;

class Adaptee{
public:
	void Adapteepro(){
		cout<<"Adaptee class"<<endl;                 //实现
	}
	~Adaptee(){
		cout<<"Adaptee is destructed"<<endl;
	}
};

class Adapter{
private:
	Adaptee *padaptee;
public:
	Adapter(){
		padaptee=new Adaptee();
	}
	void Adapterpro(){
		padaptee->Adapteepro();
	}
	~Adapter(){
		delete padaptee;
	}
};

main()
{
	Adapter *padapter=new Adapter();
	padapter->Adapterpro();
	delete padapter;
}
接口适配
#include<iostream>
using namespace std;
class AdapterBase{
public:
virtual void Method()=0; //纯虚函数
virtual ~AdapterBase(){
cout<<"Destruted"<<endl;
}
};
class Adaptee{
public:
void Method(int x){
cout<<"Method x="<<x<<endl; //实现
}
~Adaptee(){
cout<<"Adaptee is destructed"<<endl;
}
};
class AdapterA:public AdapterBase{
public:
void Method(){
cout<<"AdapterA"<<endl;
}
};
class AdapterB:public AdapterBase{
private:
Adaptee *padaptee;
public:
AdapterB(){
padaptee=new Adaptee();
}
void Method(){
padaptee->Method(3);
}
~AdapterB(){
delete padaptee;
}
};
class AdapterC:public AdapterBase{
public:
void Method(){
cout<<"AdapterC"<<endl;
}
};
main()
{
AdapterBase *pbase=new AdapterB();
pbase->Method();
delete pbase;
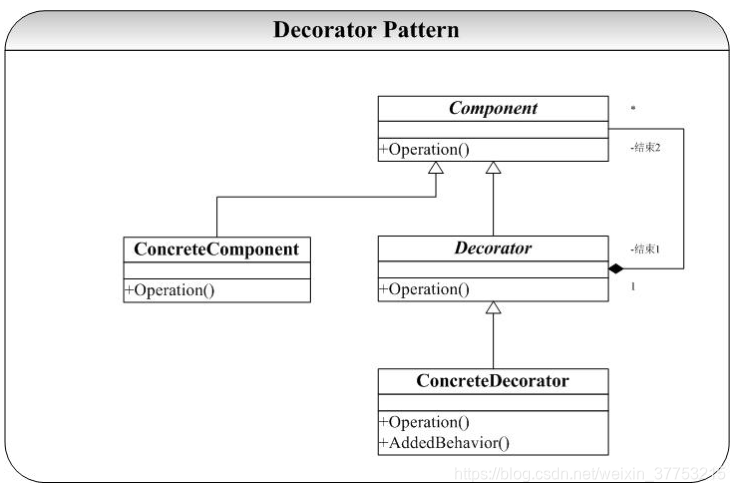
}7装饰器模式
装饰器模式(Decorator Pattern)允许向一个现有的对象添加新的功能,同时又不改变其结构。这种类型的设计模式属于结构型模式,它是作为现有的类的一个包装。
举例:用墙纸装饰房子
#include<iostream>
using namespace std;
class Base{
private:
Base *next;
public:
Base(){
next=NULL;
}
Base(Base *t){
next=t;
}
virtual void fun()=0;
void gun(){
if(next)
next->fun();
}
};
class A:public Base{
public:
void fun(){
cout<<"class A is fun"<<endl;
gun();
}
~A(){
cout<<"A is destructed"<<endl;
}
};
class Decorator:public Base{
public:
virtual void fun()=0;
};
class D1:public Decorator{
public:
void fun(){
cout<<"class D1 is fun"<<endl;
gun();
}
~D1(){
cout<<"D1 is destructed"<<endl;
}
};
class D3:public Decorator{
public:
void fun(){
cout<<"class D3 is fun"<<endl;
gun();
}
~D3(){
cout<<"D3 is destructed"<<endl;
}
};
class My{
private:
Base *base;
public:
My(Base *t){
base=t;
}
void Dofun(){
base->fun();
}
~My(){
cout<<"My is destructed"<<endl;
}
};
void main(void)
{
D3 *d3=new D3();
D1 *d1=new D1();
A *a=new A();
My *pmy=new My(a);
pmy->Dofun();
delete d3;
delete d1;
delete a;
delete pmy;
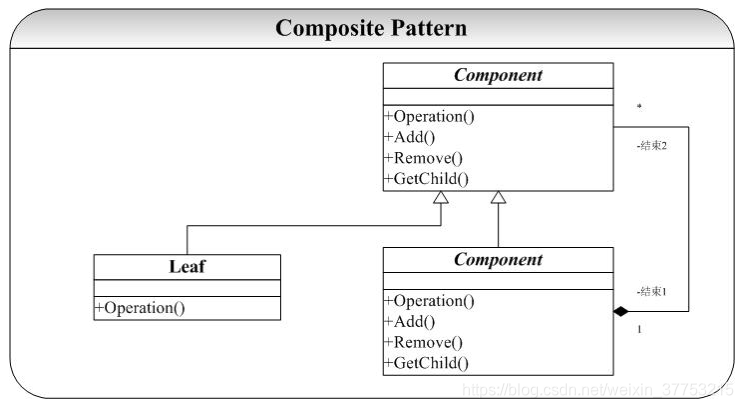
}8组合模式
组合模式(Composite Pattern),又叫部分整体模式,是用于把一组相似的对象当作一个单一的对象。组合模式依据树形结构来组合对象,用来表示部分以及整体层次。这种类型的设计模式属于结构型模式,它创建了对象组的树形结构。
举例:文件、文件夹的管理;树形菜单
#include<iostream>
#include<string.h>
#include<vector>
using namespace std;
class AbstractFlie{
protected:
string name;
public:
AbstractFlie(string n){name=n;}
AbstractFlie(){name="XXX";}
virtual void out()=0;
virtual ~AbstractFlie()
{
cout<<"AbstractFlie is destructed"<<endl;
}
};
class File:public AbstractFlie{
public:
File(string n):AbstractFlie(n){}
File(){}
void out()
{
cout<<"File:"<<this->name<<endl;
}
};
class Folder:public AbstractFlie{
private:
vector<AbstractFlie *> vec;
public:
Folder(string n):AbstractFlie(n){}
Folder(){}
void Add(AbstractFlie *t)
{
vec.push_back(t);
}
void Do()
{
vector<AbstractFlie *>::iterator it;
for(it = vec.begin();it != vec.end();it++)
{
(*it)->out();
}
}
void out()
{
cout<<name<<endl;
Do();
}
~Folder(){}
};
int main(void)
{
Folder *root=new Folder("F:\\");
File *file1=new File("1.c");
File *file2=new File("2.c");
Folder *cf=new Folder("aa");
File *file3=new File("3.c");
root->Add(file1);
root->Add(file2);
root->Add(cf);
cf->Add(file3);
root->out();
return 0;
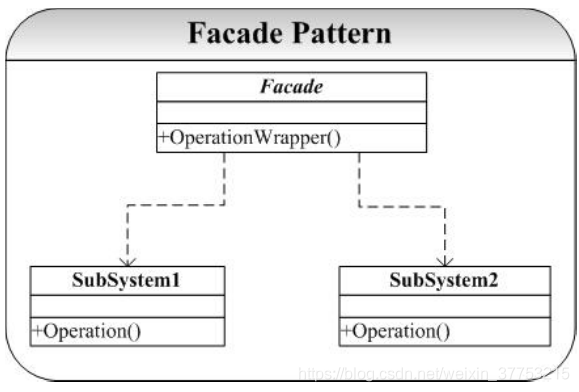
}9门面模式
门面模式(Facade),也称外观模式。隐藏系统的复杂性,并向客户端提供了一个客户端可以访问系统的接口。这种类型的设计模式属于结构型模式,它向现有的系统添加一个接口,来隐藏系统的复杂性。
举例:接待人员
#include<iostream>
using namespace std;
class CPU{
public:
void startup(){
cout<<"CPU is starting"<<endl;
}
};
class Memory{
public:
void startup(){
cout<<"Memory is starting"<<endl;
}
};
class Disk{
public:
void startup(){
cout<<"Disk is starting"<<endl;
}
};
class Facade{
private:
CPU *pcpu;
Memory *pmemory;
Disk *pdisk;
public:
Facade(){
pcpu=new CPU();
pmemory=new Memory();
pdisk=new Disk();
}
void method()
{
pcpu->startup();
pmemory->startup();
pdisk->startup();
}
~Facade()
{
delete pcpu;
delete pmemory;
delete pdisk;
}
};
int main(void)
{
Facade *pF=new Facade();
pF->method();
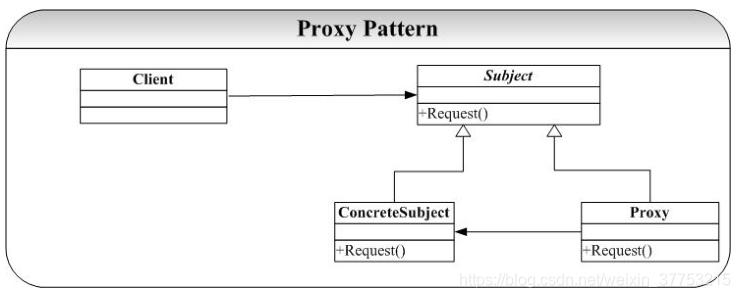
}10代理模式
在代理模式(Proxy Pattern)中,一个类代表另一个类的功能。该模式最大的好处就是实现了逻辑和实现的彻底解耦。
举例:防火墙,代售点等。
#include<iostream>
using namespace std;
class Base{
public:
Basse(){
cout<<"class Base is constructed"<<endl;
}
virtual void Method()=0;
virtual ~Base(){
cout<<"class Base is destructed"<<endl;
}
};
class Source:public Base{
public:
void Method(){
cout<<"Source class"<<endl;
}
~Source(){
cout<<"Source is destructed"<<endl;
}
};
class Proxy:public Base{
private:
Base *pa;
public:
Proxy(Base *t){
pa=t;
}
void Method(){
pa->Method(); //多态
}
~Proxy(){
cout<<"Proxy is destructed"<<endl;
}
};
main()
{
Source *ps=new Source();
Proxy *pp=new Proxy(ps);
pp->Method();
delete ps;
delete pp;
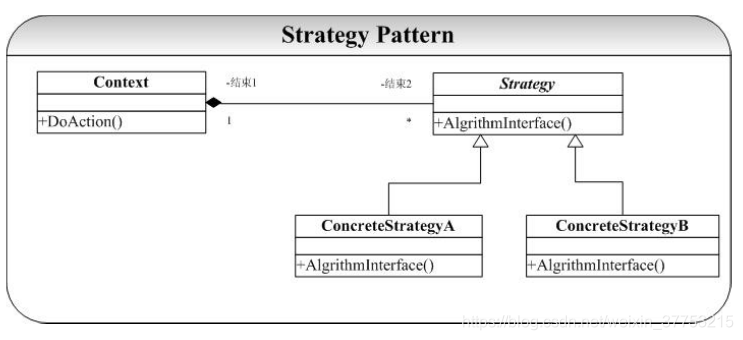
}11策略模式
在策略模式(Strategy Pattern)中,一个类的行为或其算法可以在运行时更改。这种类型的设计模式属于行为型模式。策略模式将逻辑(算法)封装到一个类里面,通过组合的方式将具体算法的实现在组合对象中实现,再通过委托的方式将抽象接口的实现委托给组合对象实现。
举例:锦囊妙计、旅游方式选择。
#include<iostream>
using namespace std;
class FlyBehavior{
public:
virtual void fly()=0;
};
class SubSonicFly:public FlyBehavior{
public:
void fly()
{
cout<<"亚音速飞行!"<<endl;
}
};
class SuperSonicFly:public FlyBehavior{
void fly()
{
cout<<"超音速飞行!"<<endl;
}
};
class TakeOffBehavior{
public:
virtual void takeOff()=0;
};
class VerticalTakeOff:public TakeOffBehavior{
public:
void takeOff()
{
cout<<"垂直起飞!"<<endl;
}
};
class LongDistanceTakeOff:public TakeOffBehavior{
public:
void takeOff()
{
cout<<"长距离飞行!"<<endl;
}
};
class AirCraft{
protected:
FlyBehavior *flyBehavior;
TakeOffBehavior *takeOffBehavior;
public:
AirCraft()
{
//flyBehavior=f;
//takeOffBehavior=t;
}
void fly()
{
flyBehavior->fly();
}
void takeOff()
{
takeOffBehavior->takeOff();
}
};
class Helicopter:public AirCraft{
public:
Helicopter()
{
flyBehavior=new SubSonicFly();
takeOffBehavior=new VerticalTakeOff();
}
~Helicopter()
{
if(! flyBehavior)
delete flyBehavior;
if(! takeOffBehavior)
delete takeOffBehavior;
}
};
int main(void)
{
//SubSonicFly *ps=new SubSonicFly();
//VerticalTakeOff *pt=new VerticalTakeOff();
AirCraft *pa=new Helicopter();
pa->fly();
pa->takeOff();
return 0;
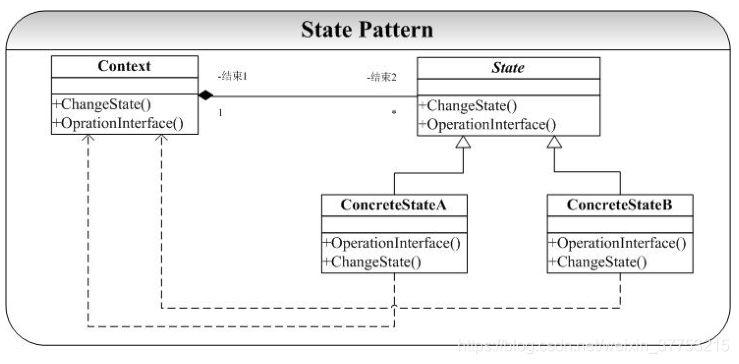
}12状态模式
在状态模式(State Pattern)中,类的行为是基于它的状态改变的。在状态模式中,我们将状态逻辑和动作实现相互分离。当一个操作中要维护大量的case分支语句,并且这些分支依赖于对象的状态。状态模式将每一个分支都封装到独立的类中。
举例:地铁入口检票
#include <iostream>
using namespace std;
#define SAFE_DELETE(p) if (p) { delete p; p = NULL; }
/*声明Context类*/
class Context;
/*抽象状态类:定义一个接口以封装与Context的一个特定状态相关的行为*/
class State
{
public:
virtual void Handle(Context *pContext) = 0;
};
/*Context类,维护一个ConcreteState子类的实例,这个实例定义当前的状态*/
class Context
{
public:
Context(State *pState) : m_pState(pState){}
void Request()
{
if (m_pState)
{
m_pState->Handle(this);
}
}
void ChangeState(State *pState)
{
m_pState = pState;
}
private:
State *m_pState; //这里的State指针是实现特定状态相关的关键
};
class ConcreteStateA : public State
{
public:
virtual void Handle(Context *pContext)
{
cout<<"I am concretestateA."<<endl;
}
};
class ConcreteStateB : public State
{
public:
virtual void Handle(Context *pContext)
{
cout<<"I am concretestateB."<<endl;
}
};
int main()
{
State *pStateA = new ConcreteStateA();//初始化两个具体状态类对象
State *pStateB = new ConcreteStateB();
Context *pContext = new Context(pStateA); //将具体状态类对象交由Context类管理
pContext->Request();//Context类根据对象状态,调用该对象的特定函数Request
pContext->ChangeState(pStateB); //改变对象状态
pContext->Request();
SAFE_DELETE(pContext);
SAFE_DELETE(pStateB);
SAFE_DELETE(pStateA);
return 0;
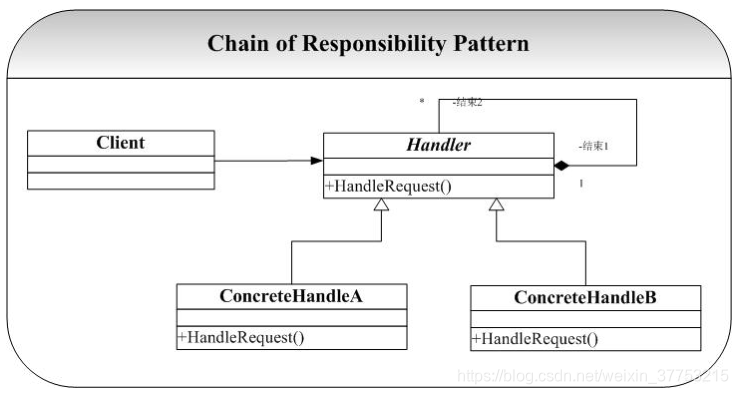
}13职责链模式
责任链模式(Chain of Responsibility Pattern)为请求创建了一个接收者对象的链。这种模式给予请求的类型,对请求的发送者和接收者进行解耦。这种类型的设计模式属于行为型模式。在这种模式中,通常每个接收者都包含对另一个接收者的引用。如果一个对象不能处理该请求,那么它会把相同的请求传给下一个接收者,依此类推。
职责链模式的最大的一个优点是给系统降低了耦合性,请求的发送者完全不必知道该请求会被哪个应答对象处理,极大的降低了系统的耦合性。
举例:“击鼓传花”。
#include<iostream>
using namespace std;


class A{
private:
	A *next;
public:
	A(){next=NULL;}
	A(A *t){next=t;}
	virtual void fun()
	{
		if(next)
			next->fun();
	}
};

class A1:public A{
public:
	void fun()
	{
		cout<<"A1"<<endl;
		A::fun();
	}
	A1(){}
	A1(A *t):A(t){}
};
class A2:public A{
public:
	void fun()
	{
		cout<<"A2"<<endl;
		A::fun();
	}
	A2(){}
	A2(A *t):A(t){}
};
class A3:public A{
public:
	void fun()
	{
		cout<<"A3"<<endl;
		A::fun();
	}
	A3(){}
	A3(A *t):A(t){}
};

int main(void)
{
	A3 *pa3=new A3();
	A2 *pa2=new A2(pa3);
	A1 *pa1=new A1(pa2);
	pa1->fun();
	return 0;
}


 9万+
9万+

 被折叠的 条评论
为什么被折叠?
被折叠的 条评论
为什么被折叠?
 到【灌水乐园】发言


