


文章目录
🐶一、线程池
1、自定义线程池
@Slf4j(topic = "c.TestPool")
public class TestPool {
    public static void main(String[] args) {
        ThreadPool threadPool = new ThreadPool(1,
                1000, TimeUnit.MILLISECONDS, 1, (queue, task)->{
            // 1. 死等
            queue.put(task);
            // 2) 带超时等待
//            queue.offer(task, 1500, TimeUnit.MILLISECONDS);
            // 3) 让调用者放弃任务执行
//            log.debug("放弃{}", task);
            // 4) 让调用者抛出异常
//            throw new RuntimeException("任务执行失败 " + task);
            // 5) 让调用者自己执行任务
            task.run();
        });
        for (int i = 0; i < 4; i++) {
            int j = i;
            threadPool.execute(() -> {
                try {
                    Thread.sleep(1000000L);
                } catch (InterruptedException e) {
                    e.printStackTrace();
                }
                log.debug("{}", j);
            });
        }
    }
}

@FunctionalInterface // 拒绝策略
interface RejectPolicy<T> {
    void reject(BlockingQueue<T> queue, T task);
}

@Slf4j(topic = "c.ThreadPool")
class ThreadPool {
    // 任务队列
    private BlockingQueue<Runnable> taskQueue;

    // 线程集合
    private HashSet<Worker> workers = new HashSet<>();

    // 核心线程数
    private int coreSize;

    // 获取任务时的超时时间
    private long timeout;

    private TimeUnit timeUnit;

    private RejectPolicy<Runnable> rejectPolicy;

    // 执行任务
    public void execute(Runnable task) {
        // 当任务数没有超过 coreSize 时,直接交给 worker 对象执行
        // 如果任务数超过 coreSize 时,加入任务队列暂存
        synchronized (workers) {
            if(workers.size() < coreSize) {
                Worker worker = new Worker(task);
                log.debug("新增 worker{}, {}", worker, task);
                workers.add(worker);
                worker.start();
            } else {
//                taskQueue.put(task);
                // 1) 死等
                // 2) 带超时等待
                // 3) 让调用者放弃任务执行
                // 4) 让调用者抛出异常
                // 5) 让调用者自己执行任务
                taskQueue.tryPut(rejectPolicy, task);
            }
        }
    }

    public ThreadPool(int coreSize, long timeout, TimeUnit timeUnit, int queueCapcity, RejectPolicy<Runnable> rejectPolicy) {
        this.coreSize = coreSize;
        this.timeout = timeout;
        this.timeUnit = timeUnit;
        this.taskQueue = new BlockingQueue<>(queueCapcity);
        this.rejectPolicy = rejectPolicy;
    }

    class Worker extends Thread{
        private Runnable task;

        public Worker(Runnable task) {
            this.task = task;
        }

        @Override
        public void run() {
            // 执行任务
            // 1) 当 task 不为空,执行任务
            // 2) 当 task 执行完毕,再接着从任务队列获取任务并执行
//            while(task != null || (task = taskQueue.take()) != null) {
            while(task != null || (task = taskQueue.poll(timeout, timeUnit)) != null) {
                try {
                    log.debug("正在执行...{}", task);
                    task.run();
                } catch (Exception e) {
                    e.printStackTrace();
                } finally {
                    task = null;
                }
            }
            synchronized (workers) {
                log.debug("worker 被移除{}", this);
                workers.remove(this);
            }
        }
    }
}
@Slf4j(topic = "c.BlockingQueue")
class BlockingQueue<T> {
    // 1. 任务队列
    private Deque<T> queue = new ArrayDeque<>();

    // 2. 锁
    private ReentrantLock lock = new ReentrantLock();

    // 3. 生产者条件变量
    private Condition fullWaitSet = lock.newCondition();

    // 4. 消费者条件变量
    private Condition emptyWaitSet = lock.newCondition();

    // 5. 容量
    private int capcity;

    public BlockingQueue(int capcity) {
        this.capcity = capcity;
    }

    // 带超时阻塞获取
    public T poll(long timeout, TimeUnit unit) {
        lock.lock();
        try {
            // 将 timeout 统一转换为 纳秒
            long nanos = unit.toNanos(timeout);
            while (queue.isEmpty()) {
                try {
                    // 返回值是剩余时间
                    if (nanos <= 0) {
                        return null;
                    }
                    nanos = emptyWaitSet.awaitNanos(nanos);
                } catch (InterruptedException e) {
                    e.printStackTrace();
                }
            }
            T t = queue.removeFirst();
            fullWaitSet.signal();
            return t;
        } finally {
            lock.unlock();
        }
    }

    // 阻塞获取
    public T take() {
        lock.lock();
        try {
            while (queue.isEmpty()) {
                try {
                    emptyWaitSet.await();
                } catch (InterruptedException e) {
                    e.printStackTrace();
                }
            }
            T t = queue.removeFirst();
            fullWaitSet.signal();
            return t;
        } finally {
            lock.unlock();
        }
    }

    // 阻塞添加
    public void put(T task) {
        lock.lock();
        try {
            while (queue.size() == capcity) {
                try {
                    log.debug("等待加入任务队列 {} ...", task);
                    fullWaitSet.await();
                } catch (InterruptedException e) {
                    e.printStackTrace();
                }
            }
            log.debug("加入任务队列 {}", task);
            queue.addLast(task);
            emptyWaitSet.signal();
        } finally {
            lock.unlock();
        }
    }

    // 带超时时间阻塞添加
    public boolean offer(T task, long timeout, TimeUnit timeUnit) {
        lock.lock();
        try {
            long nanos = timeUnit.toNanos(timeout);
            while (queue.size() == capcity) {
                try {
                    if(nanos <= 0) {
                        return false;
                    }
                    log.debug("等待加入任务队列 {} ...", task);
                    nanos = fullWaitSet.awaitNanos(nanos);
                } catch (InterruptedException e) {
                    e.printStackTrace();
                }
            }
            log.debug("加入任务队列 {}", task);
            queue.addLast(task);
            emptyWaitSet.signal();
            return true;
        } finally {
            lock.unlock();
        }
    }

    public int size() {
        lock.lock();
        try {
            return queue.size();
        } finally {
            lock.unlock();
        }
    }

    public void tryPut(RejectPolicy<T> rejectPolicy, T task) {
        lock.lock();
        try {
            // 判断队列是否满
            if(queue.size() == capcity) {
                rejectPolicy.reject(this, task);
            } else {  // 有空闲
                log.debug("加入任务队列 {}", task);
                queue.addLast(task);
                emptyWaitSet.signal();
            }
        } finally {
            lock.unlock();
        }
    }
}
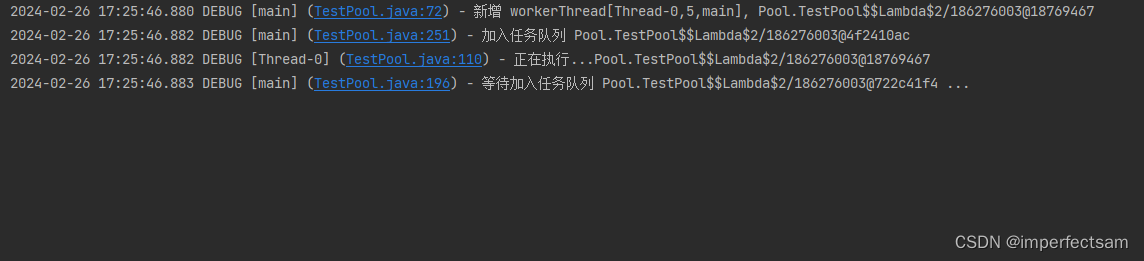
执行结果:
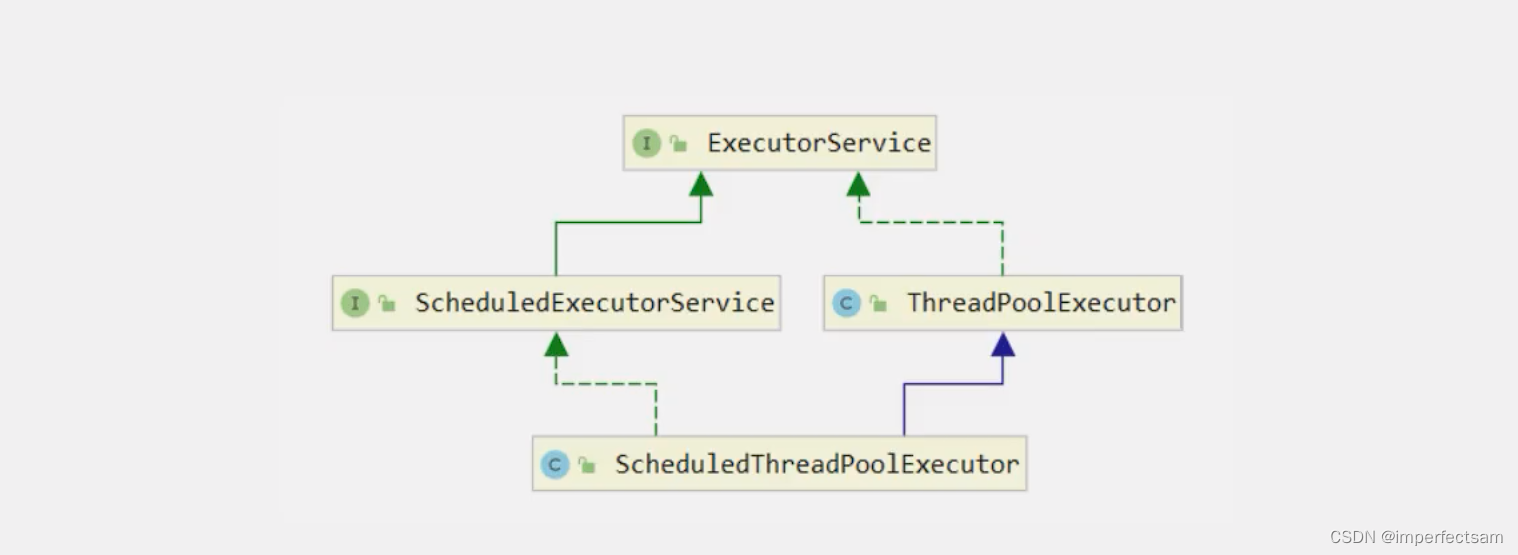
2、JDK为我们提供的线程池(ThreadPoolExecutor)
(1)线程池状态 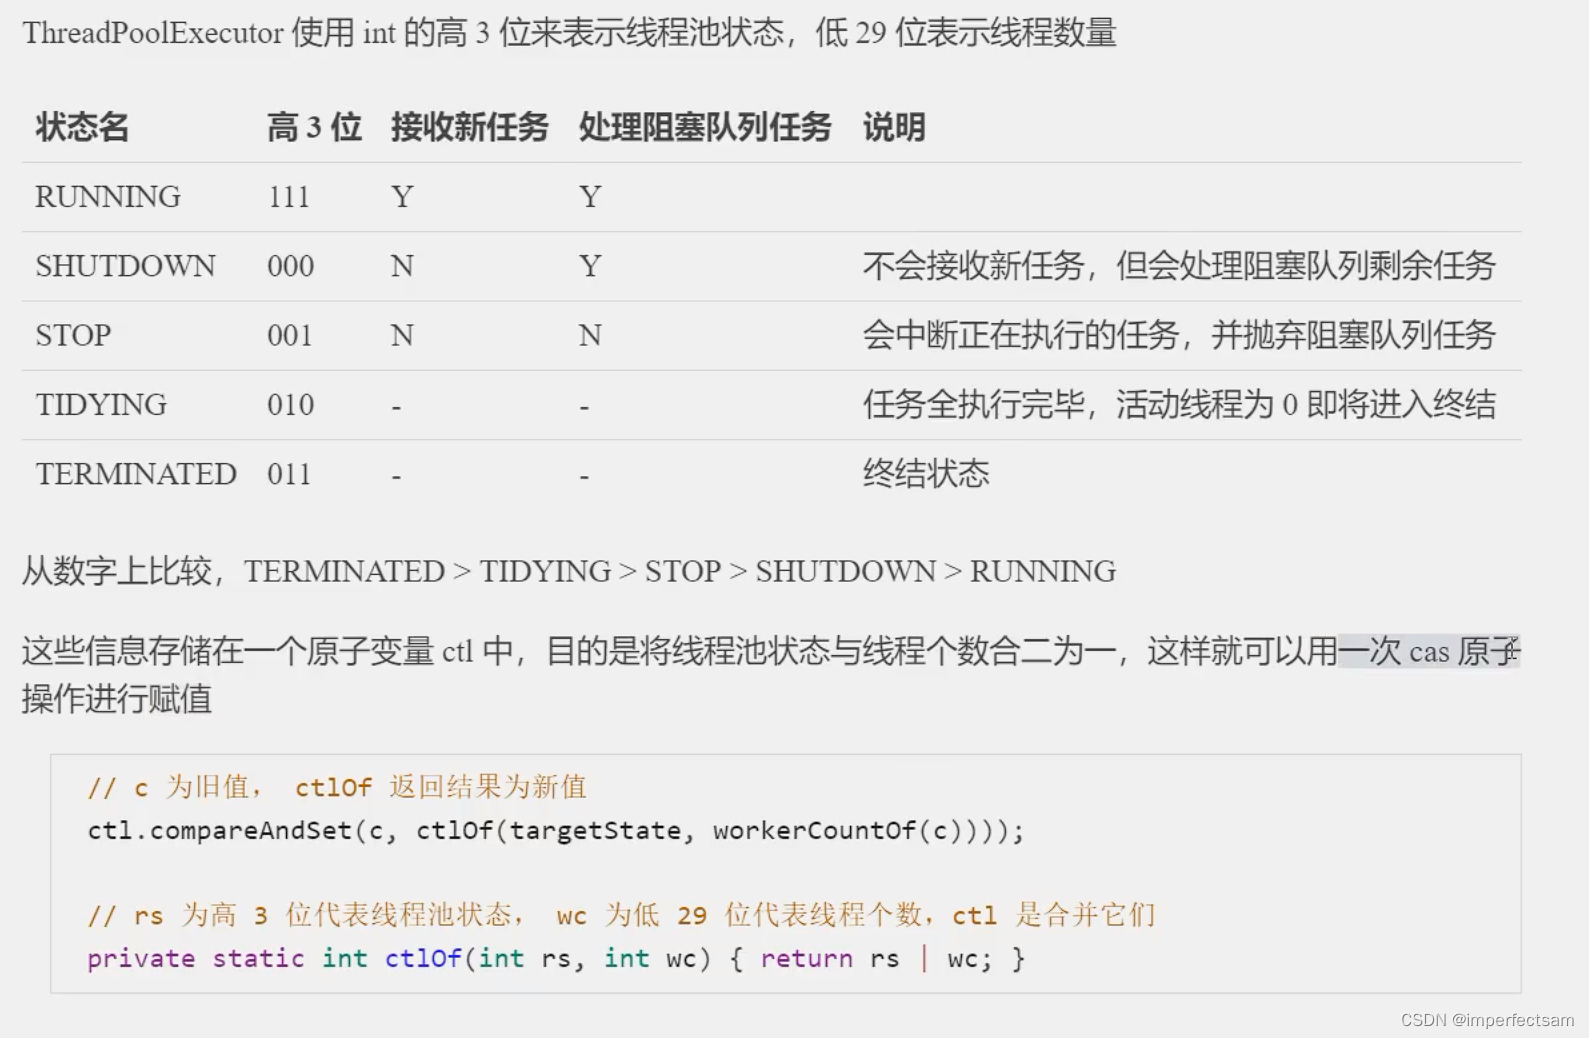
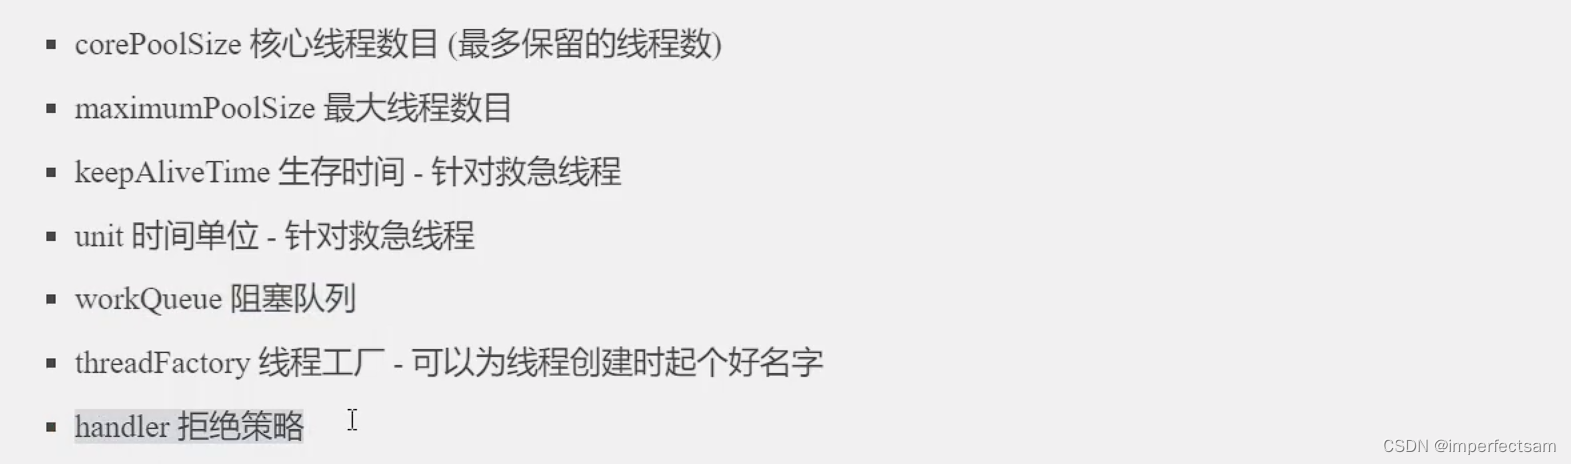
(2)构造方法
public ThreadPoolExecutor(int corePoolSize,
int maximumPoolSize,
long keepAliveTime,
TimeUnit unit,
BlockingQueue<Runnable> workQueue,
ThreadFactory threadFactory,
RejectedExecutionHandler handler)
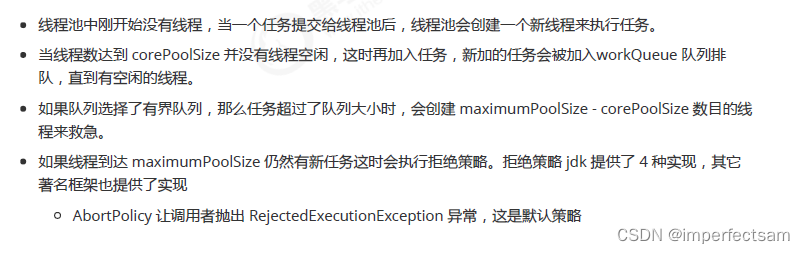
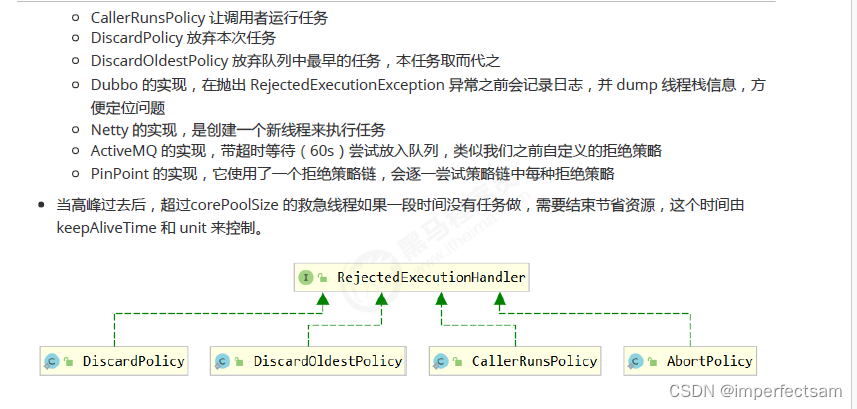
工作方式:
(3)根据上面的构造方法,JDK也提供了众多的工厂方法来创建各种用途的线程池,下面我们来看看
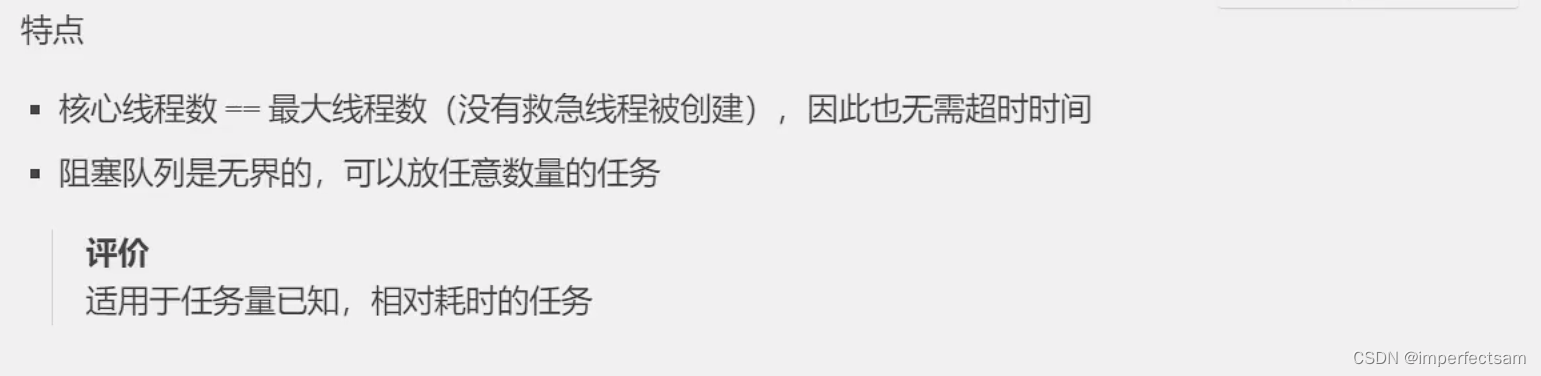
newFixedThreadPool
public static ExecutorService newFixedThreadPool(int nThreads) {
return new ThreadPoolExecutor(nThreads, nThreads,
0L, TimeUnit.MILLISECONDS,
new LinkedBlockingQueue<Runnable>());
}
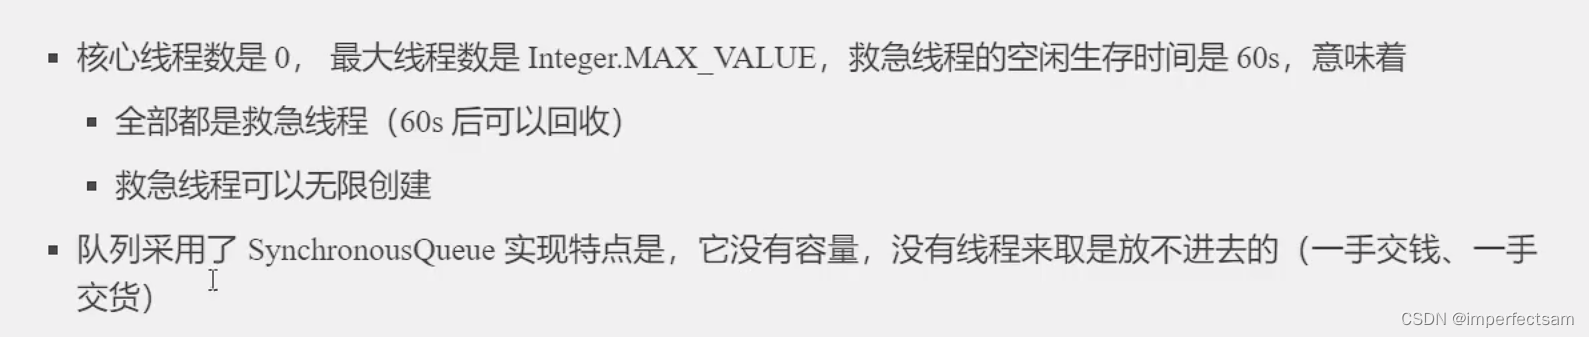
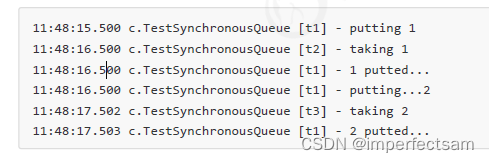
newCachedThreadPool
public static ExecutorService newCachedThreadPool() {
return new ThreadPoolExecutor(0, Integer.MAX_VALUE,
60L, TimeUnit.SECONDS,
new SynchronousQueue<Runnable>());
}
SynchronousQueue<Integer> integers = new SynchronousQueue<>();
new Thread(() -> {
try {
log.debug("putting {} ", 1);
integers.put(1);
log.debug("{} putted...", 1);
log.debug("putting...{} ", 2);
integers.put(2);
log.debug("{} putted...", 2);
} catch (InterruptedException e) {
e.printStackTrace();
}
},"t1").start();
sleep(1);
new Thread(() -> {
try {
log.debug("taking {}", 1);
integers.take();
} catch (InterruptedException e) {
e.printStackTrace();
}
},"t2").start();
sleep(1);
new Thread(() -> {
try {
log.debug("taking {}", 2);
integers.take();
} catch (InterruptedException e) {
e.printStackTrace();
}
},"t3").start();
输出结果:
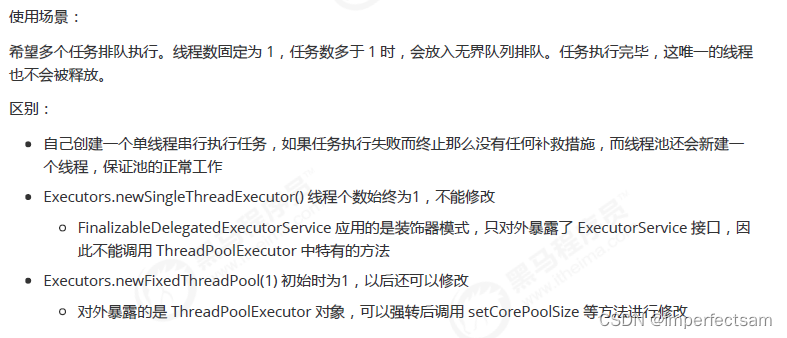
newSingleThreadExecutor
public static ExecutorService newSingleThreadExecutor() {
return new FinalizableDelegatedExecutorService
(new ThreadPoolExecutor(1, 1,
0L, TimeUnit.MILLISECONDS,
new LinkedBlockingQueue<Runnable>()));
}
3、提交任务
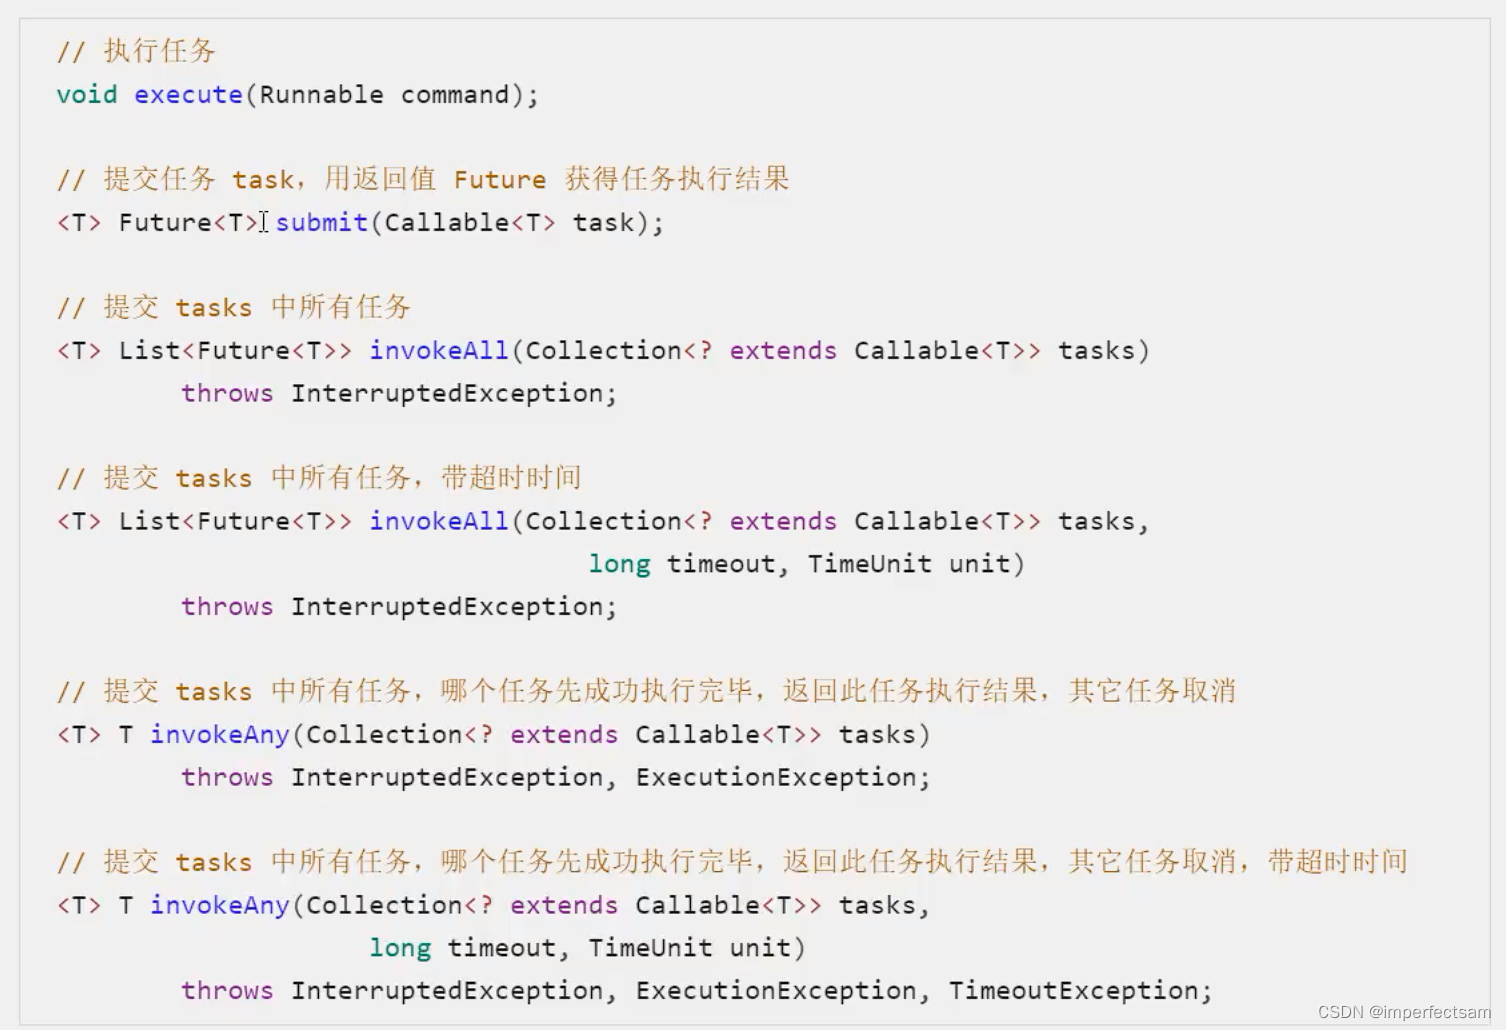
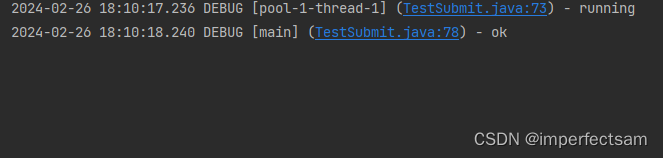
submit方法代码演示:
@Slf4j(topic = "c.TestSubmit")
public class TestSubmit {

    public static void main(String[] args) throws ExecutionException, InterruptedException {
       ExecutorService pool = Executors.newFixedThreadPool(1);
        method1(pool);
    }


    private static void method1(ExecutorService pool) throws InterruptedException, ExecutionException {
        Future<String> future = pool.submit(() -> {
            log.debug("running");
            Thread.sleep(1000);
            return "ok";
        });

        log.debug("{}", future.get());
    }
}
执行结果:
invokeAll方法代码:
@Slf4j(topic = "c.TestSubmit")
public class TestSubmit {
    public static void main(String[] args) throws ExecutionException, InterruptedException {
        ExecutorService pool = Executors.newFixedThreadPool(1);
        method2(pool);
    }


    private static void method2(ExecutorService pool) throws InterruptedException {
        List<Future<String>> futures = pool.invokeAll(Arrays.asList(
                () -> {
                    log.debug("begin");
                    Thread.sleep(1000);
                    return "1";
                },
                () -> {
                    log.debug("begin");
                    Thread.sleep(500);
                    return "2";
                },
                () -> {
                    log.debug("begin");
                    Thread.sleep(2000);
                    return "3";
                }
        ));

        futures.forEach( f ->  {
            try {
                log.debug("{}", f.get());
            } catch (InterruptedException | ExecutionException e) {
                e.printStackTrace();
            }
        });
    }


}
执行结果:
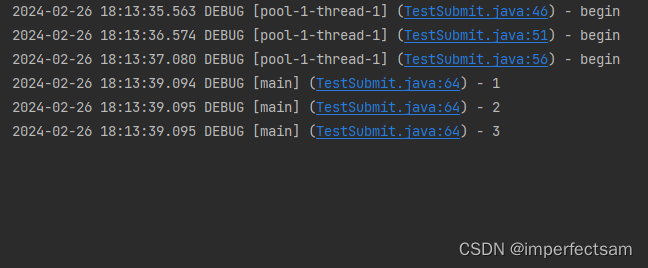
invokeAny方法代码:
@Slf4j(topic = "c.TestSubmit")
public class TestSubmit {
    public static void main(String[] args) throws ExecutionException, InterruptedException {
        ExecutorService pool = Executors.newFixedThreadPool(3);
        method3(pool);
    }

    private static void method3(ExecutorService pool) throws InterruptedException, ExecutionException {
        String result = pool.invokeAny(Arrays.asList(
                () -> {
                    log.debug("begin 1");
                    Thread.sleep(1000);
                    log.debug("end 1");
                    return "1";
                },
                () -> {
                    log.debug("begin 2");
                    Thread.sleep(500);
                    log.debug("end 2");
                    return "2";
                },
                () -> {
                    log.debug("begin 3");
                    Thread.sleep(2000);
                    log.debug("end 3");
                    return "3";
                }
        ));
        log.debug("{}", result);
    }


}
执行结果:
invokeAny用于返回一个最先得到的结果
4、关闭线程池
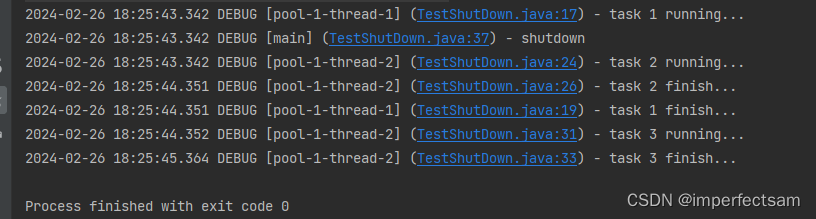
(1)、shutdown
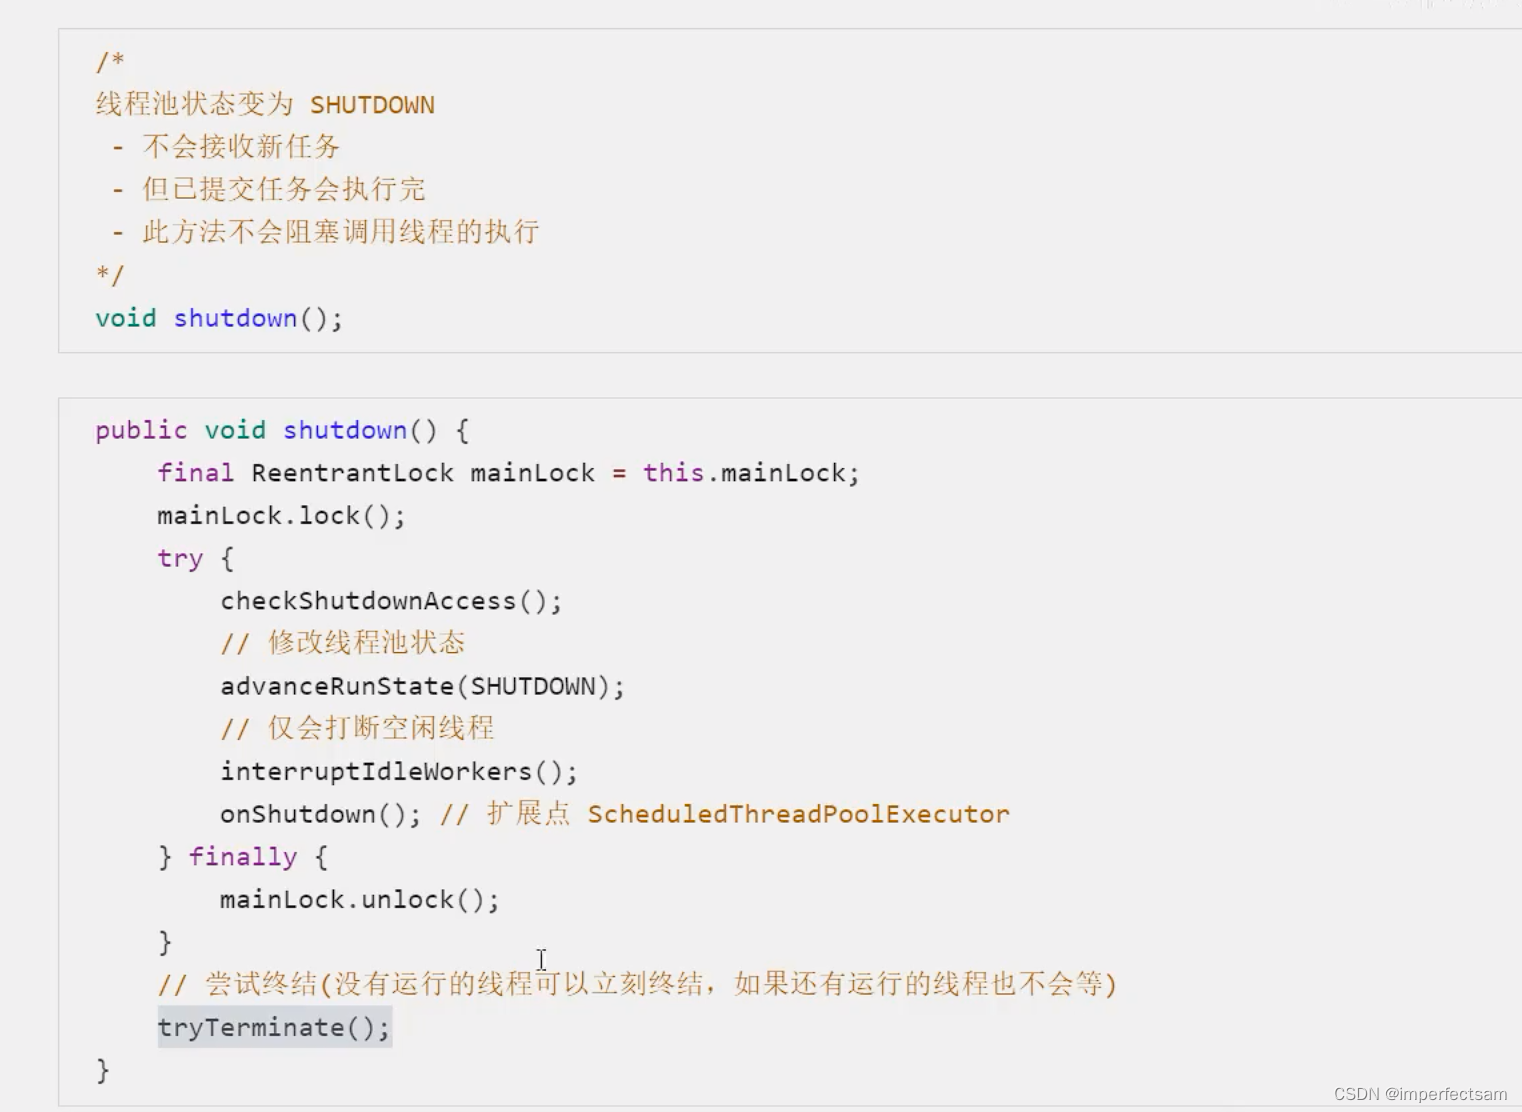
代码演示:
@Slf4j(topic = "c.TestShutDown")
public class TestShutDown {

    public static void main(String[] args) throws ExecutionException, InterruptedException {
        ExecutorService pool = Executors.newFixedThreadPool(2);

        Future<Integer> result1 = pool.submit(() -> {
            log.debug("task 1 running...");
            Thread.sleep(1000);
            log.debug("task 1 finish...");
            return 1;
        });

        Future<Integer> result2 = pool.submit(() -> {
            log.debug("task 2 running...");
            Thread.sleep(1000);
            log.debug("task 2 finish...");
            return 2;
        });

        Future<Integer> result3 = pool.submit(() -> {
            log.debug("task 3 running...");
            Thread.sleep(1000);
            log.debug("task 3 finish...");
            return 3;
        });

        log.debug("shutdown");
        pool.shutdown();
//        pool.awaitTermination(3, TimeUnit.SECONDS);
//        List<Runnable> runnables = pool.shutdownNow();
//        log.debug("other.... {}" , runnables);
    }
}
执行结果:
(2)shutdownNow
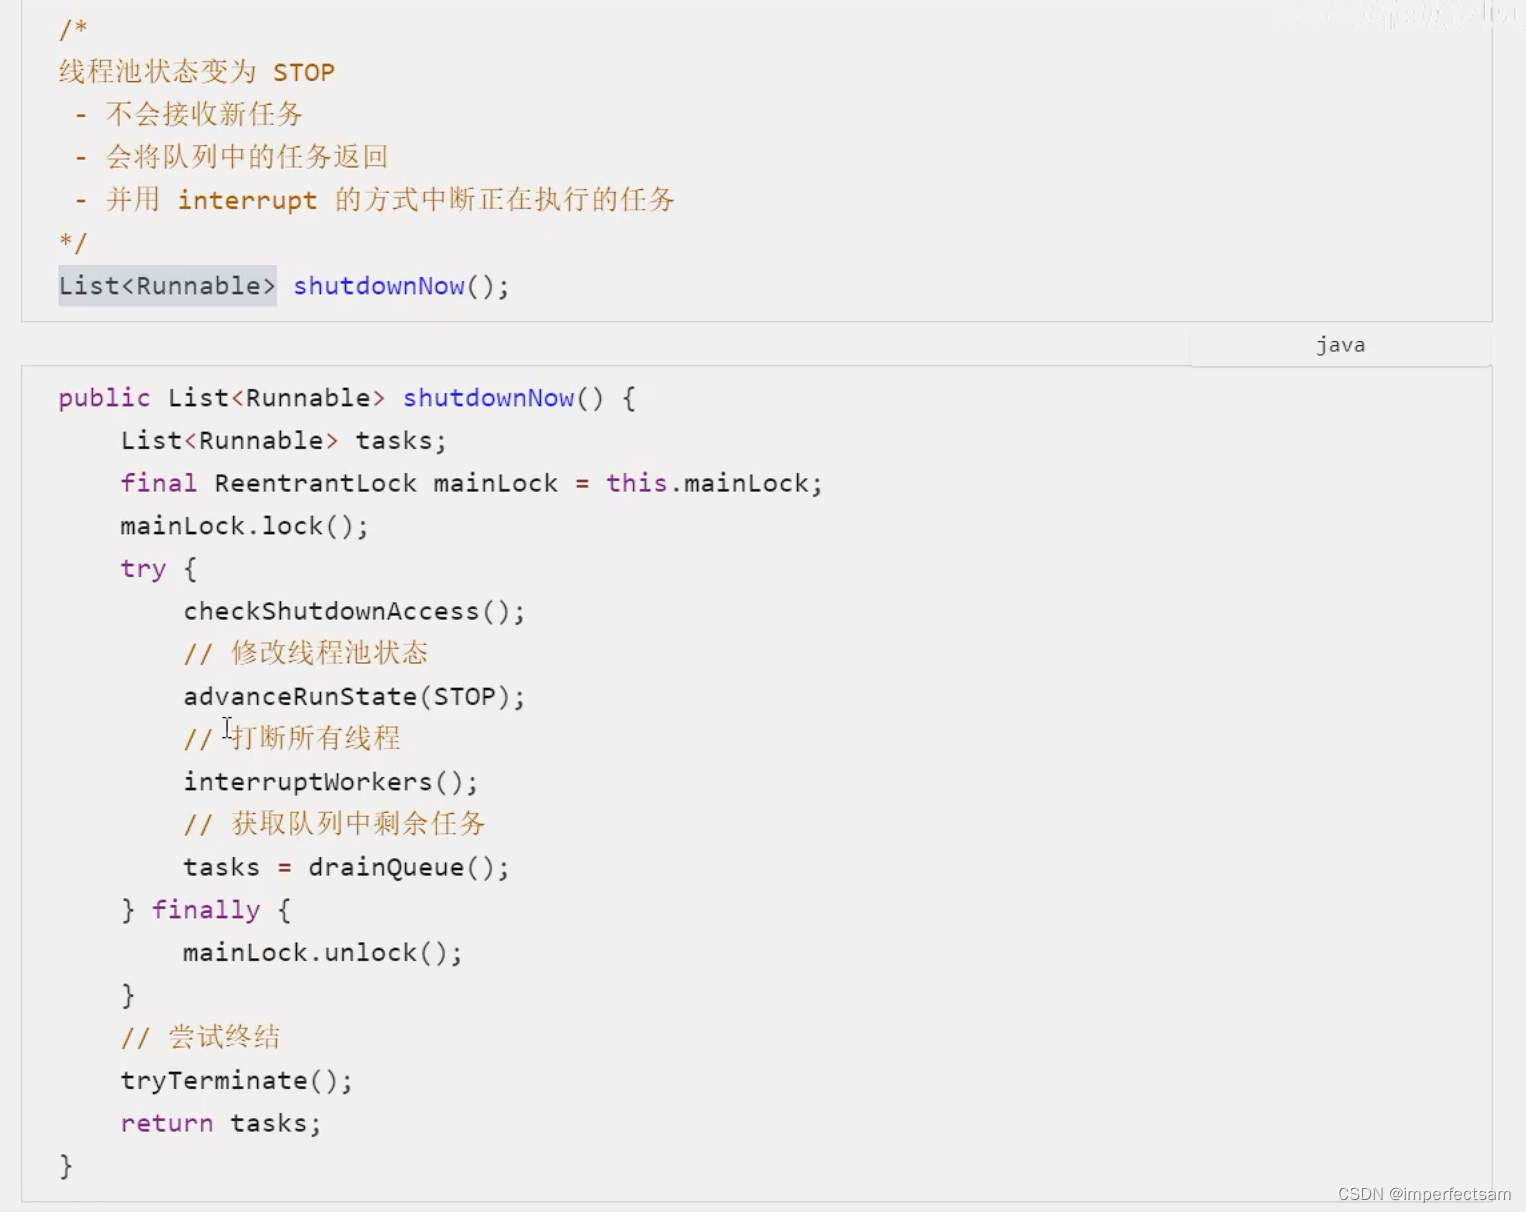
代码演示:
@Slf4j(topic = "c.TestShutDown")
public class TestShutDown {

    public static void main(String[] args) throws ExecutionException, InterruptedException {
        ExecutorService pool = Executors.newFixedThreadPool(2);

        Future<Integer> result1 = pool.submit(() -> {
            log.debug("task 1 running...");
            Thread.sleep(1000);
            log.debug("task 1 finish...");
            return 1;
        });

        Future<Integer> result2 = pool.submit(() -> {
            log.debug("task 2 running...");
            Thread.sleep(1000);
            log.debug("task 2 finish...");
            return 2;
        });

        Future<Integer> result3 = pool.submit(() -> {
            log.debug("task 3 running...");
            Thread.sleep(1000);
            log.debug("task 3 finish...");
            return 3;
        });

        log.debug("shutdown");
//        pool.shutdown();
//        pool.awaitTermination(3, TimeUnit.SECONDS);
        List<Runnable> runnables = pool.shutdownNow();
        log.debug("other.... {}" , runnables);
    }
}
执行结果:

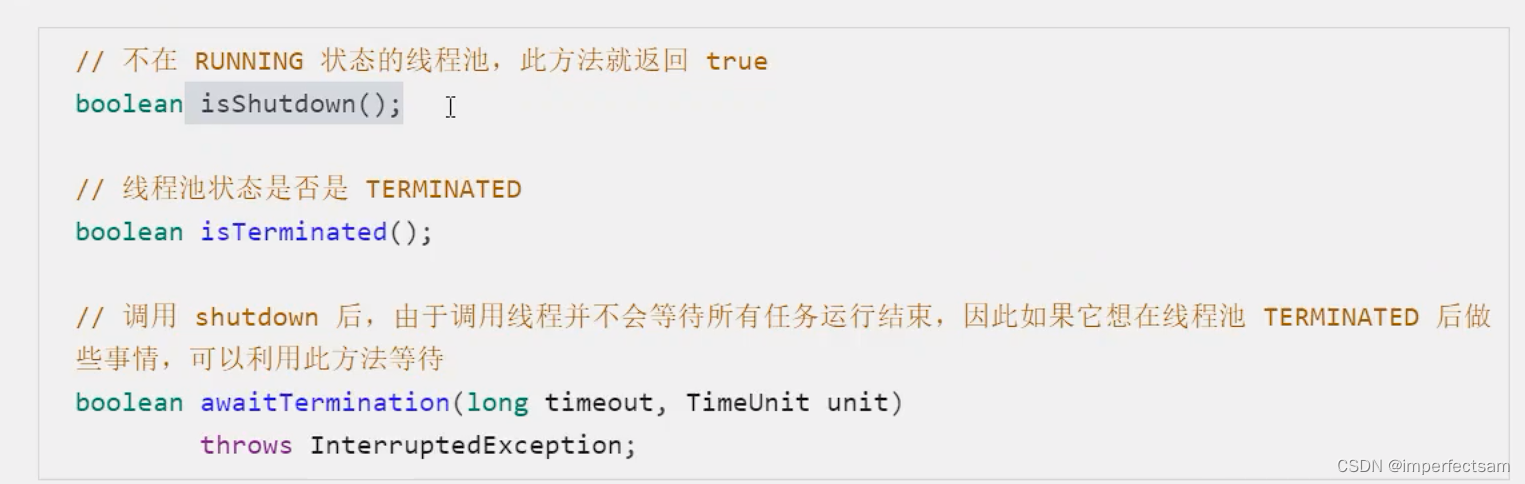
(3)其他方法
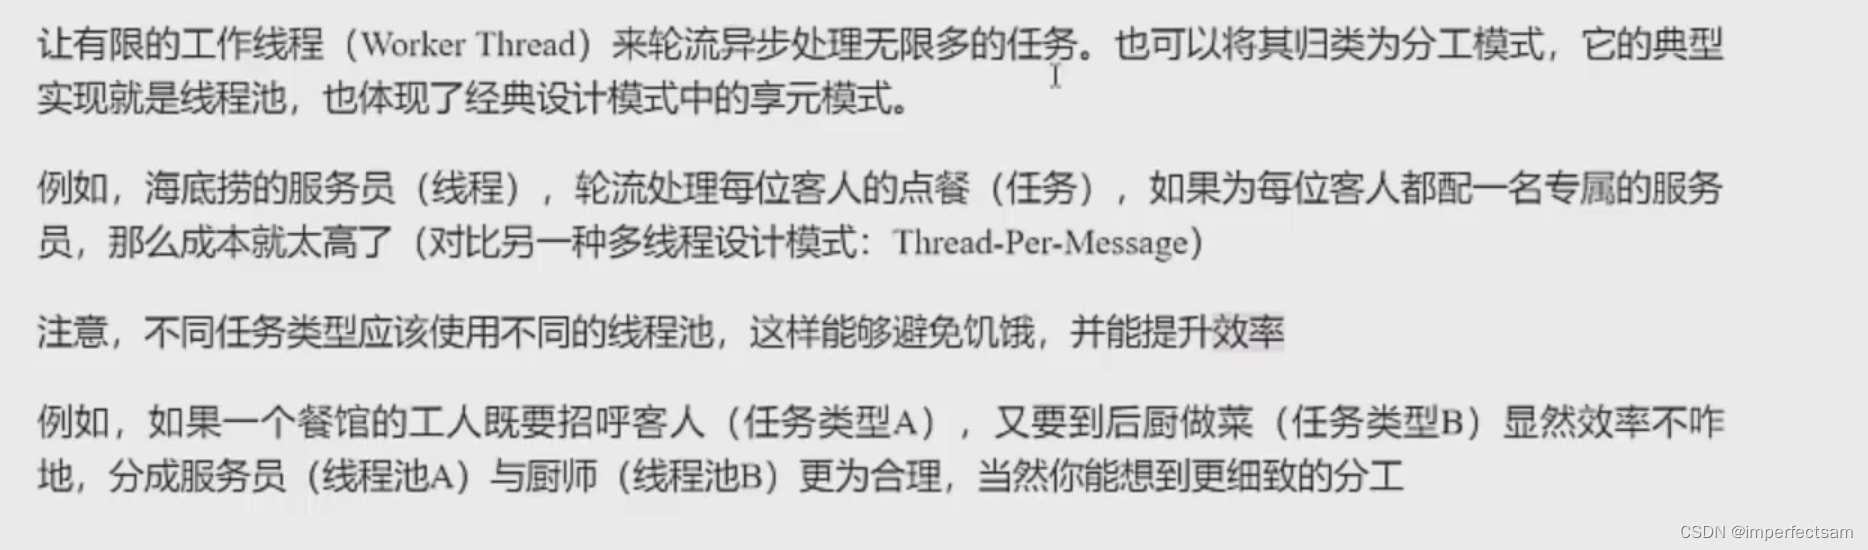
5、设计模式-工作线程
(1)定义:
(2)饥饿

代码演示:
@Slf4j(topic = "c.TestDeadLock")
public class TestStarvation {

    static final List<String> MENU = Arrays.asList("地三鲜", "宫保鸡丁", "辣子鸡丁", "烤鸡翅");
    static Random RANDOM = new Random();
    static String cooking() {
        return MENU.get(RANDOM.nextInt(MENU.size()));
    }
    public static void main(String[] args) {

        ExecutorService pool = Executors.newFixedThreadPool(2);

        pool.execute(() -> {
            log.debug("处理点餐...");
            Future<String> f = pool.submit(() -> {
                log.debug("做菜");
                return cooking();
            });
            try {
                log.debug("上菜: {}", f.get());
            } catch (InterruptedException | ExecutionException e) {
                e.printStackTrace();
            }
        });

    }
}
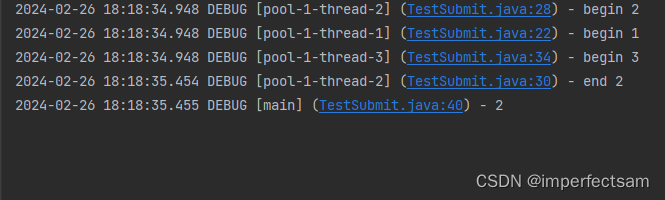
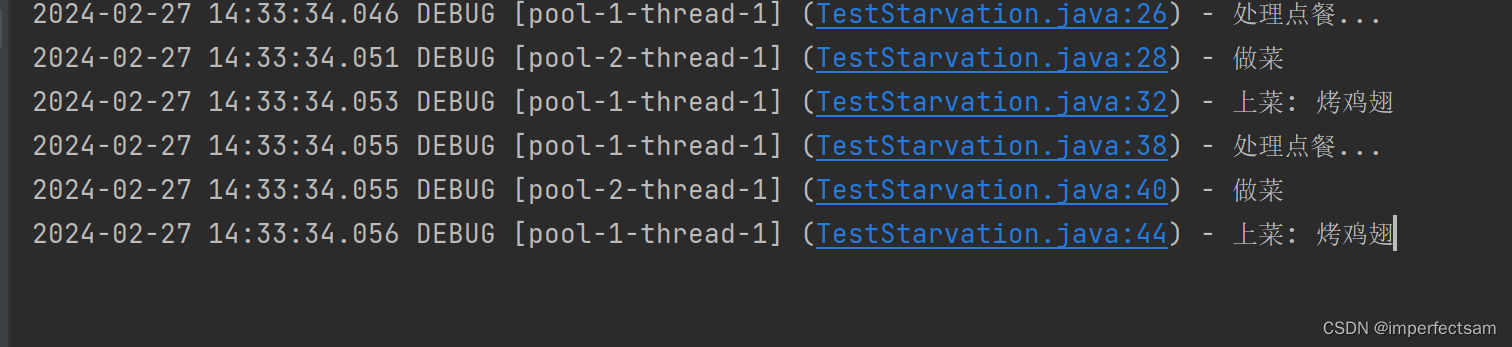
执行结果:

这里我们可以看到这两个线程都进行点餐了,而没有可用的线程去做菜了,这就导致了饥饿死锁了。
那我们应该如何解决这种饥饿的现象呢?
@Slf4j(topic = "c.TestDeadLock")
public class TestStarvation {

    static final List<String> MENU = Arrays.asList("地三鲜", "宫保鸡丁", "辣子鸡丁", "烤鸡翅");
    static Random RANDOM = new Random();
    static String cooking() {
        return MENU.get(RANDOM.nextInt(MENU.size()));
    }
    public static void main(String[] args) {
        ExecutorService waiterPool = Executors.newFixedThreadPool(1);
        ExecutorService cookPool = Executors.newFixedThreadPool(1);

        waiterPool.execute(() -> {
            log.debug("处理点餐...");
            Future<String> f = cookPool.submit(() -> {
                log.debug("做菜");
                return cooking();
            });
            try {
                log.debug("上菜: {}", f.get());
            } catch (InterruptedException | ExecutionException e) {
                e.printStackTrace();
            }
        });

    }
}
执行结果:
我们可以专门有点餐的线程和专门进行做菜的线程。
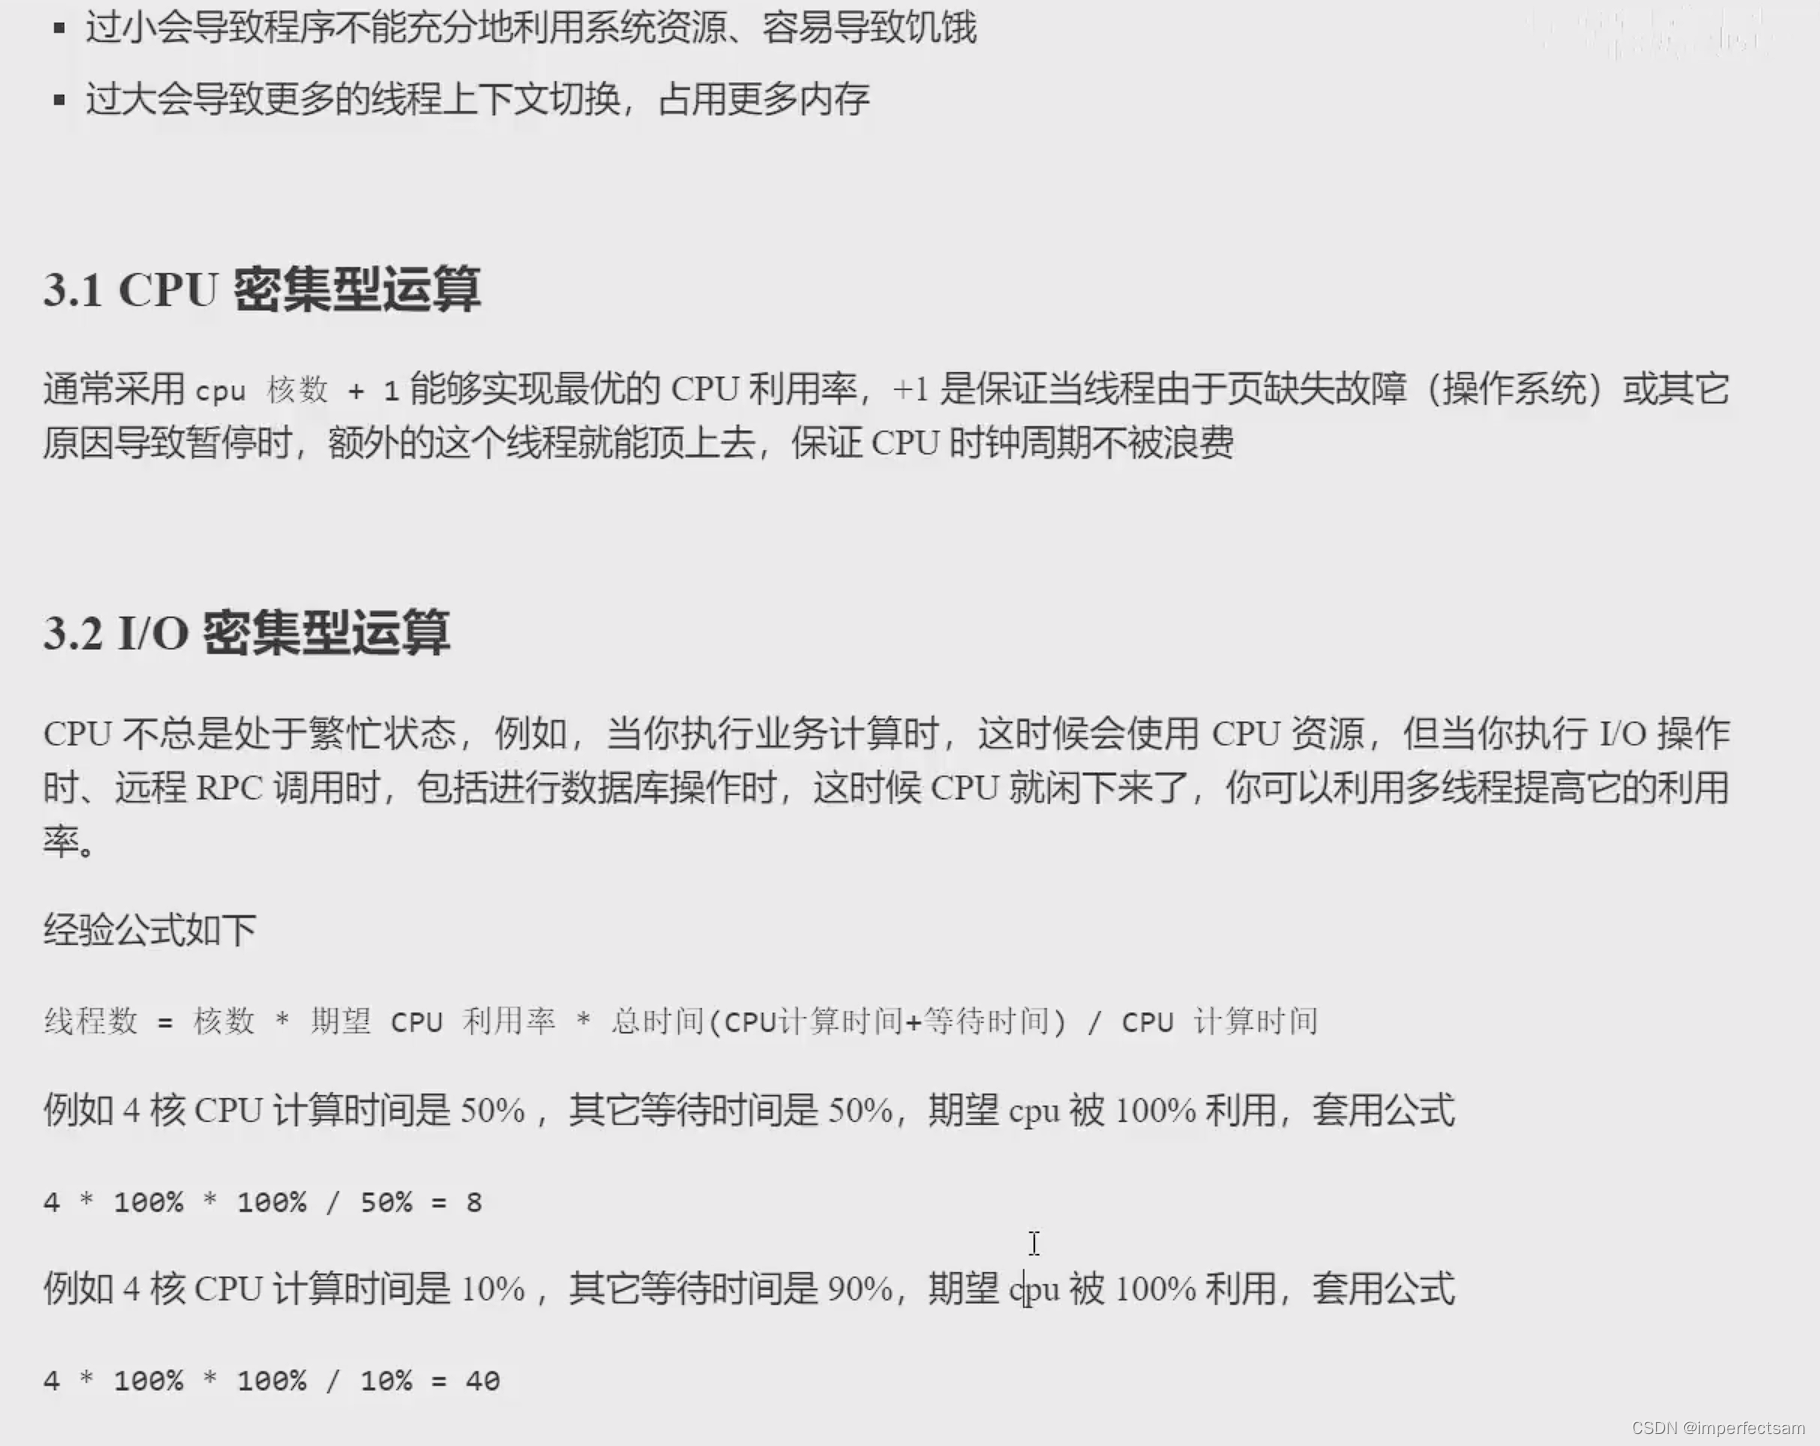
6、创建多少线程池合适
7、ScheduledThreadPool(任务调度线程池)
定义:ScheduledThreadPoolExecutor 是 Java 中的一个线程池类,用于执行定时任务。它是 ThreadPoolExecutor 的子类,因此继承了线程池的所有特性,并且增加了一些支持定时任务的功能。
代码编写:
@Slf4j(topic = "c.TestTimer")
public class TestTimer {
    public static void main(String[] args) throws ExecutionException, InterruptedException {
        ScheduledExecutorService pool = Executors.newScheduledThreadPool(1);

        method2(pool);
    }


    private static void method2(ScheduledExecutorService pool) {
        pool.schedule(() -> {
            log.debug("task1");
            int i = 1 / 0;
        }, 1, TimeUnit.SECONDS);

        pool.schedule(() -> {
            log.debug("task2");
        }, 1, TimeUnit.SECONDS);
    }


}
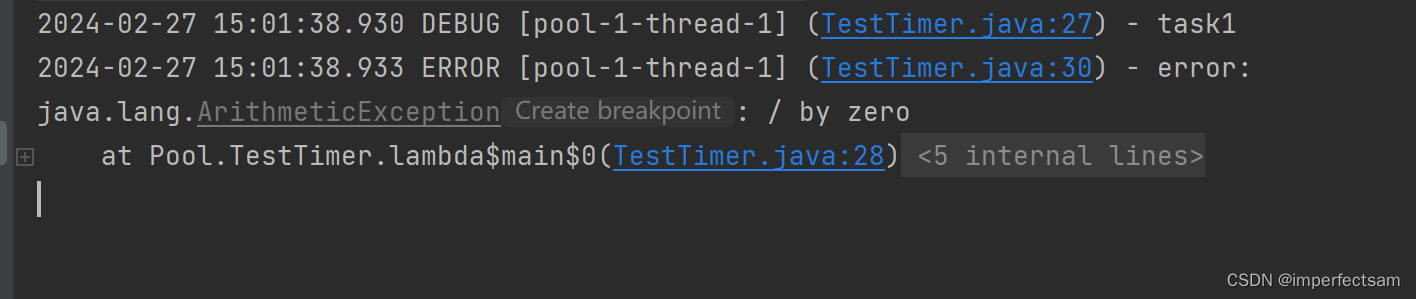
执行结果:

我们可以看到这里的即使task1发生了异常也不会影响task2的执行。
代码编写:
 private static void method3() {
        ScheduledExecutorService pool = Executors.newScheduledThreadPool(1);
        log.debug("start...");
        pool.scheduleAtFixedRate(() -> {
            log.debug("running...");
        }, 1, 1, TimeUnit.SECONDS);
    }
执行结果:
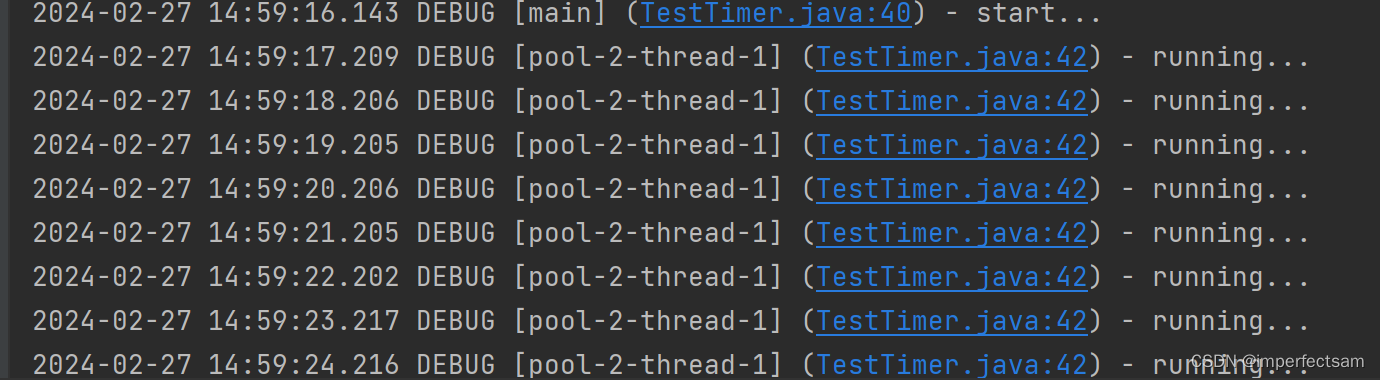
scheduleAtFixedRate这样子任务就会定时的去执行,每隔一秒就会去打印running。
8、正确处理线程池异常
   ExecutorService pool = Executors.newFixedThreadPool(1);
    pool.submit(() -> {
        try {
            log.debug("task1");
            int i = 1 / 0;
        } catch (Exception e) {
            log.error("error:", e);
        }
    });
执行结果:
🐱二、JUC
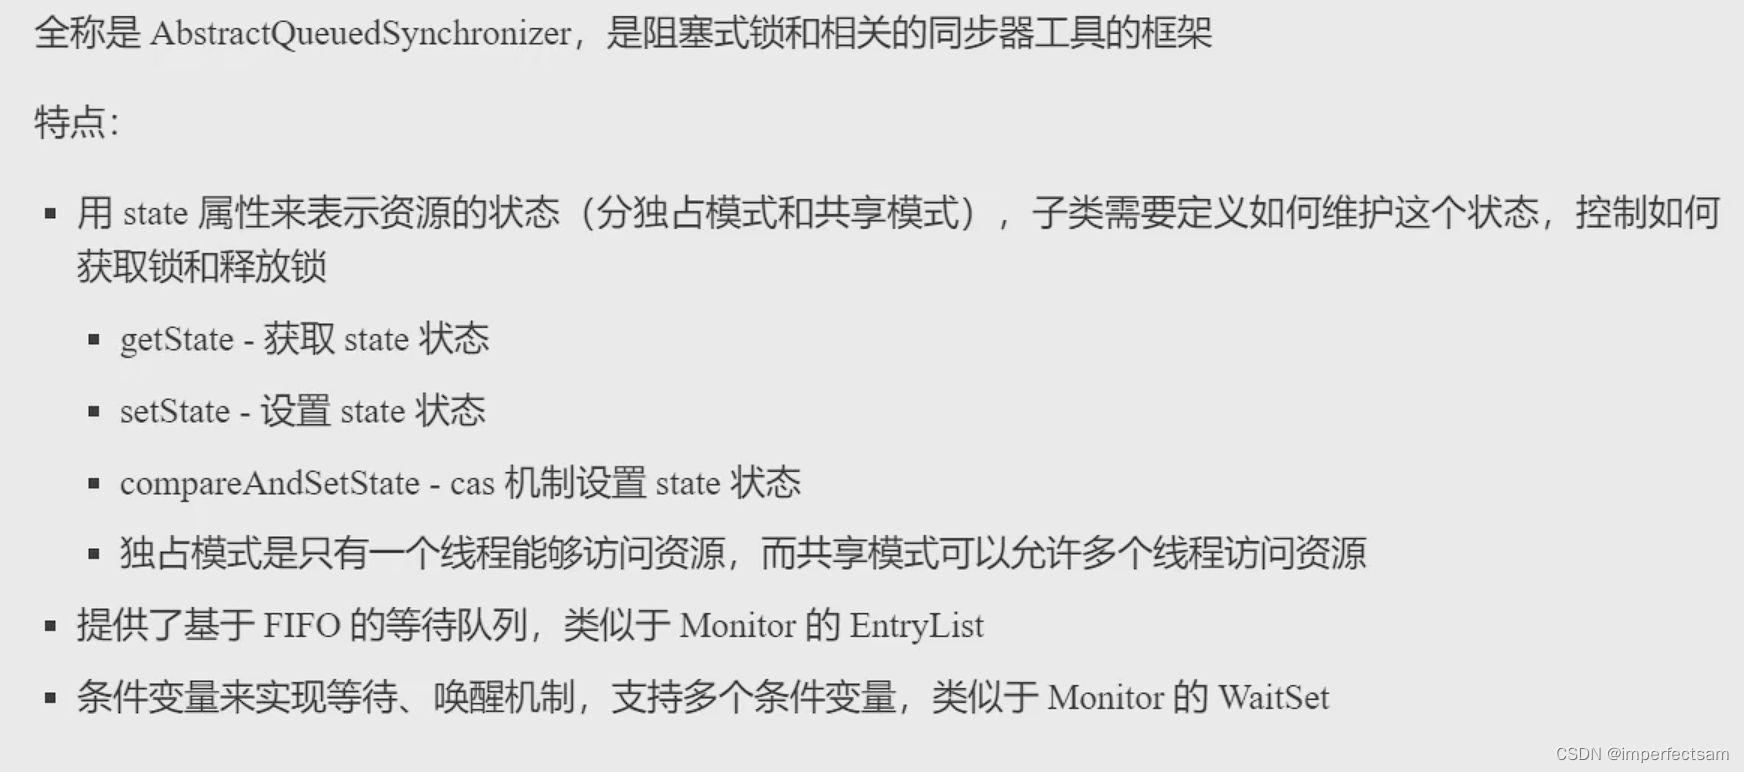
1、AQS
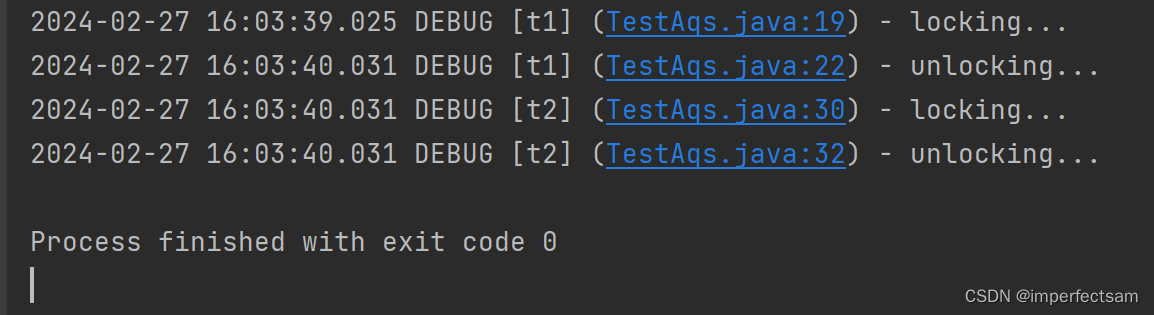
2、自定义不可重入锁
编写代码:
@Slf4j(topic = "c.TestAqs")
public class TestAqs {
    public static void main(String[] args) {
        MyLock lock = new MyLock();
        new Thread(() -> {
            lock.lock();
            try {
                log.debug("locking...");
                sleep(1);
            } finally {
                log.debug("unlocking...");
                lock.unlock();
            }
        },"t1").start();

        new Thread(() -> {
            lock.lock();
            try {
                log.debug("locking...");
            } finally {
                log.debug("unlocking...");
                lock.unlock();
            }
        },"t2").start();
    }
}

// 自定义锁(不可重入锁)
class MyLock implements Lock {

    // 独占锁  同步器类
    class MySync extends AbstractQueuedSynchronizer {
        @Override
        protected boolean tryAcquire(int arg) {
            if(compareAndSetState(0, 1)) {
                // 加上了锁,并设置 owner 为当前线程
                setExclusiveOwnerThread(Thread.currentThread());
                return true;
            }
            return false;
        }

        @Override
        protected boolean tryRelease(int arg) {
            setExclusiveOwnerThread(null);
            setState(0);
            return true;
        }

        @Override // 是否持有独占锁
        protected boolean isHeldExclusively() {
            return getState() == 1;
        }

        public Condition newCondition() {
            return new ConditionObject();
        }
    }

    private MySync sync = new MySync();

    @Override // 加锁(不成功会进入等待队列)
    public void lock() {
        sync.acquire(1);
    }

    @Override // 加锁,可打断
    public void lockInterruptibly() throws InterruptedException {
        sync.acquireInterruptibly(1);
    }

    @Override // 尝试加锁(一次)
    public boolean tryLock() {
        return sync.tryAcquire(1);
    }

    @Override // 尝试加锁,带超时
    public boolean tryLock(long time, TimeUnit unit) throws InterruptedException {
        return sync.tryAcquireNanos(1, unit.toNanos(time));
    }

    @Override // 解锁
    public void unlock() {
        sync.release(1);
    }

    @Override // 创建条件变量
    public Condition newCondition() {
        return sync.newCondition();
    }
}
执行结果:
3、ReentrantLock原理
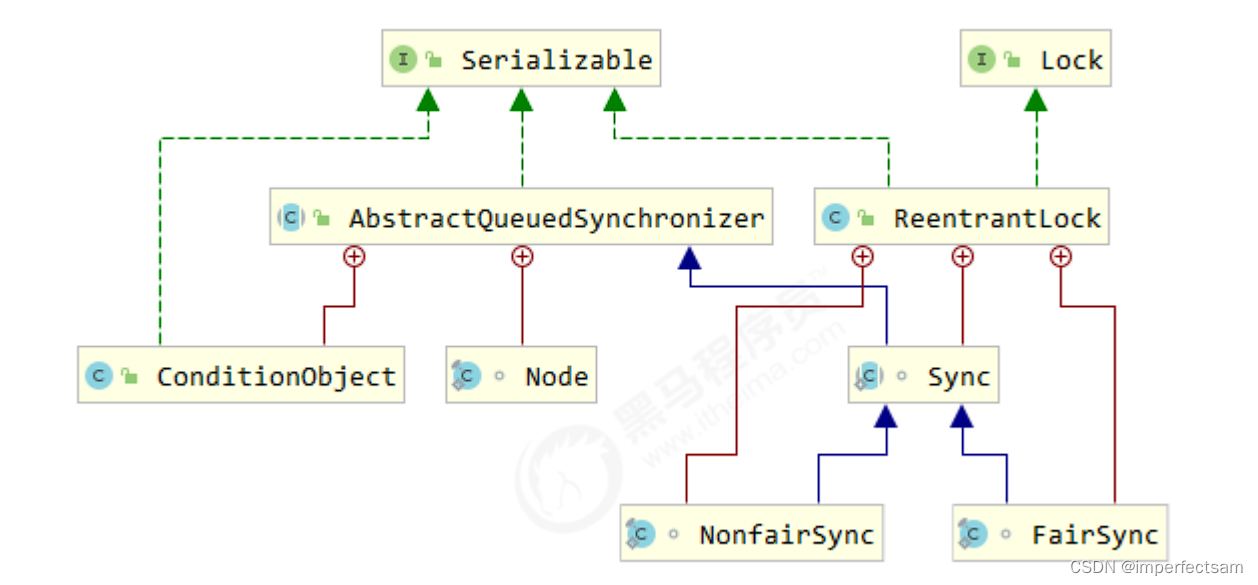
(1)非公平锁实现原理
先从构造器开始看,默认为非公平锁实现
public ReentrantLock() {
 sync = new NonfairSync();
}
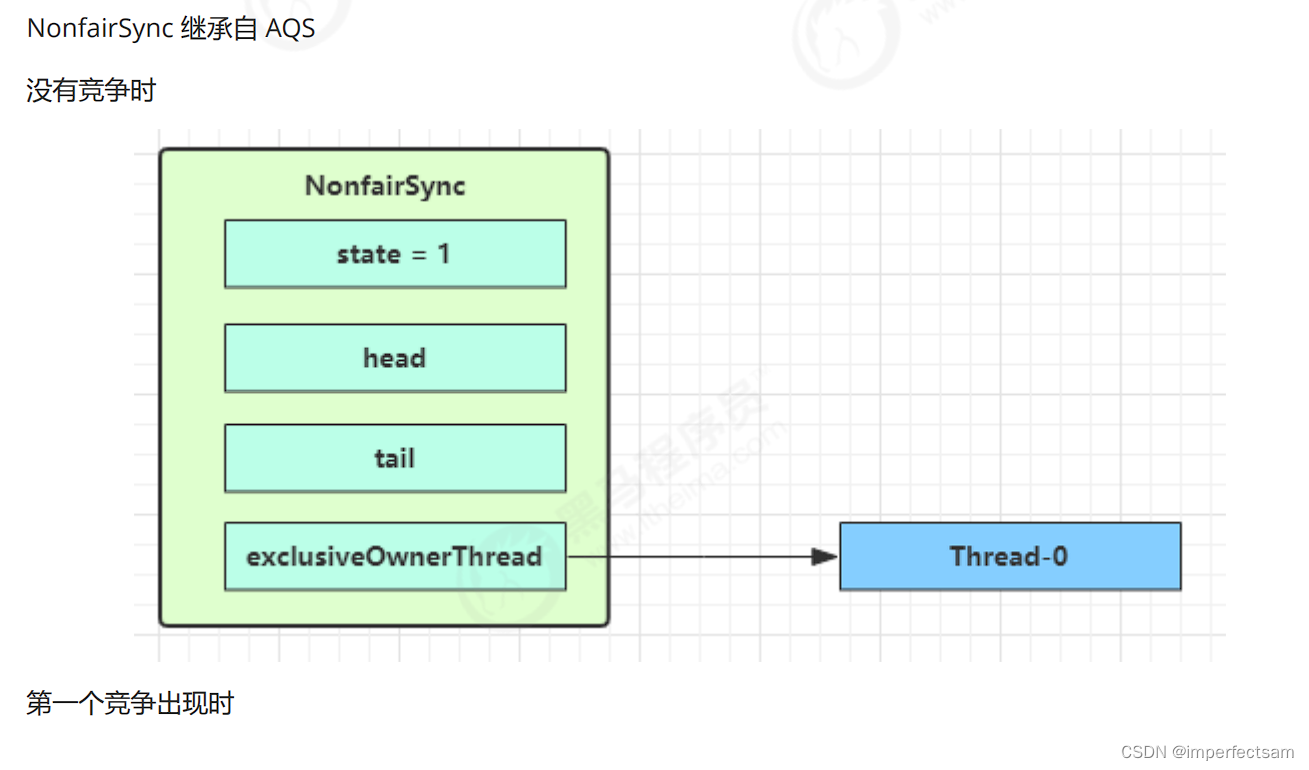

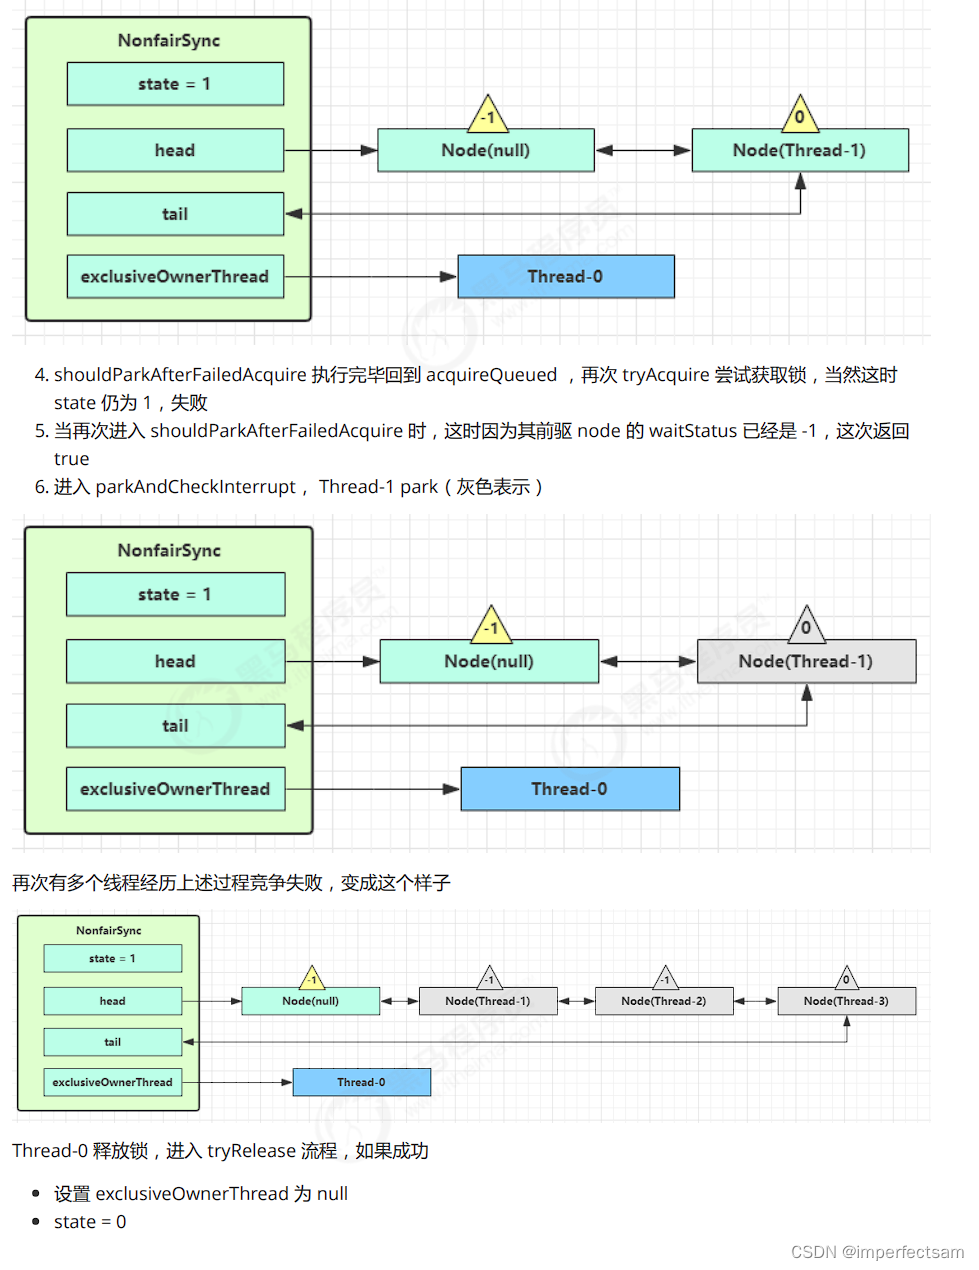
(2)加锁源码
// Sync 继承自 AQS
static final class NonfairSync extends Sync {
 private static final long serialVersionUID = 7316153563782823691L;

 // 加锁实现
 final void lock() {
 // 首先用 cas 尝试(仅尝试一次)将 state 从 0 改为 1, 如果成功表示获得了独占锁
 if (compareAndSetState(0, 1))
 setExclusiveOwnerThread(Thread.currentThread());
 else
 // 如果尝试失败,进入 ㈠
 acquire(1);
 }

 // ㈠ AQS 继承过来的方法, 方便阅读, 放在此处
 public final void acquire(int arg) {
 // ㈡ tryAcquire
 if (
 !tryAcquire(arg) &&
 // 当 tryAcquire 返回为 false 时, 先调用 addWaiter ㈣, 接着 acquireQueued ㈤
 acquireQueued(addWaiter(Node.EXCLUSIVE), arg)
 ) {
 selfInterrupt();
 }
 }

 // ㈡ 进入 ㈢
 protected final boolean tryAcquire(int acquires) {
 return nonfairTryAcquire(acquires);
 }

 // ㈢ Sync 继承过来的方法, 方便阅读, 放在此处
 final boolean nonfairTryAcquire(int acquires) {
 final Thread current = Thread.currentThread();
 int c = getState();
 // 如果还没有获得锁
 if (c == 0) {
 // 尝试用 cas 获得, 这里体现了非公平性: 不去检查 AQS 队列
 if (compareAndSetState(0, acquires)) {
 setExclusiveOwnerThread(current);
 return true;
 }
 }
 // 如果已经获得了锁, 线程还是当前线程, 表示发生了锁重入
 else if (current == getExclusiveOwnerThread()) {
 // state++
 int nextc = c + acquires;
 if (nextc < 0) // overflow
 throw new Error("Maximum lock count exceeded");
 setState(nextc);
 return true;
 }
 // 获取失败, 回到调用处
 return false;
 }

 // ㈣ AQS 继承过来的方法, 方便阅读, 放在此处
 private Node addWaiter(Node mode) {
 // 将当前线程关联到一个 Node 对象上, 模式为独占模式
 Node node = new Node(Thread.currentThread(), mode);
 // 如果 tail 不为 null, cas 尝试将 Node 对象加入 AQS 队列尾部
 Node pred = tail;
 if (pred != null) {
 node.prev = pred;
 if (compareAndSetTail(pred, node)) {
 // 双向链表
 pred.next = node;
 return node;
 }
 }
 // 尝试将 Node 加入 AQS, 进入 ㈥
 enq(node);
 return node;
 }

 // ㈥ AQS 继承过来的方法, 方便阅读, 放在此处
 private Node enq(final Node node) {
 for (;;) {
 Node t = tail;
 if (t == null) {
 // 还没有, 设置 head 为哨兵节点(不对应线程,状态为 0)
 if (compareAndSetHead(new Node())) {
 tail = head;
 }
 } else {
 // cas 尝试将 Node 对象加入 AQS 队列尾部
 node.prev = t;
 if (compareAndSetTail(t, node)) {
 t.next = node;
 return t;
 }
 }
 }
 }

 // ㈤ AQS 继承过来的方法, 方便阅读, 放在此处
 final boolean acquireQueued(final Node node, int arg) {
 boolean failed = true;
 try {
 boolean interrupted = false;
 for (;;) {
 final Node p = node.predecessor();
 // 上一个节点是 head, 表示轮到自己(当前线程对应的 node)了, 尝试获取
 if (p == head && tryAcquire(arg)) {
 // 获取成功, 设置自己(当前线程对应的 node)为 head
 setHead(node);
 // 上一个节点 help GC
 p.next = null;
 failed = false;
 // 返回中断标记 false
 return interrupted;
 }
 if (
 // 判断是否应当 park, 进入 ㈦
 shouldParkAfterFailedAcquire(p, node) &&
 // park 等待, 此时 Node 的状态被置为 Node.SIGNAL ㈧
 parkAndCheckInterrupt()
 ) {
 interrupted = true;
 }
 }
 } finally {
 if (failed)
 cancelAcquire(node);
 }
 }

 // ㈦ AQS 继承过来的方法, 方便阅读, 放在此处
 private static boolean shouldParkAfterFailedAcquire(Node pred, Node node) {
 // 获取上一个节点的状态
 int ws = pred.waitStatus;
 if (ws == Node.SIGNAL) {
 // 上一个节点都在阻塞, 那么自己也阻塞好了
 return true;
 }
 // > 0 表示取消状态
 if (ws > 0) {
 // 上一个节点取消, 那么重构删除前面所有取消的节点, 返回到外层循环重试
 do {
 node.prev = pred = pred.prev;
 } while (pred.waitStatus > 0);
 pred.next = node;
 } else {
 // 这次还没有阻塞
 // 但下次如果重试不成功, 则需要阻塞,这时需要设置上一个节点状态为 Node.SIGNAL
 compareAndSetWaitStatus(pred, ws, Node.SIGNAL);
 }
 return false;
 }

 // ㈧ 阻塞当前线程
 private final boolean parkAndCheckInterrupt() {
 LockSupport.park(this);
 return Thread.interrupted();
 }
}
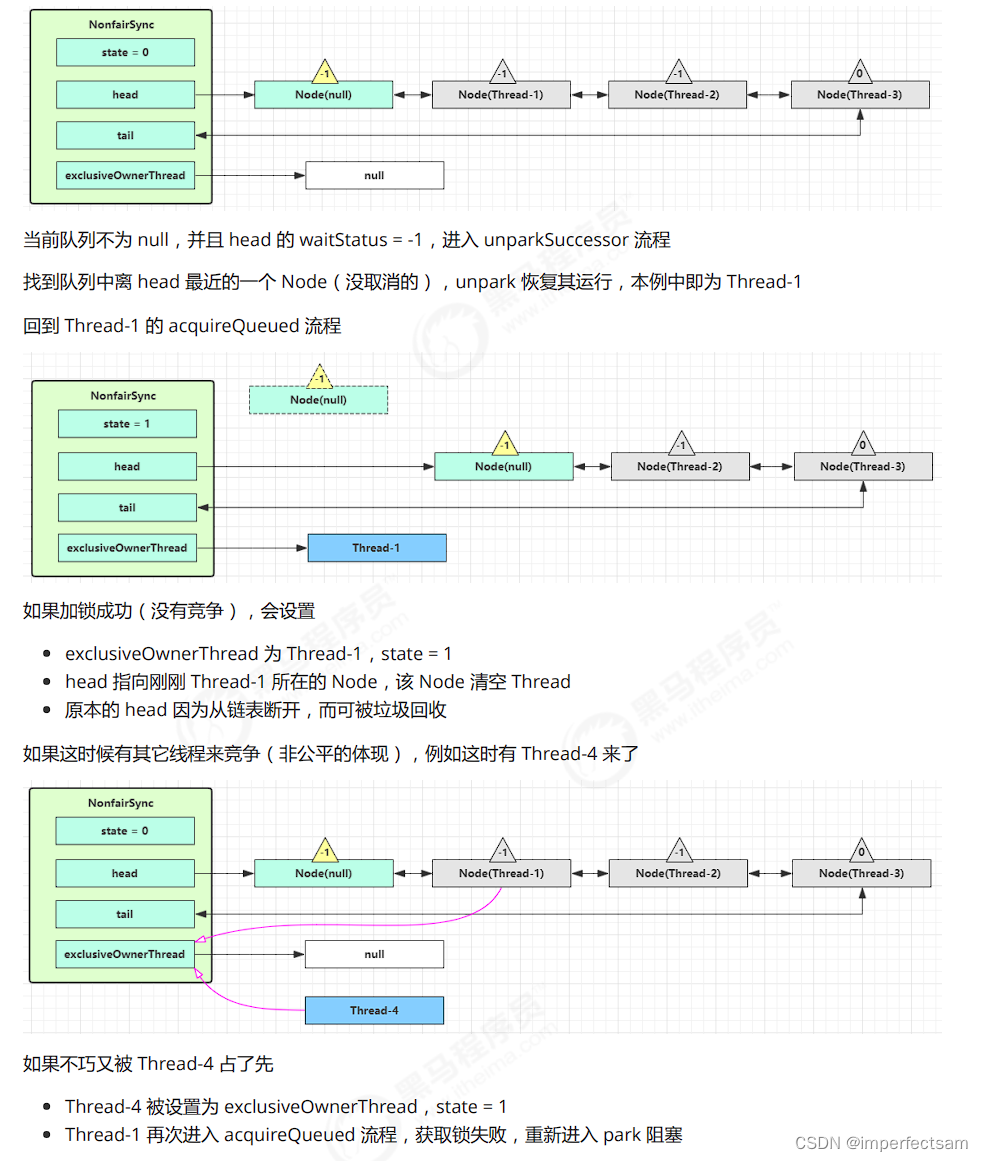
是否需要 unpark 是由当前节点的前驱节点的 waitStatus == Node.SIGNAL 来决定,而不是本节点的
waitStatus 决定
(3)解锁源码
// Sync 继承自 AQS
static final class NonfairSync extends Sync {
 // 解锁实现
 public void unlock() {
 sync.release(1);
 }

 // AQS 继承过来的方法, 方便阅读, 放在此处
 public final boolean release(int arg) {
 // 尝试释放锁, 进入 ㈠
 if (tryRelease(arg)) {
 // 队列头节点 unpark
 Node h = head;
 if (
 // 队列不为 null
 h != null &&
 // waitStatus == Node.SIGNAL 才需要 unpark
 h.waitStatus != 0
 ) {
 // unpark AQS 中等待的线程, 进入 ㈡
 unparkSuccessor(h);
 }
 return true;
 }
 return false;
 }

 // ㈠ Sync 继承过来的方法, 方便阅读, 放在此处
 protected final boolean tryRelease(int releases) {
 // state--
 int c = getState() - releases;
 if (Thread.currentThread() != getExclusiveOwnerThread())
 throw new IllegalMonitorStateException();
 boolean free = false;
 // 支持锁重入, 只有 state 减为 0, 才释放成功
 if (c == 0) {
 free = true;
 setExclusiveOwnerThread(null);
 }
 setState(c);
 return free;
 }

 // ㈡ AQS 继承过来的方法, 方便阅读, 放在此处
 private void unparkSuccessor(Node node) {
 // 如果状态为 Node.SIGNAL 尝试重置状态为 0
 // 不成功也可以
 int ws = node.waitStatus;
 if (ws < 0) {
 compareAndSetWaitStatus(node, ws, 0);
 }
 // 找到需要 unpark 的节点, 但本节点从 AQS 队列中脱离, 是由唤醒节点完成的
  Node s = node.next;
 // 不考虑已取消的节点, 从 AQS 队列从后至前找到队列最前面需要 unpark 的节点
 if (s == null || s.waitStatus > 0) {
 s = null;
 for (Node t = tail; t != null && t != node; t = t.prev)
 if (t.waitStatus <= 0)
 s = t;
 }
 if (s != null)
 LockSupport.unpark(s.thread);
 }
}
(4)可重入原理
static final class NonfairSync extends Sync {
 // ...

 // Sync 继承过来的方法, 方便阅读, 放在此处
 final boolean nonfairTryAcquire(int acquires) {
 final Thread current = Thread.currentThread();
 int c = getState();
 if (c == 0) {
 if (compareAndSetState(0, acquires)) {
 setExclusiveOwnerThread(current);
 return true;
 }
 }
 // 如果已经获得了锁, 线程还是当前线程, 表示发生了锁重入
 else if (current == getExclusiveOwnerThread()) {
 // state++
 int nextc = c + acquires;
 if (nextc < 0) // overflow
 throw new Error("Maximum lock count exceeded");
 setState(nextc);
 return true;
 }
 return false;
 }

 // Sync 继承过来的方法, 方便阅读, 放在此处
 protected final boolean tryRelease(int releases) {
 // state--
 int c = getState() - releases;
 if (Thread.currentThread() != getExclusiveOwnerThread())
 throw new IllegalMonitorStateException();
 boolean free = false;
 // 支持锁重入, 只有 state 减为 0, 才释放成功
 if (c == 0) {
 free = true;
 setExclusiveOwnerThread(null);
 }
 setState(c);
 return free;
 }
}
(5)可打断原理(不可打断模式)
在此模式下,即使它被打断,仍会驻留在 AQS 队列中,一直要等到获得锁后方能得知自己被打断了
// Sync 继承自 AQS
static final class NonfairSync extends Sync {
 // ...

 private final boolean parkAndCheckInterrupt() {
 // 如果打断标记已经是 true, 则 park 会失效
 LockSupport.park(this);
 // interrupted 会清除打断标记
 return Thread.interrupted();
 }

 final boolean acquireQueued(final Node node, int arg) {
 boolean failed = true;
 try {
 boolean interrupted = false;
 for (;;) {
 final Node p = node.predecessor();
 if (p == head && tryAcquire(arg)) {
 setHead(node);
 p.next = null;
 failed = false;
 // 还是需要获得锁后, 才能返回打断状态
 return interrupted;
 }
 if (
 shouldParkAfterFailedAcquire(p, node) &&
 parkAndCheckInterrupt()
 ) {
 // 如果是因为 interrupt 被唤醒, 返回打断状态为 true
 interrupted = true;
 }
 }
 } finally {
 if (failed)
 cancelAcquire(node);
 }
 }

 public final void acquire(int arg) {
 if (
 !tryAcquire(arg) &&
 acquireQueued(addWaiter(Node.EXCLUSIVE), arg)
 ) {
 // 如果打断状态为 true
 selfInterrupt();
 }
 }

 static void selfInterrupt() {
 // 重新产生一次中断
 Thread.currentThread().interrupt();
 }
}
(6)可打断原理(可打断模式)
static final class NonfairSync extends Sync {
 public final void acquireInterruptibly(int arg) throws InterruptedException {
 if (Thread.interrupted())
 throw new InterruptedException();
 // 如果没有获得到锁, 进入 ㈠
 if (!tryAcquire(arg))
 doAcquireInterruptibly(arg);
 }

 // ㈠ 可打断的获取锁流程
 private void doAcquireInterruptibly(int arg) throws InterruptedException {
 final Node node = addWaiter(Node.EXCLUSIVE);
 boolean failed = true;
 try {
 for (;;) {
 final Node p = node.predecessor();
 if (p == head && tryAcquire(arg)) {
 setHead(node);
 p.next = null; // help GC
 failed = false;
 return;
 }
 if (shouldParkAfterFailedAcquire(p, node) &&
 parkAndCheckInterrupt()) {
 // 在 park 过程中如果被 interrupt 会进入此
 // 这时候抛出异常, 而不会再次进入 for (;;)
 throw new InterruptedException();
 }
 }
 } finally {
 if (failed)
 cancelAcquire(node);
 }
 }
}
(7)公平锁实现原理
static final class FairSync extends Sync {
 private static final long serialVersionUID = -3000897897090466540L;
 final void lock() {
 acquire(1);
 }

 // AQS 继承过来的方法, 方便阅读, 放在此处
 public final void acquire(int arg) {
 if (
 !tryAcquire(arg) &&
 acquireQueued(addWaiter(Node.EXCLUSIVE), arg)
 ) {
 selfInterrupt();
 }
 }
 // 与非公平锁主要区别在于 tryAcquire 方法的实现
 protected final boolean tryAcquire(int acquires) {
 final Thread current = Thread.currentThread();
 int c = getState();
 if (c == 0) {
 // 先检查 AQS 队列中是否有前驱节点, 没有才去竞争
 if (!hasQueuedPredecessors() &&
 compareAndSetState(0, acquires)) {
 setExclusiveOwnerThread(current);
 return true;
 }
 }
 else if (current == getExclusiveOwnerThread()) {
 int nextc = c + acquires;
 if (nextc < 0)
 throw new Error("Maximum lock count exceeded");
 setState(nextc);
 return true;
 }
 return false;
 }

 // ㈠ AQS 继承过来的方法, 方便阅读, 放在此处
 public final boolean hasQueuedPredecessors() {
 Node t = tail;
 Node h = head;
 Node s;
 // h != t 时表示队列中有 Node
 return h != t &&
 (
 // (s = h.next) == null 表示队列中还有没有老二
 (s = h.next) == null ||
 // 或者队列中老二线程不是此线程
 s.thread != Thread.currentThread()
 );
 }
}
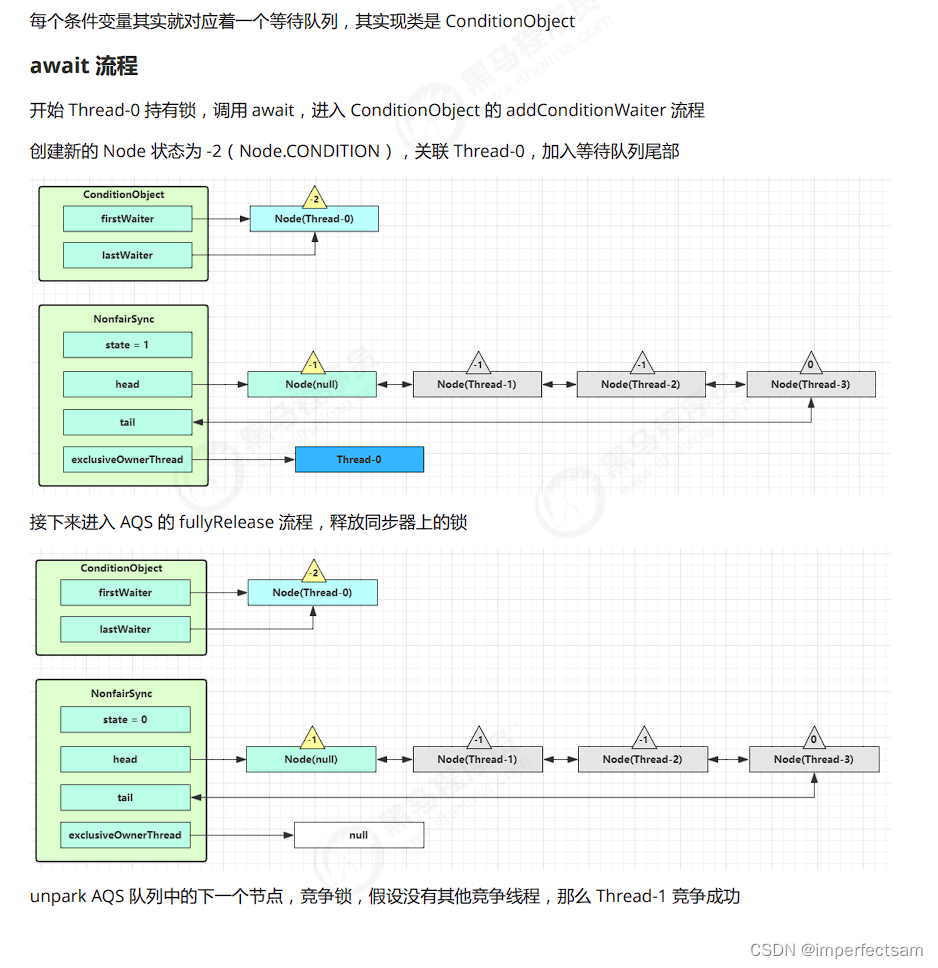
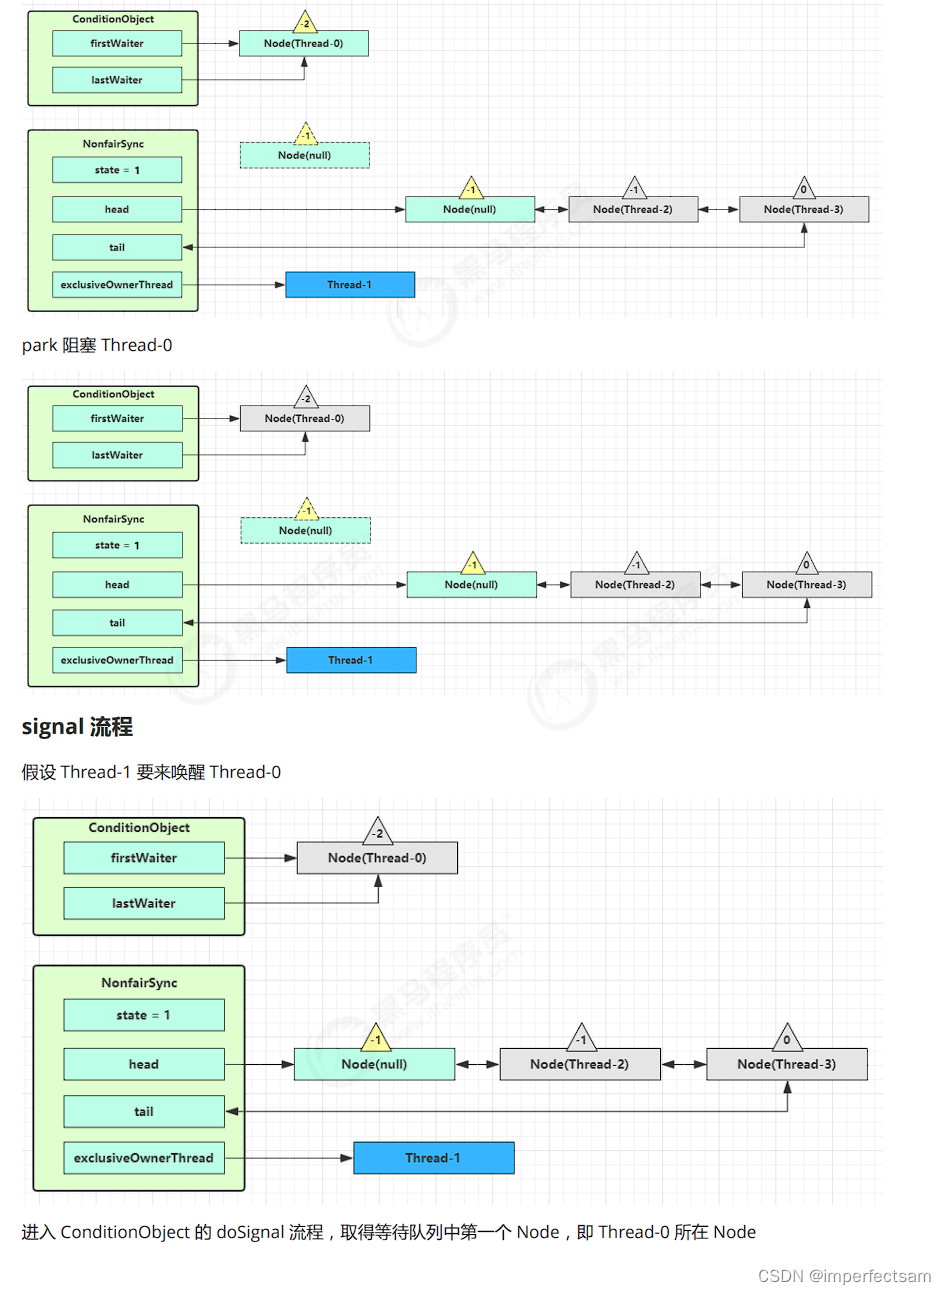
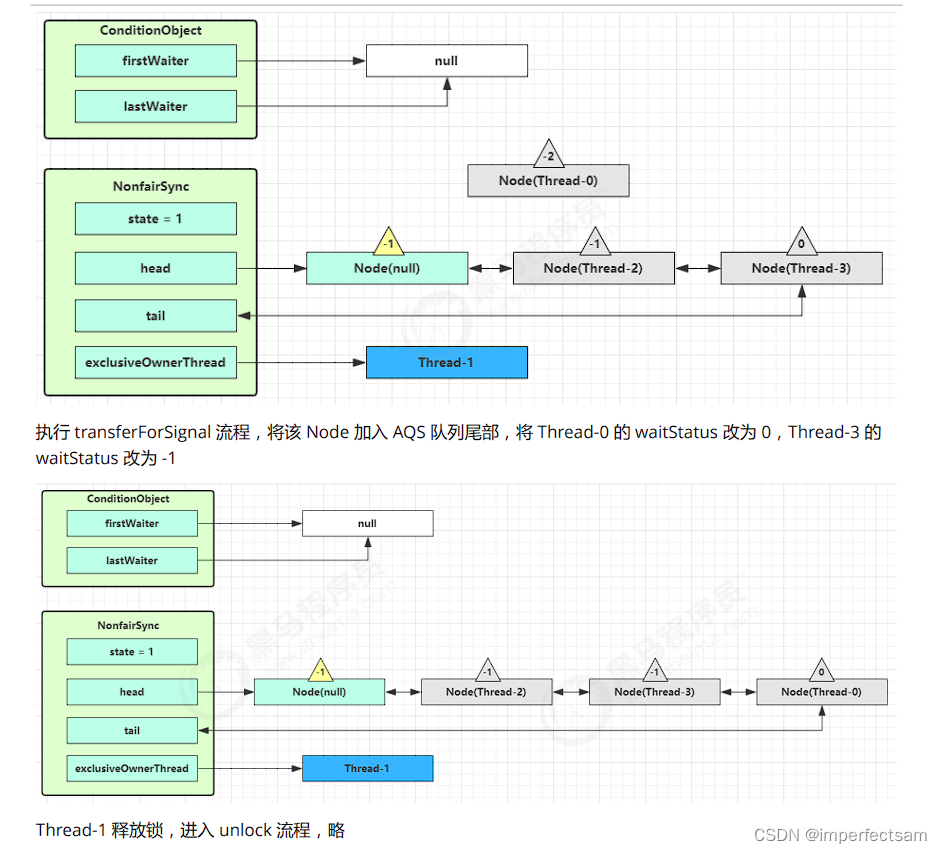
(8)条件变量实现原理
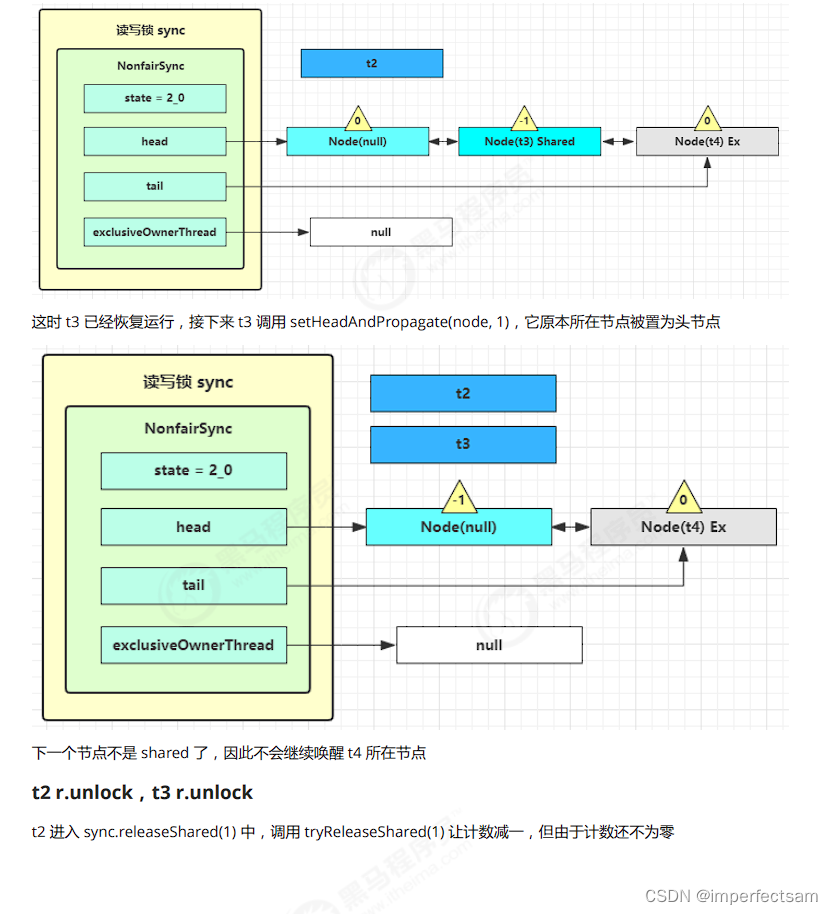
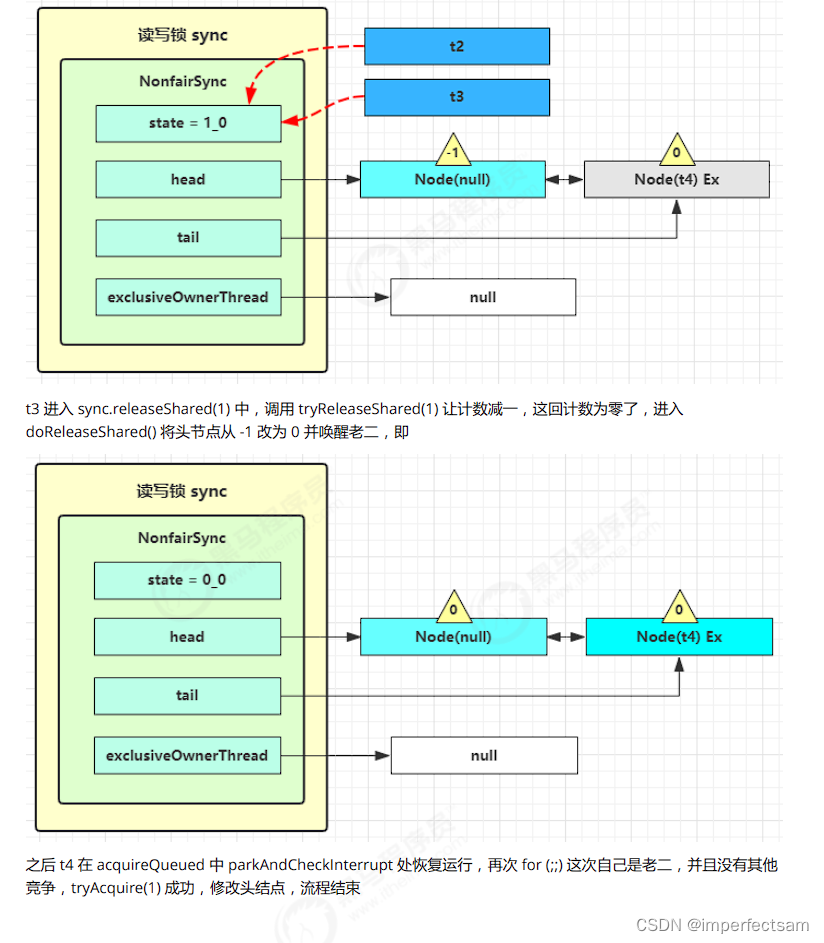
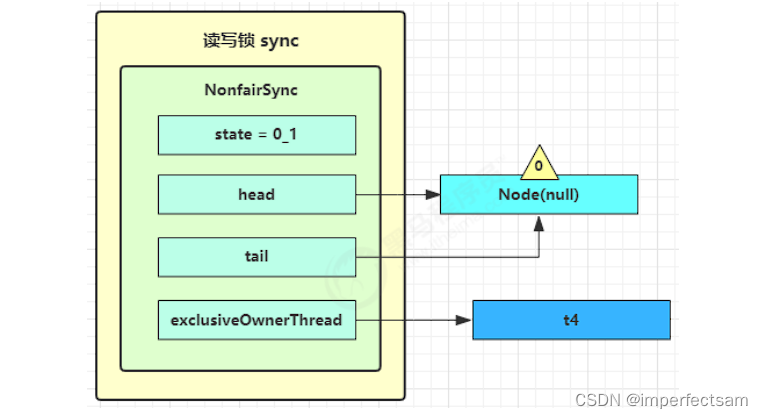
4、ReentrantReadWriteLock原理
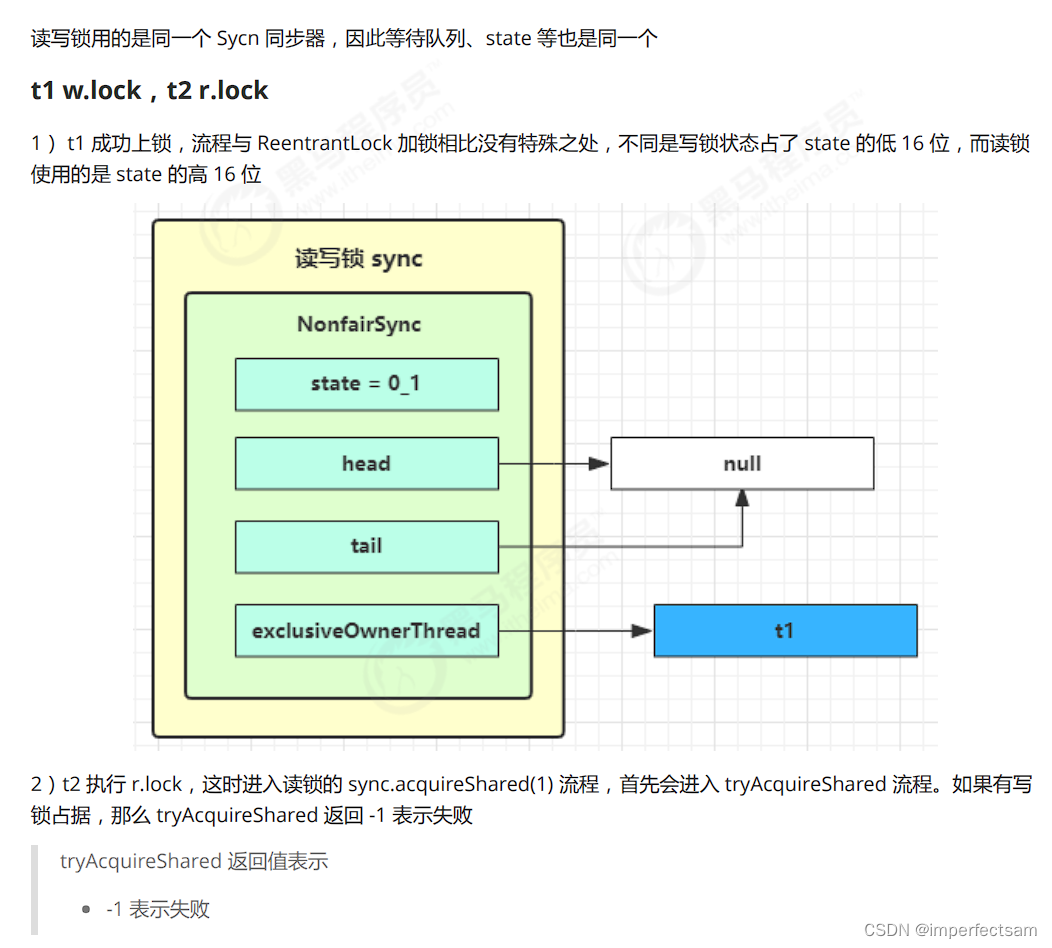

在这里插入图片描述
5、StampedLock
该类自 JDK 8 加入,是为了进一步优化读性能,它的特点是在使用读锁、写锁时都必须配合【戳】使用。
读-读优化
编写代码:
@Slf4j(topic = "c.TestStampedLock")
public class TestStampedLock {
    public static void main(String[] args) {
        DataContainerStamped dataContainer = new DataContainerStamped(1);
        new Thread(() -> {
            dataContainer.read(1);
        }, "t1").start();
        sleep(0.5);
        new Thread(() -> {
            dataContainer.read(0);
        }, "t2").start();
    }
}

@Slf4j(topic = "c.DataContainerStamped")
class DataContainerStamped {
    private int data;
    private final StampedLock lock = new StampedLock();

    public DataContainerStamped(int data) {
        this.data = data;
    }

    public int read(int readTime) {
        long stamp = lock.tryOptimisticRead();
        log.debug("optimistic read locking...{}", stamp);
        sleep(readTime);
        if (lock.validate(stamp)) {
            log.debug("read finish...{}, data:{}", stamp, data);
            return data;
        }
        // 锁升级 - 读锁
        log.debug("updating to read lock... {}", stamp);
        try {
            stamp = lock.readLock();
            log.debug("read lock {}", stamp);
            sleep(readTime);
            log.debug("read finish...{}, data:{}", stamp, data);
            return data;
        } finally {
            log.debug("read unlock {}", stamp);
            lock.unlockRead(stamp);
        }
    }

    public void write(int newData) {
        long stamp = lock.writeLock();
        log.debug("write lock {}", stamp);
        try {
            sleep(2);
            this.data = newData;
        } finally {
            log.debug("write unlock {}", stamp);
            lock.unlockWrite(stamp);
        }
    }
}
执行结果
:
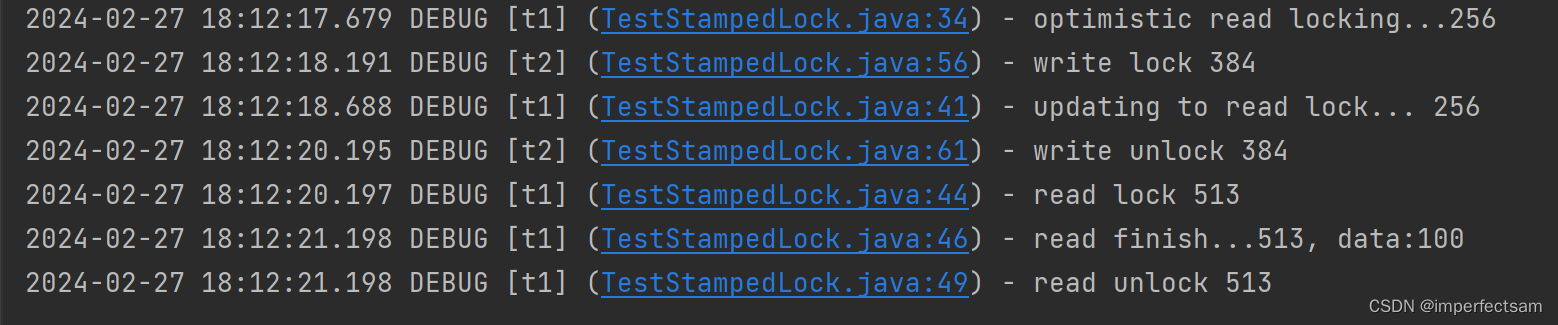
读-写优化
编写代码:
public class TestStampedLock {
    public static void main(String[] args) {
        DataContainerStamped dataContainer = new DataContainerStamped(1);
        new Thread(() -> {
            dataContainer.read(1);
        }, "t1").start();
        sleep(0.5);
        new Thread(() -> {
            dataContainer.write(100);
        }, "t2").start();
    }
}
执行结果:
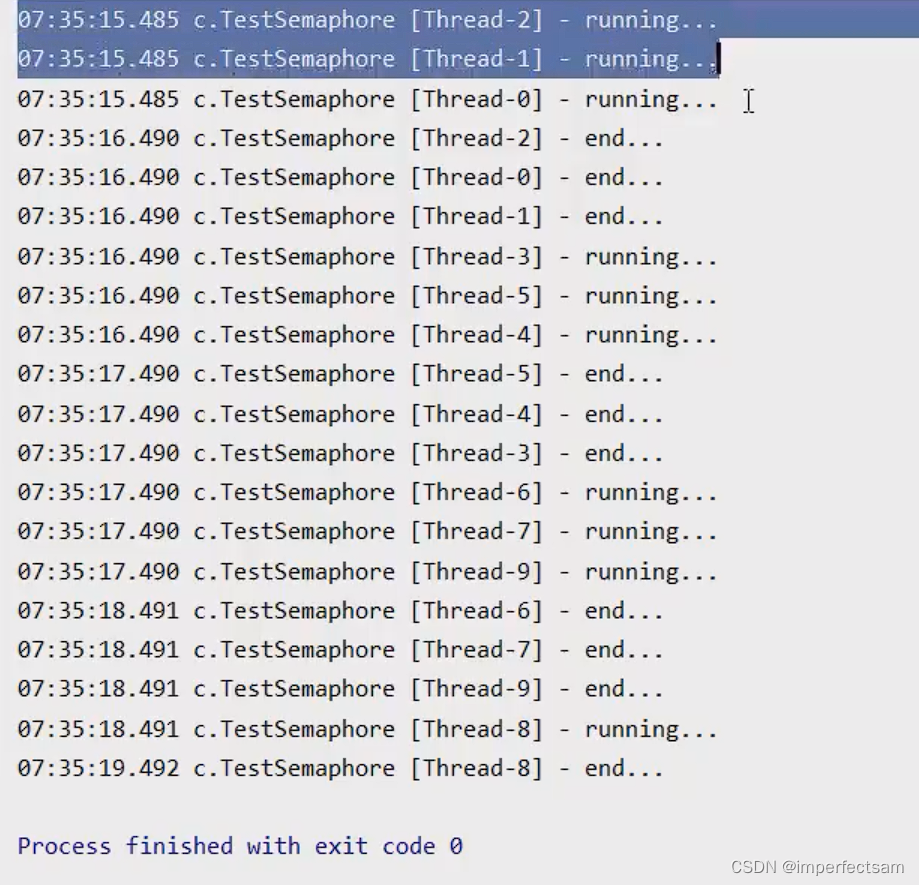
5、Semaphore
信号量,用来限制能同时访问共享资源的线程上限。
编写代码:
public static void main(String[] args) {
 // 1. 创建 semaphore 对象
 Semaphore semaphore = new Semaphore(3);
 // 2. 10个线程同时运行
 for (int i = 0; i < 10; i++) {
 new Thread(() -> {
 // 3. 获取许可
 try {
 semaphore.acquire();
 } catch (InterruptedException e) {
 e.printStackTrace();
 }
 try {
 log.debug("running...");
 sleep(1);
 log.debug("end...");
 } finally {
 // 4. 释放许可
 semaphore.release();
 }
 }).start();
 }
 }
执行结果:
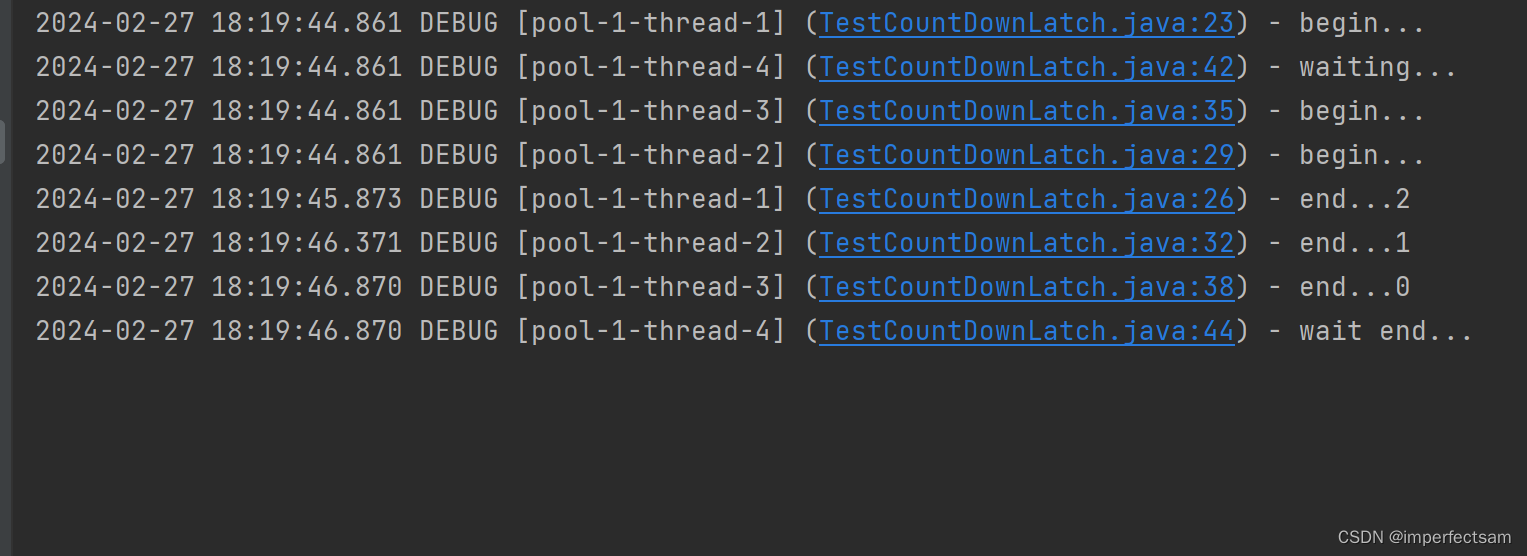
6、CountdownLatch
用来进行线程同步协作,等待所有线程完成倒计时。
其中构造参数用来初始化等待计数值,await() 用来等待计数归零,countDown() 用来让计数减一。
编写代码:
@Slf4j(topic = "c.TestCountDownLatch")
public class TestCountDownLatch {
    public static void main(String[] args) throws InterruptedException, ExecutionException {
        test5();
    }

    private static void test5() {
        CountDownLatch latch = new CountDownLatch(3);
        ExecutorService service = Executors.newFixedThreadPool(4);
        service.submit(() -> {
            log.debug("begin...");
            sleep(1);
            latch.countDown();
            log.debug("end...{}", latch.getCount());
        });
        service.submit(() -> {
            log.debug("begin...");
            sleep(1.5);
            latch.countDown();
            log.debug("end...{}", latch.getCount());
        });
        service.submit(() -> {
            log.debug("begin...");
            sleep(2);
            latch.countDown();
            log.debug("end...{}", latch.getCount());
        });
        service.submit(()->{
            try {
                log.debug("waiting...");
                latch.await();
                log.debug("wait end...");
            } catch (InterruptedException e) {
                e.printStackTrace();
            }
        });
    }

    private static void test4() throws InterruptedException {
        CountDownLatch latch = new CountDownLatch(3);

        new Thread(() -> {
            log.debug("begin...");
            sleep(1);
            latch.countDown();
            log.debug("end...{}", latch.getCount());
        }).start();

        new Thread(() -> {
            log.debug("begin...");
            sleep(2);
            latch.countDown();
            log.debug("end...{}", latch.getCount());
        }).start();

        new Thread(() -> {
            log.debug("begin...");
            sleep(1.5);
            latch.countDown();
            log.debug("end...{}", latch.getCount());
        }).start();

        log.debug("waiting...");
        latch.await();
        log.debug("wait end...");
    }


    private static void test2() throws InterruptedException {
        AtomicInteger num = new AtomicInteger(0);
        ExecutorService service = Executors.newFixedThreadPool(10, (r) -> {
            return new Thread(r, "t" + num.getAndIncrement());
        });
        CountDownLatch latch = new CountDownLatch(10);
        String[] all = new String[10];
        Random r = new Random();
        for (int j = 0; j < 10; j++) {
            int x = j;
            service.submit(() -> {
                for (int i = 0; i <= 100; i++) {
                    try {
                        Thread.sleep(r.nextInt(100));
                    } catch (InterruptedException e) {
                    }
                    all[x] = Thread.currentThread().getName() + "(" + (i + "%") + ")";
                    System.out.print("\r" + Arrays.toString(all));
                }
                latch.countDown();
            });
        }
        latch.await();
        System.out.println("\n游戏开始...");
        service.shutdown();
    }
}
执行结果:
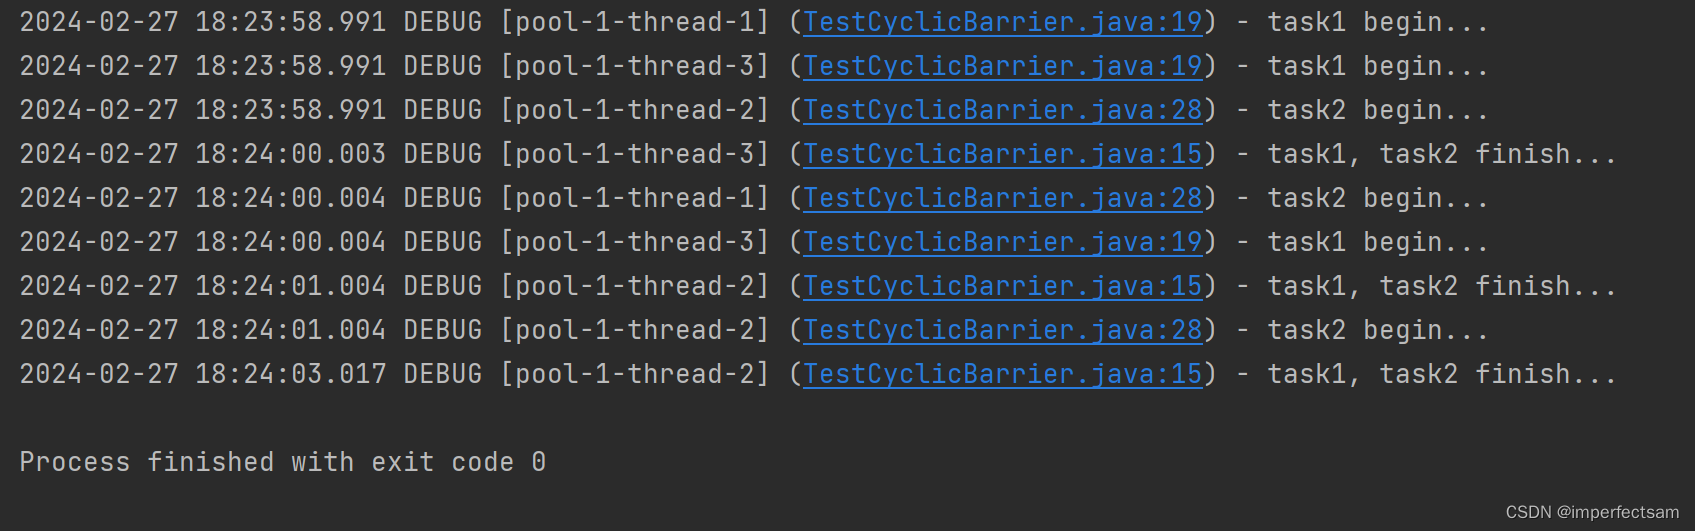
6、CyclicBarrier
循环栅栏,用来进行线程协作,等待线程满足某个计数。构造时设置『计数个数』,每个线程执
行到某个需要“同步”的时刻调用 await() 方法进行等待,当等待的线程数满足『计数个数』时,继续执行。
编写代码:
@Slf4j(topic = "c.TestCyclicBarrier")
public class TestCyclicBarrier {

    public static void main(String[] args) {
        ExecutorService service = Executors.newFixedThreadPool(3);
        CyclicBarrier barrier = new CyclicBarrier(2, ()-> {
            log.debug("task1, task2 finish...");
        });
        for (int i = 0; i < 3; i++) { // task1  task2  task1
            service.submit(() -> {
                log.debug("task1 begin...");
                sleep(1);
                try {
                    barrier.await(); // 2-1=1
                } catch (InterruptedException | BrokenBarrierException e) {
                    e.printStackTrace();
                }
            });
            service.submit(() -> {
                log.debug("task2 begin...");
                sleep(2);
                try {
                    barrier.await(); // 1-1=0
                } catch (InterruptedException | BrokenBarrierException e) {
                    e.printStackTrace();
                }
            });
        }
        service.shutdown();

    }

    private static void test1() {
        ExecutorService service = Executors.newFixedThreadPool(5);
        for (int i = 0; i < 3; i++) {
            CountDownLatch latch = new CountDownLatch(2);
            service.submit(() -> {
                log.debug("task1 start...");
                sleep(1);
                latch.countDown();
            });
            service.submit(() -> {
                log.debug("task2 start...");
                sleep(2);
                latch.countDown();
            });
            try {
                latch.await();
            } catch (InterruptedException e) {
                e.printStackTrace();
            }
            log.debug("task1 task2 finish...");
        }
        service.shutdown();
    }
}
执行结果:
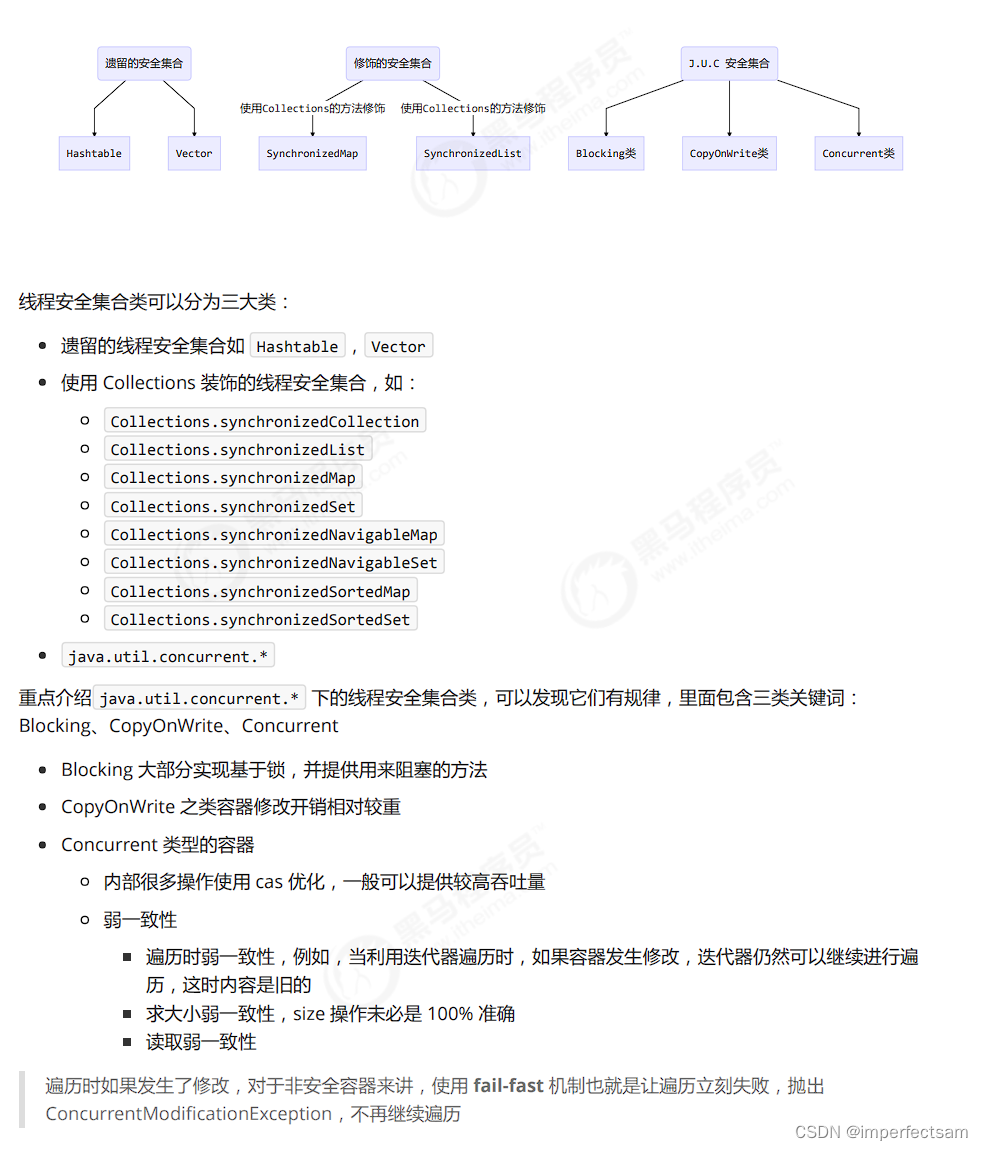
🐯三、线程安全集合类
1、ConcurrentHashMap
重要属性和内部类
// 默认为 0
// 当初始化时, 为 -1
// 当扩容时, 为 -(1 + 扩容线程数)
// 当初始化或扩容完成后,为 下一次的扩容的阈值大小
private transient volatile int sizeCtl;
// 整个 ConcurrentHashMap 就是一个 Node[]
static class Node<K,V> implements Map.Entry<K,V> {}
// hash 表
transient volatile Node<K,V>[] table;
// 扩容时的 新 hash 表
private transient volatile Node<K,V>[] nextTable;
// 扩容时如果某个 bin 迁移完毕, 用 ForwardingNode 作为旧 table bin 的头结点
static final class ForwardingNode<K,V> extends Node<K,V> {}
// 用在 compute 以及 computeIfAbsent 时, 用来占位, 计算完成后替换为普通 Node
static final class ReservationNode<K,V> extends Node<K,V> {}
// 作为 treebin 的头节点, 存储 root 和 first
static final class TreeBin<K,V> extends Node<K,V> {}
// 作为 treebin 的节点, 存储 parent, left, right
static final class TreeNode<K,V> extends Node<K,V> {}
重要方法
// 获取 Node[] 中第 i 个 Node
static final <K,V> Node<K,V> tabAt(Node<K,V>[] tab, int i)

// cas 修改 Node[] 中第 i 个 Node 的值, c 为旧值, v 为新值
static final <K,V> boolean casTabAt(Node<K,V>[] tab, int i, Node<K,V> c, Node<K,V> v)

// 直接修改 Node[] 中第 i 个 Node 的值, v 为新值
static final <K,V> void setTabAt(Node<K,V>[] tab, int i, Node<K,V> v)
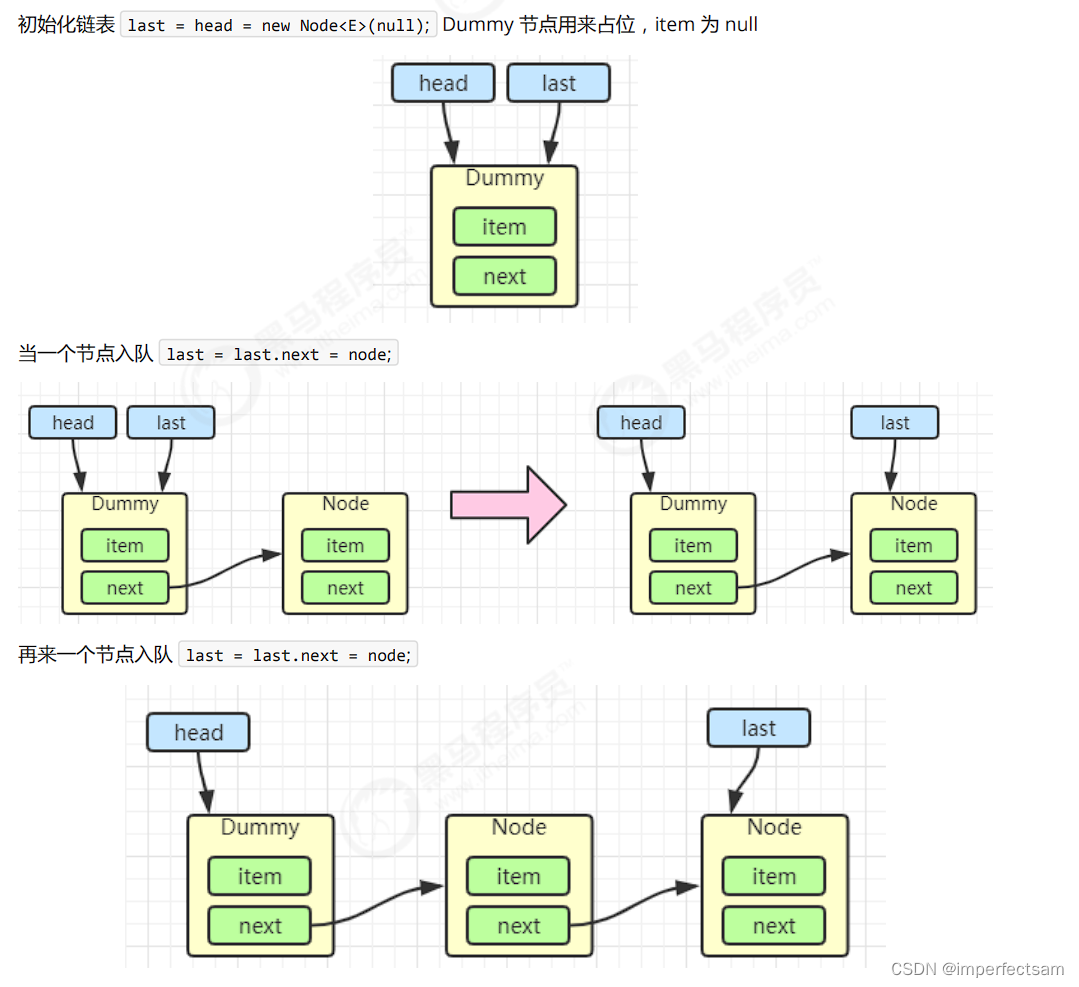
2、LinkedBlockingQueue
基本的入队出队
public class LinkedBlockingQueue<E> extends AbstractQueue<E>
 implements BlockingQueue<E>, java.io.Serializable {
 static class Node<E> {
  E item;
 /**
 * 下列三种情况之一
 * - 真正的后继节点
 * - 自己, 发生在出队时
 * - null, 表示是没有后继节点, 是最后了
 */
 Node<E> next;
 Node(E x) { item = x; }
 }
}
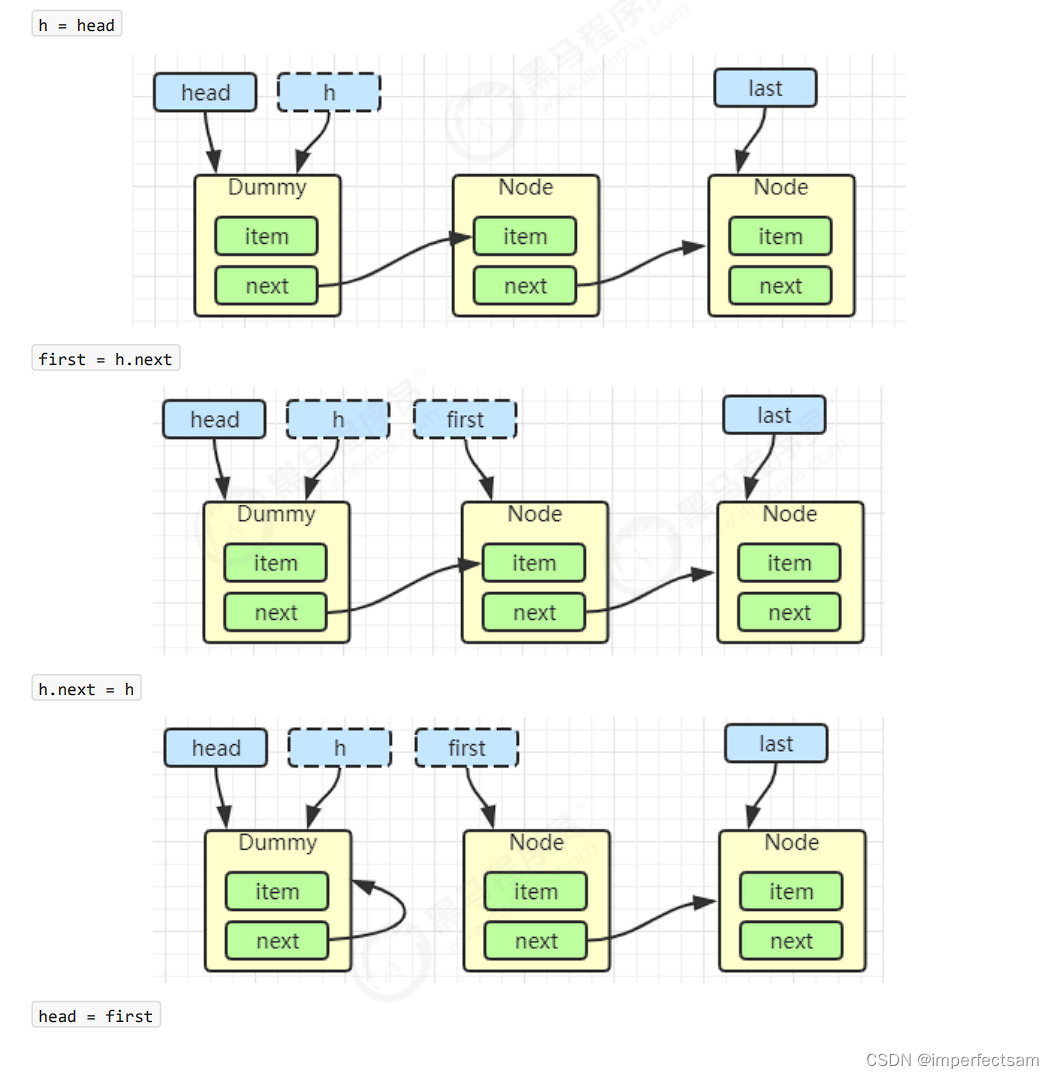
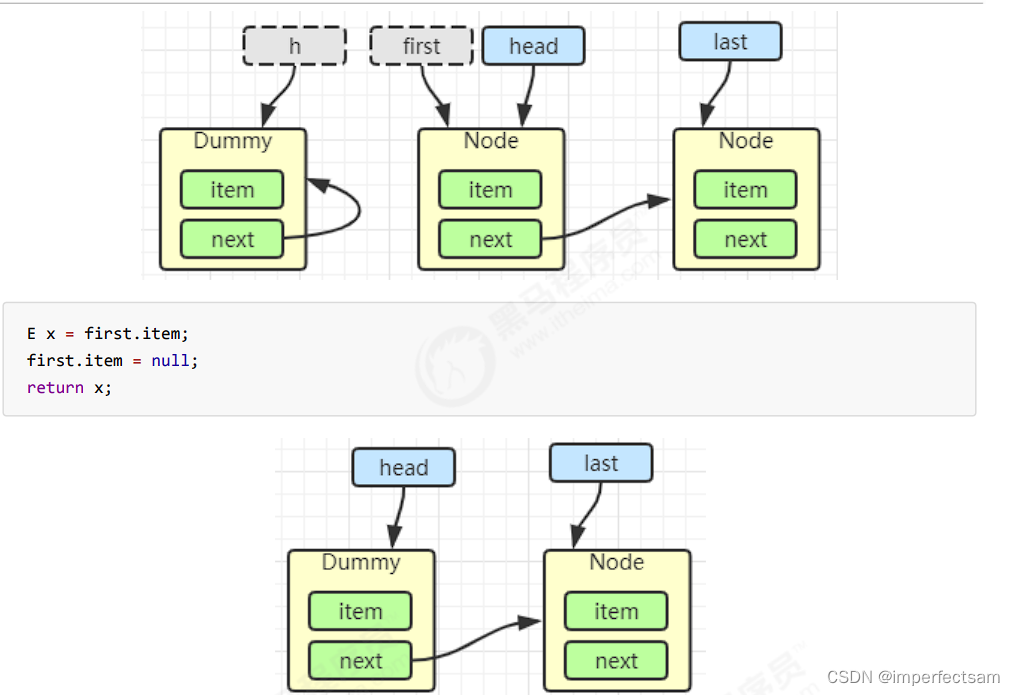
出队:
Node<E> h = head;
Node<E> first = h.next;
h.next = h; // help GC
head = first;
E x = first.item;
first.item = null;
return x;
3、ConcurrentLinkedQueue
非阻塞算法: ConcurrentLinkedQueue 使用一种称为无锁(lock-free)的非阻塞算法实现,这意味着多个线程可以并发地访问队列而无需阻塞等待。
线程安全性: ConcurrentLinkedQueue 提供了线程安全的队列操作,包括添加元素、移除元素和检查队列是否为空等操作。这意味着你可以在多个线程之间安全地使用该队列,而无需额外的同步机制。
高性能: 由于使用了无锁算法,ConcurrentLinkedQueue 在高并发环境下具有良好的性能表现。它适用于生产者-消费者模式,其中多个线程同时生产和消费队列中的元素。
FIFO顺序: ConcurrentLinkedQueue 是一个先进先出(FIFO)的队列,保持了元素插入顺序。
迭代器支持: ConcurrentLinkedQueue 提供了迭代器,你可以通过迭代器遍历队列中的元素。需要注意的是,迭代器是弱一致的(weakly consistent),因此在迭代过程中队列可能会发生变化,但不会抛出 ConcurrentModificationException 异常。


 被折叠的 条评论
为什么被折叠?
被折叠的 条评论
为什么被折叠?
 到【灌水乐园】发言


