


 本文介绍了如何在Python中利用OpenCV库绘制带有圆角的长方形。通过定义四个角的坐标,结合lines和arcs函数,可以创建出美观的长方形边框。示例代码展示了具体实现过程。
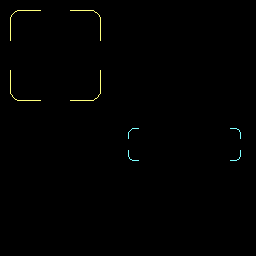
您可以通过使用绘制lines和arcs的函数来实现您想要的。在
要绘制的框架由4个相似的部分组成(每个角一个),每个部分旋转(或镜像)。在
让我们看看左上角:

如您所见,我们需要绘制2条线段(长度为d)和一条弧(半径为r的圆的四分之一)。在
假设左上角的坐标是(x1, y1)。在
这意味着弧的中心位于(x1 + r, y1 + r)。在
其中一行将从(x1 + r, y1)到(x1 + r + d, y1)。在
另一行将从(x1, y1 + r)到(x1, y1 + r + d)。在
其他角落也会发生类似的情况。在
示例代码:import cv2
import numpy as np
# ============================================================================
def draw_border(img, pt1, pt2, color, thickness, r, d):
x1,y1 = pt1
x2,y2 = pt2
# Top left
cv2.line(img, (x1 + r, y1), (x1 + r + d, y1), color, thickness)
cv2.line(img, (x1, y1 + r), (x1, y1 + r + d), color, thickness)
cv2.ellipse(img, (x1 + r, y1 + r), (r, r), 180, 0, 90, color, thickness)
# Top right
cv2.line(img, (x2 - r, y1), (x2 - r - d, y1), color, thickness)
cv2.line(img, (x2, y1 + r), (x2, y1 + r + d), color, thickness)
cv2.ellipse(img, (x2 - r, y1 + r), (r, r), 270, 0, 90, color, thickness)
# Bottom left
cv2.line(img, (x1 + r, y2), (x1 + r + d, y2), color, thickness)
cv2.line(img, (x1, y2 - r), (x1, y2 - r - d), color, thickness)
cv2.ellipse(img, (x1 + r, y2 - r), (r, r), 90, 0, 90, color, thickness)
# Bottom right
cv2.line(img, (x2 - r, y2), (x2 - r - d, y2), color, thickness)
cv2.line(img, (x2, y2 - r), (x2, y2 - r - d), color, thickness)
cv2.ellipse(img, (x2 - r, y2 - r), (r, r), 0, 0, 90, color, thickness)
# ============================================================================
img = np.zeros((256,256,3), dtype=np.uint8)
draw_border(img, (10,10), (100, 100), (127,255,255), 1, 10, 20)
draw_border(img, (128,128), (240, 160), (255,255,127), 1, 5, 5)
cv2.imwrite('round_rect.png', img)
结果:


 904
904

 被折叠的 条评论
为什么被折叠?
被折叠的 条评论
为什么被折叠?
 到【灌水乐园】发言


