


 本文介绍了如何使用Java连接FTP服务器并实现文件的上传和下载。通过FtpClient库简化操作,以及详细解释了基于Socket的FTP数据传输,涉及FTP连接、登录、上传和下载文件的步骤。
概述
FTP是File Transfer Protocol(文件传输协议)的英文简称,而中文简称为“文传协议”。FTP作为网络共享文件的传输协议,在网络应用软件中具有广泛的应用。FTP的目标是提高文件的共享性和可靠高效地传送数据。在FTP的使用当中,用户经常遇到两个概念:"下载"(Download)和"上传"(Upload)。本文就主要针对这两个操作来进行说明(当然,也包括FTP服务器的连接和登录等操作)。
笔者环境
系统环境:Windows 7(客户端与服务器均是)
服务器:自建FTP服务器(关于FTP服务器的搭建,本文不作说明。网上都有.)
开发环境:Jdk 1.8
引入第三方库:commons-net-2.2.jar(针对第一种方法)
一、基于第三方库FtpClient的FTP服务器数据传输
由于是基于第三方库,所以这里基本上没有太多要说明的东西。就是导入第三方库再调用即可,调用过程从下面的代码可以参见。为了便于文章的完整性,这也是给出其程序结构图吧。
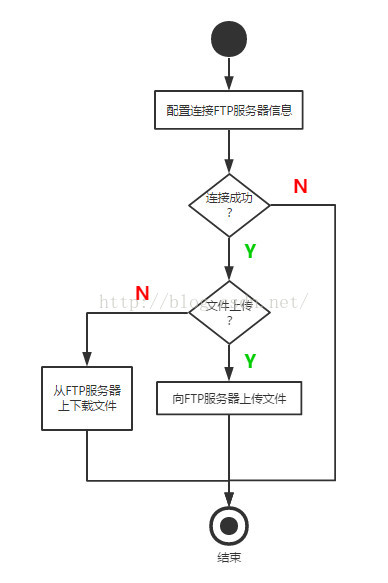
图-1 基于FtpClient的FTP网络文件传输图
1.FTP的连接及登录
public static FtpClient connectFTP(String url, int port, String username, String password) {
//创建ftp
FtpClient ftp = null;
try {
//创建地址
SocketAddress addr = new InetSocketAddress(url, port);
//连接
ftp = FtpClient.create();
ftp.connect(addr);
//登陆
ftp.login(username, password.toCharArray());
ftp.setBinaryType();
} catch (FtpProtocolException e) {
e.printStackTrace();
} catch (IOException e) {
e.printStackTrace();
}
return ftp;
}
2.上传文件到FTP服务器
public static void upload(String localFile, String ftpFile, FtpClient ftp) {
OutputStream os = null;
FileInputStream fis = null;
try {
// 将ftp文件加入输出流中。输出到ftp上
os = ftp.putFileStream(ftpFile);
File file = new File(localFile);
// 创建一个缓冲区
fis = new FileInputStream(file);
byte[] bytes = new byte[1024];
int c;
while((c = fis.read(bytes)) != -1){
os.write(bytes, 0, c);
}
System.out.println("upload success!!");
} catch (FtpProtocolException e) {
e.printStackTrace();
} catch (IOException e) {
e.printStackTrace();
} finally {
try {
if(os!=null) {
os.close();
}
if(fis!=null) {
fis.close();
}
} catch (IOException e) {
e.printStackTrace();
}
}
}
3.从FTP服务器下载文件
public static void download(String localFile, String ftpFile, FtpClient ftp) {
InputStream is = null;
FileOutputStream fos = null;
try {
// 获取ftp上的文件
is = ftp.getFileStream(ftpFile);
File file = new File(localFile);
byte[] bytes = new byte[1024];
int i;
fos = new FileOutputStream(file);
while((i = is.read(bytes)) != -1){
fos.write(bytes, 0, i);
}
System.out.println("download success!!");
} catch (FtpProtocolException e) {
e.printStackTrace();
} catch (IOException e) {
e.printStackTrace();
} finally {
try {
if(fos!=null) {
fos.close();
}
if(is!=null){
is.close();
}
} catch (IOException e) {
e.printStackTrace();
}
}
}
二、基于Socket的FTP服务器数据传输
其实上面的基于第三方包FtpClient的方法中,原理层也是基于Socket来进行通信的。所以,我们当然也可以使用Socket直接来写这个FtpClient的代码。下面给出基于Socket通信的结构构架图。这里有一点需要大家注意一下,我们的FTP协议中有两个端口(20和21)。通常情况下,我们的21号端口就是平时大家口口相传的是FTP服务器的端口号,不过其实它只是FTP服务器中的命令端口号。它是负责传送命令给FTP,一些操作如“登录”、“改变目录”、“删除文件”,依靠这个连接发送命令就可完成。而对于20号端口号(也有可能是其它的一些端口号),对于有数据传输的操作,主要是显示目录列表,上传、下载文件,我们需要依靠另一个Socket来完成。
所以在下面的结构图中,我们可以看到我们有重新获得端口号的过程,正是这个原因。

图-2 基于Socket的FTP网络文件传输图
1.FTP连接
public void connectFtp() {
try {
mFtpClient = new Socket(Config.FTP.HOST_IP, Config.FTP.HOST_PORT);
mReader = new BufferedReader(new InputStreamReader(mFtpClient.getInputStream()));
mWriter = new BufferedWriter(new OutputStreamWriter(mFtpClient.getOutputStream()));
sendCommand("USER " + Config.FTP.FTP_USERNAME);
sendCommand("PASS " + Config.FTP.FTP_PASSWD);
} catch (IOException e) {
e.printStackTrace();
}
}
2.向FTP服务器发送命令
private void sendCommand(String command) throws IOException {
if (Tools.StringTools.isEmpty(command)) {
return;
}
if (mFtpClient == null) {
return;
}
mWriter.write(command + "\r\n");
mWriter.flush();
}
3.向FTP服务器上传文件
public void uploadFile(String localPath, String ftpPath) throws IOException {
// 进入被动模式
sendCommand("PASV");
// 获得ip和端口
String response = readNewMessage();
String[] ipPort = getIPPort(response);
String ip = ipPort[0];
int port = Integer.parseInt(ipPort[1]);
// 建立数据端口的连接
Socket dataSocket = new Socket(ip, port);
sendCommand("STOR " + ftpPath);
// 上传文件前的准备
File localFile = new File(localPath);
OutputStream outputStream = dataSocket.getOutputStream();
FileInputStream fileInputStream = new FileInputStream(localFile);
// 上传文件
int offset;
byte[] bytes = new byte[1024];
while ((offset = fileInputStream.read(bytes)) != -1) {
outputStream.write(bytes, 0, offset);
}
System.out.println("upload success!!");
// 上传文件后的善后工作
outputStream.close();
fileInputStream.close();
dataSocket.close();
}
4.从FTP服务器下载文件
public void downloadFile(String localPath, String ftpPath) throws IOException {
// 进入被动模式
sendCommand("PASV");
// 获得ip和端口
String response = readNewMessage();
String[] ipPort = getIPPort(response);
String ip = ipPort[0];
int port = Integer.parseInt(ipPort[1]);
// 建立数据端口的连接
Socket dataSocket = new Socket(ip, port);
sendCommand("RETR " + ftpPath);
// 下载文件前的准备
File localFile = new File(localPath);
InputStream inputStream = dataSocket.getInputStream();
FileOutputStream fileOutputStream = new FileOutputStream(localFile);
// 下载文件
int offset;
byte[] bytes = new byte[1024];
while ((offset = inputStream.read(bytes)) != -1) {
fileOutputStream.write(bytes, 0, offset);
}
System.out.println("download success!!");
// 下载文件后的善后工作
inputStream.close();
fileOutputStream.close();
dataSocket.close();
}
5.断开FTP服务器连接
public void disconnectFtp() {
if (mFtpClient == null) {
return;
}
if (!mFtpClient.isConnected()) {
return;
}
try {
mFtpClient.close();
} catch (IOException e) {
e.printStackTrace();
}
}
本文参考:
源码下载:


 被折叠的 条评论
为什么被折叠?
被折叠的 条评论
为什么被折叠?
 到【灌水乐园】发言


