ELK的官方地址:https://www.elastic.co
ELK是有Elasticsearch + Logstash + Kibana
全部使用yum安装
系统:CentOS7.2
JDK: 1.8
首先安装jdk:
# tar -zxvf jdk-8u91-linux-x64.tar.gz
# mv jdk1.8.0_91 jdk
设置JDK的环境变量:
# vim /etc/profile
JAVA_HOME=/root/jdk
CLASSPATH=.:$JAVA_HOME/jre/lib/rt.jar:$JAVA_HOME/lib/dt.jar:$JAVA_HOME/lib/tools.jar
PATH=$PATH:$JAVA_HOME/bin
# source /etc/profile
安装Elasticsearch
设置yum源:
# rpm --import https://packages.elastic.co/GPG-KEY-elasticsearch
# vim /etc/yum.repos.d/elasticsearch.repo
[elasticsearch-2.x]
name=Elasticsearch repository for 2.x packages baseurl=https://packages.elastic.co/elasticsearch/2.x/centos
gpgcheck=1
gpgkey=https://packages.elastic.co/GPG-KEY-elasticsearch
enabled=1
安装elasticsearch:
# yum install elasticsearch -y
配置elasticsearch:
# vim /etc/elasticsearch/elasticsearch.yml
cluster.name:elk # 集群名称,要和另一台ES一致
node.name: Server2 # 本地名称,和上一台ES不能重复
path.data: /data/elk/data # 数据保存目录
path.logs:/data/elk/logs # 日志目录
bootstrap.mlockall:true # 锁定内存
network.host:0.0.0.0 # 监听地址
http.port: 9200 # 客户端访问port
# mkdir /data/elk/{data,logs} #创建目录
# chown elasticsearch:elasticsearch /data/elk -R # 添加权限
启动elasticsearch服务:
# systemctl start elasticsearch
我们使用两台做一个集群,另外一台也是同样的配置
在两台机器上都安装下面的插件:
# /usr/share/elasticsearch/bin/plugin install mobz/elasticsearch-head
# /usr/share/elasticsearch/bin/plugin install lmenezes/elasticsearch-kopf
访问插件:
http://1.1.1.10:9200/_plugin/head
http://1.1.1.10:9200/_plugin/kopf
安装logstash
设置logstash源:
# rpm --import https://packages.elastic.co/GPG-KEY-elasticsearch
# vim /etc/yum.repos.d/logstash.repo
[logstash-2.3] name=Logstash repository for 2.3.x packages baseurl=https://packages.elastic.co/logstash/2.3/centos gpgcheck=1 gpgkey=https://packages.elastic.co/GPG-KEY-elasticsearch enabled=1
# yum install logstash -y
配置logstash收集单个文件:
# vim /etc/logstash/conf.d/system.conf
input {
file {
type => "messagelog"
path => "/var/log/messages"
start_position => "beginning" # 日志手机文件,默认为end
}}
output {
file {
path => "/tmp/123.txt"
}
elasticsearch {
hosts => ["1.1.1.10"]
index => "system-messages-%{+yyyy-MM-dd}"
}}
配置logstash收集多文件日志:
# vim /etc/logstash/conf.d/nginx.conf
input {
file {
type => "messagelog"
path => "/var/log/messages"
start_position => "beginning"
}
file {
type => "nginxlog"
path => "/var/log/nginx/access.log"
start_position => "beginning"
}}
output {
if [type] == 'messagelog' {
file {
path => "/tmp/123.txt"
}
elasticsearch {
hosts => ['1.1.1.10']
index => "system-messages-%{+yyyy.MM.dd}"
}}
if [type] == 'nginxlog' {
elasticsearch {
hosts => ["1.1.1.10"]
index => "nginx-messages-%{+yyyy.MM.dd}"
}}}
检查语法配置文件语法:
# /etc/init.d/logstash configtest
# /opt/logstash/bin/logstash -f /etc/logstash/conf.d/test.conf
更改启动logstash用户:
# vim /etc/init.d/logstash
LS_USER=root
LS_GROUP=root
启动:
# /etc/init.d/logstash start
通过指定文件启动:
# /opt/logstash/bin/logstash -f system.conf
安装kibana
配置源:
# rpm --import https://packages.elastic.co/GPG-KEY-elasticsearch
vim /etc/yum.epos.d/kibana.repo
[kibana-4.5] name=Kibana repository for 4.5.x packages baseurl=http://packages.elastic.co/kibana/4.5/centos gpgcheck=1 gpgkey=http://packages.elastic.co/GPG-KEY-elasticsearch enabled=1
安装:
# yum install kibana
配置:
# vim /etc/kibana/config/kibana.yml
server.port: 5601
serve.host : '0.0.0.0'
elasticsearch.url: http://1.1.1.10:9200 # 调用elasticsearch的接口
启动:
# systemctl start kibana
然后就可以访问kibana了
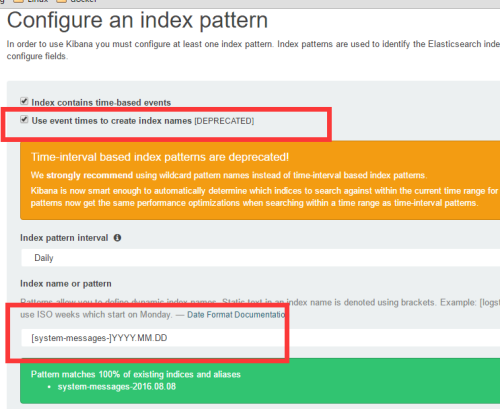
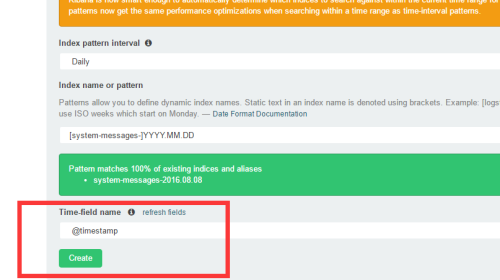
按照logstash收集单一日志的规则:
然后点击create就OK了
现在在两台elk主机上都可以连接使用:
转载于:https://blog.51cto.com/linux2017/1835961


 797
797

 被折叠的 条评论
为什么被折叠?


