


 本文介绍OpenFiler的配置方法,包括LDAP和域控制器认证配置,以及硬件RAID与软件RAID的选择。此外,还详细记录了OpenFiler在安装与使用过程中可能遇到的问题及其解决方案。
架构:b/s
服务器端:封装好的linux系统
客户端:浏览器
相关包:封装好的linux系统
Openfiler imports user and group information from central directory servers such as
Light-weight Directory Access Protocol (LDAP),
Network Information System (NIS) and
Windows Domain Controllers.
A physical volume in the context of the Logical Volume Manager (LVM) is a block device
(disk) that has been initialized with LVM metadata.
In order to use volume groups in the
Openfiler GUI, they must be created first at the command line or should have been
created during installation process.
Notification Configuration
只能报告raid相关的通知,其它的不能报
This option helps you to send notifications to the users about any events taking place
during the software raid.
Openfler does not support automatic partitioning and you will be unable to confgure
data storage disks in the Openfler graphical user interface if you select automatic
partitioning.
https://192.168.1.153:446 openfiler:password
创建用户及组的配置如下图
这几项一定要设置
Server:127.0.0.1
Base DN:dc=openfiler,dc=nas
Root bind DN:cn=Manager,dc=openfiler,dc=nas
Root bind password:123456
SMB LDAP configuration 打勾,好像不设密码,不打勾,ldap服务还是用不了
这样以后ldap服务自动启动,不用手动去开启了,就可以用了
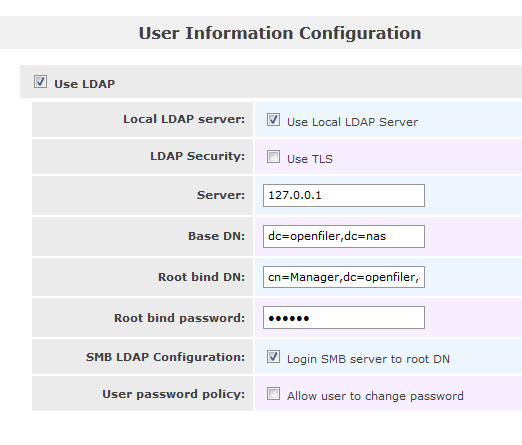
Accounts部分是Openfiler能正常使用的第一步,这里主要讨论关于Authentication的一点看法,此处配置正确了,Openfiler基本就可以当作文件服务器运行了。Openfiler中可以配置LDAP和Windows domain两种授权,组合起来就有三种方式:LDAP、Domain和混合模式。

只说在Standard view下的设置,只要设置正确,就可以使用,至于Expert vier不过是更为详细的设置罢了,从名字就可以看出来。

先说LDAP。在User Information Configuration里,设置如下:

Server:127.0.0.1

Base DN:dc=openfiler,dc=nas

Root bind DN:cn=Manager,dc=openfiler,dc=nas

这三项是最主要的,其中Base DN和Root bind DN必须和Services下面的LDAP Setting处的这两项必须一致,否则会导致不能正常使用。以上各值都是Openfiler的默认值,这样子设置是把Openfiler本身当作LDAP服务器来使用的,如果使用其他的LDAP服务器进行验证,各项按照实际填写即可。完成后,就可以添加用户和组了,如果有误,会提示无法添加用户的组的。这个模式是最简单的,基本上只要保持两个地方设置一样,就可以正常使用了。

另外就是Domian controller了。首先是Security model,如果是2003的服务器,就选Active directory;2000的话选RPC(这个没有实际验证,因为我的Domian controller是2003的)。Domain下最关键的是Domain controller和ADS realm,前者填写服务器IP,后者填写服务器的完整域名,Domain/Workgroup项,可以不添,但最好是添上。在第一次使用该域时,必须选中Join domain,因为Openfiler需要从Domain controller上读取所有的用户和组信息,当然,下面的用户名和密码也必须是Domain controller授权过的。如果一切无误,就可以在List of users和List of groups下面看到信息了。

配置完以上内容后,在List of users和List of groups可以看到所有的信息,包括LDAP模式下创建的和Domain controller上读取过来的。因为Domain controller的原因,此时Domain controller下的user和group是正常访问没问题的,按说LDAP下创建的用户是不能访问的,但实际上他们可以通过FTP来进行访问Openfiler。而在shares里面的权限分配可能会更复杂,自己还没有花时间进行验证。

需要说明的是,从LDAP模式换到Domain controller模式,LDAP下的用户是看不到的,但是并不会丢失,如果再重新换到LDAP模式下,就可以重新看到。而市场上有些NAS不能保存前一模式下的信息的。
硬件RAID卡还是要比OpenFiler自身的软RAID要好
如果想用硬RAID卡做iSCSI Target,可以试试用CentOS之类的标准Linux发行版来做,驱动比较齐全
现在我们来配置共享设备。 先对我们没有格式的分区格式化成扩展分区,一定要扩展分区:
两种算法是连写(Write-throu曲)援存和 后写(Write-back)嫒存
Cache写机制分为write through和write back两种。
Write-through(直写模式)在数据更新时,同时写入缓存Cache和后端存储。此模式的优点是操作简单;缺点是因为数据修改需要同时写入存储,数据写入速度较慢。
Write-back(回写模式)在数据更新时只写入缓存Cache。只在数据被替换出缓存时,被修改的缓存数据才会被写到后端存储。此模式的优点是数据写入速度快,因为不需要写存储;缺点是一旦更新后的数据未被写入存储时出现系统掉电的情况,数据将无法找回。
对于写操作,存在写入缓存缺失数据的情况,这时有两种处理方式:
Write allocate方式将写入位置读入缓存,然后采用write-hit(缓存命中写入)操作。写缺失操作与读缺失操作类似。
No-write allocate方式并不将写入位置读入缓存,而是直接将数据写入存储。这种方式下,只有读操作会被缓存。
无论是Write-through还是Write-back都可以使用写缺失的两种方式之一。只是通常Write-back采用Write allocate方式,而Write-through采用No-write allocate方式;因为多次写入同一缓存时,Write allocate配合Write-back可以提升性能;而对于Write-through则没有帮助。
Openfiler2.99基于RHEL6定制,内核使用2.6.32,而且只提供x86_64位版本,测试过程中发现一些问题:
1. 安装过程中不能选用中文界面
在两台测试机安装过程中,其中一台在安装界面中选择了中文文本界面,安装过程中未提示任何错误,但安装完成后系统无法引导,仍提示无操作系统。怀疑是安装程序的中文界面有bug,使用英文界面重新安装后解决。
2. 对GPT分区支持不好
其中一台测试机存储容量达到6T左右,必须使用gpt分区。在openfiler安装过程中未提示任何错误,安装完成后进入系统后发现分区仍为msdos,改为gpt分区后重启无法引导系统,估计是grub版本过低,不支持从GPT分区引导。
因此对于大容量硬盘的服务器建议在做raid的时候做两个VDs(虚拟磁盘),一个容量10G左右用于安装系统,将剩余容量都分配到另一VD中,使用GPT分区存储数据文件。
针对笔者的HP DL320服务器,因为raid卡的限制,无法修改vd容量,因此单独分出一块750G的硬盘做虚拟磁盘,另外的11块750G磁盘做RAID6总容量达到6T左右。openfiler安装到第一个虚拟磁盘中,将第二个VD作为数据分区。
3. web界面对大容量虚拟磁盘支持不好
Openfiler安装完成后,使用web界面创建磁盘分区无反应,也无法创建Volume,且web界面下不能修改数据VD的分区表属性,仍为默认msdos,最后手动分区并创建volume后问题解决。
具体解决方法如下:

msdos 标签,这里会有三种分区类型(扩展,pv,raid)
gpt标签,只有两个(pv,raid)

web界面不能创建pv及vg,需要在命令行下手动执行才可以,至少在只有一块硬盘的情况下剩余分区是这样操作的,两块盘的话应该没有问题
fdisk /dev/sda
n
+100G
t
8e
w
partprobe /dev/sda
pvcreate /dev/sda5
vgcreate vg_data /dev/sda5
这样后,就可以在web界面上看到vg了
但是这个独立机器设置network acl时,只有设0.0.0.0后,esxi主机才能连接到lun,如果指定网段172或192,非此群集的主机才可以连接lun
At the bottom, it's seeing 15TB of unused space, and the starting cylinder begins right after the end cylinder for /dev/sdb1. When I click on the Create button to make a new partition that uses all of the available space, the browser waits a moment and then simply reloads this page. Nothing is created.
I am not sure if this is the case, but there were some issues with GPT versions used in the earlier 2.99.x's
Perhaps do the following..
Conary update conary
Conary updateall
Conary update openfiler
Followed by a reboot, and see if you have any better success...
I think I have the same problem. I am running 2.99.2, and have run the update commands above and rebooted. So when I look at the partition, it is 70% free: https://onedrive.liv...hint=photo,.jpg. When I then click on "create", nothing happens... https://onedrive.liv...hint=photo,.jpg (sorry, can't see to put line breaks in here).
There is a huge bug in Openfiler. I just installed a brand new system. I try to create a new physical volume in either /sda (100Gb) or /sdb (7.8 TB) and I click "Create". Nothing happens. The "Reset" button is not clickable, is "In Use". Where do I go from here?
Now I want to create a Physical Volume, but after I click the Create button the page reloads and nothing happens.
I've read somewhere that on 1 logical drive i can only make 3 partitions, is that true or am I doing something wrong?
Otherwise i need to make 2 logical drives, but then some diskspace will be wasted..
问题点
openfiler版本是2.99的,无法新增物理卷,点击Create 保存不了,百度狂搜,最好找到解决方法了,把开始加大点,结束减少点就create了,也可以保存了。
安装后惊奇的发现,当用系统自己检测到的开始和结束磁盘位置数据,无论如何没有办法增加新的physical volume,点create没有任何反应。
又上openfiler官网的论坛寻觅,发现有用户也反映同意的问题。其中一个高手提到改了开始和结束磁盘位置数据修复了这个问题。抱着试试看的心情,把开始改大了点,把结束位置改小了点,居然就成功create了!浪费了我几十G的磁盘空间。创建了physical volume后其他到还算正常。
Openfiler Open Source Edition (OSE) is perfect for cost-constrained budgets and delivers block-level (basic iSCSI target) and file-level storage export protocols.
Openfiler Commercial Edition (CE) builds upon Openfiler OSE to provide key features such as iSCSI target for virtualization, Fibre Channel target support, block level replication and High Availabilty that are the mainstay of any business critical storage environment.
Openfiler性能问题
在Openfiler上测试,发现NFS性能比ISCSI好很多
在NFS上的VM,Linux写入性能能达到60MB/s
ISCSI上的FreeBSD和Linux只能到7MB/s,WINDOWS低于5MB/s,除了Solaris 10 ZFS,可以到30MB/s
暂时没太多时间测试IOMETER
在UNIX里用DD写2G的文件,一般在7MB/s,在WIN里用其他工具测试,一般在4MB/s多一点点。
测试的同时,用esxtop监视I/O和带宽使用。
我的OPENFILER用了5个1T的硬盘做RAID-5,在OPENFILER上读可以到200MB/s,写可以到70MB/s以上,我的主板是P4的,受限于IHC1.5Gb/s的带宽,但是也已经足够了
事实上,我着了很多资料,发现确实在VM较多的情况下,NFS比FC-SAN都快很多。所以那些准备上FC-SAN做VIC存储的可以重新好好考虑一下了。
ISCSI应该比NFS快才对吧。 如果一个LUN一个VM,可能ISCSI快,不过多个VM的话肯定是NFS快
fileio 和blockio 的设定,导致的;
iscsi一般默认为blockio 是直写;
NFS一般默认是fileio 是用内存做缓存的回写;
openfiler
In order to use volume groups in the
Openfiler GUI, they must be created first at the command line or should have been
created during installation process.


[root@openfiler1 ~]# parted /dev/sda help mkpart
[root@openfiler1 ~]# parted /dev/sda print
创建新分区,gpt可以创建128个主分区
[root@openfiler1 ~]# parted /dev/sda mkpart primary ext3 19.2GB 19.7GB
删除新分区,删除分区号就行了
[root@openfiler1 ~]# parted /dev/sda rm 7


(parted) mkpart primary ext3 9978MB 61178MB
 4      9978MB  61.2GB  51.2GB               primary  msftres
创建主分区,使用全部容量。分区完成后可在web界面看到,但是此时还提示为未知分区。
(parted) set 4 lvm on
 4      9978MB  61.2GB  51.2GB               primary  lvm
不改的话,分区标记为gpt的默认msftres标志,改了以后就成了lvm了,在web界面也就不是未知类型了
将4分区的Flags标记为lvm,此时已经可以在web界面看到此分区了,分区显示正常,分区类型也识别正确
[root@openfiler1 ~]# vgcreate vg0-file /dev/sda4
做完此步之后就可以在web界面看到volume group了。

卷组建完之后,建lv,开ip访问,添加共享文件夹,开启nfs服务
客户端挂载linux需要开启portmap,或rpcbind
[root@test1 u1]# mount -o nolock 172.16.1.2:/mnt/vg0/svn/14 /mnt/cc

# parted /dev/sdb
GNU Parted 1.8.1
Using /dev/sdb
Welcome to GNU Parted! Type \'help\' to view a list of commands.
(parted) mklabel gpt
#将MBR磁盘格式化为GPT
(parted) mklable msdos
#如果要反过来.将GPT磁盘转化为MBR磁盘
(parted) mkpart primary 0 100
#划分一个起始位置为0大小为100M的主分区
(parted) mkpart primary 100 200
#划分一个起始位置为100M大小为100M的主分区
(parted) mkpart primary 0 -1
#划分所有空间到一个分区
(parted) mkpart primary 10GB 100%(另外一种形式)
(parted) print
#打印当前分区
(parted) quit

[root@openfiler1 ~]# parted /dev/sdb
GNU Parted 1.8.8
Using /dev/sdb
Welcome to GNU Parted! Type 'help' to view a list of commands.
(parted) print
Model: ATA ST3500413AS (scsi)
Disk /dev/sdb: 500GB
Sector size (logical/physical): 512B/512B
Partition Table: msdos

Number  Start  End  Size  Type  File system  Flags

(parted) help mklabel
  mklabel,mktable LABEL-TYPE               create a new disklabel (partition table)

        LABEL-TYPE is one of: aix, amiga, bsd, dvh, gpt, mac, msdos, sun, loop


下面两个命令都可以改变磁盘分区表模式,将msdos改为gpt

(parted) mklabel
Warning: The existing disk label on /dev/sdb will be destroyed and all data on this disk will be lost. Do you want to continue?
Yes/No? y
New disk label type?  [msdos]?


(parted) mktable
Warning: The existing disk label on /dev/sdb will be destroyed and all data on this disk will be lost. Do you want to continue?
Yes/No? yes
New disk label type?  [msdos]? gpt
(parted) print
Model: ATA ST3500413AS (scsi)
Disk /dev/sdb: 500GB
Sector size (logical/physical): 512B/512B
Partition Table: gpt


(parted) help mkpart
  mkpart PART-TYPE [FS-TYPE] START END     make a partition

        PART-TYPE is one of: primary, logical, extended
        FS-TYPE is one of: ext3, ext2, fat32, fat16, hfsx, hfs+, hfs, jfs, linux-swap, ntfs, reiserfs, hp-ufs, sun-ufs, xfs, apfs2, apfs1, asfs, amufs5, amufs4, amufs3, amufs2,
        amufs1, amufs0, amufs, affs7, affs6, affs5, affs4, affs3, affs2, affs1, affs0
        START and END are disk locations, such as 4GB or 10%.  Negative values count from the end of the disk.  For example, -1s specifies exactly the last sector.

        'mkpart' makes a partition without creating a new file system on the partition.  FS-TYPE may be specified to set an appropriate partition ID.
(parted)
系统恢复盘的作用,用来恢复文件系统错误,grub错误,很有用。
Linux下普遍采用的是ext3文件系统,ext3是一个具有日志记录功能的日志文件系统,可以进行简单的容错和恢复,但是在一个高负荷读写的ext3文件系统下,如果突然发生掉电,就很有可能发生文件系统内部结构不一致,导致文件系统破坏。

Linux在启动时,会自动去分析和检查系统分区,如果发现文件系统有简单的错误,会自动修复,如果文件系统破坏比较严重,系统无法完成修复时,系统就会自动进入单用户模式下或者出现一个交互界面,提示用户介入手动修复,现象类似下面所示:
checking root filesystem
/dev/sdb5 contains a file system with errors, check forced
/dev/sdb5:
Unattached inode 68338812
/dev/sdb5: UNEXPECTED INCONSISTENCY; RUN fsck MANUALLY
(i.e., without -a or -p options)
FAILED
/contains a file system with errors check forced
an eror occurred during the file system check
****dropping you to a shell;the system will reboot
****when you leave the shell
Press enter for maintenance
(or type Control-D to continue):
give root password for maintenance

从这个错误可以看出,系统根分区文件系统出现了问题,系统在启动时无法自动修复,然后进入到了一个交互界面,提示用户进行系统修复。
这个问题发生的几率很高,引起这个问题的主要原因就是系统突然掉电,引起文件系统结构不一致。一般情况下解决此问题的办法是采用fsck命令,进行强制修复。
根据上面的错误提示,当按下“Control-D”组合键后系统自动重启,当输入root密码后进入系统修复模式,在修复模式下,可以执行fsck命令,具体操作过程如下:

这里一定要先卸载,再操作。
[root@localhost /]#umount /dev/sdb5
[root@localhost /]#fsck .ext3 -y  /dev/sdb5
e2fsck 1.39 (29-May-2006)
/ contains a file system with errors, check forced.
Pass 1: Checking inodes, blocks, and sizes
Pass 2: Checking directory structure
Pass 3: Checking directory connectivity
Pass 4: Checking reference counts
Inode 6833812 ref count is 2, should be 1.  Fix? yes
Unattached inode 6833812
Connect to /lost+found? yes
Inode 6833812 ref count is 2, should be 1.  Fix? yes
Pass 5: Checking group summary information
Block bitmap differences:  -(519--529) -9273
Fix? yes
…… ……
/: ***** FILE SYSTEM WAS MODIFIED *****
/: 19/128520 files (15.8% non-contiguous), 46034/514048 blocks
        上面就是fsck修复受损文件系统的过程,fsck详细用法在本书第四章有详细的讲述,这里不在多讲。需要注意的是,在执行fsck的时候,一定要先卸载要修复的分区,然后再执行修复操作,切记!
GRUB引导错误导致无法启动系统解决办法 这篇文章对我遇到的openfiler不能启动有很大的帮助
openfiler正常使用时,突然断电,导致无法启动,这时用安装光盘启动到恢复模式进行操作
现象:openfiler服务器突然断电,再次启动时,光标停留在屏幕上,不能启动。
这是centos的画面,仅供参考,都是bootloader的问题导致的现象

解决办法:
使用CentOS安装光盘进行开机GRUB引导修复,使用CentOS系统光盘引导计算机(系统盘要与原来安装的系统版本相同)
输入:linux rescue
然后一系列的画面,到需要点击continue时选择Continue出现下面的界面,并输入
chroot /mnt/sysimage ,回车 #将当前目录切换到原来系统的根目录,再进入grub,进行修复

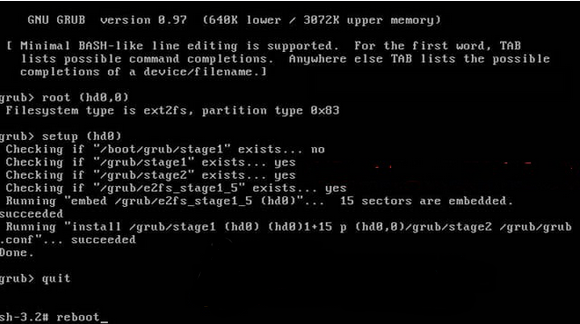
输入:root (hd0,0) 回车 #注意root与(hd0,0) 之间必须要有空格
继续输入:setup (hd0) 回车 #注意root与(hd0) 之间必须要有空格
再次输入:quit 回车 #退出grub模式
最后输入:reboot #重启系统
拿出光盘,grub修复完毕,可以正常进入系统
备注:如果通过上面的操作还是无法正常进入系统
可以在
输入:chroot /mnt/sysimage 之后继续输入
vi /boot/grub/grub.conf #编辑,添加以下内容(CentOS 5.9为例)
# grub.conf generated by anaconda
#
# Note that you do not have to rerun grub after making changes to this file
# NOTICE: You have a /boot partition. This means that
# all kernel and initrd paths are relative to /boot/, eg.
# root (hd0,0)
# kernel /vmlinuz-version ro root=/dev/sda3
# initrd /initrd-version.img
#boot=/dev/sda1
default=0
timeout=5
splashimage=(hd0,0)/grub/splash.xpm.gz
hiddenmenu
title CentOS (2.6.18-348.el5)
root (hd0,0)
kernel /vmlinuz-2.6.18-348.el5 ro root=LABEL=/
initrd /initrd-2.6.18-348.el5.img
:wq! #保存退出
输入:quit 回车 #退出grub模式
输入:reboot #重启系统
一般都可修复成功,正常进入系统。
如果系统是通过U盘安装的,拔了U盘之后就进不了系统,插上U盘又可以正常启动
可以采用如下方法修复
插上U盘,正常进入系统
输入:grub-install /dev/sda #安装grub到sda
vi /boot/grub/device.map #编辑修改为
(hd0) /dev/sda
之前可能为:
(hd1) /dev/sda
(hd0) /dev/sdb
vi /boot/grub/grub.conf #编辑修改里面的(hd1,0)为(hd0,0)
title CentOS (2.6.18-348.el5)
root (hd0,0)
kernel /vmlinuz-2.6.18-348.el5 ro root=LABEL=/
initrd /initrd-2.6.18-348.el5.img
后面的全部删除
保存后重启,拿掉U盘,即可正常进入系统。


 553
553

 被折叠的 条评论
为什么被折叠?
被折叠的 条评论
为什么被折叠?
 到【灌水乐园】发言


