


 本文介绍如何将Freemarker模板引擎与SpringMVC框架集成,实现表现层的高效渲染。文中详细展示了配置步骤及关键代码示例。
Freemarker是一种基于java的模板引擎。SpringMVC对FreeMarker进行一些配置的支持,能够利用Freemarker只关注表现层以及Spring MVC的三层分离的特点,向前端输出HTML代码,实现代码和页面完全的隔离。
在SpringMVC中使用FreeMarker需要在spring的配置文件中做配置,首先是在web.xml中配置SpringMVC的Servlet,如下:
 1 <?xml version="1.0" encoding="UTF-8"?>
 2 <web-app xmlns:xsi="http://www.w3.org/2001/XMLSchema-instance" xmlns="http://xmlns.jcp.org/xml/ns/javaee" xsi:schemaLocation="http://xmlns.jcp.org/xml/ns/javaee http://xmlns.jcp.org/xml/ns/javaee/web-app_3_1.xsd" id="WebApp_ID" version="3.1">
 3   <display-name>freemarker_springmvc</display-name>
 4   <welcome-file-list>
 5     <welcome-file>index.html</welcome-file>
 6   </welcome-file-list>
 7   <listener>
 8     <listener-class>org.springframework.web.context.ContextLoaderListener</listener-class>
 9   </listener>
10   <context-param>
11     <param-name>contextConfigLocation</param-name>
12     <param-value>WEB-INF/applicationContext.xml</param-value>
13   </context-param>
14   <servlet>
15     <servlet-name>freemarker</servlet-name>
16     <servlet-class>org.springframework.web.servlet.DispatcherServlet</servlet-class>
17     <load-on-startup>1</load-on-startup>
18   </servlet>
19   <servlet-mapping>
20     <servlet-name>freemarker</servlet-name>
21     <url-pattern>/*</url-pattern>
22   </servlet-mapping>
23 </web-app>
然后在spring的配置文件applicationContext.xml中加入FreeMarker的配置:
 1     <!-- freemarker配置 -->
 2     <bean id="freemarkerConfig"
 3         class="org.springframework.web.servlet.view.freemarker.FreeMarkerConfigurer">
 4         <property name="templateLoaderPath" value="/WEB-INF/templates" />
 5         <property name="freemarkerSettings">
 6             <props>
 7                 <prop key="template_update_delay">0</prop>
 8                 <prop key="default_encoding">UTF-8</prop>
 9             </props>
10         </property>
11     </bean>
其中templateLoaderPath是指定模板文件的位置,freemarkerSetting是对FreeMarker的配置,包括boolean和date时间的显示格式,比如可以设置date_format属性的值为yyyy-MM-ss,格式化格式采用SimpleDateFormat。更多的配置可以参考Configuration和Configurable的API。
最后一步是配置FreeMarker在SpringMVC里面的视图解析器,在freemarker-servlet.xml的文件中添加:
 1     <!-- 针对freemarker的视图配置项 -->
 2     <bean id="viewResolver"
 3         class="org.springframework.web.servlet.view.freemarker.FreeMarkerViewResolver">
 4         <property name="cache" value="true" />
 5         <property name="prefix" value="/" />
 6         <property name="suffix" value=".ftl" />
 7         <property name="contentType" value="text/html;charset=UTF-8" />
 8         <property name="requestContextAttribute" value="request" /><!-- 定义request对象名称 -->
 9         <property name="exposeSessionAttributes" value="true" /> <!-- 暴露session属性 -->
10     </bean>
其中requestContextAttribute属性通过查看springmvc的mvc模板的源码得知,在FreeMarkerViewResolver的父类UrlBasedViewResolver中定义的:
1 /**
2      * Set the name of the RequestContext attribute for all views.
3      * @param requestContextAttribute name of the RequestContext attribute
4      * @see AbstractView#setRequestContextAttribute
5      */
6     public void setRequestContextAttribute(String requestContextAttribute) {
7         this.requestContextAttribute = requestContextAttribute;
8     }
设置requestContext对象的变量名的,这样每个页面都能取得这个对象了。
exposeSessionAttributes的属性设置源码如下:
1 /**
2      * Set whether all HttpSession attributes should be added to the
3      * model prior to merging with the template. Default is "false".
4      * @see AbstractTemplateView#setExposeSessionAttributes
5      */
6     public void setExposeSessionAttributes(boolean exposeSessionAttributes) {
7         this.exposeSessionAttributes = exposeSessionAttributes;
8     }
更多属性设置可以参考spring的文档,这些属性对于velocity模板引擎也是通用的。
Controller代码如下,其中ModelAndView是org.springframework.web.servlet下的:
 1 import org.springframework.stereotype.Controller;
 2 import org.springframework.ui.Model;
 3 import org.springframework.web.bind.annotation.RequestMapping;
 4 import org.springframework.web.servlet.ModelAndView;
 5
 6 @Controller
 7 public class TestController {
 8
 9     @RequestMapping("/mv")
10     public ModelAndView test(){
11         ModelAndView mv = new ModelAndView();
12         mv.setViewName("main_f");
13         mv.addObject("user", "bigbang");
14         return mv;
15     }
16     @RequestMapping("/main_first.html")
17     public String main_first(Model model){
18         model.addAttribute("user", "bigbang");
19         return "main_f";
20     }
21
22     @RequestMapping("/main_second.html")
23     public String main_second(Model model){
24         model.addAttribute("user", "bigbang");
25         return "main_s";
26     }
27
28     @RequestMapping("/anonymous.html")
29     public String test2(){
30         return "main_f";
31     }
32 }
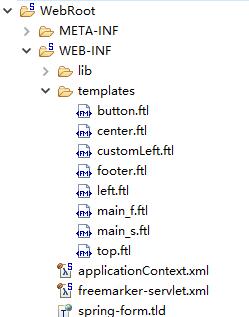
此处为体现了FreeMarker的使用,所以写了比较多的模块,在此只贴出文件位置图,其中main_f.ftl包含top.ftl、left.ftl和center.ftl,main_s.ftl包含top.ftl、customLeft.ftl和center.ftl:
正常访问下的效果图如下:
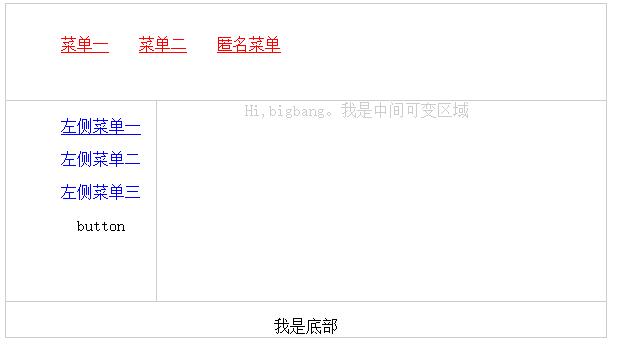
请求main_first.html:
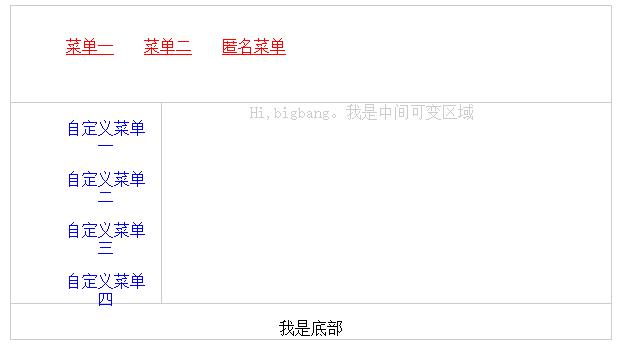
请求main_second.html的效果图如下:


 285
285

 被折叠的 条评论
为什么被折叠?
被折叠的 条评论
为什么被折叠?
 到【灌水乐园】发言


