1.屏幕适配
装好之后,安装增强功能,然后重启
2.VirtualBox 从宿主机访问虚拟机
在我的机器(Windows 7)上安装了VirtualBox,在VirtualBox安装了ubuntu,我要访问网络ubuntu,前面成功过,后来又不能访问了,将过程记录下来,免得以后重复钻研。
VirtualBox安装后会在Windows 7分配一个网卡——虚拟网卡而已,在控制面板\网络和 Internet\网络连接中可以看到 VirtualBox Host-Only Network,这个网卡的IP一般是
以太网适配器VirtualBox Host-Only Network:
连接特定的DNS 后缀. . . . . . . :
本地链接IPv6 地址. . . . . . . . : fe80::9849:c1ab:2f1b:f7f2
IPv4 地址. . . . . . . . . . . . : 192.168.56.1
子网掩码 . . . . . . . . . . . . : 255.255.255.0
默认网关. . . . . . . . . . . . . :
通常情况下,这个网卡没有启用。
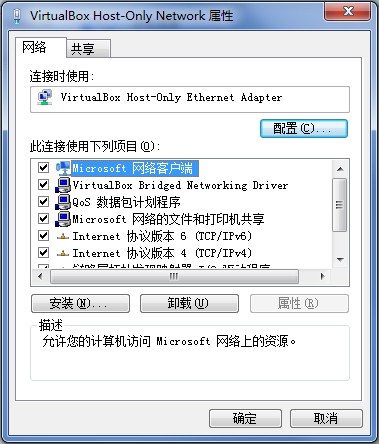
右击 VirtualBox Host-Only Network ——>属性,在属性对话框中将 VirtualBox Bridged Networking Driver选择上。这是确认VirtualBox Host-Only Network网卡能工作。
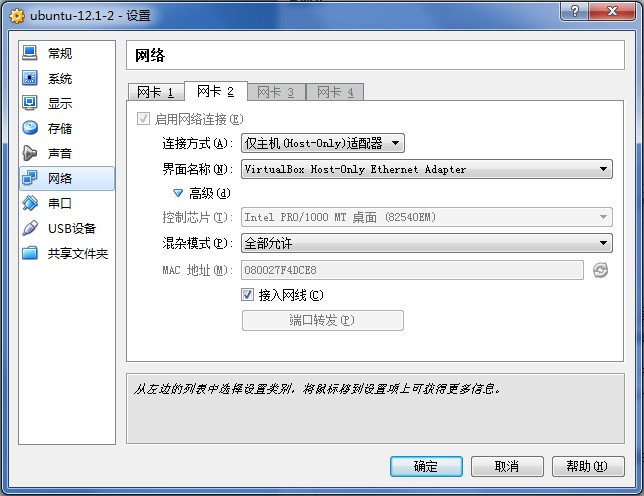
在虚拟机设置中,添加一个Adapter,连接方式选择Host-Only Adapter,界面名称选择VirtualBox Host-Only Ethernet Adapter。
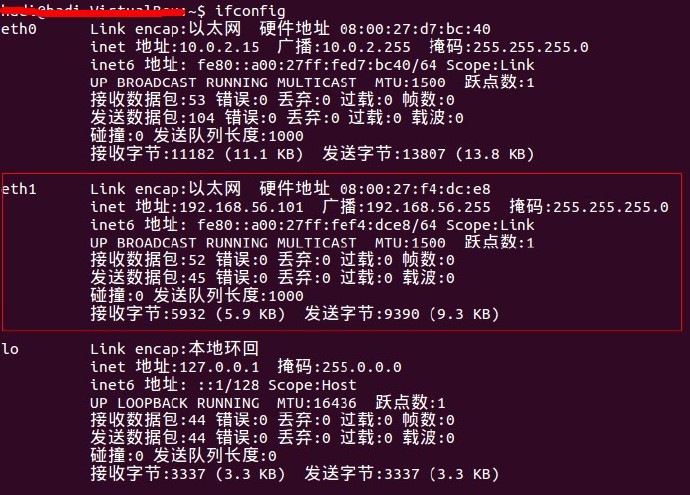
运行ubuntu后,在终端里用ifconfig命令查看是不是多了块网卡
eth1 就是新增的网卡,我们再给它设置一个ip 192.168.56.101 netmask 255.255.255.0,设置好后从Windows 7中ping下 192.168.56.101,能拼通则可以从宿主机访问虚拟机VirtualBox了。
注:ip无需特别配置,只需完成上图网卡2的配置,重启后即可。通过克隆的虚拟机,需要先关闭网卡2的配置,重启后再打开。
http://blog.sina.com.cn/s/blog_705e4fdc01017diz.html
http://zhenghaoju700.blog.163.com/blog/static/135859518201092810295402/
3.命令行
http://www.jb51.net/os/windows/124883.html
http://418684644-qq-com.iteye.com/blog/1451000
http://blog.chinaunix.net/uid-734339-id-3188230.html
cmd到D:\ProgramStation\Oracle\VirtualBox输入命令行
查看有哪些虚拟机
	VBoxManage list vms

	VBoxManage startvm      <uuid>|<name> 开启指定UUID|名称的虚拟机
						[-type gui|vrdp] 设置虚拟机标准显示设备GUI界面|VRDP

开启虚拟机在后台运行	VBoxManage startvm <vm_name> -type headless
	VBoxManage startvm ubuntu1.1 -type headless


开启虚拟机并开启远程桌面连接的支持
	VBoxManage startvm <vm_name> -type vrdp
	VBoxManage startvm ubuntu1.1 -type vrdp
VBoxManage startvm 虚拟机名 --type headlessVBoxManage startvm ubuntu1.1 -type headlessVBoxManage startvm ubuntu1.2 -type headlessVBoxManage startvm centos6.6_4 -type headlessVBoxManage startvm ubuntu3 -type headlessVBoxManage startvm ubuntu1.2 -type vrdp
启动VM的命令:/usr/bin/VBoxManage startvm WinXP -type vrdp,默认是-type gui即以图形界面启动虚拟机。
控制VM比如保存状态关闭的命令:/usr/bin/VBoxManage controlvm WinXP savestate。
关闭虚拟机
VBoxManage controlvm ubuntu1.2 acpipowerbutton
VBoxManage controlvm ubuntu3 poweroff
复制虚拟机
VBoxManage clonehd N:\VirtualMachinesVbox\centos6.6_4\centos6.6_1.vdi N:\VirtualMachinesVbox\centos6.6_5\centos6.6_5.vdi
VirtualBox-“please use a kernel appropriate for your cpu”
This kernel requires the following features not present on the CPU:
pae
Unable to boot – please use a kernel appropriate for your CPU.
百度了一下,找到解决方案:
选中对应的虚拟系统——设置——系统——处理器——启用 PAE/NX!
重启搞定!
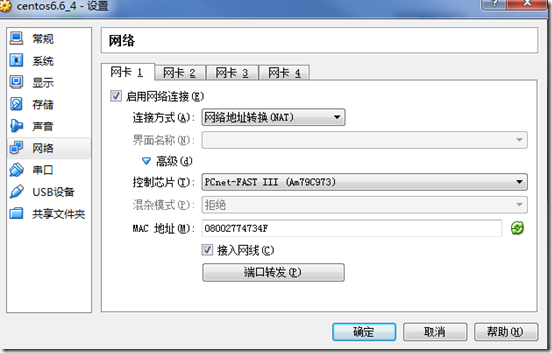
网络配置
网卡1默认配置


 3174
3174

 被折叠的 条评论
为什么被折叠?


