


3.1 环境与profile
3.1.1 配置profile bean
Spring为不同的环境提供相关的bean,在这个过程中需要根据环境决定该创建哪个bean和不创建哪个bean。不过Spring并不是在构建的时候做出这样的决策,而是等到运行时再来确定。这样避免了同一份部署单元(war或jar)可以适用于所有的环境,而没有必要重新构建。所以Spring提供了bean profile功能,要使用profile,你首先要讲所有不同的bean定义整理到一个或多个profile之中,在将应用部署到每个环境时,要确保对应的profile处于激活(active)状态。
在Java配置中,可以使用@Profile注解制定某个bean属于某个profile,或者使用XML来配置profile。尽管每个DataSource bean都被声明在一个profile中,并且只有当规定的profile激活时,相应的bean才会被创建,但是可能会有其他的bean并没有声明在一个给定的profile范围内。当bean没有指定profile时始终都会被创建。属于多个profile的多个bean,虽然类型一样(都是javax.sql.DataSource),并且ID一样(都是dataSource),在运行时,只会创建一个bean,这取决于处于激活状态的是哪个profile。
@Profile注解配置profile实现bean的装配
package com.myapp;
import javax.sql.DataSource;
import org.springframework.context.annotation.Bean;
import org.springframework.context.annotation.Configuration;
import org.springframework.context.annotation.Profile;
import org.springframework.jdbc.datasource.embedded.EmbeddedDatabaseBuilder;
import org.springframework.jdbc.datasource.embedded.EmbeddedDatabaseType;
import org.springframework.jndi.JndiObjectFactoryBean;
@Configuration
public class DataSourceConfig {

  @Bean(destroyMethod = "shutdown")
  @Profile("dev")
  public DataSource embeddedDataSource() {
    return new EmbeddedDatabaseBuilder()
        .setType(EmbeddedDatabaseType.H2)
        .addScript("classpath:schema.sql")
        .addScript("classpath:test-data.sql")
        .build();
  }

  @Bean
  @Profile("prod")
  public DataSource jndiDataSource() {
    JndiObjectFactoryBean jndiObjectFactoryBean = new JndiObjectFactoryBean();
    jndiObjectFactoryBea n.setJndiName("jdbc/myDS");
    jndiObjectFactoryBean.setResourceRef(true);
    jndiObjectFactoryBean.setProxyInterface(javax.sql.DataSource.class);
    return (DataSource) jndiObjectFactoryBean.getObject();
  }
}
XML配置profile实现bean的装配
<?xml version="1.0" encoding="UTF-8"?>
<beans xmlns="http://www.springframework.org/schema/beans"
  xmlns:xsi="http://www.w3.org/2001/XMLSchema-instance"
  xmlns:jdbc="http://www.springframework.org/schema/jdbc"
  xmlns:jee="http://www.springframework.org/schema/jee"
  xmlns:p="http://www.springframework.org/schema/p"
  xsi:schemaLocation="
    http://www.springframework.org/schema/jee
    http://www.springframework.org/schema/jee/spring-jee.xsd
    http://www.springframework.org/schema/jdbc
    http://www.springframework.org/schema/jdbc/spring-jdbc.xsd
    http://www.springframework.org/schema/beans
    http://www.springframework.org/schema/beans/spring-beans.xsd">

  <beans profile="dev">
    <jdbc:embedded-database id="dataSource" type="H2">
      <jdbc:script location="classpath:schema.sql" />
      <jdbc:script location="classpath:test-data.sql" />
    </jdbc:embedded-database>
  </beans>

  <beans profile="prod">
    <jee:jndi-lookup id="dataSource"
      lazy-init="true"
      jndi-name="jdbc/myDatabase"
      resource-ref="true"
      proxy-interface="javax.sql.DataSource" />
  </beans>
</beans>
3.1.2 激活profile
Spring的profiles有两个变量我们可以配置:配置不同,生效的环境不同
- spring.profiles.default 默认值,优先级低。当active没有配置时,使用此变量
- spring.profiles.active 优先级高,指定当前容器使用哪个profile
- 如果两个参数都没有设置,那就没有激活的profile,因此只会创建那些没有定义profile的bean
有多种方式可以设置这两个属性:
- 作为DispatcherServlet的初始化参数
- 作为Web应用的上下文参数
- 作为JNDI条目
- 作为环境变量
- 作为JVM的系统属性
- 在集成测试类上,使用@ActiveProfiles注解设置
通常使用DispatcherServlet的参数将spring.profiles.default设置为开发环境的profile,在Servlet上下文中进行设置(为了兼顾ContextLoaderListener)。例如,在Web应用中,设置spring.profiles.default的web.xml文件如下所示:
<?xml version="1.0" encoding="UTF-8"?>
<web-app version="3.0" xmlns="http://java.sun.com/xml/ns/javaee"
    xmlns:xsi="http://www.w3.org/2001/XMLSchema-instance"
    xsi:schemaLocation="http://java.sun.com/xml/ns/javaee
    http://java.sun.com/xml/ns/javaee/web-app_3_0.xsd">

    <context-param>
        <param-name>contextConfigLocation</param-name>
        <param-value>
            /WEB-INF/spring/root-context.xml
        </param-value>
    </context-param>

    <!--
    <context-param>
        <param-name>contextConfigLocation</param-name>
        <param-value>
            classpath*:/applicationContext*.xml
        </param-value>
    </context-param>
    -->

    <!-- 在上下文context-param中设置profile.default的默认值 -->
    <context-param>
        <param-name>spring.profiles.default</param-name>
        <param-value>dev</param-value>
    </context-param>

    <!-- 在上下文context-param中设置profile.active的默认值 -->
    <!-- 设置active后default失效,web启动时会加载对应的环境信息 -->
    <!-- <context-param>
        <param-name>spring.profiles.active</param-name>
        <param-value>dev</param-value>
    </context-param>-->

    <listener>
      <listener-class>
        org.springframework.web.context.ContextLoaderListener
      </listener-class>
    </listener>

    <servlet>
        <servlet-name>appServlet</servlet-name>
        <servlet-class>
            org.springframework.web.servlet.DispatcherServlet
        </servlet-class>
        <!-- 在DispatcherServlet参数中设置profile的默认值,active同理 -->
        <init-param>
            <param-name>spring.profiles.default</param-name>
            <param-value>dev</param-value>
        </init-param>
        <load-on-startup>1</load-on-startup>
    </servlet>
    <servlet-mapping>
        <servlet-name>appServlet</servlet-name>
        <url-pattern>/</url-pattern>
    </servlet-mapping>

</web-app>
profile进行测试 Spring提供了@ActiveProfiles注解,我们可以使用它来制定运行测试时要激活哪个profile。在集成测试时,通常想要激活的是开发环境的profile。
@RunWith(SpringJUnit4ClassRunner.class)
@ContextConfiguration(classes=DataSourceConfig.class)
@ActiveProfiles("dev")
public class DevDataSourceTest {
  ...
}
3.2 条件化的bean
假设你希望一个或多个bean只有在应用的类路径下包含特定的库时才创建。或者我们希望某个bean只有当另外某个特定的bean也声明了之后才会创建。我们还可以要求某个特定的环境变量设置之后,才会创建某个bean。
为了解决上面的问题,Spring推出了@Conditional注解,它可以用在带有@Bean注解的方法上(如果给定的条件计算结果为true,就回创建这个bean,否则的话,这个bean会被忽略),从而方便程序根据当前环境或者容器情况来动态注入bean。
Spring Boot对Spring的@Conditional注解进行了扩展,生成了很多派生注解。如下:
- @ConditionalOnBean:在存在某个bean的时候
- @ConditionalOnMissingBean:不存在某个bean的时候
- @ConditionalOnClass:当前classpath可以找到某个类型的类时
- @ConditionalOnMissingClass:当前classpath不可以找到某个类型的类时
- @ConditionalOnResource:当前classpath是否存在某个资源文件
- @ConditionalOnProperty:当前jvm是否包含某个系统属性为某个值
- @ConditionalOnJava:当前spring context是否是Java应用程序
- @ConditionalOnWebApplication:当前spring context是否是web应用程序
package com.habuma.restfun;
import org.springframework.context.annotation.Bean;
import org.springframework.context.annotation.Conditional;
import org.springframework.context.annotation.Configuration;
@Configuration
public class MagicConfig {
  @Bean
  @Conditional(MagicExistsCondition.class)
  public MagicBean magicBean() {
    return new MagicBean();
  }
}
@Conditional给定了一个Class,它指明了MagicExistsCondition.class。@Conditional将会通过Condition接口进行条件比对:
public interface Condition {
    boolean matches(ConditionContext context, AnnotatedTypeMetadata metadata);
}
设置给@Conditional的类可以是任意实现了Condition接口的类型。这个接口只需要提供matches()方法的实现即可。如果matches()方法返回true,那么就创建带有@Conditional注解的bean;反之,不会创建。
public class MagicExistsCondition implements Condition {
  @Override
  public boolean matches(ConditionContext context, AnnotatedTypeMetadata metadata) {
    Environment env = context.getEnvironment();
    return env.containsProperty("magic");
  }
}
matches()方法通过给定的ConditionContext对象进而得到Environment对象,并使用这个对象检测环境中是否存在名为magic的环境属性。
ConditionContext是一个接口,大致如下:
public interface ConditionContext {
    //借助getRegistry()返回的BeanDefinitionRegistry检查bean定义
    BeanDefinitionRegistry getRegistry();
    //借助getBeanFactory()返回的ConfigurableListableBeanFactory检查bean是否存在,甚至探查bean的属性
    ConfigurableListableBeanFactory getBeanFactory();
    //借助getEnvironment()返回的Environment检查环境变量是否存在以下它的值是什么
    Environment getEnvironment();
    //借助getResourceLoader()返回的ResourceLoader检查所加载的资源
    ResourceLoader getResourceLoader();
    //借助getClassLoader()返回的ClassLoader检查所加载的类是否存在
    ClassLoader getClassLoader();
}
AnnotatedTypeMetadata则能够让我们检查带有@Bean注解的方法上还有什么其他注解。
//借助isAnnotated()方法,我们能够判断带有@Bean注解的方法是不是还有其他特定的注解。借助其他方法,我们能够检查@Bean注解的方法上其他注解的属性
public interface AnnotatedTypeMetadata {
    boolean isAnnotated(String annotationType);
    Map<String, Object> getAnnotationAttributes(String annotationType);
    Map<String, Object> getAnnotationAttributes(String annotationType, boolean classValuesAsString);
    MultiValueMap<String, Object> getAllAnnotationAttributes(String annotationType);
    MultiValueMap<String, Object> getAllAnnotationAttributes(String annotationType, boolean classValuesAsString);
}
从Spring4开始,@Profile注解进行了重构,使其基于@Conditional和Condition实现。如下所示:
package org.springframework.context.annotation;
import java.lang.annotation.Documented;
@Retention(RetentionPolicy.RUNTIME)
@Target({ElementType.TYPE, ElementType.METHOD})
@Documented
@Conditional(ProfileCondition.class)
public @interface Profile {
    String[] value();
}
@Profile本身使用了@Condition注解,并且引用ProfileCondition作为Condition实现。ProfileCondition实现了Condition接口,并且在做出决策的过程中,考虑到了ConditionContext和AnnotatedTypeMetadata中的多个因素。ProfileCondition通过AnnotatedTypeMetadata得到了用于@Profile注解的所有属性。借助该信息,它会明确地检查value属性,该属性包含了bean的profile名称。然后,它根据通过ConditionContext得到的Environment来检查该Profile是否处于激活状态。
class ProfileCondition implements Condition {
    @Override
    public boolean matches(ConditionContext context, AnnotatedTypeMetadata metadata) {
        if (context.getEnvironment() != null) {
            MultiValueMap<String, Object> attrs = metadata.getAllAnnotationAttributes(Profile.class.getName());
            if (attrs != null) {
                for (Object value : attrs.get("value")) {
                    if (context.getEnvironment().acceptsProfiles(((String[]) value))) {
                        return true;
                    }
                }
                return false;
            }
        }
        return true;
    }
}
3.3 处理自动装配的歧义性
当Spring自动装配,将bean引用注入到构造参数和属性中时,如果只有一个bean匹配所需的结果时,自动装配是有效的;如果不仅有一个bean能够匹配结果的话,这种歧义性会阻碍Spring自动装配属性、构造器参数或方法参数。
当发生歧义时,Spring提供了多种可选方案来解决这样的问题。你可以将可选bean中的某一个设为首选(primary)的bean,或者使用限定符(qualifier)来帮助Spring将可选的bean的范围缩小到只有一个bean。
3.3.1 标示首选的bean
在声明bean的时候,通过将其中一个可选的bean设置为首选(primary)bean能够避免自动装配的歧义性。@Primary能够与@Component组合用在组件扫描的bean上,也可以与@Bean组合用在Java配置的Bean声明中。注意,当设置多个primary bean,仍然会导致歧义性。
使用Java注解配置
@Component
@Primary
public class IceCream implements Dessert{ ··· }
或者
@Bean
@Primary
public Dessert iceCream(){
   return new IceCream();
}
使用XML进行配置
<bean id="iceCream" class="com.desserteater.IceCream" primary="true" />
3.3.2 限定自动装配的bean
Spring的限定符能够在所有可选的bean上进行缩小范围的操作,最终能够达到只有一个bean满足所规定的限制条件。如果将所有限定符都用上后依然存在歧义性,那么你可以继续使用更多的限定符来缩小选择范围。
@Qualifier注解是使用限定符的主要方式,它可以与@Autowired和@Inject协同使用,在注入的时候指定想要注入进去的是哪个bean。@Qualifier注解所设置的参数就是想要注入的bean的ID。
@Autowired
@Qualifier("iceCream")
public void setDessert(Dessert dessert){
   this.dessert = dessert;
}
更准确地讲,@Qualifier("iceCream")所引用的bean要具有String类型的"iceCream"作为限定符。
创建自定义的限定符 我们可以为bean设置自己的限定符,而不是依赖于将bean ID作为限定符。在这里所需要做的就是在bean声明上添加@Qualifier注解。
@Component
@Qualifier("cold")
public class IceCream implements Dessert{ ··· }
在这种情况下,cold限定符分配给了IceCream bean。因为它没有耦合类名,因此你可以随意重构IceCream的类名,而不必担心会破坏自动装配。在注入的地方,只要引用cold限定符就可以了。
@Autowired
@Qualifier("cold")
public void setDessert(Dessert dessert){
   this.dessert = dessert;
}
或
@Bean
@Qualifier("cold")
public Dessert iceCream(){
   return new IceCream();
}
当使用自定义的@Qualifier值时,最佳实践是为bean选择特征性或描述性的术语,而不是使用随意的名字。
使用自定义的限定符注解 下面通过@Qualifier注解标注的自定义注解,这样就具备了@Qualifier注解的特性,它们本身实际上就成为了限定符注解。
- 注解Cold
@Target({ElementType.TYPE,ElementType.METHOD,ElementType.FIELD})
@Retention(RetentionPolicy.RUNTIME)
@Documented
@Qualifier
public @interface Cold {}
- 注解Creamy
@Target({ElementType.TYPE,ElementType.METHOD,ElementType.FIELD})
@Retention(RetentionPolicy.RUNTIME)
@Documented
@Qualifier
public @interface Creamy {}
- 注解Fruity
@Target({ElementType.TYPE,ElementType.METHOD,ElementType.FIELD})
@Retention(RetentionPolicy.RUNTIME)
@Documented
@Qualifier
public @interface Fruity {}
我们可以通过自定义限定符注解的组合使用,从而将可选范围缩小到只有一个bean满足需求。
- 用自定义限定符注解标注实体类
@Component
@Cold
@Fruity
public class Popsicle implements Dessert{ ··· }
- 用自定义限定符注解实现实体类的自动装配
@Autowired
@Cold
@Creamy
public void setDessert(Dessert dessert){
   this.dessert = dessert;
}
3.4 bean的作用域
默认情况下,Spring应用上下文中所有bean都是作为以单例(singleton)的形式创建的。也就是说,不管给定的一个bean被注入到其他bean多少次,每次所注入的都是同一个实例。
有时候,可能会发现,你所使用的类是易变的(mutable),它们会保存一些状态,因此重用是不安全的。这种情况下,将class声明为单例的bean就不是什么好主意了。因为对象会被污染,稍后重用的时候会出现意想不到的问题。
Spring定义了多种作用域,包括:
- 单例(Singleton):在整个应用中,只创建bean的一个实例
- 原型(Prototype):每次注入或者通过Spring应用上下文获取的时候,都会创建一个新的bean实例
- 会话(Session):在Web应用中,为每个会话创建一个bean实例
- 请求(Request):在Web应用中,为每个请求创建一个bean实例
<bean id="notepad" class="com.myapp.Notepad" scope="singleton"/>
这里的scope就是用来配置spring bean的作用域,它标识bean的作用域。在spring2.0之前bean只有2种作用域即:singleton(单例)、non-singleton(也称 prototype), Spring2.0以后,增加了session、request、global session三种专用于Web应用程序上下文的Bean。因此,默认情况下Spring2.0现在有五种类型的Bean。当然,Spring2.0对 Bean的类型的设计进行了重构,并设计出灵活的Bean类型支持,理论上可以有无数多种类型的Bean,用户可以根据自己的需要,增加新的Bean类型,满足实际应用需求。
- singleton作用域(scope 默认值)
当一个bean的作用域设置为singleton, 那么Spring IOC容器中只会存在一个共享的bean实例,并且所有对bean的请求,只要id与该bean定义相匹配,则只会返回bean的同一实例。换言之,当把 一个bean定义设置为singleton作用域时,Spring IOC容器只会创建该bean定义的唯一实例。这个单一实例会被存储到单例缓存(singleton cache)中,并且所有针对该bean的后续请求和引用都 将返回被缓存的对象实例,这里要注意的是singleton作用域和GOF设计模式中的单例是完全不同的,单例设计模式表示一个ClassLoader中 只有一个class存在,而这里的singleton则表示一个容器对应一个bean,也就是说当一个bean被标识为singleton时 候,spring的IOC容器中只会存在一个该bean。
Java注解配置
@Component
@Scope(ConfigurableBeanFactory.SCOPE_SINGLETON)
public class notepad(){···}
Java配置配置
@Bean
@Scope(ConfigurableBeanFactory.SCOPE_SINGLETON)
public Notepad notepad(){
   return new Notepad();
}
XML配置实例
<bean id="notepad" class="com.myapp.Notepad" scope="singleton"/>
或者
<bean id="notepad" class="com.myapp.Notepad" singleton="true"/>
- prototype作用域
prototype作用域部署的bean,每一次请求(将其注入到另一个bean中,或者以程序的方式调用容器的getBean()方法)都会产生一个新的bean实例,相当与一个new的操作,对于prototype作用域的bean,有一点非常重要,那就是Spring不能对一个prototype bean的整个生命周期负责,容器在初始化、配置、装饰或者是装配完一个prototype实例后,将它交给客户端,随后就对该prototype实例不闻不问了。不管何种作用域,容器都会调用所有对象的初始化生命周期回调方法,而对prototype而言,任何配置好的析构生命周期回调方法都将不会被调用。 清除prototype作用域的对象并释放任何prototype bean所持有的昂贵资源,都是客户端代码的职责。(让Spring容器释放被singleton作用域bean占用资源的一种可行方式是,通过使用 bean的后置处理器,该处理器持有要被清除的bean的引用。)
配置实例:
<bean id="notepad" class="com.myapp.Notepad" scope="prototype"/>
或者
<bean id="notepad" class="com.myapp.Notepad" singleton="false"/>
3.4.1 使用会话和请求作用域
当我们在一个电子商务网站上购物时,可能会有一个bean代表用户的购物车,如果购物车是个单例的话,那么所有用户都向同一个购物车里添加商品;另外,如果购物车是原型作用域的话,那么在应用中某一个地方往购物车中添加商品,在应用的另一个地方就可能不能用了,因为在这里注入的是另外一个原型作用域的购物车。就购物车来说,最合适的是会话作用域,因为它与给定的用户关联性最大。
- session作用域
使用value设置为WebApplicationContext.SCOPE_SESSION,会告诉Spring为Web应用中的每个会话创建一个ShoppingCart。这会创建多个ShoppingCart bean的实例,但是对于给定的会话只会创建一个实例,在当前会话的操作中,这个bean实际上相当于单例。
@Component
@Scope(value=WebApplicationContext.SCOPE_SESSION,
       proxyMode=ScopedProxyMode.INTERFACES)
public ShoppingCart cart(){···}
需要注意的是,@Scope还有一个proxyMode属性,它被设置为ScopedProxyMode.INTERFACES。这个属性解决了将会话或请求作用域的bean注入单例bean时遇到的问题。
我们来看,因为StoreService是一个单例的bean,会在Spring应用上下文加载的时候创建,当它创建的时候,Spring会试图将ShoppingCart bean注入到setShoppingCart()方法中。但是ShoppingCart bean是会话作用域的,此时并不存在。直到某个用户进入系统,创建了会话之后,才会出现ShoppingCart实例。
我们并不想让Spring注入某个固定的ShoppingCart 实例到StoreService中,我们希望的是当StoreService处理购物车功能时,它所使用的ShoppingCart实例恰好是当前会话所对应的那一个。
Spring并不会讲实际的ShoppingCart bean注入到StoreService中,Spring会注入一个到ShoppingCart bean的代理。这个代理会暴露于ShoppingCart相同的方法,所以StoreService会认为它就是一个购物车。但是,当StoreService调用ShoppingCart的方法时,代理会对其进行懒解析并将调用委托给会话作用域内真正的ShoppingCart bean。
属性proxyMode被设置为ScopeProxyMode.INTERFACES,这表明这个代理要实现ShoppingCart接口,并将调用委托给实现bean。
如果ShoppingCart是接口而不是类的话,这是可以的(也是最为理想的代理模式)。但如果ShoppingCart是一个具体的类的话,Spring就没有办法创建基于接口的代理了。此时,它必须使用CGLib来生成基于类的代理。所以,如果bean类型是具体类的话,我们必须要讲proxyMode属性设置为ScopedProxyMode.TARGET_CLASS,以此来表明要以生成目标类扩展的方式创建代理。
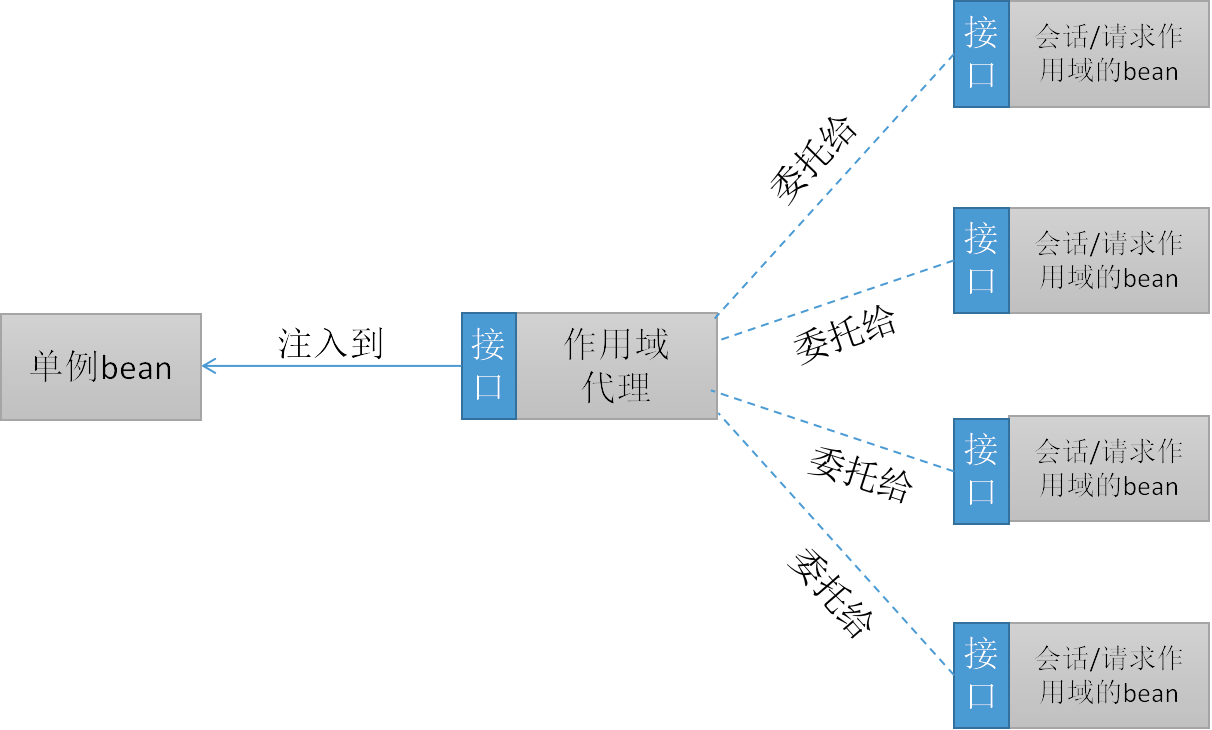
作用域代理能够延迟注入请求和会话作用域的bean
- global session作用域
global session作用域类似于标准的HTTP Session作用域,不过它仅仅在基于portlet的web应用中才有意义。Portlet规范定义了全局Session的概念,它被所有构成某个 portlet web应用的各种不同的portlet所共享。在global session作用域中定义的bean被限定于全局portlet Session的生命周期范围内。如果你在web中使用global session作用域来标识bean,那么web会自动当成session类型来使用。配置实例:和request配置实例的前提一样,配置好web启动文件就可以如下配置:
<bean id="notepad" class="com.myapp.Notepad" scope="global session"/>
- request作用域 请求作用域和会话作用域一样,都是以作用域代理的方式进行注入。
request表示该针对每一次HTTP请求都会产生一个新的bean,同时该bean仅在当前HTTP request内有效,配置实例:request、session、global session使用的时候首先要在初始化web的web.xml中做如下配置:如果你使用的是Servlet 2.4及以上的web容器,那么你仅需要在web应用的XML声明文件web.xml中增加下述ContextListener即可:
 <web-app>
   ...
  <listener>
<listener-class>org.springframework.web.context.request.RequestContextListener</listener-class>
  </listener>
   ...
</web-app>
如果是Servlet2.4以前的web容器,那么你要使用一个javax.servlet.Filter的实现:
<web-app>
 ..
 <filter>
    <filter-name>requestContextFilter</filter-name>
    <filter-class>org.springframework.web.filter.RequestContextFilter</filter-class>
 </filter>
 <filter-mapping>
    <filter-name>requestContextFilter</filter-name>
    <url-pattern>/*</url-pattern>
 </filter-mapping>
   ...
</web-app>
接着既可以配置bean的作用域了:
<bean id="notepad" class="com.myapp.Notepad" scope="request"/>
- 自定义bean装配作用域
在spring2.0中作用域是可以任意扩展的,你可以自定义作用域,甚至你也可以重新定义已有的作用域(但是你不能覆盖singleton和 prototype),spring的作用域由接口org.springframework.beans.factory.config.Scope来定 义,自定义自己的作用域只要实现该接口即可,下面给个实例:我们建立一个线程的scope,该scope在表示一个线程中有效,代码如下:
public class MyScope implements Scope {
      privatefinal ThreadLocal threadScope = new ThreadLocal() {
          protected Object initialValue() {
             returnnew HashMap();
           }
     };
     public Object get(String name, ObjectFactory objectFactory) {
         Map scope = (Map) threadScope.get();
         Object object = scope.get(name);
        if(object==null) {
           object = objectFactory.getObject();
           scope.put(name, object);
         }
        return object;
      }
     public Object remove(String name) {
         Map scope = (Map) threadScope.get();
        return scope.remove(name);
      }
      publicvoid registerDestructionCallback(String name, Runnable callback) {
      }
    public String getConversationId() {
       // TODO Auto-generated method stub
        returnnull;
     }
}
3.4.2 在XML中声明作用域代理
<bean id="cart"
      class="com.myapp.ShoppingCart"
      scope="session">
      <aop:scoped-proxy />
<bean/>
<bean id="cart"
      class="com.myapp.ShoppingCart"
      scope="session">
      <aop:scoped-proxy proxy-target-class="false" />
<bean/>
3.5 运行时值注入
装配bean的另外一个方面指的是将一个值注入到bean的属性或者构造器函数参数中。有时候硬编码是可以的,但有的时候,我们可能会希望避免硬编码值,而是想让这些值在运行时再确定。为了实现这些功能,Spring提供了两种在运行时求值的方式:
- 属性占位符(Property placeholder)
- Spring表达式语言(SpEL)
3.5.1 注入外部的值
在Spring中,处理外部值的最简单方式就是声明属性源并通过Spring的Environment来检索属性。
package com.soundsystem;
import org.springframework.beans.factory.annotation.Autowired;
import org.springframework.context.annotation.Bean;
import org.springframework.context.annotation.Configuration;
import org.springframework.context.annotation.PropertySource;
import org.springframework.core.env.Environment;
@Configuration
@PropertySource("classpath:/com/soundsystem/app.properties")
public class EnvironmentConfig {
  @Autowired
  Environment env;
  @Bean
  public BlankDisc blankDisc() {
    return new BlankDisc(
        env.getProperty("disc.title"),
        env.getProperty("disc.artist"));
  }
}
在本例中,@PropertySource引用了类路径中一个名为app.properties的文件,大致如下:
disc.title=Sgt. Peppers Lonely Hearts Club Band
disc.artist=The Beatles
深入Spring的Environment Environment继承了PropertyResolver接口,PropertyResolver接口的getProperty()方法有四个重载的变种形式:
String getProperty(String key);
String getProperty(String key, String defaultValue);
<T> T getProperty(String key, Class<T> targetType);
<T> T getProperty(String key, Class<T> targetType, T defaultValue);
前两个方法返回String类型,后两个方法方便转换成其他类型(比如Integer类型)。
另外containsProperty()用于判断某个属性是否存在。getPropertyAsClass()可以将参数转化为某个类。
同时,Environment还提供了一些方法来检查哪些profile处于接货状态:
String[] getActiveProfiles();
String[] getDefaultProfiles();
boolean acceptsProfiles(String... profiles);
解析属性占位符
Spring一直支持将属性定义到外部的属性的文件中,并使用占位符值将其插入到Spring bean中。在Spring装配中,占位符的形式为使用"${···}"包装起来的属性名称。
使用XML的方式解析BlankDisc构造器函数:
<bean id="sgtPeppers" class="com.soundsystem.BlankDisc"
    c:_title="${disc.title}"
    c:_artist="${disc.artist}"/>
可以看出,title构造器参数所给定的值是从一个属性中解析得到的,这个属性的名称为disc.title。artist参数装配的名为diskc.artist的属性值。按照这种方式,XML配置没有使用任何硬编码的值,它的值是从配置文件意外的一个源中解析得到的。
如果我们依赖于组件扫描和自动装配来创建和初始化应用组件的话,那么就没有指定占位符的配置文件或类了。在这种情况下,我们可以使用@Value注解,它的使用方式与@Autowired注解非常类似。比如,在BlankDisc类中,构造器可以改成如下所示:
public BlankDisc(@Value("${disc.title}") String title,
                 @Value("${disc.artist}") String artist) {
  this.title = title;
  this.artist = artist;
}
为了使用占位符,我们必须要配置一个PropertyPlaceHolderConfigurer bean或PropertySourcePlaceholderCOnfigurer bean。推荐使用PropertySourcePlaceholderConfigurer,因为它能够基于Spring Environment及其属性源来解析占位符。
如下的@Bean方法在Java中配置了PropertySourcePlaceholderConfigurer:
@Bean
public static PropertySourcePlaceholderConfigurer placeholderConfigurer(){
   return new PropertySourcePlaceholderConfigurer();
}
如果你想使用XML配置的话,Spring context命名空间的<context:propertyplaceholder>元素将会为你生成PropertySourcePlaceholderConfigurer bean:
<?xml version="1.0" encoding="UTF-8"?>
<beans xmlns="http://www.springframework.org/schema/beans"
  xmlns:xsi="http://www.w3.org/2001/XMLSchema-instance"
  xmlns:c="http://www.springframework.org/schema/c"
  xmlns:context="http://www.springframework.org/schema/context"
  xsi:schemaLocation="http://www.springframework.org/schema/beans
                      http://www.springframework.org/schema/beans/spring-beans.xsd
                      http://www.springframework.org/schema/context
                      http://www.springframework.org/schema/context/spring-context-4.0.xsd">

  <context:property-placeholder
    location="com/soundsystem/app.properties" />

  <bean class="com.soundsystem.BlankDisc"
    c:_title = "${disc.title}"
    c:_artist = "${disc.artist}"/>

</beans>
解析外部属性能够将值的处理推迟到运行时,但是它的关注点在于根据名称解析来自于Spring Environment和属性源的属性。而Spring表达式语言提供了一种更通用的方式在运行时计算所要注入值。
3.5.2 使用Spring表达式语言进行装配
Spring3引入了Spring表达式语言(Spring Expression Language, SpEL),它能够以一种强大的简洁的方式将值装配到bean 属性和构造器参数中,在这个过程中所使用的表达式会在运行时计算得到值。使用SpEL,你可以实现超乎想象的装配效果,这是使用其他的装配技术难以做到的(甚至是不可能的)。 SpEL拥有很多特性,包括:
- 使用bean的ID来引用bean;
- 调用方法和访问对象的属性;
- 对值进行算术、关系和逻辑运算;
- 正则表达式匹配;
- 集合操作;
SpEL能够用在依赖注入意外的其他地方。例如,Spring Security支持使用SpEL表达式定义安全限制规则。另外,如果你在Spring MVC应用中使用Thymeleaf模板作为视图的话,那么这些模型可以使用SpEL表达式引用模型数据。
SpEL样例 (略) 表示字面值 (略) 引用bean、属性和方法 (略) 在表达式中使用类型 (略) SpEL运算符 (略) 计算正则表达式 (略) 计算集合 (略) 在表达式中使用类型


 998
998

 被折叠的 条评论
为什么被折叠?
被折叠的 条评论
为什么被折叠?
 到【灌水乐园】发言


