


 本文介绍了一种使用Spring和Zookeeper实现动态配置的方法。通过自定义BeanFactoryPostProcessor,可以在Spring加载配置后,从Zookeeper中读取配置并覆盖Bean定义中的属性值,实现在不重启服务的情况下动态更新配置。

实现思路
利用Spring中BeanFactoryPostProcessor的机制,在Spring加载完配置文件完成Bean 定义之后,通过读取zk中配置内容,覆盖Bean Definiton中的property values
实现过程
配置相关注解定义
@Config 注解用于说明该类为配置类用于存储相关配置信息
@Target({ElementType.TYPE})
@Retention(RetentionPolicy.RUNTIME)
@Documented
public @interface Config {
}
@ConfigField 注解用于标注类的属性字段对应配置中的配置项
@Target({ElementType.FIELD})
@Retention(RetentionPolicy.RUNTIME)
@Documented
public @interface ConfigField {
    String key();
}
自定义BeanFactoryPostProcessor, 此处实现了接口beanDefinitionRegistryPostProcessor
该类主要用于实现方法 postProcessBeanDefinitionRegistry;其核心代码如下
// 获取spring解析后的Bean 定义信息
for (String beanName : beanDefinitionRegistry.getBeanDefinitionNames()) {
  BeanDefinition beanDefinition = beanDefinitionRegistry.getBeanDefinition(beanName);
  String className = beanDefinition.getBeanClassName();
  Class<?> clazz = Class.forName(className);
  // 判断该类是否为配置类
  if (isConfigBean(clazz)) {
        // path 为 zk中应用对应节点 /config/app/env
        String configPath = path + "/" + className;
        Stat stat = curatorFramework.checkExists().forPath(configPath);
        if (stat != null) {
            String value = new String(curatorFramework.getData().forPath(configPath));
            JSONObject jsonObject = JSONObject.parseObject(value);
            // 获取配置类中字段与配置项key的对应
            Map<String, String> configFieldMap = findConfigFieldAnnation(clazz);

            for (String key : jsonObject.keySet()) {
                String propertyValue = jsonObject.getString(key);
                String property = configFieldMap.get(key);
                // 采用zk中的值覆盖到 Bean Definiton propertyValue
                beanDefinition.getPropertyValues().add(property, propertyValue);
            }
            log.info("Hxlzp config register bean : {}, property values : {}", className, value);
        }
    }
}
判断类是否为配置类
private boolean isConfigBean(Class<?> clazz) {
    return clazz.getAnnotation(Config.class) != null;
}
获取配置类的属性与配置项的对应关系
private Map<String, String> findConfigFieldAnnation(Class<?> clazz) {
    Map<String, String> map = new HashMap<String, String>();

    for (Field field : clazz.getDeclaredFields()) {
        ConfigField configField = field.getAnnotation(ConfigField.class);

        if (configField != null) {
            map.put(configField.key(), field.getName());
        }
    }

    return map;
}
zk 节点定义
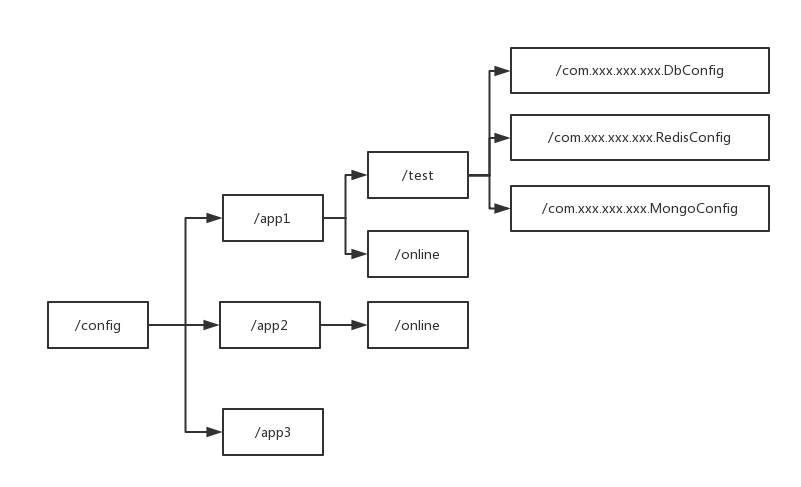
如下图所示:二级为应用节点, 三级为应用的所属环境节点,四级为应用的各个环境下的配置节点,配置节点约束节点名必须与配置类的类名保持一致
zk 配置节点的数据格式
配置节点数据采用json格式;如下
{
  "db.username" : "",
  "db.password" : "",
  "db.url" : ""
}
使用示例
定义DB配置类
定义类 DbConfig, 用于记录Db相关配置
@Data
@Config
@Component("dbConfig")
public class DbConfig {

    @ConfigField(key = "db.url")
    private String url;

    @ConfigField(key = "db.username")
    private String username;

    @ConfigField(key = "db.password")
    private String password;

}
定义DataSource
此处采用 Druid作为数据源
@Slf4j
@Data
public class ExampleDatasource extends DruidDataSource {

    @Resource
    private DbConfig dbConfig;

    /**
     * 重写init;实现db配置后初始化
     */
    public void init () throws SQLException {
        if (!this.dbConfig.getUrl().equals(this.getUrl()) ||
                !this.dbConfig.getUsername().equals(this.getUsername()) || !this.dbConfig.getPassword().equals(this.getPassword())) {
            // 說明首次初始化 或 db配置發生變化 此处也即实现了在无需重启的情况下完成db数据源的动态切换
            this.inited = false;
        }
        if (inited) {
            // 因 getConnection 的時候 再次調用了init 需判斷是否已初始化過
            return;
        }
        if (dbConfig != null) {
            log.info("datasource set db config , {}", dbConfig.getUrl());

            this.setUrl(dbConfig.getUrl());
            this.setUsername(dbConfig.getUsername());
            this.setPassword(dbConfig.getPassword());

            super.init();
        }
    }
}
Spring 配置
配置文件中需定义 上文中 BeanDefinitionRegistryPostProcessor; 示例如下
<!-- 扫描目录 -->
<context:component-scan base-package="com.xxxx.xxx.xxx" />
<!-- hxlzpConfig 即为自定义的 BeanDefinitionRegistryPostProcessor 实现类-->
<bean id="hxlzpConfig" class="com.xxx.xxx.xxx.hxlzpConfig" destroy-method="destroy" />
<!-- 数据源 -->
<bean id="newDataSource" class="com.bj58.hxlzp.config.example.ExampleDatasource" scope="singleton"
      init-method="init" destroy-method="close">
    <!-- 配置初始化大小、最小、最大 -->
    <property name="initialSize" value="1" />
    <property name="minIdle" value="1" />
    <property name="maxActive" value="200" />
    <property name="...." value="...."/>
</bean>
<!-- mapper文件扫描包 -->
<bean id="newSqlSessionFactory" class="org.mybatis.spring.SqlSessionFactoryBean"></bean>
<!-- mapper接口扫描包 -->
<bean class="org.mybatis.spring.mapper.MapperScannerConfigurer"></bean>
测试
可以通过从ApplicationContext 中获取dao执行简单的操作验证; 也可以修改zk中节点配置数据 验证数据源的动态切换
ClassPathXmlApplicationContext classPathXmlApplicationContext = new ClassPathXmlApplicationContext("applicationContext.xml");
        classPathXmlApplicationContext.start();

classPathXmlApplicationContext.getBean(UserDao.class).getById(1);


 7804
7804

 被折叠的 条评论
为什么被折叠?
被折叠的 条评论
为什么被折叠?
 到【灌水乐园】发言


