


 本文介绍如何创建自定义的SpringBoot Starter,以短信服务为例,详细讲解从项目搭建、配置类编写到自动配置和服务核心类的实现过程,帮助开发者实现可复用的模块。
一.说明
我们在使用SpringBoot的时候常常要引入一些Starter,例如spring-boot-starter-web,官方为我们提供了几乎所有的默认配置,很好的降低了使用框架时的复杂度,所以在用xxx-starter的时候,可以不用费心去写一些繁琐的配置文件,即使必要的配置在application.properties或application.yml中配置就可以了,当你实现了一个Starter,可以在不同的项目中复用,非常方便,今天我们来编写自己的Starter以之前的短信业务为例。
spring-boot-starter-xxx是官方提供Starter的命名规则,非官方Starter的命名规则官方建议为 xxx-spring-boot-starter
二.搭建项目
建立SpringBoot项目,清除resources下的文件和文件夹

Maven依赖如下:
org.springframework.boot
spring-boot-starter
2.1.3.RELEASE
org.springframework.boot
spring-boot-autoconfigure
2.1.3.RELEASE
org.springframework.boot
spring-boot-configuration-processor
2.1.3.RELEASE
org.projectlombok
lombok
1.18.6
true
org.springframework.boot
spring-boot-starter-web
2.1.3.RELEASE
com.alibaba
fastjson
1.2.45
二.编写项目基础类
创建SendSMSDTO传输类,用于参数传递
/**
* SMSDTO参数类
* @Author Sans
* @CreateTime 2019/4/20
* @attention
*/
@Data
public class SendSMSDTO {
/**
* 模板ID
*/
private String templateid;
/**
* 参数
*/
private String param;
/**
* 手机号
*/
private String mobile;
/**
* 用户穿透ID,可以为空
*/
private String uid;
}
创建RestTemplateConfig配置类,用于调用短信接口
/**
* RestTemplateConfig配置
* @Author Sans
* @CreateTime 2019/4/20
* @attention
*/
@Configuration
public class RestTemplateConfig {
@Bean
public RestTemplate restTemplate( ) {
return new RestTemplate();
}
}
创建短信接口枚举类,用于存放短信接口API地址
/**
* 短信请求API枚举
* @Author Sans
* @CreateTime 2019/4/20
* @attention
*/
@Getter
public enum ENUM_SMSAPI_URL {
SENDSMS("https://open.ucpaas.com/ol/sms/sendsms"),
SENDBATCHSMS("https://open.ucpaas.com/ol/sms/sendsms_batch");
private String url;
ENUM_SMSAPI_URL(String url) {
this.url = url;
}
}
三.编写Starter自动配置类
创建SmsProperties配置属性类,该类主要用于读取yml/properties信息
/**
* SMS配置属性类
* @Author Sans
* @CreateTime 2019/4/20
* @attention 使用ConfigurationProperties注解可将配置文件(yml/properties)中指定前缀的配置转为bean
*/
@Data
@ConfigurationProperties(prefix = "sms-config")
public class SmsProperties {
private String appid;
private String accountSid;
private String authToken;
}
创建短信核心服务类
/**
* 短信核心服务类
* @Author Sans
* @CreateTime 2019/4/20
* @attention
*/
public class SmsService {
@Autowired
private RestTemplate restTemplate;
private String appid;
private String accountSid;
private String authToken;
/**
* 初始化
*/
public SmsService(SmsProperties smsProperties) {
this.appid = smsProperties.getAppid();
this.accountSid = smsProperties.getAccountSid();
this.authToken = smsProperties.getAuthToken();
}
/**
* 单独发送
*/
public String sendSMS(SendSMSDTO sendSMSDTO){
JSONObject jsonObject = new JSONObject();
jsonObject.put("sid", accountSid);
jsonObject.put("token", authToken);
jsonObject.put("appid", appid);
jsonObject.put("templateid", sendSMSDTO.getTemplateid());
jsonObject.put("param", sendSMSDTO.getParam());
jsonObject.put("mobile", sendSMSDTO.getMobile());
if (sendSMSDTO.getUid()!=null){
jsonObject.put("uid",sendSMSDTO.getUid());
}else {
jsonObject.put("uid","");
}
String json = JSONObject.toJSONString(jsonObject);
//使用restTemplate进行访问远程Http服务
HttpHeaders headers = new HttpHeaders();
headers.setContentType(MediaType.APPLICATION_JSON_UTF8);
HttpEntity httpEntity = new HttpEntity(json, headers);
String result = restTemplate.postForObject(ENUM_SMSAPI_URL.SENDSMS.getUrl(), httpEntity, String.class);
return result;
}
/**
* 群体发送
*/
public String sendBatchSMS(SendSMSDTO sendSMSDTO){
JSONObject jsonObject = new JSONObject();
jsonObject.put("sid", accountSid);
jsonObject.put("token", authToken);
jsonObject.put("appid", appid);
jsonObject.put("templateid", sendSMSDTO.getTemplateid());
jsonObject.put("param", sendSMSDTO.getParam());
jsonObject.put("mobile", sendSMSDTO.getMobile());
if (sendSMSDTO.getUid()!=null){
jsonObject.put("uid",sendSMSDTO.getUid());
}else {
jsonObject.put("uid","");
}
String json = JSONObject.toJSONString(jsonObject);
//使用restTemplate进行访问远程Http服务
HttpHeaders headers = new HttpHeaders();
headers.setContentType(MediaType.APPLICATION_JSON_UTF8);
HttpEntity httpEntity = new HttpEntity(json, headers);
String result = restTemplate.postForObject(ENUM_SMSAPI_URL.SENDBATCHSMS.getUrl(), httpEntity, String.class);
return result;
}
}
创建SmsAutoConfiguration自动配置类,该类主要用于创建核心业务类实例
/**
* 短信自动配置类
* @Author Sans
* @CreateTime 2019/4/20
* @attention
*/
@Configuration
@EnableConfigurationProperties(SmsProperties.class)//使@ConfigurationProperties注解生效
public class SmsAutoConfiguration {
@Bean
public SmsService getBean(SmsProperties smsProperties){
SmsService smsService = new SmsService(smsProperties);
return smsService;
}
}
四.创建spring.factories文件
spring.factories该文件用来定义需要自动配置的类,SpringBoot启动时会进行对象的实例化,会通过加载类SpringFactoriesLoader加载该配置文件,将文件中的配置类加载到spring容器
在src/main/resources新建META-INF文件夹,在META-INF文件夹下新建spring.factories文件.配置内容如下:
org.springframework.boot.autoconfigure.EnableAutoConfiguration=com.sms.starter.config.SmsAutoConfiguration
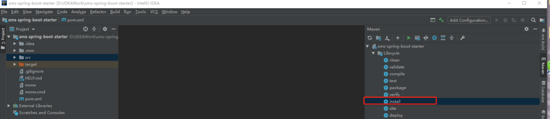
五.打包和测试
使用Maven插件,将项目打包安装到本地仓库
新建测试项目,引入我们自己的Starter,Maven依赖如下:
org.springframework.boot
spring-boot-starter-web
com.sms.starter
sms-spring-boot-starter
0.0.1-SNAPSHOT
配置测试项目的application.yml
sms-config:
account-sid: //这里填写平台获取的ID和KEY
auth-token: //这里填写平台获取的ID和KEY
appid: //这里填写平台获取的ID和KEY
参数填写自己的手机号和申请的模板以及对应的参数
/**
* 测试短信DEMO
* @Author Sans
* @CreateTime 2019/4/20
* @attention
*/
@RestController
@RequestMapping("/sms")
public class TestController {
@Autowired
private SmsService smsService;
/**
* 短信测试
* @Attention
* @Author: Sans
* @CreateTime: 2019/4/20
*/
@RequestMapping(value = "/sendsmsTest",method = RequestMethod.GET)
public String sendsmsTest(){
//创建传输类设置参数
SendSMSDTO sendSMSDTO = new SendSMSDTO();
sendSMSDTO.setMobile(""); //手机号
sendSMSDTO.setTemplateid(""); //模板
sendSMSDTO.setParam(""); //参数
return smsService.sendSMS(sendSMSDTO);
}
}
以上就是本文的全部内容,希望对大家的学习有所帮助,也希望大家多多支持脚本之家。


 2251
2251

 被折叠的 条评论
为什么被折叠?
被折叠的 条评论
为什么被折叠?
 到【灌水乐园】发言


