


 本文介绍使用Appium进行移动应用自动化测试的经验分享,包括测试用例设计、代码框架搭建及具体实现案例。

在APP发展广泛的社会上,我们测试人员的测试技能也要跟着进步,对面APP的测试,每次都要快速上线新版本的迭代测试中,测试人员每次都要做很多次的回归测试,让人觉得好疲累。对面这种情况,现在使用Appium来做自动化测试,可以帮助测试人员能够准确快速地做很多次回归测试啦!
Appium的环境搭建和配置,在本文我就不多说了,具体请详见我的博文“Appium的环境搭建和配置” 。
今天整理下,以前用开源中国APP当练手项目的实践经验,在环境搭建好的前提下,大概包括以下几方面:
一、测试用例的设计
写测试用例前,先要了解APP的所有功能模块,明确测试范围,确定测试用例的颗粒度。
假如测试项目的测试时间比较紧迫,一般都是建议重点先测试用户使用频率比较高的基本功能点。
假如测试项目的测试时间比较充裕,那测试用例的颗粒度可以做到最小,把覆盖面扩大到所有功能点上。
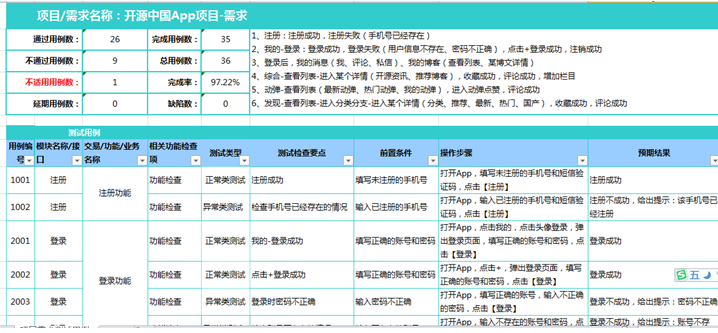
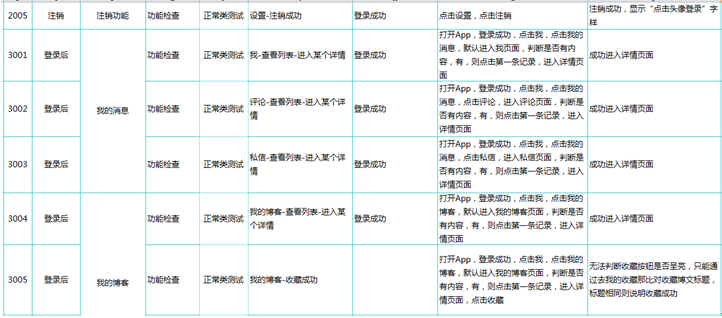
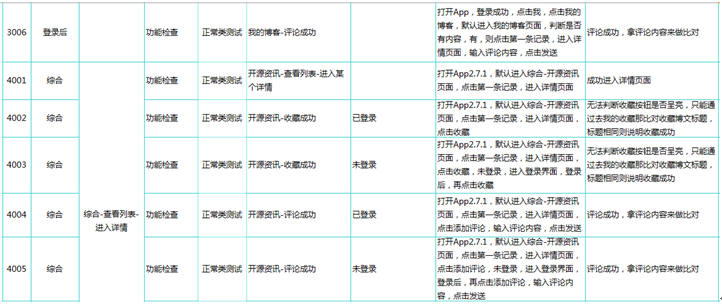
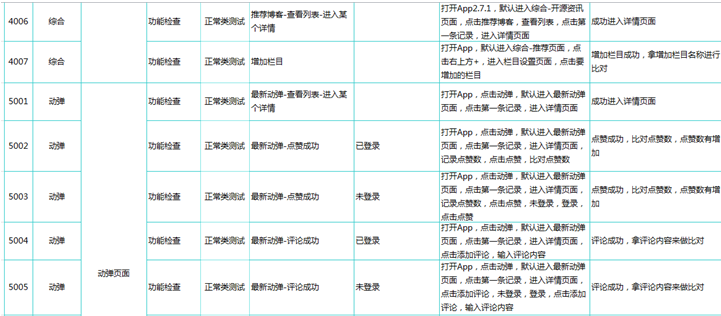
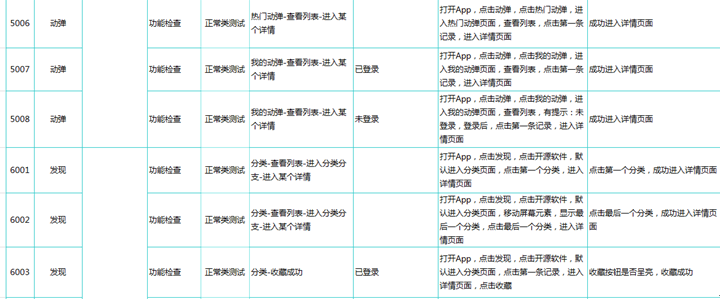
根据我对开源中国APP的功能了解,大概设计了部分测试用例,可见下图或码云上的测试用例文件。
二、代码测试框架的设计
我的设计是这样的
1、 每个测试用例,写一个测试TestCase文件。
2、 所有TestCase文件都会使用到的方法,写在一个BaseTest类里,由TestCase文件来继承使用。比如:启动Appium、截图。
3、 部分TestCase文件会使用到的方法,可以按功能点来建一个类,再调用。比如:登录功能、注销功能、收藏结果比对。
4、 每个TestCase文件都可以单独执行。
5、 也可以把所有TestCase文件放到XML文件里,运行TestNG Suite,批量执行测试用例。
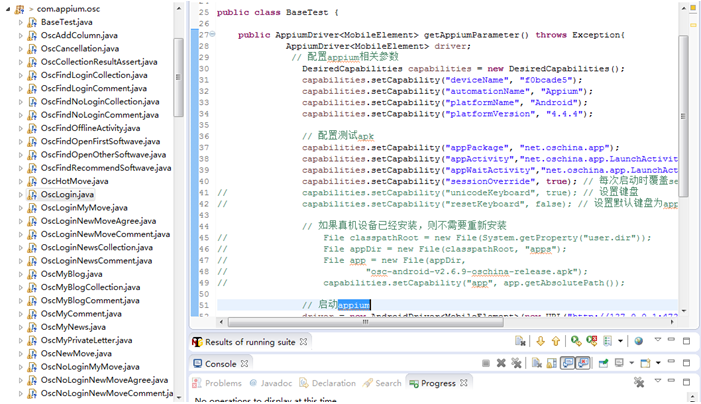
三、源代码
源代码,只涉及到安卓机的,可见下图,也可以详见源代码(已上传码云)。
以下是“综合-开源资讯-收藏”测试用例,OscLoginNewsCollection类,源代码如下:
package com.appium.osc;

import java.io.File;
import java.net.URL;
import java.util.HashMap;
import java.util.List;
import java.util.concurrent.TimeUnit;

import org.apache.commons.io.FileUtils;
import org.openqa.selenium.By;
import org.openqa.selenium.JavascriptExecutor;
import org.openqa.selenium.OutputType;
import org.openqa.selenium.TakesScreenshot;
import org.openqa.selenium.WebDriver;
import org.openqa.selenium.WebElement;
import org.openqa.selenium.remote.DesiredCapabilities;
import org.openqa.selenium.support.ui.ExpectedCondition;
import org.openqa.selenium.support.ui.WebDriverWait;
import org.testng.Assert;
import org.testng.Reporter;
import org.testng.annotations.AfterClass;
import org.testng.annotations.BeforeClass;
import org.testng.annotations.Test;

import io.appium.java_client.AppiumDriver;
import io.appium.java_client.MobileElement;
import io.appium.java_client.android.AndroidDriver;

public class OscLoginNewsCollection extends BaseTest {

	private AppiumDriver<MobileElement> driver;

	@BeforeClass
	public void setUp() throws Exception {

		driver = this.getAppiumParameter();

	}

	@Test(description = "综合-开源资讯-收藏成功")
	public void LoginNewsCollection() throws InterruptedException {
		this.screenshot("LoginNewsCollection1.jpg", driver);
		// 登录
		OscLogin Login = new OscLogin();
		Login.login(driver);
		this.screenshot("LoginNewsCollection2.jpg", driver);
		// 点击【综合】
		WebElement itemMe = driver.findElement(By
				.id("net.oschina.app:id/nav_item_news"));
		itemMe.click();

		// 点击【开源资讯】
		WebElement layoutView = driver.findElement(By
				.id("net.oschina.app:id/layout_tab"));
		WebElement linearLayout = layoutView.findElement(By
				.className("android.widget.LinearLayout"));
		List<WebElement> support = linearLayout.findElements(By
				.className("android.support.v7.a.a$f"));
		WebElement supportText = support.get(0);
		supportText.click();

		// 等待30秒内寻找这个元素
		   (new WebDriverWait(driver,20)).until(
			new ExpectedCondition<MobileElement>(){
				@Override
				public MobileElement apply(WebDriver d) {
					MobileElement recyclerView = driver.findElement(By
							.id("net.oschina.app:id/recyclerView"));
					List<MobileElement> titleView = recyclerView.findElements(By
							.id("net.oschina.app:id/ll_title"));
					   if(titleView.size()>0){
					   MobileElement textView=titleView.get(0);
					   return textView;
					   }
					   return null;
				 }
			});
		 //进入开源资讯列表界面后截图
		   this.screenshot("LoginNewsCollection3.jpg", driver);
		// 点击资讯标题
		   MobileElement recyclerView = driver.findElement(By
					.id("net.oschina.app:id/recyclerView"));
			List<MobileElement> titleView = recyclerView.findElements(By
					.id("net.oschina.app:id/ll_title"));
//			String titleText = "";
			for(int i=0;i<titleView.size();i++){
				MobileElement textView=titleView.get(i);
				MobileElement lay_info = textView.findElement(By.id("net.oschina.app:id/lay_info"));
				if(lay_info != null){
				MobileElement subTextView = textView.findElement(By
						   .id("net.oschina.app:id/tv_title"));
				   String titleText = subTextView.getText().substring(7);
				   System.out.println("=====列表标题:" + titleText );
				   subTextView.click();
				   break;
				}
			}


		 //进入详情页面
		   MobileElement actionBar = driver.findElement(By.id("net.oschina.app:id/action_bar"));
		   MobileElement actionBarTexts = actionBar.findElement(By.className("android.widget.TextView"));
		   String actionBarText = actionBarTexts.getText();
		   System.out.println("=====进入" + actionBarText);

			// 等待30秒内寻找这个元素
		   (new WebDriverWait(driver,30)).until(
			new ExpectedCondition<MobileElement>(){
				@Override
				public MobileElement apply(WebDriver d) {
					MobileElement lay_container = driver.findElement(By
							.id("net.oschina.app:id/lay_container"));
				      return lay_container;
				 }
			});

		   //打印详情页面的标题
		   String inforDetailsTitle = "";
		   if(actionBarText.equals("软件详情") == true){
			   MobileElement tv_software_name = driver.findElement(By
					   .id("net.oschina.app:id/tv_software_name"));
			   inforDetailsTitle = tv_software_name.getText().substring(13);
			   System.out.println("=====详情标题:" + inforDetailsTitle);
		   }else if(actionBarText.equals("问答详情") == true){
			   MobileElement tv_ques_detail_title = driver.findElement(By
					   .id("net.oschina.app:id/tv_ques_detail_title"));
			   inforDetailsTitle = tv_ques_detail_title.getText();
			   System.out.println("=====详情标题:" + inforDetailsTitle);
		   }else{
			   MobileElement tv_title = driver.findElement(By
					   .id("net.oschina.app:id/tv_title"));
			   inforDetailsTitle = tv_title.getText();
			   System.out.println("=====详情标题:" + inforDetailsTitle);
		   }
		// 进入开源资讯详情界面后截图
		   this.screenshot("LoginNewsCollection4.jpg", driver);

		// 收藏成功
		WebElement collectionLinear = driver.findElement(By
				.className("android.widget.LinearLayout"));
		WebElement clickCollection = collectionLinear.findElement(By
				.id("net.oschina.app:id/ib_fav"));
		clickCollection.click();

		//刷新页面等待3秒
	    try{
	    	Thread.sleep(3000);
	    }
	    catch(Exception e){
	    	e.printStackTrace();
	    }
		// 收藏成功截图
	    this.screenshot("LoginNewsCollection5.jpg", driver);

		// 从博客详情返回综合列表
		WebElement returnButton = driver.findElement(By
				.id("net.oschina.app:id/action_bar"));
		WebElement clickButton = returnButton.findElement(By
				.className("android.widget.ImageButton"));
		clickButton.click();
		this.screenshot("LoginNewsCollection6.jpg", driver);
		// 检测收藏标题是否存在于我的收藏列表中
		OscCollectionResultAssert ResultAssert = new OscCollectionResultAssert();
		ResultAssert.CollectionResultAssert(driver, inforDetailsTitle);
		// 进入我的收藏列表后截图
		this.screenshot("LoginNewsCollection7.jpg", driver);
		Reporter.log("综合-开源资讯-登录-收藏");

		// 从我的收藏列表返回到个人信息页面
		MobileElement returnButton2 = driver.findElement(By
				.id("net.oschina.app:id/action_bar"));
		MobileElement clickButton2 = returnButton2.findElement(By
				.className("android.widget.ImageButton"));
		clickButton2.click();
		this.screenshot("LoginNewsCollection8.jpg", driver);
		// 注销
		OscCancellation Cancellation = new OscCancellation();
		Cancellation.Cancellation(driver);
		this.screenshot("LoginNewsCollection9.jpg", driver);

	}

	@AfterClass
	public void tearDown() throws Exception {
		driver.quit();
	}

}
四、测试报告
把所有TestCase文件放到XML文件里,运行TestNG Suite,批量执行测试用例。
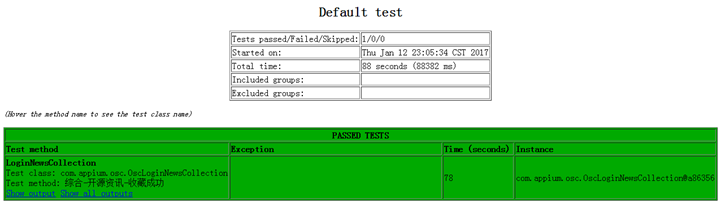
以下是“综合-开源资讯-收藏”单个执行测试报告:
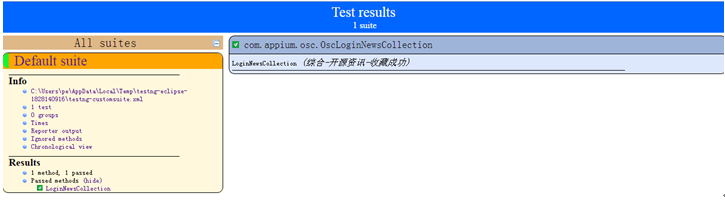
以下是“综合-开源资讯-收藏”单个执行的总测试报告如下图所示:
五、 测试过程中屏幕截图
在测试过程中屏幕截图也是很重要,它可以协助你排查问题。
以下是测试OscLoginNewsCollection类的屏幕截图gif文件:

六、 实践中遇到的问题
1、 无法判断“收藏成功的按钮是否呈亮”。大家要是知道判断方法的话,请私信告诉我,谢谢!
2、 若大家觉得我写的代码存在问题,那也可以私信告诉我,我会很乐意地接受你的建议的。谢谢!


 1284
1284

 被折叠的 条评论
为什么被折叠?
被折叠的 条评论
为什么被折叠?
 到【灌水乐园】发言


