


最近想在之前的系统里加入oauth2.0服务,于是找到spring security oauth项目主页,发现只有例子和开发人员指南可以参考,例子用的是java config的方式,与现在的系统用xml的方式有点不一致。便自己研究了下,系统里已经集成了spring security,并且用户的认证授权是由CAS提供的。
1、理解 OAuth2.0
1.1 相关引用
理解OAuth2.0 http://www.ruanyifeng.com/blog/2014/05/oauth_2_0.html
开发人员指南 https://www.oschina.net/translate/oauth-2-developers-guide
1.2 理解 Spring Security 的几个概念:
- 认证与授权 认证是对访问主体进行合法化认证,不管用的是CAS用户还是JDBC查询出来的用户还是接下来要说的client,我们都需要进行认证,只是CAS这种方式,用户的认证由CAS确定,授权同样也是可以由CAS确定的。授权是对已经认证的主体赋予相应的权限,使之可以访问对于的资源。
- 权限校验 主体请求访问被保护资源时,将被保护资源所需的权限和主体所拥护的权限二者进行比对,如果校验通过则用户可以访问被保护资源,否则拒绝访问。
1.3 for example
用户 admin 需要访问 /admin/user ,这个资源我们需要用户具备 ROLE_ADMIN 这样的角色才能访问,那么 admin 就要具备这样的角色,如果用户 admin 只是具有 ROLE_USER 角色,他密码用户名正确,我们称他是合法用户,也就是 检查 他的票据(用户名密码或者是CAS的票据)是可以认同的,但你不具备访问/admin/user的权限。这个时候返回的应该是403,而不是401。
2、准备工作
2.1 添加依赖
这里加入的是2.0.12.RELEASE,因为parent里有platform-bom的Athens-SR1版本。
<dependency>
	<groupId>org.springframework.security.oauth</groupId>
	<artifactId>spring-security-oauth2</artifactId>
</dependency>
2.2 引入命名空间
<beans:beans xmlns="http://www.springframework.org/schema/security"
	xmlns:beans="http://www.springframework.org/schema/beans" xmlns:util="http://www.springframework.org/schema/util"
	xmlns:oauth2="http://www.springframework.org/schema/security/oauth2"
	xmlns:xsi="http://www.w3.org/2001/XMLSchema-instance"
	xsi:schemaLocation="http://www.springframework.org/schema/beans
		http://www.springframework.org/schema/beans/spring-beans.xsd
		http://www.springframework.org/schema/util
		http://www.springframework.org/schema/util/spring-util.xsd
		http://www.springframework.org/schema/security
		http://www.springframework.org/schema/security/spring-security.xsd
		http://www.springframework.org/schema/security/oauth2
		http://www.springframework.org/schema/security/spring-security-oauth2.xsd">
3、开始配置
3.1 配置client的认证服务器
这里由于之前集成了CAS,增加 provider 即可。
<authentication-manager alias="authenticationManager">
	<authentication-provider ref="casAuthenticationProvider" />
	<authentication-provider user-service-ref="clientDetailsUserDetailsService" />
</authentication-manager>
这样的方式会生成一个ProviderManager 的 authenticationManager ,ProviderManager 会得到所有的 provider 进行遍历,直到最后没有异常。这里增加的 provider 会对 client 的 id 和 scret进行校验,之前的 provider 处理CAS返回来的信息,一个是对普通用户的认证,一个是对客户端的认证,这两种对于 spring security 来说 都是需要认证的用户。
3.2 client 信息
当然需要知道有什么 有 client 吧。所以 下一步 配置 ClientDetailsUserDetailsService,这里把client当作系统的用户来处理。
<beans:bean id="clientDetailsUserDetailsService"
	class="org.springframework.security.oauth2.provider.client.ClientDetailsUserDetailsService">
	<beans:constructor-arg ref="clientDetailsService" />
</beans:bean>

<oauth2:client-details-service id="clientDetailsService">
	<oauth2:client client-id="123" secret="456" scope="read,write,trust"
		redirect-uri="https://www.baidu.com" authorities="ROLE_CLIENT"
		authorized-grant-types="authorization_code,refresh_token,implicit,client_credentials" />
</oauth2:client-details-service>
这里使用的内存的配置,后期可以修改成 JDBC。建表文件在 github 上 oauth 项目里有。
3.3 配置 TokenServices
既然是rest ,那么就应该是一个无状态的连接。如何确定访问的权限呢,这就通过 token 来识别。配置 TokenServices 、token 的 保存、过期、删除 就由这管理。
<beans:bean id="defaultTokenServices"
	class="org.springframework.security.oauth2.provider.token.DefaultTokenServices">
	<beans:property name="tokenStore" ref="tokenStore" />
	<beans:property name="supportRefreshToken" value="true" />
</beans:bean>

<beans:bean id="tokenStore"
	class="org.springframework.security.oauth2.provider.token.store.InMemoryTokenStore" />
这里使用的也是内存保存,后期同样需要 修改成 jdbc 的方式。不然重启之后client 又需要用户授权了。
3.4 配置一些默认的处理
<beans:bean id="defaultUserApprovalHandler"
	class="org.springframework.security.oauth2.provider.approval.DefaultUserApprovalHandler" />

<beans:bean id="oAuth2AuthenticationEntryPoint"
	class="org.springframework.security.oauth2.provider.error.OAuth2AuthenticationEntryPoint" />

<beans:bean id="oAuth2AccessDeniedHandler"
	class="org.springframework.security.oauth2.provider.error.OAuth2AccessDeniedHandler" />
3.5 配置 client 的授权服务器
<oauth2:authorization-server
	token-services-ref="defaultTokenServices" client-details-service-ref="clientDetailsService"
	user-approval-handler-ref="defaultUserApprovalHandler">
	<oauth2:authorization-code />
	<oauth2:implicit />
	<oauth2:refresh-token />
	<oauth2:client-credentials />
	<oauth2:password disabled="true" />
</oauth2:authorization-server>
这里禁用了 password 的方式,因为 用户信息是从CAS那里获取的,使用这种方式这样的没有办法认证的,如果一定需要,还要开发一个与CAS服务交互,或者远程调用,或者直接连接数据库,我的另一篇博客里有替代的方式 https://my.oschina.net/taoyuanping/blog/809157
3.6 配置 资源服务器
<oauth2:resource-server id="apiResourceServer"
	resource-id="api-Resource" token-services-ref="defaultTokenServices" />
3.7 配置 http 标签
<http pattern="/oauth/token" create-session="stateless"
	entry-point-ref="oAuth2AuthenticationEntryPoint">
	<csrf disabled="true" />
	<anonymous enabled="false" />
	<intercept-url pattern="/oauth/token" access="hasRole('CLIENT')" />
	<custom-filter ref="clientCredentialsTokenEndpointFilter"
		before="BASIC_AUTH_FILTER" />
	<access-denied-handler ref="oAuth2AccessDeniedHandler" />
</http>
开启client 授权服务器后,框架会自动配置 几个 url ,包括 授权、获取令牌。这里需要对 获取令牌的 请求做认证
加入过滤器 clientCredentialsTokenEndpointFilter
<beans:bean id="clientCredentialsTokenEndpointFilter"
	class="org.springframework.security.oauth2.provider.client.ClientCredentialsTokenEndpointFilter">
	<beans:property name="authenticationManager" ref="authenticationManager" />
</beans:bean>
这个过滤器可以对client 进行合法认证,总不能随随便便发个client_id我就发个令牌给你吧。需要关闭 csrf ,用不着的。只有具备 ROLE_CLIENT 的角色才能使用。
3.8 配置资源访问权限
client 的认证服务 授权服务 资源服务 都有了,还需要什么 ,还需要一个 可以对访问资源服务器的入口,或者说对 token 的校验。
<http pattern="/api/**" create-session="stateless"
	entry-point-ref="oAuth2AuthenticationEntryPoint">
	<csrf disabled="true" />
	<anonymous enabled="false" />
	<intercept-url pattern="/api/**" access="hasRole('USER')" />
	<custom-filter ref="apiResourceServer" before="PRE_AUTH_FILTER" />
	<access-denied-handler ref="oAuth2AccessDeniedHandler" />
</http>
- 这里的 hasRole('USER') 其实角色 资源的所有着具备的角色,资源的所有者授权给client,client 是不是就具备了这样的角色。还有一种oauth的scope的认证。需要 配置 expression-handler。
- <custom-filter ref="apiResourceServer" before="PRE_AUTH_FILTER" /> 会生成一个 OAuth2AuthenticationProcessingFilter 的过滤器,这个过滤器负责认证accass_token的有效性。
4、配置MVC
@Controller
@RequestMapping("/api")
public class UserApi {

	@Autowired
	private UserService userService;

	@ResponseBody
	@RequestMapping(value = "/user", method = RequestMethod.POST)
	public User getUser(Principal principal) {
		User user = userService.findByUsername(principal.getName());
		return user;
	}

}
5、 测试
5.1 获取 code
http://www.yakee.net:8080/framework/oauth/authorize?client_id=123&response_type=code
没有登陆,需要用户登陆

登陆用户 admin /123456 cas 返回信息 用户具备 user 角色。
<cas:serviceResponse xmlns:cas='http://www.yale.edu/tp/cas'>
    <cas:authenticationSuccess>
        <cas:user>admin</cas:user>
        <cas:attributes>
            <cas:isFromNewLogin>true</cas:isFromNewLogin>
            <cas:authenticationDate>2016-12-15T19:10:18.258+08:00</cas:authenticationDate>
            <cas:longTermAuthenticationRequestTokenUsed>false</cas:longTermAuthenticationRequestTokenUsed>
            <cas:authorities>ROLE_REST_SERVICE</cas:authorities>
            <cas:authorities>ROLE_ADMIN</cas:authorities>
            <cas:authorities>ROLE_USER</cas:authorities>
        </cas:attributes>
    </cas:authenticationSuccess>
</cas:serviceResponse>
5.2 admin 用户授权客户端 123
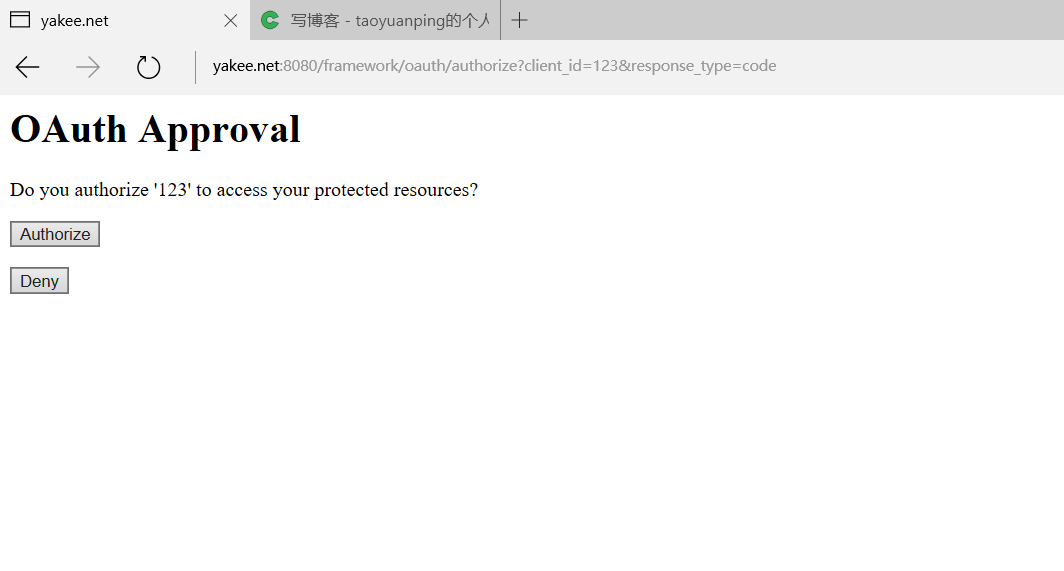
页面难看是难看了,但是功能一个不落。
5.3 返回 授权码 code
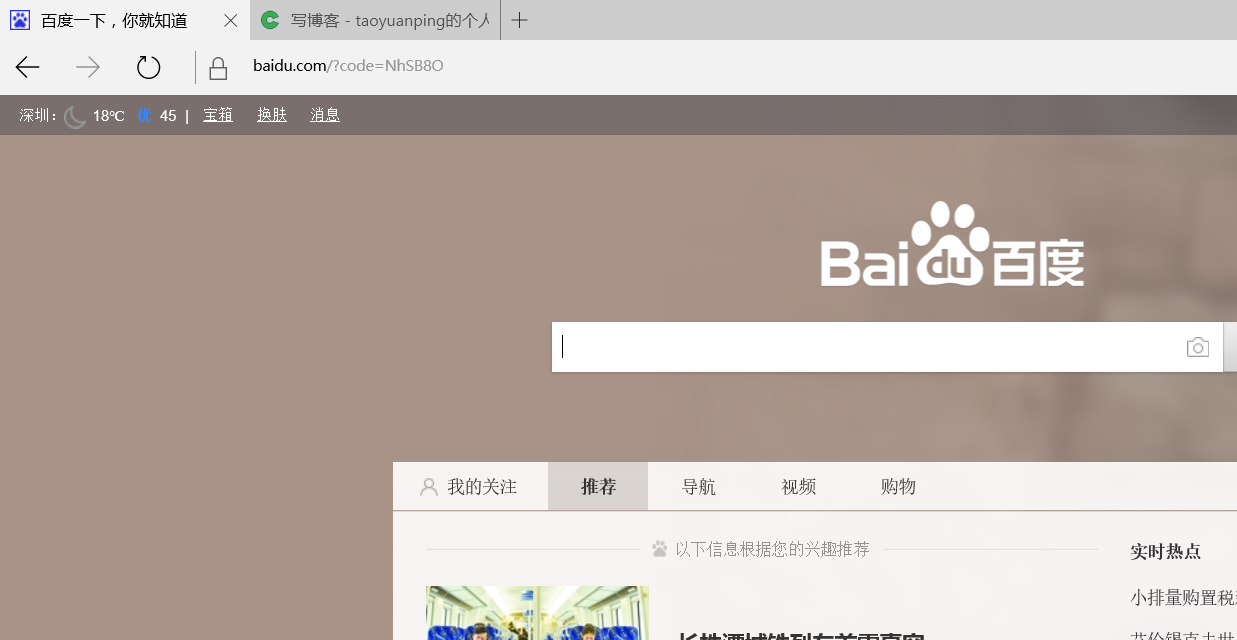
返回code 参数 NhSB8O
5.4 使用授权码 获取 token
@Test
public void getToken() {
	Map<String, String> params = new HashMap<String, String>();
	params.put("redirect_uri", "https://www.baidu.com");
	params.put("grant_type", "authorization_code");
	params.put("client_secret", "456");
	params.put("client_id", "123");
	params.put("code", "NhSB8O");

	String rsp = null;

	try {
		rsp = WebUtils.doPost("http://www.yakee.net:8080/framework/oauth/token", params, 3000, 15000);

		System.out.println(rsp);

	} catch (Exception e) {
		e.printStackTrace();
	}

}
返回
{
    "additionalInformation":{},
    "expiration":"2016-12-16 07:17:39",
    "expired":false,
    "expiresIn":43199,
    "refreshToken":{
        "expiration":"2017-01-14 19:17:39",
        "value":"58c44eee-67bb-46b0-b98f-5226d2c81214"
    },
    "scope":["read","write","trust"],
    "tokenType":"bearer",
    "value":"eb7cb64d-02b8-4208-9d01-6ec77265f8a2"
}
过期时间真短。
5.5 使用 access_token 获取用户
@Test
public void getUser() {
	Map<String, String> params = new HashMap<String, String>();
	params.put("access_token", "eb7cb64d-02b8-4208-9d01-6ec77265f8a2");

	String rsp = null;

	try {
		rsp = WebUtils.doPost("http://www.yakee.net:8080/framework/api/user", params, 3000, 15000);

		System.out.println(rsp);

	} catch (Exception e) {
		e.printStackTrace();
	}

}
发起请求后 过滤链情况
Request received for POST '/api/user':

org.apache.catalina.connector.RequestFacade@1a793b92

servletPath:/api/user
pathInfo:null
headers:
accept: text/xml,text/javascript,text/html
user-agent: aop-sdk-java
content-type: application/x-www-form-urlencoded;charset=UTF-8
host: www.yakee.net:8080
connection: keep-alive
content-length: 49


Security filter chain: [
  SecurityContextPersistenceFilter
  WebAsyncManagerIntegrationFilter
  HeaderWriterFilter
  OAuth2AuthenticationProcessingFilter
  SecurityContextHolderAwareRequestFilter
  ExceptionTranslationFilter
  FilterSecurityInterceptor
]


************************************************************
返回
{
    "createDate":"2016-12-12 01:42:38",
    "department":"软件研发部",
    "email":"taoyuanping@yakee.net",
    "enabled":true,
    "id":2,
    "modifyDate":"2016-12-12 01:42:38",
    "name":"陶远平",
    "password":"$2a$10$lH8n4sStC44KjG7GPsrgneBcZp.trl9U8WCH06BERpN6DAx4U30HK",
    "phone":"15220176365",
    "username":"admin"
}
6、后续配置
开发 client 的管理,将信息保存到数据库。将token保存到数据库并且增加过期时间,优化用户授权页面,错误信息等,配置expression-handler,支持oauth的scope权限认证。最后配置https,使用OpenSSL生成自签证书即可,使用http调用rest服务可不是明智之举。


 440
440

 被折叠的 条评论
为什么被折叠?
被折叠的 条评论
为什么被折叠?
 到【灌水乐园】发言


