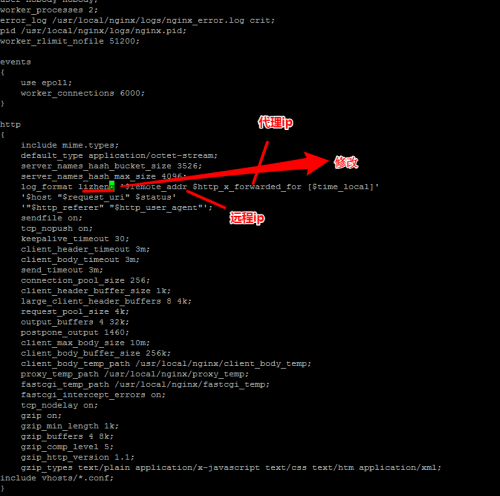
1.打开主配置文件
进入hosts目录下
cd /usr/local/nginx/conf/vhosts
进入主配置文件
vim ../nginx.conf
log_format 后面的字符串可以改成lizheng
3.lizheng的日志如何使用
打开test.conf
vim test.conf
server
{
listen 80;
server_name www.test.com www.rise.com www.aaa.com;
if ($host != 'www.test.com')
{
rewrite ^/(.*)$ http://www.test.com/$1 permanent;
}
index index.html index.htm index.php;
root /data/www;
access_log /tmp/access.log lizheng; ---添加一行
location ~ ,*admin\.php$ {
auth_basic "lizheng auth";
auth_basic_user_file /usr/local/nginx/conf/.htpasswd;
include fastcgi_params;
fastcgi_pass unix:/tmp/www.sock;
#fastcgi_pass 127.0.0.1:9000;
fastcgi_index index.php;
fastcgi_param SCRIPT_FILENAME /data/www$fastcgi_script_name;
}
3.查看是否有错
/usr/local/nginx/sbin/nginx -t
4.重新加载
/etc/init.d/nginx reload
5.测试
curl -x127.0.0.1:80 www.test.com/sdffssdff -I
6.查看日志
cat /tmp/access.log
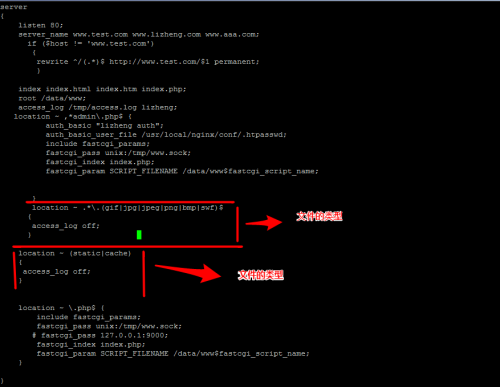
7.如何配置不去记录图片的日志
打开vim test.conf配置文件
server
{
listen 80;
server_name www.test.com www.rise.com www.aaa.com;
if ($host != 'www.test.com')
{
rewrite ^/(.*)$ http://www.test.com/$1 permanent;
}
index index.html index.htm index.php;
root /data/www;
access_log /tmp/access.log lizheng; ---添加一行
location ~ ,*admin\.php$ {
auth_basic "lizheng auth";
auth_basic_user_file /usr/local/nginx/conf/.htpasswd;
include fastcgi_params;
fastcgi_pass unix:/tmp/www.sock;
#fastcgi_pass 127.0.0.1:9000;
fastcgi_index index.php;
fastcgi_param SCRIPT_FILENAME /data/www$fastcgi_script_name;
}
location ~ .*\.(gif|jpg|jpeg|png|bmp|swf)$
{
access_log off;
}
location ~ (static|cache)
{
access_log off;
}
查看是否有错
/usr/local/nginx/sbin/nginx -t
重新加载
/etc/init.d/nginx reload
清空日志
> /tmp/access_log
刷新网页后(ww.test.com)查看日志
cat /tmp/access_log
转载于:https://blog.51cto.com/11937277/1880141


 本文详细介绍了Nginx的基本配置步骤,包括修改日志格式、设置权限验证、排除特定资源的日志记录等,并提供了测试配置正确性的方法。


 被折叠的 条评论
为什么被折叠?


