 人脸检测与识别


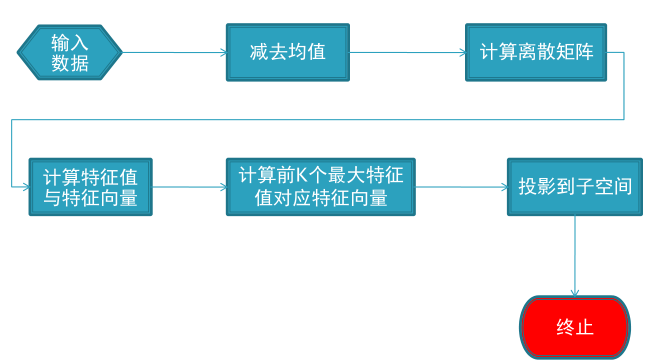
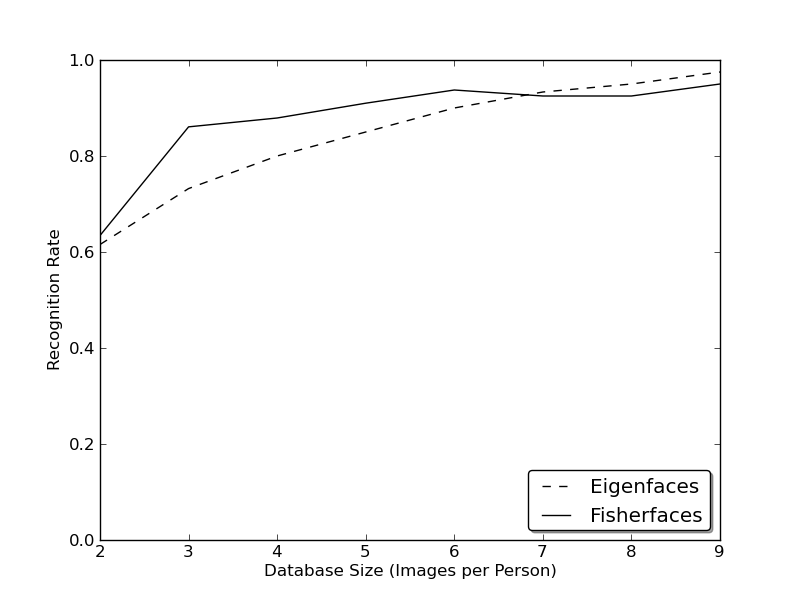
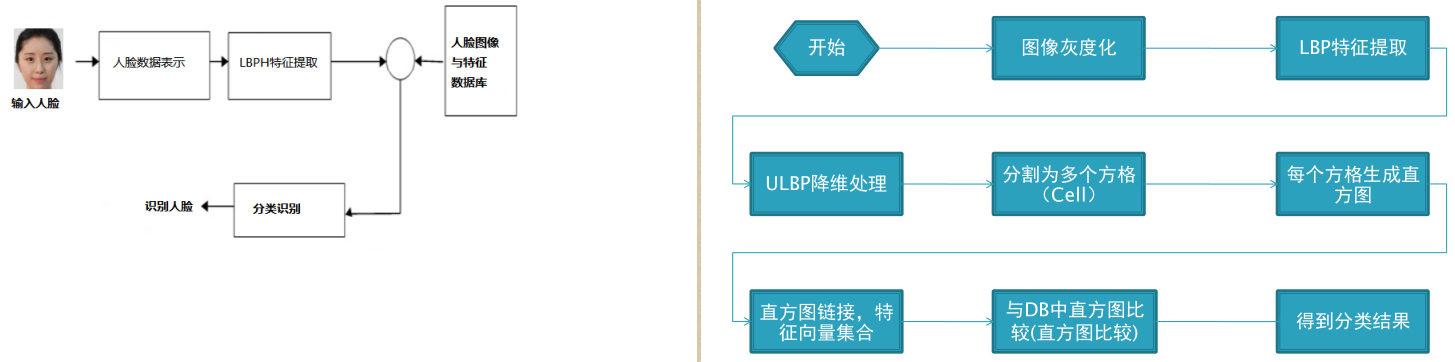
1.OpenCV(EigenFace、FisherFace、LBPH)
https://docs.opencv.org/master/db/d3a/facedetect_8cpp-example.html
/*This program demonstrates usage of the Cascade classifier class*/
#include "opencv2/objdetect.hpp"
#include "opencv2/highgui.hpp"
#include "opencv2/imgproc.hpp"
#include
using namespace std;
using namespace cv;
static void help()
{
    cout << "\nThis program demonstrates the use of cv::CascadeClassifier class to detect objects (Face + eyes). You can use Haar or LBP features.\n"
            "This classifier can recognize many kinds of rigid objects, once the appropriate classifier is trained.\n"
            "It's most known use is for faces.\n"
            "Usage:\n"
            "./facedetect [--cascade=<cascade_path> this is the primary trained classifier such as frontal face]\n"
               "   [--nested-cascade[=nested_cascade_path this an optional secondary classifier such as eyes]]\n"
               "   [--scale=]\n"
               "   [--try-flip]\n"
               "   [filename|camera_index]\n\n"
            "see facedetect.cmd for one call:\n"
            "./facedetect --cascade=\"../../data/haarcascades/haarcascade_frontalface_alt.xml\" --nested-cascade=\"../../data/haarcascades/haarcascade_eye_tree_eyeglasses.xml\" --scale=1.3\n\n"
            "During execution:\n\tHit any key to quit.\n"
            "\tUsing OpenCV version " << CV_VERSION << "\n" << endl;
}
void detectAndDraw( Mat& img, CascadeClassifier& cascade,
                    CascadeClassifier& nestedCascade,
                    double scale, bool tryflip );
string cascadeName;
string nestedCascadeName;
int main( int argc, const char** argv )
{
    VideoCapture capture;
    Mat frame, image;
    string inputName;
    bool tryflip;
    CascadeClassifier cascade, nestedCascade;
    double scale;
    cv::CommandLineParser parser(argc, argv,
        "{help h||}"
        "{cascade|../../data/haarcascades/haarcascade_frontalface_alt.xml|}"
        "{nested-cascade|../../data/haarcascades/haarcascade_eye_tree_eyeglasses.xml|}"
        "{scale|1|}{try-flip||}{@filename||}"
    );
    if (parser.has("help"))
    {
        help();
        return 0;
    }
    cascadeName = parser.get("cascade");
    nestedCascadeName = parser.get("nested-cascade");
    scale = parser.get("scale");
    if (scale < 1)
        scale = 1;
    tryflip = parser.has("try-flip");
    inputName = parser.get("@filename");
    if (!parser.check())
    {
        parser.printErrors();
        return 0;
    }
    if ( !nestedCascade.load( nestedCascadeName ) )
        cerr << "WARNING: Could not load classifier cascade for nested objects" << endl;
    if( !cascade.load( cascadeName ) )
    {
        cerr << "ERROR: Could not load classifier cascade" << endl;
        help();
        return -1;
    }
    if( inputName.empty() || (isdigit(inputName[0]) && inputName.size() == 1) )
    {
        int camera = inputName.empty() ? 0 : inputName[0] - '0';
        if(!capture.open(camera))
            cout << "Capture from camera #" <<  camera << " didn't work" << endl;
    }
    else if( inputName.size() )
    {
        image = imread( inputName, 1 );
        if( image.empty() )
        {
            if(!capture.open( inputName ))
                cout << "Could not read " << inputName << endl;
        }
    }
    else
    {
        image = imread( "../data/lena.jpg", 1 );
        if(image.empty()) cout << "Couldn't read ../data/lena.jpg" << endl;
    }
    if( capture.isOpened() )
    {
        cout << "Video capturing has been started ..." << endl;
        for(;;)
        {
            capture >> frame;
            if( frame.empty() )
                break;
            Mat frame1 = frame.clone();
            detectAndDraw( frame1, cascade, nestedCascade, scale, tryflip );
            char c = (char)waitKey(10);
            if( c == 27 || c == 'q' || c == 'Q' )
                break;
        }
    }
    else
    {
        cout << "Detecting face(s) in " << inputName << endl;
        if( !image.empty() )
        {
            detectAndDraw( image, cascade, nestedCascade, scale, tryflip );
            waitKey(0);
        }
        else if( !inputName.empty() )
        {
            /* assume it is a text file containing the
            list of the image filenames to be processed - one per line */
            FILE* f = fopen( inputName.c_str(), "rt" );
            if( f )
            {
                char buf[1000+1];
                while( fgets( buf, 1000, f ) )
                {
                    int len = (int)strlen(buf);
                    while( len > 0 && isspace(buf[len-1]) )
                        len--;
                    buf[len] = '\0';
                    cout << "file " << buf << endl;
                    image = imread( buf, 1 );
                    if( !image.empty() )
                    {
                        detectAndDraw( image, cascade, nestedCascade, scale, tryflip );
                        char c = (char)waitKey(0);
                        if( c == 27 || c == 'q' || c == 'Q' )
                            break;
                    }
                    else
                    {
                        cerr << "Aw snap, couldn't read image " << buf << endl;
                    }
                }
                fclose(f);
            }
        }
    }
    return 0;
}
void detectAndDraw( Mat& img, CascadeClassifier& cascade,
                    CascadeClassifier& nestedCascade,
                    double scale, bool tryflip )
{
    double t = 0;
    vector faces, faces2;
    const static Scalar colors[] =
    {
        Scalar(255,0,0),
        Scalar(255,128,0),
        Scalar(255,255,0),
        Scalar(0,255,0),
        Scalar(0,128,255),
        Scalar(0,255,255),
        Scalar(0,0,255),
        Scalar(255,0,255)
    };
    Mat gray, smallImg;
    cvtColor( img, gray, COLOR_BGR2GRAY );
    double fx = 1 / scale;
    resize( gray, smallImg, Size(), fx, fx, INTER_LINEAR_EXACT );
    equalizeHist( smallImg, smallImg );
    t = (double)getTickCount();
    cascade.detectMultiScale( smallImg, faces,
        1.1, 2, 0
        //|CASCADE_FIND_BIGGEST_OBJECT
        //|CASCADE_DO_ROUGH_SEARCH
        |CASCADE_SCALE_IMAGE,
        Size(30, 30) );
    if( tryflip )
    {
        flip(smallImg, smallImg, 1);
        cascade.detectMultiScale( smallImg, faces2,
                                 1.1, 2, 0
                                 //|CASCADE_FIND_BIGGEST_OBJECT
                                 //|CASCADE_DO_ROUGH_SEARCH
                                 |CASCADE_SCALE_IMAGE,
                                 Size(30, 30) );
        for( vector::const_iterator r = faces2.begin(); r != faces2.end(); ++r )
        {
            faces.push_back(Rect(smallImg.cols - r->x - r->width, r->y, r->width, r->height));
        }
    }
    t = (double)getTickCount() - t;
    printf( "detection time = %g ms\n", t*1000/getTickFrequency());
    for ( size_t i = 0; i < faces.size(); i++ )
    {
        Rect r = faces[i];
        Mat smallImgROI;
        vector nestedObjects;
        Point center;
        Scalar color = colors[i%8];
        int radius;
        double aspect_ratio = (double)r.width/r.height;
        if( 0.75 < aspect_ratio && aspect_ratio < 1.3 )
        {
            center.x = cvRound((r.x + r.width*0.5)*scale);
            center.y = cvRound((r.y + r.height*0.5)*scale);
            radius = cvRound((r.width + r.height)*0.25*scale);
            circle( img, center, radius, color, 3, 8, 0 );
        }
        else
            rectangle( img, Point(cvRound(r.x*scale), cvRound(r.y*scale)),
                       Point(cvRound((r.x + r.width-1)*scale), cvRound((r.y + r.height-1)*scale)),
                       color, 3, 8, 0);
        if( nestedCascade.empty() )
            continue;
        smallImgROI = smallImg( r );
        nestedCascade.detectMultiScale( smallImgROI, nestedObjects,
            1.1, 2, 0
            //|CASCADE_FIND_BIGGEST_OBJECT
            //|CASCADE_DO_ROUGH_SEARCH
            //|CASCADE_DO_CANNY_PRUNING
            |CASCADE_SCALE_IMAGE,
            Size(30, 30) );
        for ( size_t j = 0; j < nestedObjects.size(); j++ )
        {
            Rect nr = nestedObjects[j];
            center.x = cvRound((r.x + nr.x + nr.width*0.5)*scale);
            center.y = cvRound((r.y + nr.y + nr.height*0.5)*scale);
            radius = cvRound((nr.width + nr.height)*0.25*scale);
            circle( img, center, radius, color, 3, 8, 0 );
        }
    }
    imshow( "result", img );
}
https://docs.opencv.org/master/db/d7c/group__face.html

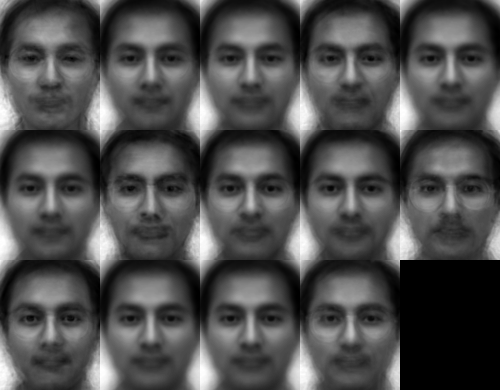
特征脸方法(Eigenface)

/*Eigenfaces in OpenCV*/
/*
* Copyright (c) 2011. Philipp Wagner <bytefish[at]gmx[dot]de>.
* Released to public domain under terms of the BSD Simplified license.
*
* Redistribution and use in source and binary forms, with or without
* modification, are permitted provided that the following conditions are met:
* * Redistributions of source code must retain the above copyright
* notice, this list of conditions and the following disclaimer.
* * Redistributions in binary form must reproduce the above copyright
* notice, this list of conditions and the following disclaimer in the
* documentation and/or other materials provided with the distribution.
* * Neither the name of the organization nor the names of its contributors
* may be used to endorse or promote products derived from this software
* without specific prior written permission.
*
* See <http://www.opensource.org/licenses/bsd-license>
*/
#include "opencv2/core.hpp"
#include "opencv2/face.hpp"
#include "opencv2/highgui.hpp"
#include "opencv2/imgproc.hpp"
#include
#include
#include
using namespace cv;
using namespace cv::face;
using namespace std;
static Mat norm_0_255(InputArray _src) {
Mat src = _src.getMat();
// Create and return normalized image:
Mat dst;
switch(src.channels()) {
case 1:
cv::normalize(_src, dst, 0, 255, NORM_MINMAX, CV_8UC1);
break;
case 3:
cv::normalize(_src, dst, 0, 255, NORM_MINMAX, CV_8UC3);
break;
default:
src.copyTo(dst);
break;
}
return dst;
}
static void read_csv(const string& filename, vector& images, vector& labels, char separator = ';') {
std::ifstream file(filename.c_str(), ifstream::in);
if (!file) {
string error_message = "No valid input file was given, please check the given filename.";
CV_Error(Error::StsBadArg, error_message);
}
string line, path, classlabel;
while (getline(file, line)) {
stringstream liness(line);
getline(liness, path, separator);
getline(liness, classlabel);
if(!path.empty() && !classlabel.empty()) {
images.push_back(imread(path, 0));
labels.push_back(atoi(classlabel.c_str()));
}
}
}
int main(int argc, const char *argv[]) {
// Check for valid command line arguments, print usage
// if no arguments were given.
if (argc < 2) {
cout << "usage: " << argv[0] << " <output_folder> " << endl;
exit(1);
}
string output_folder = ".";
if (argc == 3) {
output_folder = string(argv[2]);
}
// Get the path to your CSV.
string fn_csv = string(argv[1]);
// These vectors hold the images and corresponding labels.
vector images;
vector labels;
// Read in the data. This can fail if no valid
// input filename is given.
try {
read_csv(fn_csv, images, labels);
} catch (cv::Exception& e) {
cerr << "Error opening file \"" << fn_csv << "\". Reason: " << e.msg << endl;
// nothing more we can do
exit(1);
}
// Quit if there are not enough images for this demo.
if(images.size() <= 1) {
string error_message = "This demo needs at least 2 images to work. Please add more images to your data set!";
CV_Error(Error::StsError, error_message);
}
// Get the height from the first image. We'll need this
// later in code to reshape the images to their original
// size:
int height = images[0].rows;
// The following lines simply get the last images from
// your dataset and remove it from the vector. This is
// done, so that the training data (which we learn the
// cv::BasicFaceRecognizer on) and the test data we test
// the model with, do not overlap.
Mat testSample = images[images.size() - 1];
int testLabel = labels[labels.size() - 1];
images.pop_back();
labels.pop_back();
// The following lines create an Eigenfaces model for
// face recognition and train it with the images and
// labels read from the given CSV file.
// This here is a full PCA, if you just want to keep
// 10 principal components (read Eigenfaces), then call
// the factory method like this:
//
// EigenFaceRecognizer::create(10);
//
// If you want to create a FaceRecognizer with a
// confidence threshold (e.g. 123.0), call it with:
//
// EigenFaceRecognizer::create(10, 123.0);
//
// If you want to use _all_ Eigenfaces and have a threshold,
// then call the method like this:
//
// EigenFaceRecognizer::create(0, 123.0);
//
Ptr model = EigenFaceRecognizer::create();
model->train(images, labels);
// The following line predicts the label of a given
// test image:
int predictedLabel = model->predict(testSample);
//
// To get the confidence of a prediction call the model with:
//
// int predictedLabel = -1;
// double confidence = 0.0;
// model->predict(testSample, predictedLabel, confidence);
//
string result_message = format("Predicted class = %d / Actual class = %d.", predictedLabel, testLabel);
cout << result_message << endl;
// Here is how to get the eigenvalues of this Eigenfaces model:
Mat eigenvalues = model->getEigenValues();
// And we can do the same to display the Eigenvectors (read Eigenfaces):
Mat W = model->getEigenVectors();
// Get the sample mean from the training data
Mat mean = model->getMean();
// Display or save:
if(argc == 2) {
imshow("mean", norm_0_255(mean.reshape(1, images[0].rows)));
} else {
imwrite(format("%s/mean.png", output_folder.c_str()), norm_0_255(mean.reshape(1, images[0].rows)));
}
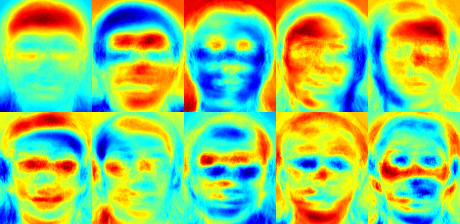
// Display or save the Eigenfaces:
for (int i = 0; i < min(10, W.cols); i++) {
string msg = format("Eigenvalue #%d = %.5f", i, eigenvalues.at(i));
cout << msg << endl;
// get eigenvector #i
Mat ev = W.col(i).clone();
// Reshape to original size & normalize to [0...255] for imshow.
Mat grayscale = norm_0_255(ev.reshape(1, height));
// Show the image & apply a Jet colormap for better sensing.
Mat cgrayscale;
applyColorMap(grayscale, cgrayscale, COLORMAP_JET);
// Display or save:
if(argc == 2) {
imshow(format("eigenface_%d", i), cgrayscale);
} else {
imwrite(format("%s/eigenface_%d.png", output_folder.c_str(), i), norm_0_255(cgrayscale));
}
}
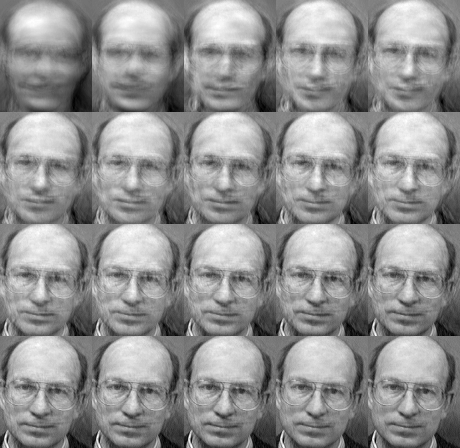
// Display or save the image reconstruction at some predefined steps:
for(int num_components = min(W.cols, 10); num_components < min(W.cols, 300); num_components+=15) {
// slice the eigenvectors from the model
Mat evs = Mat(W, Range::all(), Range(0, num_components));
Mat projection = LDA::subspaceProject(evs, mean, images[0].reshape(1,1));
Mat reconstruction = LDA::subspaceReconstruct(evs, mean, projection);
// Normalize the result:
reconstruction = norm_0_255(reconstruction.reshape(1, images[0].rows));
// Display or save:
if(argc == 2) {
imshow(format("eigenface_reconstruction_%d", num_components), reconstruction);
} else {
imwrite(format("%s/eigenface_reconstruction_%d.png", output_folder.c_str(), num_components), reconstruction);
}
}
// Display if we are not writing to an output folder:
if(argc == 2) {
waitKey(0);
}
return 0;
}
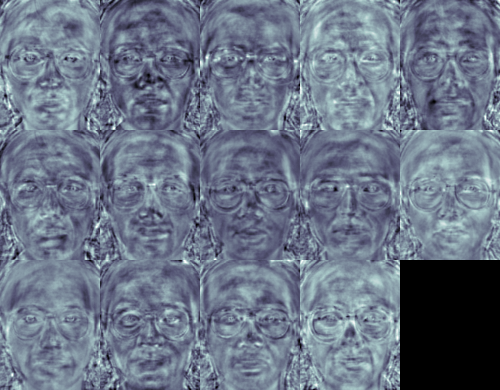
FisherFace(LDA线性判别分析)
/*Fisherfaces in OpenCV*/
/*
 * Copyright (c) 2011. Philipp Wagner <bytefish[at]gmx[dot]de>.
 * Released to public domain under terms of the BSD Simplified license.
 *
 * Redistribution and use in source and binary forms, with or without
 * modification, are permitted provided that the following conditions are met:
 *   * Redistributions of source code must retain the above copyright
 *     notice, this list of conditions and the following disclaimer.
 *   * Redistributions in binary form must reproduce the above copyright
 *     notice, this list of conditions and the following disclaimer in the
 *     documentation and/or other materials provided with the distribution.
 *   * Neither the name of the organization nor the names of its contributors
 *     may be used to endorse or promote products derived from this software
 *     without specific prior written permission.
 *
 *   See <http://www.opensource.org/licenses/bsd-license>
 */
#include "opencv2/core.hpp"
#include "opencv2/face.hpp"
#include "opencv2/highgui.hpp"
#include "opencv2/imgproc.hpp"
#include
#include
#include
using namespace cv;
using namespace cv::face;
using namespace std;
static Mat norm_0_255(InputArray _src) {
    Mat src = _src.getMat();
    // Create and return normalized image:
    Mat dst;
    switch(src.channels()) {
    case 1:
        cv::normalize(_src, dst, 0, 255, NORM_MINMAX, CV_8UC1);
        break;
    case 3:
        cv::normalize(_src, dst, 0, 255, NORM_MINMAX, CV_8UC3);
        break;
    default:
        src.copyTo(dst);
        break;
    }
    return dst;
}
static void read_csv(const string& filename, vector& images, vector& labels, char separator = ';') {
    std::ifstream file(filename.c_str(), ifstream::in);
    if (!file) {
        string error_message = "No valid input file was given, please check the given filename.";
        CV_Error(Error::StsBadArg, error_message);
    }
    string line, path, classlabel;
    while (getline(file, line)) {
        stringstream liness(line);
        getline(liness, path, separator);
        getline(liness, classlabel);
        if(!path.empty() && !classlabel.empty()) {
            images.push_back(imread(path, 0));
            labels.push_back(atoi(classlabel.c_str()));
        }
    }
}
int main(int argc, const char *argv[]) {
    // Check for valid command line arguments, print usage
    // if no arguments were given.
    if (argc < 2) {
        cout << "usage: " << argv[0] << "  <output_folder> " << endl;
        exit(1);
    }
    string output_folder = ".";
    if (argc == 3) {
        output_folder = string(argv[2]);
    }
    // Get the path to your CSV.
    string fn_csv = string(argv[1]);
    // These vectors hold the images and corresponding labels.
    vector images;
    vector labels;
    // Read in the data. This can fail if no valid
    // input filename is given.
    try {
        read_csv(fn_csv, images, labels);
    } catch (cv::Exception& e) {
        cerr << "Error opening file \"" << fn_csv << "\". Reason: " << e.msg << endl;
        // nothing more we can do
        exit(1);
    }
    // Quit if there are not enough images for this demo.
    if(images.size() <= 1) {
        string error_message = "This demo needs at least 2 images to work. Please add more images to your data set!";
        CV_Error(Error::StsError, error_message);
    }
    // Get the height from the first image. We'll need this
    // later in code to reshape the images to their original
    // size:
    int height = images[0].rows;
    // The following lines simply get the last images from
    // your dataset and remove it from the vector. This is
    // done, so that the training data (which we learn the
    // cv::BasicFaceRecognizer on) and the test data we test
    // the model with, do not overlap.
    Mat testSample = images[images.size() - 1];
    int testLabel = labels[labels.size() - 1];
    images.pop_back();
    labels.pop_back();
    // The following lines create an Fisherfaces model for
    // face recognition and train it with the images and
    // labels read from the given CSV file.
    // If you just want to keep 10 Fisherfaces, then call
    // the factory method like this:
    //
    //      FisherFaceRecognizer::create(10);
    //
    // However it is not useful to discard Fisherfaces! Please
    // always try to use _all_ available Fisherfaces for
    // classification.
    //
    // If you want to create a FaceRecognizer with a
    // confidence threshold (e.g. 123.0) and use _all_
    // Fisherfaces, then call it with:
    //
    //      FisherFaceRecognizer::create(0, 123.0);
    //
    Ptr model = FisherFaceRecognizer::create();
    model->train(images, labels);
    // The following line predicts the label of a given
    // test image:
    int predictedLabel = model->predict(testSample);
    //
    // To get the confidence of a prediction call the model with:
    //
    //      int predictedLabel = -1;
    //      double confidence = 0.0;
    //      model->predict(testSample, predictedLabel, confidence);
    //
    string result_message = format("Predicted class = %d / Actual class = %d.", predictedLabel, testLabel);
    cout << result_message << endl;
    // Here is how to get the eigenvalues of this Eigenfaces model:
    Mat eigenvalues = model->getEigenValues();
    // And we can do the same to display the Eigenvectors (read Eigenfaces):
    Mat W = model->getEigenVectors();
    // Get the sample mean from the training data
    Mat mean = model->getMean();
    // Display or save:
    if(argc == 2) {
        imshow("mean", norm_0_255(mean.reshape(1, images[0].rows)));
    } else {
        imwrite(format("%s/mean.png", output_folder.c_str()), norm_0_255(mean.reshape(1, images[0].rows)));
    }
    // Display or save the first, at most 16 Fisherfaces:
    for (int i = 0; i < min(16, W.cols); i++) {
        string msg = format("Eigenvalue #%d = %.5f", i, eigenvalues.at(i));
        cout << msg << endl;
        // get eigenvector #i
        Mat ev = W.col(i).clone();
        // Reshape to original size & normalize to [0...255] for imshow.
        Mat grayscale = norm_0_255(ev.reshape(1, height));
        // Show the image & apply a Bone colormap for better sensing.
        Mat cgrayscale;
        applyColorMap(grayscale, cgrayscale, COLORMAP_BONE);
        // Display or save:
        if(argc == 2) {
            imshow(format("fisherface_%d", i), cgrayscale);
        } else {
            imwrite(format("%s/fisherface_%d.png", output_folder.c_str(), i), norm_0_255(cgrayscale));
        }
    }
    // Display or save the image reconstruction at some predefined steps:
    for(int num_component = 0; num_component < min(16, W.cols); num_component++) {
        // Slice the Fisherface from the model:
        Mat ev = W.col(num_component);
        Mat projection = LDA::subspaceProject(ev, mean, images[0].reshape(1,1));
        Mat reconstruction = LDA::subspaceReconstruct(ev, mean, projection);
        // Normalize the result:
        reconstruction = norm_0_255(reconstruction.reshape(1, images[0].rows));
        // Display or save:
        if(argc == 2) {
            imshow(format("fisherface_reconstruction_%d", num_component), reconstruction);
        } else {
            imwrite(format("%s/fisherface_reconstruction_%d.png", output_folder.c_str(), num_component), reconstruction);
        }
    }
    // Display if we are not writing to an output folder:
    if(argc == 2) {
        waitKey(0);
    }
    return 0;
}
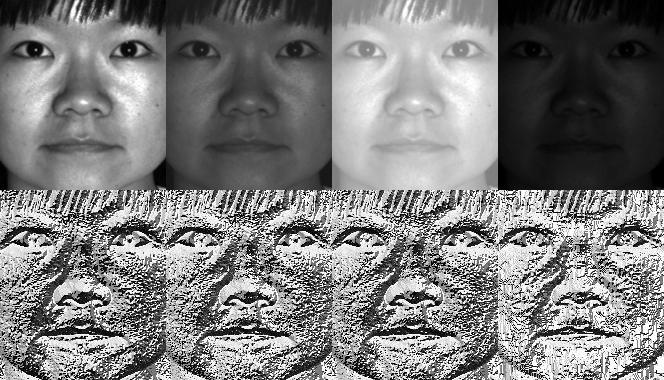
LBPH
/*Local Binary Patterns Histograms in OpenCV*/
/*
 * Copyright (c) 2011. Philipp Wagner <bytefish[at]gmx[dot]de>.
 * Released to public domain under terms of the BSD Simplified license.
 *
 * Redistribution and use in source and binary forms, with or without
 * modification, are permitted provided that the following conditions are met:
 *   * Redistributions of source code must retain the above copyright
 *     notice, this list of conditions and the following disclaimer.
 *   * Redistributions in binary form must reproduce the above copyright
 *     notice, this list of conditions and the following disclaimer in the
 *     documentation and/or other materials provided with the distribution.
 *   * Neither the name of the organization nor the names of its contributors
 *     may be used to endorse or promote products derived from this software
 *     without specific prior written permission.
 *
 *   See <http://www.opensource.org/licenses/bsd-license>
 */
#include "opencv2/core.hpp"
#include "opencv2/face.hpp"
#include "opencv2/highgui.hpp"
#include
#include
#include
using namespace cv;
using namespace cv::face;
using namespace std;
static void read_csv(const string& filename, vector& images, vector& labels, char separator = ';') {
    std::ifstream file(filename.c_str(), ifstream::in);
    if (!file) {
        string error_message = "No valid input file was given, please check the given filename.";
        CV_Error(Error::StsBadArg, error_message);
    }
    string line, path, classlabel;
    while (getline(file, line)) {
        stringstream liness(line);
        getline(liness, path, separator);
        getline(liness, classlabel);
        if(!path.empty() && !classlabel.empty()) {
            images.push_back(imread(path, 0));
            labels.push_back(atoi(classlabel.c_str()));
        }
    }
}
int main(int argc, const char *argv[]) {
    // Check for valid command line arguments, print usage
    // if no arguments were given.
    if (argc != 2) {
        cout << "usage: " << argv[0] << " " << endl;
        exit(1);
    }
    // Get the path to your CSV.
    string fn_csv = string(argv[1]);
    // These vectors hold the images and corresponding labels.
    vector images;
    vector labels;
    // Read in the data. This can fail if no valid
    // input filename is given.
    try {
        read_csv(fn_csv, images, labels);
    } catch (cv::Exception& e) {
        cerr << "Error opening file \"" << fn_csv << "\". Reason: " << e.msg << endl;
        // nothing more we can do
        exit(1);
    }
    // Quit if there are not enough images for this demo.
    if(images.size() <= 1) {
        string error_message = "This demo needs at least 2 images to work. Please add more images to your data set!";
        CV_Error(Error::StsError, error_message);
    }
    // The following lines simply get the last images from
    // your dataset and remove it from the vector. This is
    // done, so that the training data (which we learn the
    // cv::LBPHFaceRecognizer on) and the test data we test
    // the model with, do not overlap.
    Mat testSample = images[images.size() - 1];
    int testLabel = labels[labels.size() - 1];
    images.pop_back();
    labels.pop_back();
    // The following lines create an LBPH model for
    // face recognition and train it with the images and
    // labels read from the given CSV file.
    //
    // The LBPHFaceRecognizer uses Extended Local Binary Patterns
    // (it's probably configurable with other operators at a later
    // point), and has the following default values
    //
    //      radius = 1
    //      neighbors = 8
    //      grid_x = 8
    //      grid_y = 8
    //
    // So if you want a LBPH FaceRecognizer using a radius of
    // 2 and 16 neighbors, call the factory method with:
    //
    //      cv::face::LBPHFaceRecognizer::create(2, 16);
    //
    // And if you want a threshold (e.g. 123.0) call it with its default values:
    //
    //      cv::face::LBPHFaceRecognizer::create(1,8,8,8,123.0)
    //
    Ptr model = LBPHFaceRecognizer::create();
    model->train(images, labels);
    // The following line predicts the label of a given
    // test image:
    int predictedLabel = model->predict(testSample);
    //
    // To get the confidence of a prediction call the model with:
    //
    //      int predictedLabel = -1;
    //      double confidence = 0.0;
    //      model->predict(testSample, predictedLabel, confidence);
    //
    string result_message = format("Predicted class = %d / Actual class = %d.", predictedLabel, testLabel);
    cout << result_message << endl;
    // First we'll use it to set the threshold of the LBPHFaceRecognizer
    // to 0.0 without retraining the model. This can be useful if
    // you are evaluating the model:
    //
    model->setThreshold(0.0);
    // Now the threshold of this model is set to 0.0. A prediction
    // now returns -1, as it's impossible to have a distance below
    // it
    predictedLabel = model->predict(testSample);
    cout << "Predicted class = " << predictedLabel << endl;
    // Show some informations about the model, as there's no cool
    // Model data to display as in Eigenfaces/Fisherfaces.
    // Due to efficiency reasons the LBP images are not stored
    // within the model:
    cout << "Model Information:" << endl;
    string model_info = format("\tLBPH(radius=%i, neighbors=%i, grid_x=%i, grid_y=%i, threshold=%.2f)",
            model->getRadius(),
            model->getNeighbors(),
            model->getGridX(),
            model->getGridY(),
            model->getThreshold());
    cout << model_info << endl;
    // We could get the histograms for example:
    vector histograms = model->getHistograms();
    // But should I really visualize it? Probably the length is interesting:
    cout << "Size of the histograms: " << histograms[0].total() << endl;
    return 0;
}
https://blog.youkuaiyun.com/zuidao3105/article/details/79346591


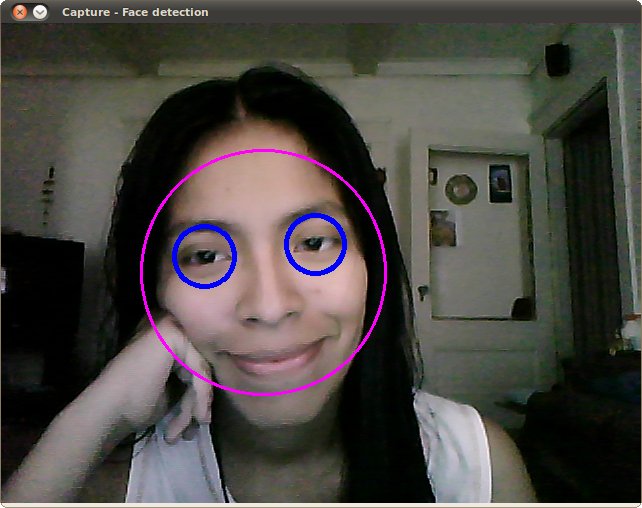
在OpenCV中主要使用了两种特征(即两种方法)进行人脸检测,Haar特征和LBP特征。使用已经训练好的XML格式的分类器进行人脸检测。在OpenCV的安装目录下的sources文件夹里的data文件夹里可以看到下图所示的内容(opencv\sources\data\haarcascades ):

文件夹的名字“haarcascades”、“hogcascades”和“lbpcascades”分别表示通过“haar”、“hog”和“lbp”三种不同的特征而训练出的分类器:"haar"特征主要用于人脸检测,“hog”特征主要用于行人检测,“lbp”特征主要用于人脸识别,“eye”特征主要用于眼睛的检测识别。

实现人脸检测主要依赖于detectMultiScale()函数,下面简单说一下函数参数的含义,先看函数原型:
CV_WRAP virtual void detectMultiScale( const Mat& image,
                                   CV_OUT vector& objects,
                                   double scaleFactor=1.1,
                                   int minNeighbors=3, int flags=0,
                                   Size minSize=Size(),
                                   Size maxSize=Size() );
各参数含义:
const Mat& image: 需要被检测的图像(灰度图)
vector& objects: 保存被检测出的人脸位置坐标序列
double scaleFactor: 每次图片缩放的比例
int minNeighbors: 每一个人脸至少要检测到多少次才算是真的人脸
int flags: 决定是缩放分类器来检测,还是缩放图像
Size(): 表示人脸的最大最小尺寸
/*检测图片中的人脸*/
#include
#include <opencv2/opencv.hpp>
#include <opencv2/calib3d/calib3d.hpp>

using namespace std;
using namespace cv;

int main()
{
    Mat image, image_gray;      //定义两个Mat变量,用于存储每一帧的图像

    image = imread("F://1.png");
    imshow("原图", image);

    cvtColor(image, image_gray, CV_BGR2GRAY);//转为灰度图
    equalizeHist(image_gray, image_gray);//直方图均衡化,增加对比度方便处理

    CascadeClassifier eye_Classifier;  //载入分类器
    CascadeClassifier face_cascade;    //载入分类器

    //加载分类训练器,OpenCv官方文档提供的xml文档,可以直接调用
    //xml文档路径  opencv\sources\data\haarcascades
    if (!eye_Classifier.load("F:\\haarcascade_eye.xml"))  //需要将xml文档放在自己指定的路径下
    {
        cout << "Load haarcascade_eye.xml failed!" << endl;
        return 0;
    }

    if (!face_cascade.load("F:\\haarcascade_frontalface_alt.xml"))
    {
        cout << "Load haarcascade_frontalface_alt failed!" << endl;
        return 0;
    }

    //vector 是个类模板 需要提供明确的模板实参 vector则是个确定的类 模板的实例化
    vector eyeRect;
    vector faceRect;

    //检测关于眼睛部位位置
    eye_Classifier.detectMultiScale(image_gray, eyeRect, 1.1, 2, 0 | CV_HAAR_SCALE_IMAGE, Size(30, 30));
    for (size_t eyeIdx = 0; eyeIdx < eyeRect.size(); eyeIdx++)
    {
        rectangle(image, eyeRect[eyeIdx], Scalar(0, 0, 255));   //用矩形画出检测到的位置
    }

    //检测关于脸部位置
    face_cascade.detectMultiScale(image_gray, faceRect, 1.1, 2, 0 | CV_HAAR_SCALE_IMAGE, Size(30, 30));
    for (size_t i = 0; i < faceRect.size(); i++)
    {
        rectangle(image, faceRect[i], Scalar(0, 0, 255));      //用矩形画出检测到的位置
    }

    imshow("人脸识别图", image);         //显示当前帧
    waitKey(0);

}

return 0;
/*检测摄像头中的人脸*/
#include
#include <opencv2/opencv.hpp>
#include <opencv2/calib3d/calib3d.hpp>

using namespace std;
using namespace cv;

int main()
{
    Mat image, image_gray;      //定义两个Mat变量,用于存储每一帧的图像
    VideoCapture capture(0);    //从摄像头读入视频

    while (1)                  //循环显示每一帧
    {
        capture >> image;     //读取当前帧

        //image = imread("F://1.png");
        //imshow("原图", image);

        cvtColor(image, image_gray, CV_BGR2GRAY);//转为灰度图
        equalizeHist(image_gray, image_gray);//直方图均衡化,增加对比度方便处理

        CascadeClassifier eye_Classifier;  //载入分类器
        CascadeClassifier face_cascade;    //载入分类器

        //加载分类训练器,OpenCv官方文档提供的xml文档,可以直接调用
        //xml文档路径  opencv\sources\data\haarcascades
        if (!eye_Classifier.load("F:\\haarcascade_eye.xml"))  //需要将xml文档放在自己指定的路径下
        {
            cout << "Load haarcascade_eye.xml failed!" << endl;
            return 0;
        }

        if (!face_cascade.load("F:\\haarcascade_frontalface_alt.xml"))
        {
            cout << "Load haarcascade_frontalface_alt failed!" << endl;
            return 0;
        }

        //vector 是个类模板 需要提供明确的模板实参 vector则是个确定的类 模板的实例化
        vector eyeRect;
        vector faceRect;

        //检测关于眼睛部位位置
        eye_Classifier.detectMultiScale(image_gray, eyeRect, 1.1, 2, 0 | CV_HAAR_SCALE_IMAGE, Size(30, 30));//检测
        for (size_t eyeIdx = 0; eyeIdx < eyeRect.size(); eyeIdx++)
        {
            rectangle(image, eyeRect[eyeIdx], Scalar(0, 0, 255));   //用矩形画出检测到的位置
        }

        //检测关于脸部位置
        face_cascade.detectMultiScale(image_gray, faceRect, 1.1, 2, 0 | CV_HAAR_SCALE_IMAGE, Size(30, 30));//检测
        for (size_t i = 0; i < faceRect.size(); i++)
        {
            rectangle(image, faceRect[i], Scalar(0, 0, 255));      //用矩形画出检测到的位置
        }

        imshow("人脸识别图", image);         //显示当前帧
        char c = waitKey(30);         //延时30ms,即每秒播放33帧图像
        if (c == 27)  break;
    }

    return 0;
}
https://blog.youkuaiyun.com/sinat_26917383/article/details/69831495
HAAR级联检测基础


https://blog.youkuaiyun.com/shadow_guo/article/details/44114421
调整基于HAAR特征的AdaBoost级联分类器的物体识别的参数

2.Cloud API
Baidu AI:https://ai.baidu.com/docs#/Face-Detect/top (face qualities/landmark72)
Face++:https://console.faceplusplus.com.cn/documents/4888373(HumanBody/Gesture)
MS:https://docs.microsoft.com/en-us/azure/cognitive-services/face/overview(Face detection/Face landmarks/Head pose/Face attributes)

3.Open Library
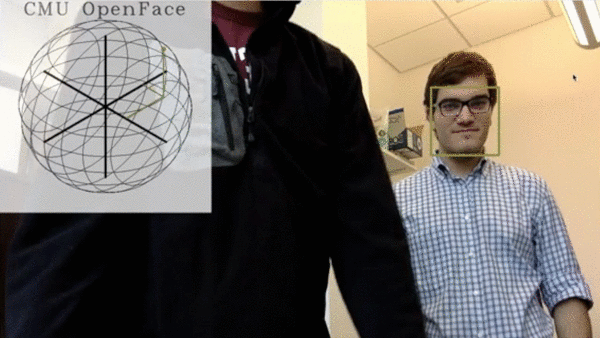
https://github.com/TadasBaltrusaitis/OpenFace


https://github.com/ageitgey/face_recognition(http://dlib.net)
import face_recognition
known_image = face_recognition.load_image_file("biden.jpg")
unknown_image = face_recognition.load_image_file("unknown.jpg")

biden_encoding = face_recognition.face_encodings(known_image)[0]
unknown_encoding = face_recognition.face_encodings(unknown_image)[0]

results = face_recognition.compare_faces([biden_encoding], unknown_encoding)

https://github.com/seetaface/SeetaFaceEngine

http://www.arcsoft.com.cn/ai/arcface.html

https://github.com/accord-net/framework
http://www.aforgenet.com/framework/

http://www.emgu.com/wiki/index.php/Main_Page

4.Face Recognition with DL
https://github.com/mbhybird/facenet
https://github.com/mbhybird/openface
Multi-task Cascaded Convolutional Networks(MTCNN)


https://www.cnblogs.com/gbin1/p/7456422.html
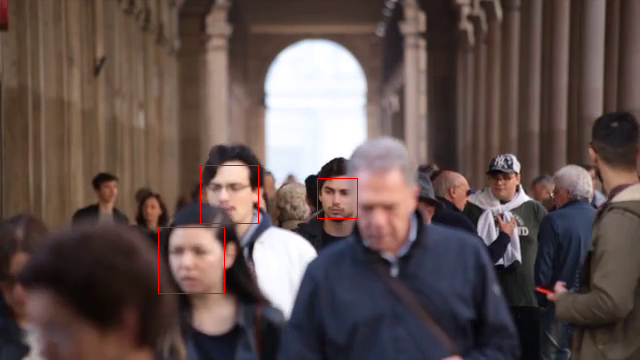
第一步:寻找所有的脸
在我们的流水线中的第一步是人脸检测。很明显在我们区分人脸之前需要在图片中将脸标记出来。
如果你有在最近十年里面用过相机的话,你可能已经见过正在运行中的人脸检测了:

面部识别是相机的一个伟大的功能。当相机可以自动挑出面部的时候,这将确保在拍照片的瞬间所有的脸都对准焦点了。不过我们使用它是为了别的目的--寻找我们想在下一步要传递的照片区域。
2000年年初的时候,当Paul Viola和Michael Jones发明了一种可以在廉价相机上面快速运行的面部检测技术后,人脸检测成为了主流。然而现在更可靠的解决方案出现了。我们现在用的是2005年发明的一个叫做方向梯度直方图,简称为HOG。
为了识别出图片中的脸,首先我们需要将图片转换为黑白色,因为在识别面部的时候我们不需要颜色数据。
然后我们需要依次遍历图片中的每个像素。对于单个像素,我们也需要看直接包围它的其他元素:

我们的目标是比较这个像素与周围像素的深度。然后我们要画一个箭头来代表图像变暗的方向:

如果你对这个图像中的每个像素都重复这个过程,最后每个像素,最终每个像素会被一个箭头取代。这些箭头被称为梯度(gradients),它们能显示出图像上从明亮到黑暗的流动过程:

这看起来没有明确的目的,但其实这很有必要。如果我们直接分析像素,同一个人明暗不同的两张照片将具有完全不同的像素值。但是如果只考虑亮度变化方向(direction)的话,明暗图像将会有同样的结果。这使得问题变得更容易解决!
但是保存每个像素的梯度太过细节化了,我们最终很有可能捡了芝麻丢了西瓜。如果能从更高的角度上观察基本的明暗流动,我们就可以看出图像的基本规律,这会比之前更好。
为了做到这一点,我们将图像分割成一些 16×16 像素的小方块。在每个小方块中,我们将计算出每个主方向上有多少个梯度(有多少指向上,指向右上,指向右等)。然后我们将用指向性最强那个方向的箭头来代替原来的那个小方块。
最终的结果是,我们把原始图像转换成了一个非常简单的表达形式,这种表达形式可以用一种简单的方式来捕获面部的基本结构:

原始图像被表示成了 HOG 形式,以捕获图像的主要特征,无论图像明暗度如何。
为了在这个 HOG 图像中找到脸部,我们要所需要做的,就是找到我们的图像中,与已知的一些 HOG 图案中,看起来最相似的部分。这些 HOG 图案都是从其他面部训练数据中提取出来的:
使用这种技术,我们现在可以轻松地在任何图片中找到脸部:

第二步:脸部的不同姿势和方位
当当当,我们把图片中的脸部分离出来了。 但现在,我们要处理的问题就是,对于电脑来说,面朝不同方向的同一张脸是两个人:

人类可以很轻松地识别出到两个图片都是同一个人,但电脑会认为这两张图片是两个完全不同的人。
为了解决这一点,我们将试图扭曲每个图片,使得眼睛和嘴唇总是在图像中的样本位置(sample place)。 这将使我们在接下来的步骤中,更容易比较脸部之间的不同。
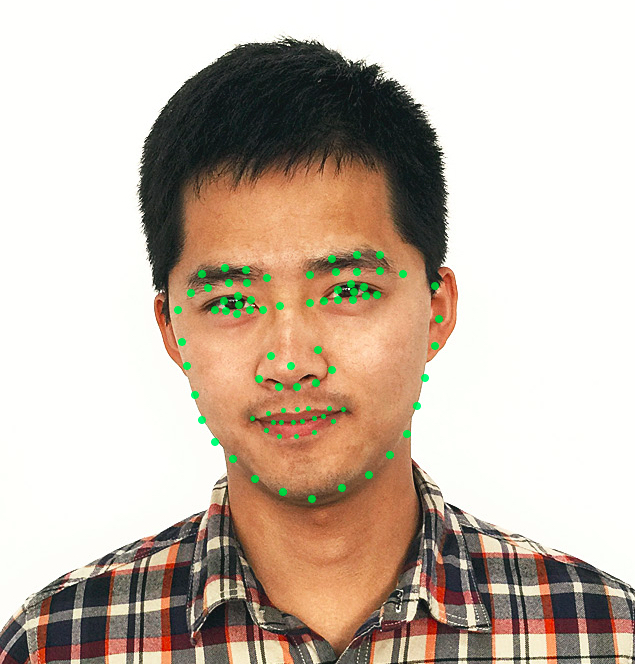
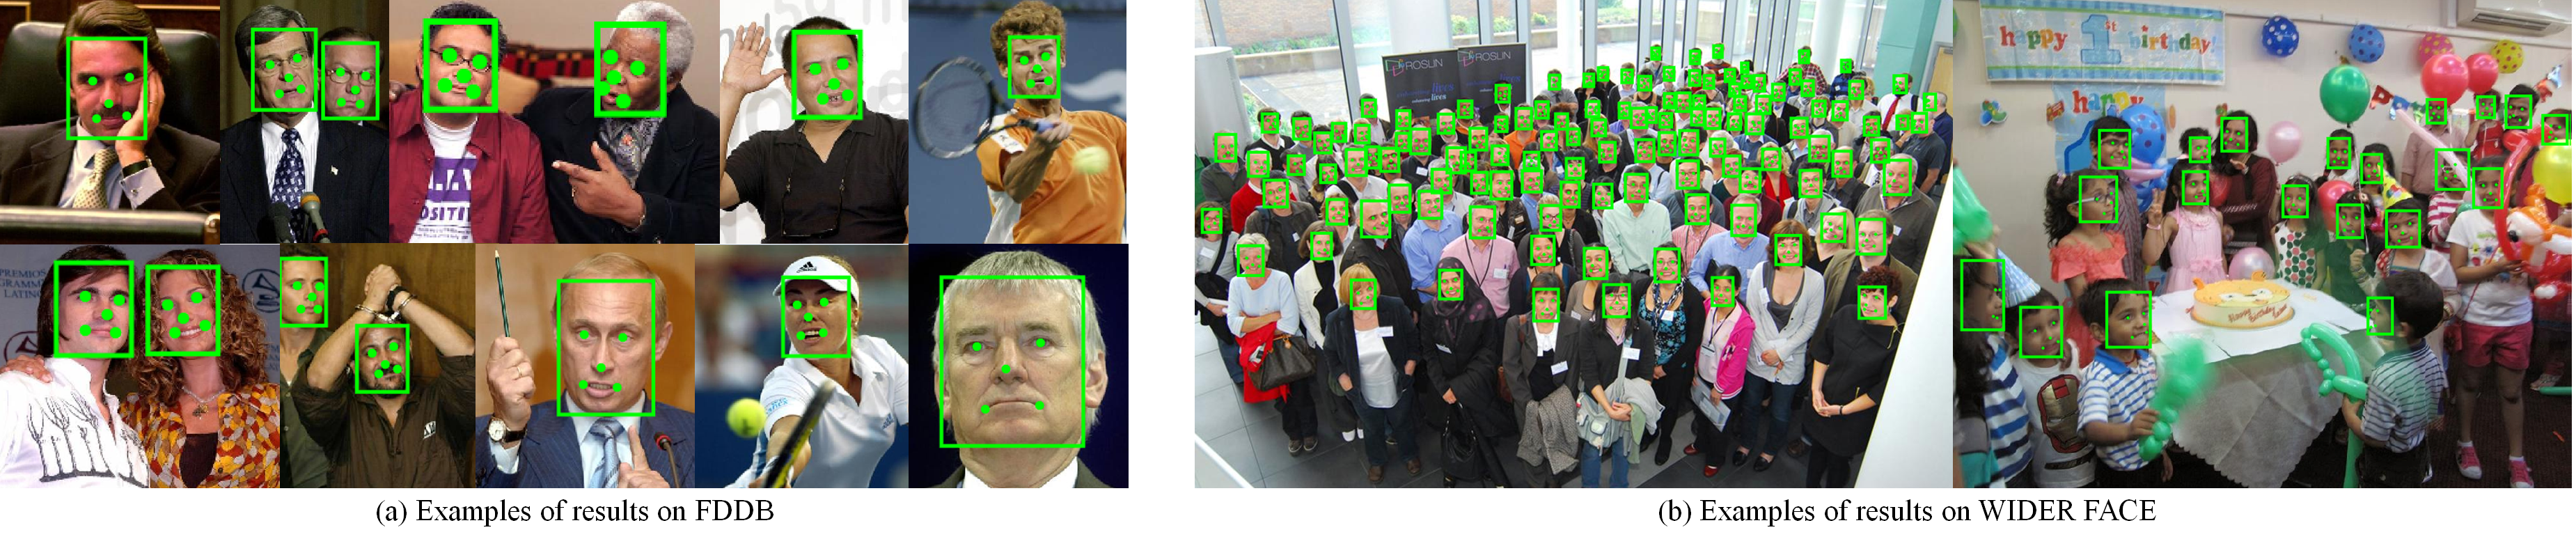
为此,我们将使用一种称为面部特征点估计(face landmark estimation)的算法。 很多方法都可以做到这一点,但这次我们会使用由 瓦希德·卡奇米(Vahid Kazemi)和约瑟菲娜·沙利文(Josephine Sullivan)在 2014 年发明的方法。
基本思路是找到 68 个人脸上普遍存在的特征点( landmarks)——包括下巴的顶部、每只眼睛的外部轮廓、每条眉毛的内部轮廓等。接下来我们训练一个机器学习算法,让它能够在任何脸部找到这 68 个特定的点:

我们将在每一张脸上定位的 68 个特征点。这张图片的作者是在OpenFace工作的卡内基梅隆大学 Ph.D. 布兰东·阿莫斯(Brandon Amos)。
这是在测试图片上定位 68 个特征点的结果:

你也可以使用这一技术来实现自己的 Snapchat 实时 3D 脸部过滤器!
现在,我们知道了眼睛和嘴巴在哪儿,我们将图像进行旋转、缩放和错切,使得眼睛和嘴巴尽可能靠近中心。我们不会做任何花哨的三维扭曲,因为这会让图像失真。我们只会使用那些能够保持图片相对平行的基本图像变换,例如旋转和缩放(称为仿射变换):
现在无论人脸朝向哪边,我们都能将眼睛和嘴巴向中间挪动到大致相同的位置。这将使我们的下一步更加准确。
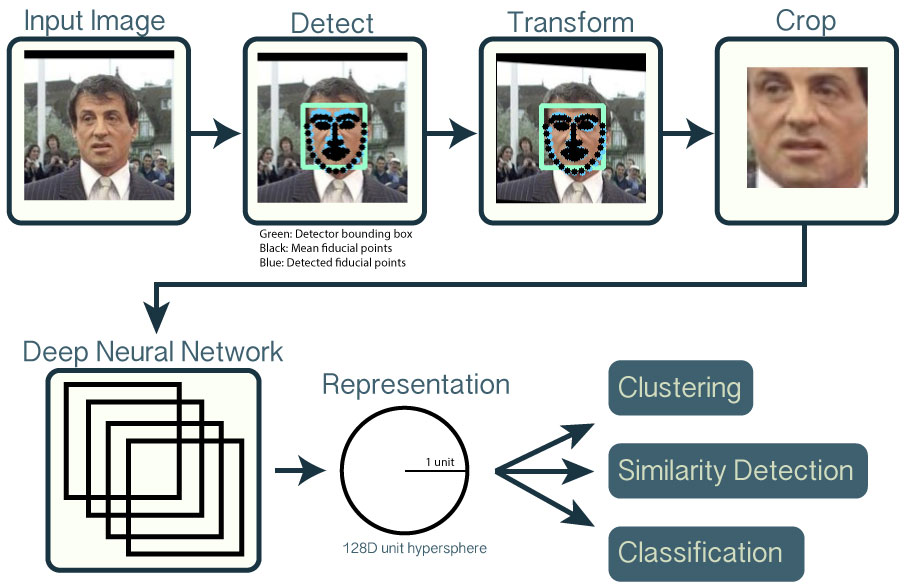
第三步:给脸部编码
现在我们要面临最核心的问题了——准确识别不同的人脸。这才是这件事的有趣之处!
最简单的人脸识别方法,是把我们在第二步中发现的未知人脸,与我们已经标注了的人脸图片作比较。当我们发现未知的面孔与一个以前标注过的面孔看起来及其相似的时候,它肯定是同一个人。这个想看起来很完美,对吧?
实际上这种方法有一个巨大的问题。像 Facebook 这种拥有数十亿用户和数万亿张照片的网站,是不可能去循环比较每张先前标记的脸的,这太浪费时间了。他们需要在毫秒内识别人脸,而不是几个小时。
我们需要的方法是从每张人脸上提取一些基本的测量数值。然后,我们可以用同样的方式测量未知的面孔,并找到最接近测量数值的那张已知的脸。例如,我们可以测量每个耳朵的大小、眼距、鼻子的长度等。如果你曾经看过像《犯罪现场调查》这样的电视剧,你就知道我在说什么了。
测量面部的最可靠方法
好的,所以为了建立我们的已知脸部数据库呢,我们应该测量面部的哪些数值?耳朵的大小?鼻子的长度?眼睛的颜色?还有什么?
事实证明,对于我们人类来说一些显而易见的测量值(比如眼睛颜色),对计算机来说没什么意义。研究人员发现,最准确的方法是让计算机自己找出它要收集的测量值。深度学习在寻找哪些部分的测量值比较重要方面表现的比人类更好。
所以,解决方案是训练一个深度卷积神经网络。但是,并不是让它去识别图片中的物体,这一次我们的训练是要让它为脸部生成 128 个测量值。
每次训练要观察三个不同的脸部图像:
1. 加载一张已知的人的面部训练图像
2. 加载同一个人的另一张照片
3. 加载另外一个人的照片
然后,算法查看它自己为这三个图片生成的测量值。再然后,稍微调整神经网络,以确保第一张和第二张生成的测量值接近,而第二张和第三张生成的测量值略有不同。

在为几千个人的数百万图像重复该步骤几百万次之后,神经网络学习了如何可靠地为每个人生成 128 个测量值。对于同一个人的任何十张不同的照片,它都应该给出大致相同的测量值。
机器学习专业人士把每张脸的 128 个测量值称为一个嵌入(embedding)。将复杂的原始数据(如图片)缩减为可由计算机生成的一个数列的方法,在机器学习(特别是语言翻译)中出现了很多次。我们正在使用的这种脸部提取方法是由 Google 的研究人员在 2015 年发明的,但也有许多类似方法存在。
给我们的脸部图像编码
这个通过训练卷积神经网络来输出脸部嵌入的过程,需要大量的数据和强大的计算能力。即使使用昂贵的 Nvidia Telsa 显卡,你也需要大约 24 小时的连续训练,才能获得良好的准确性。
但一旦网络训练完成,它就可以为每一张脸生成测量值,即使之前它从未见过这张脸!所以这种训练只需一次即可。幸运的是,OpenFace 上面的大牛已经做完了这些,并且他们发布了几个训练过可以直接使用的网络。谢谢Brandon Amos他的团队!
所以我们需要做的,就是通过他们预训练的网络来处理我们的脸部图像,以获得 128 个测量值。这是我们测试图像的一些测量值:

那么,这 128 个数字到底测量了脸部的哪些部分?我们当然不知道,但是这对我们并不重要。我们关心的是,当看到同一个人两张不同的图片时,我们的网络能得到几乎相同的数值。
第四步:从编码中找出人的名字
最后这一步实际上是整个过程中最简单的一步。我们要做的就是找到数据库中,与我们的测试图像的测量值最接近的那个人。
你可以通过任何基本的机器学习分类算法来达成这一目标。我们并不需要太花哨的深度学习技巧。我们将使用一个简单的线性 SVM 分类器,但实际上还有很多其他的分类算法可以使用。
我们需要做的是训练一个分类器,它可以从一个新的测试图像中获取测量结果,并找出最匹配的那个人。分类器运行一次只需要几毫秒,分类器的结果就是人的名字!
所以让我们试一下我们的系统。首先,我使用Will Ferrell, Chad Smith and Jimmy Falon三人每人 20 张照片的嵌入来训练分类器:

嗯……就是这些训练数据!
接下来,在这个分类器上运行了威尔·法瑞尔和查德·史密斯在吉米·法伦的节目上互相模仿的那个视频的每一帧:
https://cdn-images-1.medium.com/max/800/1*_GNyjR3JlPoS9grtIVmKFQ.gif
总结:
1. 使用 HOG 算法给图片编码,以创建图片的简化版本。使用这个简化的图像,找到其中看起来最像通用 HOG 面部编码的部分。
2. 通过找到脸上的主要特征点,找出脸部的姿势。一旦我们找到这些特征点,就利用它们把图像扭曲,使眼睛和嘴巴居中。
3. 把上一步得到的面部图像放入神经网络中,神经网络知道如何找到 128 个特征测量值。保存这 128 个测量值。
4. 看看我们过去已经测量过的所有脸部,找出哪个人的测量值和我们要测量的面部最接近。这就是你要找的人!
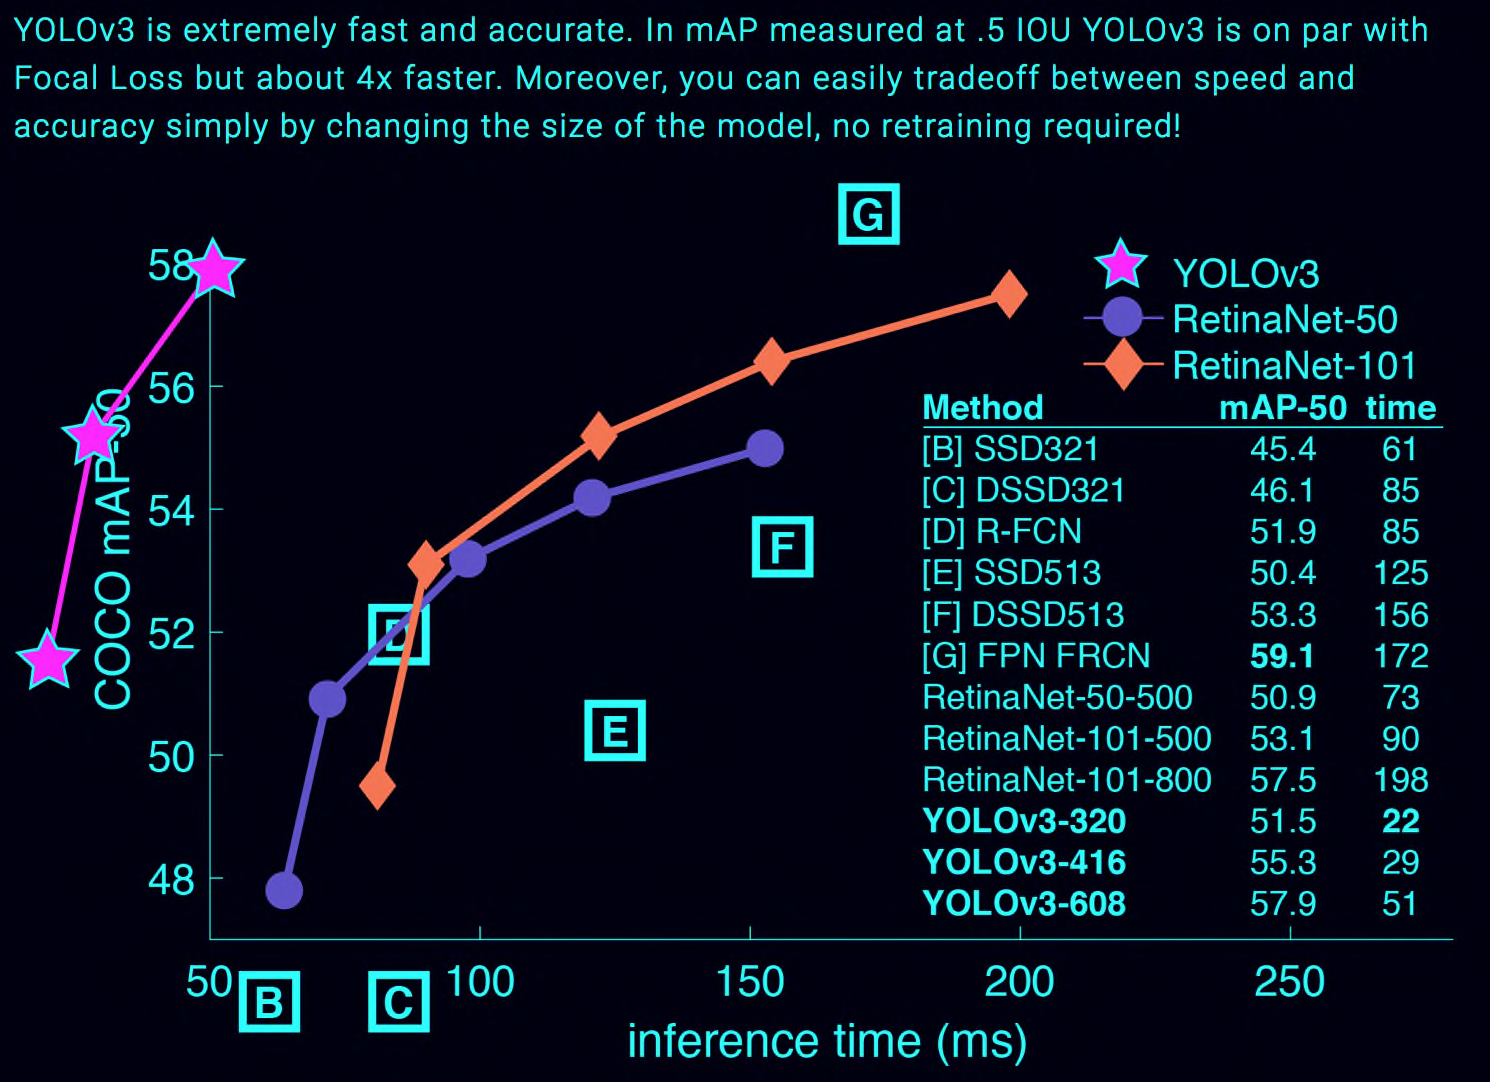
5.Object Detection
https://pjreddie.com/darknet/yolo/


https://github.com/allanzelener/YAD2K
# Installation
git clone https://github.com/allanzelener/yad2k.git
cd yad2k

# [Option 1] To replicate the conda environment:
conda env create -f environment.yml
source activate yad2k
# [Option 2] Install everything globaly.
pip install numpy h5py pillow
pip install tensorflow-gpu  # CPU-only: conda install -c conda-forge tensorflow
pip install keras # Possibly older release: conda install keras

# Quick Start
wget http://pjreddie.com/media/files/yolo.weights
wget https://raw.githubusercontent.com/pjreddie/darknet/master/cfg/yolo.cfg
./yad2k.py yolo.cfg yolo.weights model_data/yolo.h5
./test_yolo.py model_data/yolo.h5  # output in images/out/
https://github.com/mbhybird/keras-yolo3
# Quick Start
wget https://pjreddie.com/media/files/yolov3.weights
python convert.py yolov3.cfg yolov3.weights model_data/yolo.h5
python yolo.py
or
python yolo_video.py


 1960
1960

 被折叠的 条评论
为什么被折叠?
被折叠的 条评论
为什么被折叠?
 到【灌水乐园】发言


