


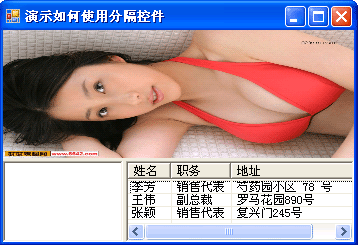
 本文展示了一个使用C#实现的简单窗体设计案例,通过PictureBox、RichTextBox、Splitter及ListView等控件创建了具备图片展示、文本编辑及列表查看等功能的分隔窗口。文章详细介绍了各控件的配置与交互逻辑。
using System;
using System.Drawing;
using System.Collections;
using System.ComponentModel;
using System.Windows.Forms;
using System.Data;
namespace SplitWindow
{
/// <summary>
/// Form1 的摘要说明。
/// </summary>
public class Form1 : System.Windows.Forms.Form
{
p rivate System.Windows.Forms.PictureBox pictureBox1;
p rivate System.Windows.Forms.Splitter splitter1;
p rivate System.Windows.Forms.RichTextBox richTextBox1;
p rivate System.Windows.Forms.Splitter splitter2;
p rivate System.Windows.Forms.ListView listView1;
p rivate System.Windows.Forms.ColumnHeader columnHeader1;
p rivate System.Windows.Forms.ColumnHeader columnHeader2;
p rivate System.Windows.Forms.ColumnHeader columnHeader3;
/// <summary>
/// 必需的设计器变量。
/// </summary>
p rivate System.ComponentModel.Container components = null;
public Form1()
{
//
// Windows 窗体设计器支持所必需的
//
InitializeComponent();
//
// TODO: 在 InitializeComponent 调用后添加任何构造函数代码
//
}
/// <summary>
/// 清理所有正在使用的资源。
/// </summary>
protected override void Dispose( bool disposing )
{
if( disposing )
{
if (components != null)
{
components.Dispose();
}
}
base.Dispose( disposing );
}
#region Windows 窗体设计器生成的代码
/// <summary>
/// 设计器支持所需的方法 - 不要使用代码编辑器修改
/// 此方法的内容。
/// </summary>
p rivate void InitializeComponent()
{
System.ComponentModel.ComponentResourceManager resources = new System.ComponentModel.ComponentResourceManager(typeof(Form1));
this.pictureBox1 = new System.Windows.Forms.PictureBox();
this.splitter1 = new System.Windows.Forms.Splitter();
this.richTextBox1 = new System.Windows.Forms.RichTextBox();
this.splitter2 = new System.Windows.Forms.Splitter();
this.listView1 = new System.Windows.Forms.ListView();
this.columnHeader1 = new System.Windows.Forms.ColumnHeader();
this.columnHeader2 = new System.Windows.Forms.ColumnHeader();
this.columnHeader3 = new System.Windows.Forms.ColumnHeader();
((System.ComponentModel.ISupportInitialize)(this.pictureBox1)).BeginInit();
this.SuspendLayout();
//
// pictureBox1
//
this.pictureBox1.Dock = System.Windows.Forms.DockStyle.Top;
this.pictureBox1.Image = ((System.Drawing.Image)(resources.GetObject("pictureBox1.Image")));
this.pictureBox1.Location = new System.Drawing.Point(0, 0);
this.pictureBox1.Name = "pictureBox1";
this.pictureBox1.Size = new System.Drawing.Size(344, 128);
this.pictureBox1.SizeMode = System.Windows.Forms.PictureBoxSizeMode.StretchImage;
this.pictureBox1.TabIndex = 0;
this.pictureBox1.TabStop = false;
//
// splitter1
//
this.splitter1.Cursor = System.Windows.Forms.Cursors.HSplit;
this.splitter1.Dock = System.Windows.Forms.DockStyle.Top;
this.splitter1.Location = new System.Drawing.Point(0, 128);
this.splitter1.MinExtra = 0;
this.splitter1.Name = "splitter1";
this.splitter1.Size = new System.Drawing.Size(344, 3);
this.splitter1.TabIndex = 1;
this.splitter1.TabStop = false;
//
// richTextBox1
//
this.richTextBox1.Dock = System.Windows.Forms.DockStyle.Left;
this.richTextBox1.Location = new System.Drawing.Point(0, 131);
this.richTextBox1.Name = "richTextBox1";
this.richTextBox1.Size = new System.Drawing.Size(120, 75);
this.richTextBox1.TabIndex = 2;
this.richTextBox1.Text = "";
//
// splitter2
//
this.splitter2.Location = new System.Drawing.Point(120, 131);
this.splitter2.Name = "splitter2";
this.splitter2.Size = new System.Drawing.Size(3, 75);
this.splitter2.TabIndex = 3;
this.splitter2.TabStop = false;
//
// listView1
//
this.listView1.Columns.AddRange(new System.Windows.Forms.ColumnHeader[] {
this.columnHeader1,
this.columnHeader2,
this.columnHeader3});
this.listView1.Dock = System.Windows.Forms.DockStyle.Fill;
this.listView1.FullRowSelect = true;
this.listView1.GridLines = true;
this.listView1.Location = new System.Drawing.Point(123, 131);
this.listView1.Name = "listView1";
this.listView1.Size = new System.Drawing.Size(221, 75);
this.listView1.TabIndex = 4;
this.listView1.UseCompatibleStateImageBehavior = false;
this.listView1.View = System.Windows.Forms.View.Details;
this.listView1.SelectedIndexChanged += new System.EventHandler(this.listView1_SelectedIndexChanged);
//
// columnHeader1
//
this.columnHeader1.Text = "姓名";
this.columnHeader1.Width = 40;
//
// columnHeader2
//
this.columnHeader2.Text = "职务";
//
// columnHeader3
//
this.columnHeader3.Text = "地址";
this.columnHeader3.Width = 150;
//
// Form1
//
this.AutoScaleBaseSize = new System.Drawing.Size(6, 14);
this.ClientSize = new System.Drawing.Size(344, 206);
this.Controls.Add(this.listView1);
this.Controls.Add(this.splitter2);
this.Controls.Add(this.richTextBox1);
this.Controls.Add(this.splitter1);
this.Controls.Add(this.pictureBox1);
this.Name = "Form1";
this.StartPosition = System.Windows.Forms.FormStartPosition.CenterScreen;
this.Text = "演示如何使用分隔控件";
this.Load += new System.EventHandler(this.Form1_Load);
((System.ComponentModel.ISupportInitialize)(this.pictureBox1)).EndInit();
this.ResumeLayout(false);
}
#endregion
/// <summary>
/// 应用程序的主入口点。
/// </summary>
[STAThread]
static void Main()
{
Application.Run(new Form1());
}
p rivate void Form1_Load(object sender, System.EventArgs e)
{
int itemNumber=this.listView1.Items.Count;
string[] subItem0={"张颖","销售代表","复兴门245号"};
this.listView1.Items.Insert(itemNumber, new ListViewItem(subItem0));
this.listView1.Items[itemNumber].ImageIndex=0;
string[] subItem1={"王伟","副总裁","罗马花园890号"};
this.listView1.Items.Insert(itemNumber, new ListViewItem(subItem1));
this.listView1.Items[itemNumber].ImageIndex=1;
string[] subItem2={"李芳","销售代表","芍药园小区 78 号"};
this.listView1.Items.Insert(itemNumber, new ListViewItem(subItem2));
this.listView1.Items[itemNumber].ImageIndex=2;
}
p rivate void listView1_SelectedIndexChanged(object sender, System.EventArgs e)
{
try
{
ListViewItem MyItem=this.listView1.SelectedItems[0];
switch(MyItem.Text)
{
case "张颖":
this.richTextBox1.Text="获北京大学心理学学士学位。她同时完成了“冷食的艺术”。张颖是国际美食协会的会员。";
Bitmap SrcBitmap1=new Bitmap("EMPID1.bmp");
this.pictureBox1.Image=SrcBitmap1;
break;
case "王伟":
this.richTextBox1.Text="王伟获南京大学商业学士学位,获该校国际营销博士学位。他能说流利的法语和意大利语并能阅读德语。他加入公司时是销售代表,被提拔为销售经理并升任销售副总裁。王伟是销售管理圆桌协会,北京商业总会和太平洋周边进口协会的成员。";
Bitmap SrcBitmap2=new Bitmap("EMPID2.bmp");
this.pictureBox1.Image=SrcBitmap2;
break;
case "李芳":
this.richTextBox1.Text="李芳获北京学院化学学士学位。她同时完成了食品零售管理资格程序。李芳被雇用为销售员并提升为销售代表。";
Bitmap SrcBitmap3=new Bitmap("EMPID3.bmp");
this.pictureBox1.Image=SrcBitmap3;
break;
}
}
catch(Exception Err)
{
}
}
}
}


 8926
8926

 被折叠的 条评论
为什么被折叠?
被折叠的 条评论
为什么被折叠?
 到【灌水乐园】发言


