


 本文介绍了一个关于OSPF(开放最短路径优先)区域配置的实验步骤,详细展示了如何在不同路由器上配置Stub、Totally Stub及NSSA区域。通过实际操作加深了对OSPF区域特性的理解。
实验目的:了解OSPF的区域配置步骤<?xml:namespace prefix = o ns = "urn:schemas-microsoft-com:office:office" />
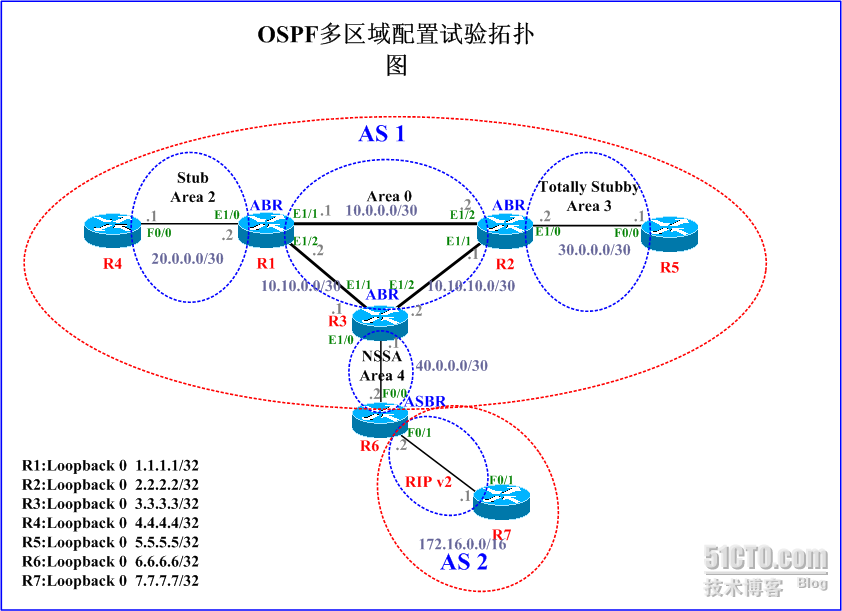
实验环境:如下图所示的实验拓扑,根据要求在个台路由器进行配置
<?xml:namespace prefix = v ns = "urn:schemas-microsoft-com:vml" />
实验步骤:
1:进入到第一台路由器进行如下的配置
R1(config)#int e1/1
R1(config-if)#ip add <?xml:namespace prefix = st1 ns = "urn:schemas-microsoft-com:office:smarttags" />10.0.0.1 255.255.255.252
R1(config-if)#no shut
R1(config-if)#int e1/0
R1(config-if)#ip add 20.0.0.1 255.255.255.252
R1(config-if)#no shut
R1(config-if)#int e1/2
R1(config-if)#ip add 10.10.0.0 255.255.255.252
R1(config-if)#no shut
R1(config-if)#int lo 0
R1(config-if)#ip add 1.1.1.1 255.255.255.255
R1(config-if)#exit
R1(config)#router ospf 1
R1(config-router)#net 10.0.0.0 0.0.0.3 area 0
R1(config-router)#net 10.10.0.0 0.0.0.3 area 0
R1(config-router)#net 20.0.0.0 0.0.0.3 area 2
R1(config-router)#net 1.1.1.1 0.0.0.0 area 2
R1(config-router)#area 2 stub
2:进入到第二台路由器进行如下的配置
R2(config)#int e1/2
R2(config-if)#ip add 10.0.0.2 255.255.255.252
R2(config-if)#no shut
R2(config-if)#int e1/1
R2(config-if)#ip add 10.10.10.2 255.255.255.252
R2(config-if)#no shut
R2(config-if)#int e1/0
R2(config-if)#ip add 30.0.0.1 255.255.255.252
R2(config-if)#no shut
R2(config-if)#int lo 0
R2(config-if)#ip add 2.2.2.2 255.255.255.255
R2(config-if)#exit
R2(config)#router ospf 1
R2(config-router)#net 10.0.0.0 0.0.0.3 area 0
R2(config-router)#net 10.10.10.0 0.0.0.3 area 0
R2(config-router)#net 30.0.0.0 0.0.0.3 area 3
R2(config-router)#net 2.2.2.2 0.0.0.0 area 3
R2(config-router)#area 3 stub no-summary
3:进入到第三台路由器进行如下的配置
R3(config)#int e1/1
R3(config-if)#ip add 10.10.0.2 255.255.255.252
R3(config-if)#no shut
R3(config-if)#int e1/2
R3(config-if)#ip add 10.10.10.2 255.255.255.252
R3(config-if)#no shut
R3(config-if)#int e1/0
R3(config-if)#ip add 40.0.0.1 255.255.255.252
R3(config-if)#no shut
R3(config-if)#int lo 0
R3(config-if)#ip add 3.3.3.3 255.255.255.255
R3(config-if)#exit
R3(config)#router ospf 1
R3(config-router)#net 10.10.0.0 0.0.0.3 area 0
R3(config-router)#net 10.10.10.0 0.0.0.3 area 0
R3(config-router)#net 40.0.0.0 0.0.0.3 area 4
R3(config-router)#net 3.3.3.3 0.0.0.0 area 0
R3(config-router)#area 4 nssa
4:进入到第四台路由器进行如下的配置
R4(config)#int fa0/0
R4(config-if)#ip add 20.0.0.2 255.255.255.252
R4(config-if)#no shut
R4(config-if)#int lo 0
R4(config-if)#ip add 4.4.4.4 255.255.255.255
R4(config-if)#exit
R4(config)#router ospf 1
R4(config-router)#net 20.0.0.0 0.0.0.3 area 2
R4(config-router)#net 4.4.4.4 0.0.0.0.0 area 2
R4(config-router)#area 2 stub
5:进入到第五台路由器进行如下的配置
R5(config)#int fa0/0
R5(config-if)#int add 30.0.0.2 255.255.255.252
R5(config-if)#no shut
R5(config-if)#int lo 0
R5(config-if)#ip add 5.5.5.5 255.255.255.255
R5(config-if)#exit
R5(config)#router ospf 1
R5(config-router)#net 30.0.0.0 0.0.0.3 area 3
R5(config-router)#net 5.5.5.5 0.0.0.0 area 3
R5(config-router)#area 3 stub no-summary
6:进入到第六台路由器进行如下的配置
R6(config)#int fa0/0
R6(config-if)#ip add 40.0.0.2 255.255.255.252
R6(config-if)#no shut
R6(config-if)#int fa 0/1
R6(config-if)#ip add 172.16.0.1 255.255.0.0
R6(config-if)#no shut
R6(config-if)#int lo 0
R6(config-if)#ip add 6.6.6.6 255.255.255.255
R6(config-if)#exit
R6(config)#router ospf 1
R6(config-router)#net 40.0.0.0 0.0.0.3 area 4
R6(config-router)#net 6.6.6.6 0.0.0.0 area 4
R6(config-router)#area 4 nssa
R6(config-router)# redistribute rip subnets
R6(config-router)#router rip
R6(config-router)#ver 2
R6(config-router)#no auto-summary
R6(config-router)#net 172.16.0.0
R6(config-router)# redistribute ospf 1 metric 3
7:进入到第七台路由器进行如下的配置
R7(config)#int fa 0/0
R7(config-if)#ip add 172.16.0.2 255.255.0.0
R7(config-if)#no shut
R7(config-if)#int lo 0
R7(config-if)#ip add 7.7.7.7 255.255.255.255
R7(config-if)#exit
R7(config)#router rip
R7(config-router)#ver 2
R7(config-router)#no auto-summary
R7(config-router)#net 172.16.0.0
R7(config-router)#net 7.7.7.7
小结:
Stub 区域
Stub 区域是一些特定的区域,Stub 区域的ABR 不允许注入Type5 LSA,在这些区域中路由器的路
由表规模以及路由信息传递的数量都会大大减少。
为了进一步减少Stub 区域中路由器的路由表规模以及路由信息传递的数量,可以将该区域配置为
Totally Stub(完全Stub)区域,该区域的ABR 不会将区域间的路由信息和外部路由信息传递到本
区域。
(Totally)Stub 区域是一种可选的配置属性,但并不是每个区域都符合配置的条件。通常来说,
(Totally)Stub 区域位于自治系统的边界。
为保证到本自治系统的其他区域或者自治系统外的路由依旧可达,该区域的ABR 将生成一条缺省
路由,并发布给本区域中的其他非ABR 路由器。
配置(Totally)Stub 区域时需要注意下列几点:
骨干区域不能配置成(Totally)Stub 区域。
如果要将一个区域配置成Stub 区域,则该区域中的所有路由器必须都要配置stub 命令。
6
如果要将一个区域配置成Totally Stub 区域,该区域中的所有路由器必须配置stub 命令,该
区域的ABR 路由器需要配置stub [ no-summary ]命令。
(Totally)Stub 区域内不能存在ASBR,即自治系统外部的路由不能在本区域内传播。
虚连接不能穿过(Totally)Stub 区域。
NSSA 区域
NSSA(Not-So-Stubby Area)区域是Stub 区域的变形,与Stub 区域有许多相似的地方。NSSA
区域也不允许Type5 LSA 注入,但可以允许Type7 LSA 注入。Type7 LSA 由NSSA 区域的ASBR
产生,在NSSA 区域内传播。当Type7 LSA 到达NSSA 的ABR 时,由ABR 将Type7 LSA 转换成
Type5 LSA,传播到其他区域。
如图1-5所示,运行OSPF协议的自治系统包括3 个区域:区域1、区域2 和区域0,另外两个自治
系统运行RIP协议。区域1 被定义为NSSA区域,区域1 接收的RIP路由传播到NSSA ASBR后,由
NSSA ASBR产生Type7 LSA在区域1 内传播,当Type7 LSA到达NSSA ABR后,转换成Type5 LSA
传播到区域0 和区域2。
另一方面,运行RIP 的自治系统的RIP 路由通过区域2 的ASBR 产生Type5 LSA 在OSPF 自治系
统中传播。但由于区域1 是NSSA 区域,所以Type5 LSA 不会到达区域1。
与Stub 区域一样,虚连接也不能穿过NSSA 区域
转载于:https://blog.51cto.com/huangkai/336315


 5266
5266

 被折叠的 条评论
为什么被折叠?
被折叠的 条评论
为什么被折叠?
 到【灌水乐园】发言


