 Spring配置及客户端测试流程


 博客介绍了微服务基础服务相关内容,可使用Apollo代替或自行搭建。着重阐述了spring基础功能的关键点,包括依赖包、启动类、配置文件等步骤,还说明了客户端引入依赖及配置方法,最后介绍了测试及客户端刷新环境变量的方式。

微服务的基础服务之一,可以使用Apollo 代替,后续补充,也可以自己搭建 https://github.com/ctripcorp/apollo
spring 基础功能不做简介,只说关键点:
第一步:依赖包
<dependency>
    <groupId>org.springframework.cloud</groupId>
    <artifactId>spring-cloud-config-server</artifactId>
</dependency>
第二步:启动类,加注释,熟悉的套路不多说
@SpringBootApplication
@EnableConfigServer
public class SpringcloudconfigserverApplication {
    public static void main(String[] args) {
        SpringApplication.run(SpringcloudconfigserverApplication.class, args);
    }
}
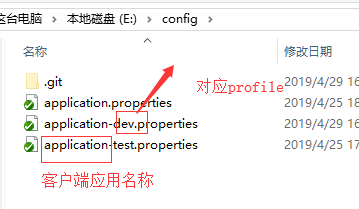
第三步:配置文件(方便测试采用的本地git库,远程的话需要配置账户密码)
### 配置服务器配置项
spring.application.name = config-server
### 定义HTTP服务端口
server.port = 9090
### 本地仓库的GIT URI 配置,正式环境自己切换成远程git仓库
spring.cloud.config.server.git.uri = file:///E:/config
第四步:上传配置文件
第五步:客户端引入依赖,启动类配置注解同server端
<dependency>
    <groupId>org.springframework.cloud</groupId>
    <artifactId>spring-cloud-starter-config</artifactId>
</dependency>
第六步:客户端配置
bootstrap.properties
### bootstrap 上下文配置
# 配置服务器 URI
spring.cloud.config.uri = http://localhost:9090/
# 配置客户端应用名称:{application}
spring.cloud.config.name = application
# profile 是激活配置
spring.cloud.config.profile = dev
# label 在Git中指的分支名称
spring.cloud.config.label = master
说明:name+profile+label 来定位git中配置文件的位置,别搞错
完工。是不是很简单
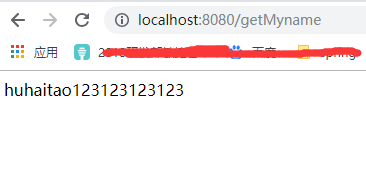
开始测试
/**
 * @author hht
 * @ClassName TestConfigController
 * @Description TODO
 * @Date 2019/4/25 18:40
 * @VERSION 1.0
 * RefreshScope 用来刷新环境变量  @Value
 */
@RefreshScope
@RestController
public class TestConfigController {

    @Value("${my.name}")
    private String name;

    @GetMapping("/getMyname")
    public String getMyname(){
        return name;
    }
}
成功截图
补充:客户端如何刷新环境变量,参考上一步代码通过 @RefreshScope 和 ContextRefresher 的refresh()方法,这里用的定时器拉取做的测试,当然生产环境可以结合spring cloud bus实现事件驱动更新
@SpringBootApplication
@EnableScheduling
public class SpringCloudConfigClientApplication {

    private ContextRefresher refresher;

    public  SpringCloudConfigClientApplication(ContextRefresher refresher){
        this.refresher = refresher;

    }

    public static void main(String[] args) {
        SpringApplication.run(SpringCloudConfigClientApplication.class, args);
    }

    /**
     * @Author chengpunan
     * @Description 初始化后延时 3秒运行 ,然后 每隔 5秒 执行一次
     * @Date 16:24 2019/4/29
     * @Param []
     * @return void
     **/
    @Scheduled(fixedRate = 5 * 1000,initialDelay = 3 * 1000)
    public void autoRefresh(){
        System.out.println(new Date());
        refresher.refresh();
    }

}
注意:为了方便测试不要引入spring-boot-starter-actuator
如果引入 server端添加
### 全局关闭 Actuator 安全
# management.security.enabled = false
### 细粒度的开放 Actuator Endpoints
### sensitive 关注是敏感性,安全
endpoints.env.sensitive = false
endpoints.health.sensitive = false
client端添加
### 全局关闭 Actuator 安全
management.security.enabled = false
### 细粒度的开放 Actuator Endpoints
### sensitive 关注是敏感性,安全
endpoints.env.sensitive = false
endpoints.refresh.sensitive = false
endpoints.beans.sensitive = false
endpoints.health.sensitive = false
endpoints.actuator.sensitive = false


 167万+
167万+

 被折叠的 条评论
为什么被折叠?
被折叠的 条评论
为什么被折叠?
 到【灌水乐园】发言


