


 本文深入探讨SpringMVC框架中不同响应方式的实现,包括void、ModelAndView、String、重定向及通过HttpServletRequest和HttpServletResponse的使用。同时,详细讲解了请求参数的接收方法,涵盖基本数据类型、对象、数组、集合以及Date类型数据的处理。

一,基本操作
1.响应请求的方式
不响应 | void+@ResponseBody注解 |
ModelAndView | 通过setViewName方法 | 直接指定响应页面 | 返回值为String类型,返回结果指定跳转地址 |
重定向 | 跳转地址前加redirect:前缀即可 |
HttpServletRequest和HttpServletResponse | 形参中声明这两个变量。然后通过相关api跳转|
上一篇看过ModelAndView的响应方式这里就从void开始
1.返回void
返回值为void时,方法中可以不用做任何返回,在浏览器中,springmvc会默认去查找和方法同名的页面作为方法的视图返回。 如果确实不需要该方法返回页面,可以使用@ResponseBody注解,表示一个请求到此为止。
@RequestMapping("/test1")
@ResponseBody
public void test1() {
   System.out.println("test1");
}
下面讲述各种请求的方式与实现代码,结果就不一一演示了
配置web.xml文件
<?xml version="1.0" encoding="UTF-8"?>
<web-app xmlns:xsi="http://www.w3.org/2001/XMLSchema-instance" xmlns="http://xmlns.jcp.org/xml/ns/javaee" xsi:schemaLocation="http://xmlns.jcp.org/xml/ns/javaee http://xmlns.jcp.org/xml/ns/javaee/web-app_3_1.xsd" id="WebApp_ID" version="3.1">
  <display-name>SpringMVC-01-hello</display-name>
  <welcome-file-list>
    <welcome-file>index.html</welcome-file>
    <welcome-file>index.htm</welcome-file>
    <welcome-file>index.jsp</welcome-file>
    <welcome-file>default.html</welcome-file>
    <welcome-file>default.htm</welcome-file>
    <welcome-file>default.jsp</welcome-file>
  </welcome-file-list>
	<servlet>
		<servlet-name>springmvc</servlet-name>
		<servlet-class>org.springframework.web.servlet.DispatcherServlet</servlet-class>
		<init-param>
			<param-name>contextConfigLocation</param-name>
			<param-value>classpath:Spring-MVC.xml</param-value>
		</init-param>
		<load-on-startup>1</load-on-startup>
	</servlet>

	<!-- Map all requests to the DispatcherServlet for handling -->
	<servlet-mapping>
		<servlet-name>springmvc</servlet-name>
		<url-pattern>/</url-pattern>
	</servlet-mapping>
</web-app>
配置spring-mvc的配置文件
<?xml version="1.0" encoding="UTF-8"?>
<beans xmlns="http://www.springframework.org/schema/beans"
	xmlns:xsi="http://www.w3.org/2001/XMLSchema-instance"
	xmlns:context="http://www.springframework.org/schema/context"
	xmlns:mvc="http://www.springframework.org/schema/mvc"
	xsi:schemaLocation="http://www.springframework.org/schema/mvc http://www.springframework.org/schema/mvc/spring-mvc-4.3.xsd
		http://www.springframework.org/schema/beans http://www.springframework.org/schema/beans/spring-beans.xsd
		http://www.springframework.org/schema/context http://www.springframework.org/schema/context/spring-context-4.3.xsd">
	<!-- 开启扫描 -->
	<context:component-scan base-package="com.sxt"/>

	<!-- 开启SpringMVC注解的方式 -->
	<mvc:annotation-driven></mvc:annotation-driven>

	<!-- 配置视图解析器 和Controller的一个方法一起使用后面有标记-->
	<!--  <bean class="org.springframework.web.servlet.view.InternalResourceViewResolver">
			<property name="prefix" value="/"/>
			<property name="suffix" value=".jsp"/>
	</bean>  -->
</beans>
自定义的Controller,index的jsp页面内容自定义
package com.sxt;

import java.io.IOException;

import javax.servlet.ServletException;
import javax.servlet.http.HttpServletRequest;
import javax.servlet.http.HttpServletResponse;

import org.springframework.stereotype.Controller;
import org.springframework.web.bind.annotation.RequestMapping;
import org.springframework.web.bind.annotation.ResponseBody;
import org.springframework.web.servlet.ModelAndView;

@Controller
@RequestMapping("/hello")
public class HelloController {

	//ModelAndView,响应方式
	@RequestMapping("/hello1")
	public ModelAndView hello1(){
		System.out.println("-----hello1---");
		ModelAndView m = new ModelAndView();
		m.setViewName("/index.jsp");
		return m;
	}
	//返回一个字符串
	@RequestMapping("/hello2")
	@ResponseBody//该注解表示一个请求到此结束
	public void  hello2(){

		System.out.println("aaaa");
	}
	/*
	 * 此方法需要在spring-mvc的配置文件配置视图解析器,自动添加index的前缀后缀,开启后可用这个方法
	@RequestMapping("/h1")
	public String hello3(){
		System.out.println("111");
		return "index";
	}*/
	//重定向跳转 :返回路径注意: 返回的字符带"/“表示从根目录下开始找,不带”/"从当前目录下查找
	@RequestMapping("/h2")
	public String hello4(){
		System.out.println("111");
		return "redirect:/index.jsp";
	}
	//通过request和response
	@RequestMapping("/h5")
	public void hello5(HttpServletRequest request,HttpServletResponse response) throws IOException, Exception{
		System.out.println("333");
		request.getRequestDispatcher("/index.jsp").forward(request, response);
	}

}
上面方法除了视图解析器需要在配置文件配置,其余的都一样
@RequertMapping的说明
1.映射路径 @RequestMapping最基本的功能,用法:
@RequestMapping("/delete")
 public String delete(){
 	System.out.println("波波烤鸭:删除数据操作....");
 	return "/hello";
 }
窄化请求 窄化请求用来限定请求路径,即将@RequestMapping放在类上,这样,方法的请求路径是类上的@ReqmestMapping+方法上的@RequestMapping 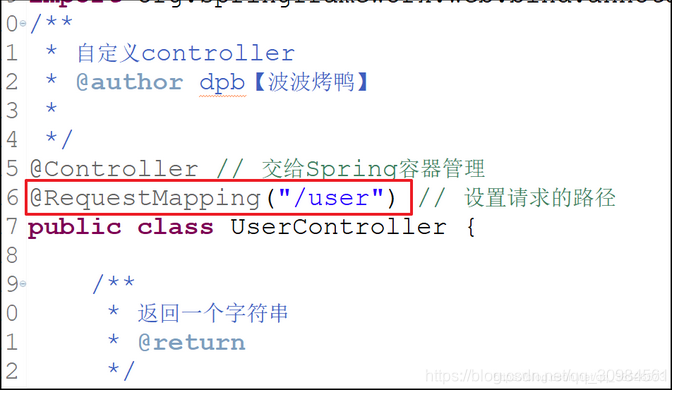 请求方法限定
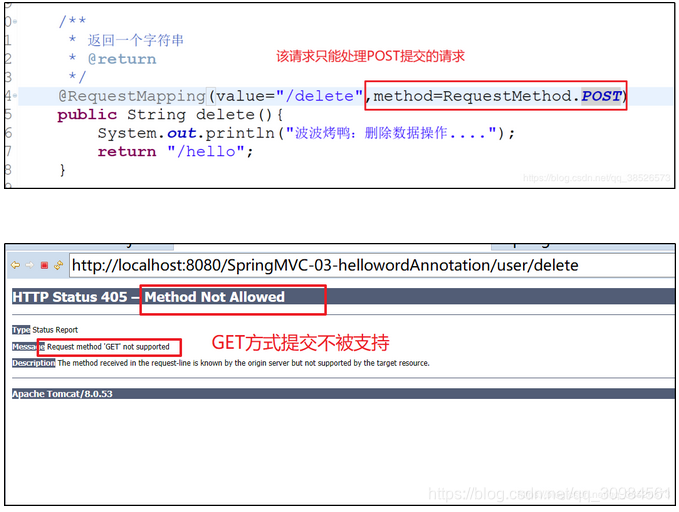
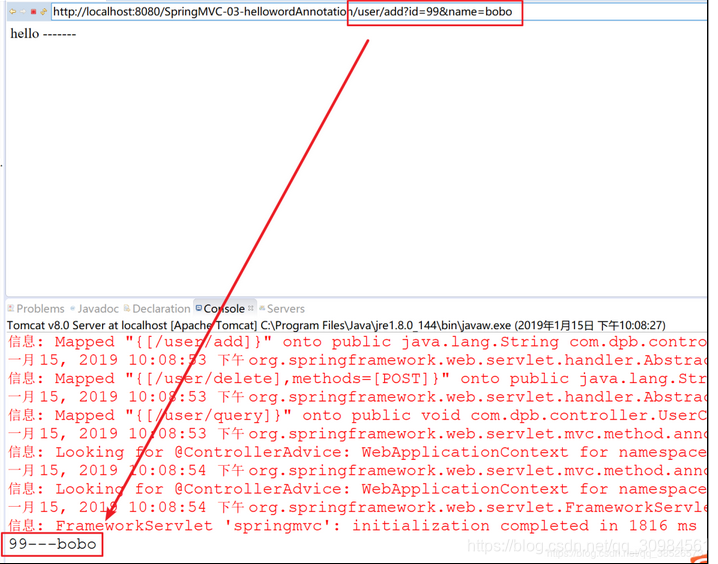
基本数据类型
java基本数据类型+string 使用基本数据类型时,参数名称和浏览器传来的参数的key一致,这样才能实现自动映射
/**
* 接收参数
* 基本数据类型
* @param id
* @param name
* @return
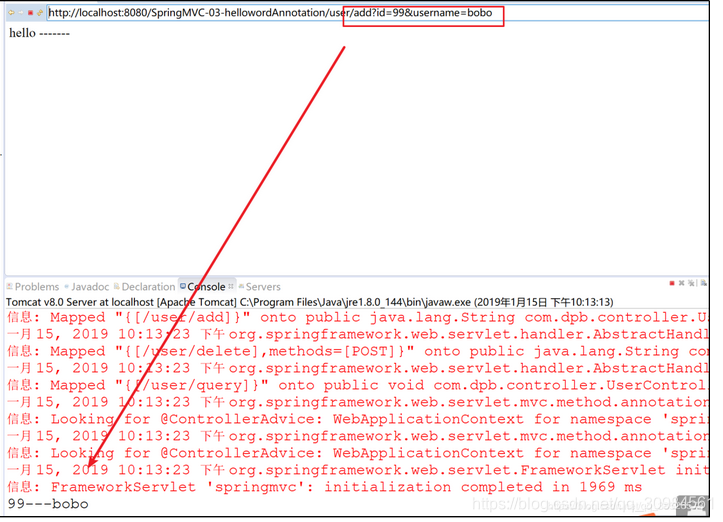
*/ @RequestMapping("add") public String add(int id,String name){ System.out.println(id+"---"+name); return "/hello"; }
如果参数名和浏览器传来的key不一致,可以通过@RequestParam来解决。如下
/**
 * 接收参数
 *    基本数据类型
 *    请求参数如果和形参名称不一致可以通过@RequestParam类指定
 * @param id
 * @param name
 * @return
 */ @RequestMapping("add")
 public String add(int id,@RequestParam("username")String name){
  			System.out.println(id+"---"+name);
 			 return "/hello";
   }
加@ReuestParam,如果为重新指定参数名,则默认的参数名依然是原本的参数名,同时也要注意,添加了这个注解后,对应的参数将成为必填参数.如果没有传递相关的参数,则会抛异常 但如果不想传参数,也有两种方式解决
1.通过required属性指定该参数不是必填的
/**
 * 接收参数
 *    基本数据类型
 *    请求参数如果和形参名称不一致可以通过@RequestParam类指定
 * @param id
 * @param name
 * @return
 */ @RequestMapping("add")
  public String add(int id ,@RequestParam(value="username",required=false)String name){
 				 System.out.println(id+"---"+name);
 				 return "/hello";
   }
2.通过defaultValue属性给指定参数一个默认值
/**
 * 接收参数
 *    基本数据类型
 *    请求参数如果和形参名称不一致可以通过@RequestParam类指定
 * @param id
 * @param name
 * @return
 */ @RequestMapping("add")
  public String add(int id ,@RequestParam(value="username",defaultValue="kaoya")String name){
   					System.out.println(id+"---"+name);
   						 return "/hello";
     }
对象
创建一个book对象 和user对象
package com.sxt.bean;

public class Book {
	private Integer id;

	private String name;

	@Override
	public String toString() {
		return "Book [id=" + id + ", name=" + name + "]";
	}

	public Integer getId() {
		return id;
	}

	public void setId(Integer id) {
		this.id = id;
	}

	public String getName() {
		return name;
	}

	public void setName(String name) {
		this.name = name;
	}
}
package com.sxt.bean;

import java.util.Arrays;
import java.util.Date;
import java.util.List;

public class User {
	private Integer id;

	private Integer age;

	private String unama;
	private String[] favorites;

	private List<String> list;

	private Date birth;

	private Book book;

	@Override
	public String toString() {
		return "User [id=" + id + ", age=" + age + ", unama=" + unama + ", favorites=" + Arrays.toString(favorites)
				+ ", list=" + list + ", birth=" + birth + ", book=" + book + "]";
	}

	public Integer getId() {
		return id;
	}

	public void setId(Integer id) {
		this.id = id;
	}

	public Integer getAge() {
		return age;
	}

	public void setAge(Integer age) {
		this.age = age;
	}

	public String getUnama() {
		return unama;
	}

	public void setUnama(String unama) {
		this.unama = unama;
	}

	public String[] getFavorites() {
		return favorites;
	}

	public void setFavorites(String[] favorites) {
		this.favorites = favorites;
	}

	public List<String> getList() {
		return list;
	}

	public void setList(List<String> list) {
		this.list = list;
	}

	public Date getBirth() {
		return birth;
	}

	public void setBirth(Date birth) {
		this.birth = birth;
	}

	public Book getBook() {
		return book;
	}

	public void setBook(Book book) {
		this.book = book;
	}


}
创建配置文件
<?xml version="1.0" encoding="UTF-8"?>
<beans xmlns="http://www.springframework.org/schema/beans"
	xmlns:xsi="http://www.w3.org/2001/XMLSchema-instance"
	xmlns:context="http://www.springframework.org/schema/context"
	xmlns:mvc="http://www.springframework.org/schema/mvc"
	xsi:schemaLocation="http://www.springframework.org/schema/mvc http://www.springframework.org/schema/mvc/spring-mvc-4.3.xsd
		http://www.springframework.org/schema/beans http://www.springframework.org/schema/beans/spring-beans.xsd
		http://www.springframework.org/schema/context http://www.springframework.org/schema/context/spring-context-4.3.xsd">
	<!-- 开启扫描 -->
	<context:component-scan base-package="com.sxt"/>

	<!-- 开启SpringMVC注解的方式 -->
	<mvc:annotation-driven></mvc:annotation-driven>
</beans>
建立user.jsp页面
<%@ page language="java" contentType="text/html; charset=UTF-8"
    pageEncoding="UTF-8"%>
<!DOCTYPE html PUBLIC "-//W3C//DTD HTML 4.01 Transitional//EN" "http://www.w3.org/TR/html4/loose.dtd">
<html>
<head>
<meta http-equiv="Content-Type" content="text/html; charset=UTF-8">
<title>Insert title here</title>
</head>
<body>
<form action="add" method="post">
	<table>
		<tr>
			<td>编号</td>
			<td><input type="text" name="id"></td>
		</tr>
		<tr>
			<td>名字</td>
			<td><input type="text" name="unama"></td>
		</tr>
		<tr>
			<td>年龄</td>
			<td><input type="text" name="age"></td>
		</tr>
		<tr>
			<td>id</td>
			<td><input type="text" name="book.id"></td>
		</tr>
		<tr>
			<td>作者</td>
			<td><input type="text" name="book.name"></td>
		</tr>
		<tr>
			<td><input type="submit" value="添加"></td>
		</tr>
	</table>
</form>

</body>
</html>
创建自定义的Controller
package com.sxt;

import java.util.Date;

import org.springframework.stereotype.Controller;

import org.springframework.web.bind.annotation.RequestMapping;
import org.springframework.web.bind.annotation.ResponseBody;

import com.sxt.bean.User;

@Controller
public class UserController {

	@RequestMapping("/add")//对象接受数据方法
	@ResponseBody
	public void add(User user) {
		System.out.println(user);
	}

}
测试


因为测试的对象所以其他都没给值
数组与集合的数据接受
bean层和配置文件,web.xml文件都一样
package com.sxt;

import java.util.Date;

import org.springframework.stereotype.Controller;

import org.springframework.web.bind.annotation.RequestMapping;
import org.springframework.web.bind.annotation.ResponseBody;

import com.sxt.bean.User;

@Controller
public class UserController {
	//数组数据获取
	@RequestMapping("/add2")
	@ResponseBody
	public void add3(User user) {
		System.out.println(user);
		String[] favorites = user.getFavorites();
		for (String f : favorites) {
			System.out.println(f);
		}

	}
	//集合数据获取
	@RequestMapping("/add3")
	@ResponseBody
	public void add4(User user) {
		System.out.println(user);
		System.out.println(user.getList());

	}

}
创建对应的jsp页面
获取数组类的jsp页面 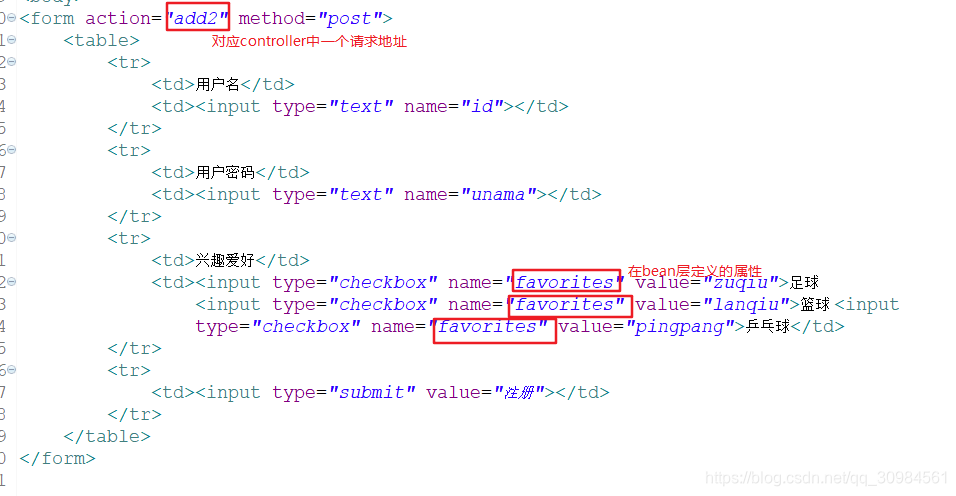 获取集合类的jsp页面
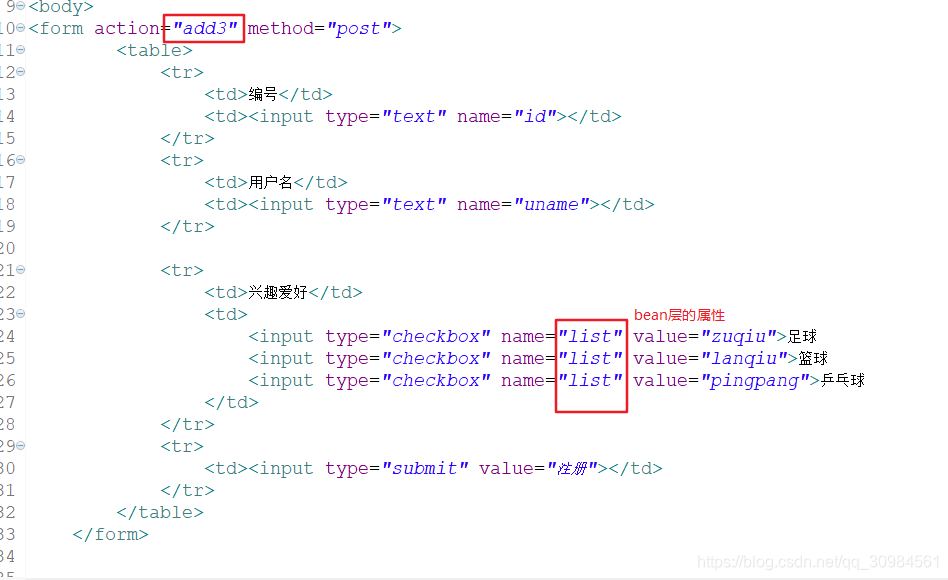
测试访问路径
数组的输出结果

集合输出结果

总结: 1.数组(无论是基本数据类型还是对象数组)都可以直接写在接口参数中。 2.集合(无论是基本数据类型还是对象)都需要一个包装类将其包装起来,不能直接写在接口参数中。 3.对于基本数据类型,数组和集合在表单中的写法是一样的 4.对于对象数据类型,数组和集合在表单中的写法是一样的
Data类型接受
接受数据类型是Data类型的需要通过转换器进行接受
自定义Controller
创建自定义的转换器
package com.sxt;

import java.util.Date;

import org.springframework.stereotype.Controller;

import org.springframework.web.bind.annotation.RequestMapping;
import org.springframework.web.bind.annotation.ResponseBody;

import com.sxt.bean.User;

@Controller
public class UserController {
	@RequestMapping("/add4")
	@ResponseBody
	public void add4(Date d) {
		System.out.println(d);

	}

}
package com.sxt;

import java.text.ParseException;
import java.text.SimpleDateFormat;
import java.util.Date;

import org.springframework.core.convert.converter.Converter;
/**
 * Data类型转换器
 * @author Administrator
 *
 */
public class Convert implements Converter<String, Date>{

	@Override
	public Date convert(String arg0) {
		SimpleDateFormat format = new SimpleDateFormat("yyyy-MM-dd");
		try {
			return format.parse(arg0);
		} catch (ParseException e) {
			// TODO Auto-generated catch block
			e.printStackTrace();
		}
		return null;
	}

}
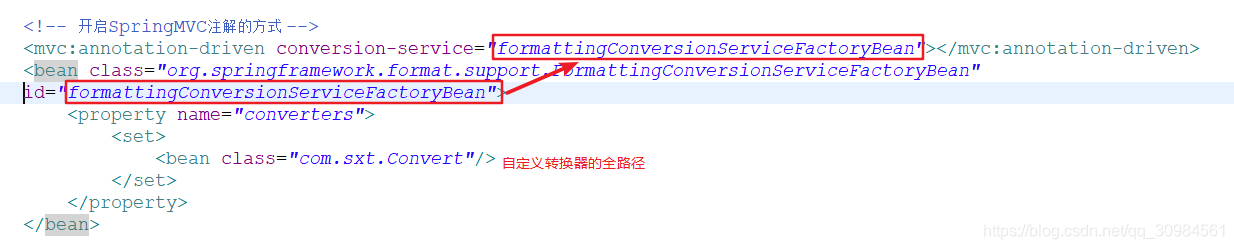
在spring-mvc.xml配置文件配置
<?xml version="1.0" encoding="UTF-8"?>
<beans xmlns="http://www.springframework.org/schema/beans"
	xmlns:xsi="http://www.w3.org/2001/XMLSchema-instance"
	xmlns:context="http://www.springframework.org/schema/context"
	xmlns:mvc="http://www.springframework.org/schema/mvc"
	xsi:schemaLocation="http://www.springframework.org/schema/mvc http://www.springframework.org/schema/mvc/spring-mvc-4.3.xsd
		http://www.springframework.org/schema/beans http://www.springframework.org/schema/beans/spring-beans.xsd
		http://www.springframework.org/schema/context http://www.springframework.org/schema/context/spring-context-4.3.xsd">
		<!-- 开启扫描 -->
	<context:component-scan base-package="com.sxt"/>

	<!-- 开启SpringMVC注解的方式 -->
	<mvc:annotation-driven conversion-service="formattingConversionServiceFactoryBean"></mvc:annotation-driven>
	<bean class="org.springframework.format.support.FormattingConversionServiceFactoryBean" id="formattingConversionServiceFactoryBean">
		<property name="converters">
			<set>
				<bean class="com.sxt.Convert"/>
			</set>
		</property>
	</bean>

</beans>
测试


响应数据
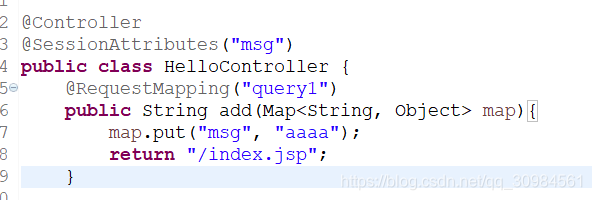
3.1ModelAndView 3.2HttpServletRequest 3.3HttpSession 3.4Map
创建自定义controller
package com.sxt;

import java.util.Map;

import org.springframework.stereotype.Controller;
import org.springframework.ui.Model;
import org.springframework.ui.ModelMap;
import org.springframework.web.bind.annotation.RequestMapping;
import org.springframework.web.bind.annotation.SessionAttributes;
import org.springframework.web.servlet.ModelAndView;

@Controller
public class HelloController {
	@RequestMapping("query1")
	public String add(Map<String, Object> map){
		map.put("msg", "aaaa");
		return "/index.jsp";
	}

	@RequestMapping("query2")
	public String add1(Model m){
		m.addAttribute("msg", "bbb");
		return "/index.jsp";
	}

	@RequestMapping("query3")
	public String add2(ModelMap mm){
		mm.addAttribute("msg", "ccc");
		return "/index.jsp";
	}

	@RequestMapping("query4")
	public ModelAndView add3(){
			ModelAndView view = new ModelAndView();
			view.addObject("msg", "ddd");
			view.setViewName("index.jsp");
			return view;
	}
}
创建springmvc配置文件
<?xml version="1.0" encoding="UTF-8"?>
<beans xmlns="http://www.springframework.org/schema/beans"
	xmlns:xsi="http://www.w3.org/2001/XMLSchema-instance"
	xmlns:context="http://www.springframework.org/schema/context"
	xmlns:mvc="http://www.springframework.org/schema/mvc"
	xsi:schemaLocation="http://www.springframework.org/schema/mvc http://www.springframework.org/schema/mvc/spring-mvc-4.3.xsd
		http://www.springframework.org/schema/beans http://www.springframework.org/schema/beans/spring-beans.xsd
		http://www.springframework.org/schema/context http://www.springframework.org/schema/context/spring-context-4.3.xsd">
		<!-- 开启扫描 -->
	<context:component-scan base-package="com.sxt"/>

	<!-- 开启SpringMVC注解的方式 -->
	<mvc:annotation-driven ></mvc:annotation-driven>

</beans>
创建index.jsp页面
<%@ page language="java" contentType="text/html; charset=UTF-8"
    pageEncoding="UTF-8"%>
<!DOCTYPE html PUBLIC "-//W3C//DTD HTML 4.01 Transitional//EN" "http://www.w3.org/TR/html4/loose.dtd">
<html>
<head>
<meta http-equiv="Content-Type" content="text/html; charset=UTF-8">
<title>Insert title here</title>
</head>
<body>
${msg}

<h3>request:${requestScope.msg }</h3>
	<h3>session:${sessionScope.msg }</h3>
	<h3>application:${applicationScope.msg }</h3>
</body>
</html>
request:${requestScope.msg }
session:${sessionScope.msg }
application:${applicationScope.msg }
检查msg是保存在哪一个作用域的,结果证明都是保存在request作用域的
注意:加上@SessionAttributes这个注解是将数据保存在session作用域中的.
post方式提交中文乱码问题
在web.xml文件添加如下代码
<!-- spring框架提供的字符集过滤器 -->
 <!-- spring Web MVC框架提供了org.springframework.web.filter.CharacterEncodingFilter用于解决POST方式造成的中文乱码问题  -->
 <filter>
 	 <filter-name>encodingFilter</filter-name>
 	  		<filter-class>org.springframework.web.filter.CharacterEncodingFilter</filter-class>
 	  <init-param>
 	  		 <param-name>encoding
 	  		 </param-name>
 	  		 <param-value>UTF-8</param-value>
 	   </init-param>
 </filter>
 	  	  	 <filter-mapping >
 	  	  	 <filter-name>encodingFilter</filter-name>
 	  	  	  <url-pattern>/*</url-pattern>
 </filter-mapping>


 1399
1399

 被折叠的 条评论
为什么被折叠?
被折叠的 条评论
为什么被折叠?
 到【灌水乐园】发言


