


 本文详细介绍了iOS开发中AutoLayout的使用方法,包括视图间的约束设置、优先级调整及按钮元素的EdgeInsets配置等内容。

-
第一个图标,是两个或多个view 的 constraints
1)第一部分4个分别是,前对齐,后对齐,上对齐,下对齐(注意看前面的图标指示)
2)第二部分3个分别是,表示两个或多个坚直对齐(如图标示),第二个表示水平居中对齐,第三个不知道,大概是基线
3)第三部分2个分别是,in Container 在父view中,你选一个view勾上这个,表示它会以父view为基准,竖直对齐,第二个同理

2. 第二个图标,是单个view
1)第一部分,是view本身,上下左右,相对于最近的view的间距, 下面的constrain to margins 勾不勾上是一样的,勾上会减去默认的8个点,如果确定要用设定的值,就点中间的 红色虚线 “工” ,变成实线“工”就表示运用了
2)第二部分,是view本身,的高宽比,设定高宽?
3)第三部分,是两个view 等宽,等高 一起变化,aspect ratio 不知道没用
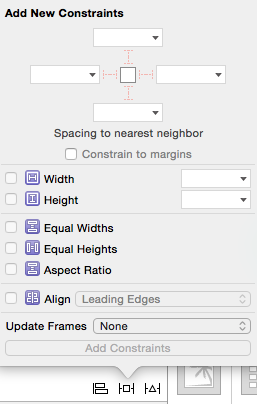
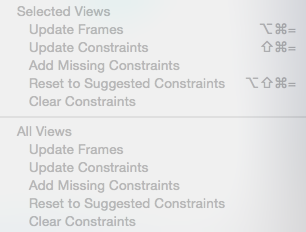
3. 每三个图标,是更新
1)上部分,是选中的view
update frames 在设好constrainst 的情况下,根据设好的constraints列新frme
update constrainst 与上相反
add missing constraints 是有时候你设置了一半的constraints时可以用这个增加余下的,但有时会出现乱七八糟的东东
reset to suggested constraints 不知道,也会加乱七八糟的
clear constraints 清除所有的constraints
2)下部分,是所有的view
在UIButton中有三个对EdgeInsets的设置:ContentEdgeInsets、titleEdgeInsets、imageEdgeInsets
//使图文 上下居中
tfRightBtn.titleLabel?.font = UIFont.systemFontOfSize(11)
let image = UIImage(named: "筛选")
tfRightBtn.setImage(image, forState: UIControlState.Normal)
//计算size
var size = CGRect();
let size2 = CGSize();
let string = "筛选";
size = string.boundingRectWithSize(size2, options: NSStringDrawingOptions.UsesFontLeading, attributes: [NSFontAttributeName: UIFont.systemFontOfSize(11)], context: nil);
tfRightBtn.imageEdgeInsets = UIEdgeInsetsMake(1, 10, 15, -size.width)
tfRightBtn.setTitle("筛选", forState: UIControlState.Normal)
tfRightBtn.setTitleColor(UIColor.grayColor(), forState: UIControlState.Normal)
tfRightBtn.titleEdgeInsets = UIEdgeInsetsMake(15, 10 - image!.size.width, 0, 0)
tfRightBtn.titleLabel?.textAlignment = NSTextAlignment.Center;//设置title的字体居中
-
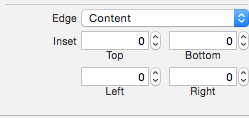
图片缩进 (edge 有 content title image 可选 ) content 表示图片和文字一起移动
button 设置时遇到的问题, 发现一个图片加到button上时被压缩的好小,原因是这里设置了缩进(edge 选 image)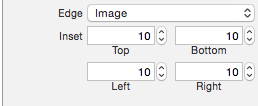
这样可以做那种按钮很大,容易点,但中间的图片看起来又不大的效果
如果要定制图片 文字 frame , 就两个都要改,先选image,再选title
用代码写,会覆盖XIB
2. 设置relation
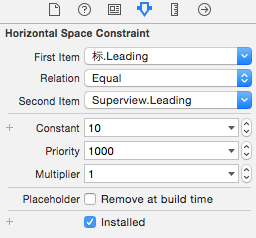
relation 有equal = less than or equal <= greater than equal
priority -- 优先级。这个可以调。有时有冲突,调低一点就没有红色 冲突了。 如果调成250,则那个约束的名字后面会加个@250 。
constraint 可以连线拉出来做一个变量,比如
@IBOutlet weak var likeButtonWidth: NSLayoutConstraint!
这样就可动态改变,同时可用来改变与之相关的一变量的布局
xib file's owner---------custom class 与那个类对应在这里改


 453
453

 被折叠的 条评论
为什么被折叠?
被折叠的 条评论
为什么被折叠?
 到【灌水乐园】发言


