


 本文详细介绍了在Windows环境中配置并启动服务的过程,包括添加系统时间控件、使用ServiceInstaller和ProjectInstaller类来实现服务的自动或手动运行,以及在binDebug目录下生成配置文件的原理。同时,提供了修改配置文件以简化操作的方法。
参考
http://www.cnblogs.com/jeffwongishandsome/archive/2011/04/24/2026381.html
http://www.cnblogs.com/herbert/archive/2010/07/09/1774406.html
ConfigurationManager.RefreshSection("appSettings");// 刷新命名节,在下次检索它时将从磁盘重新读取它。
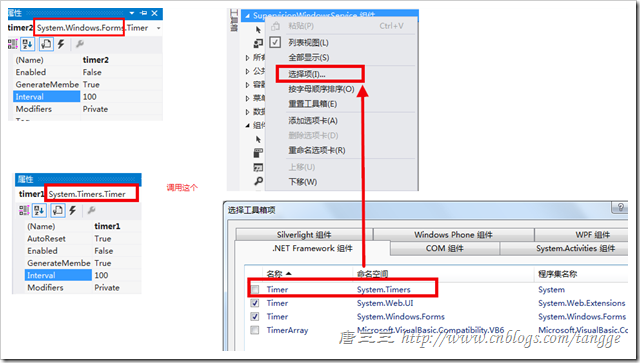
1.左侧工具栏里有Timer控件,但是如果调用的是系统时间,就需要添加System.timer.timer空间下的控件。
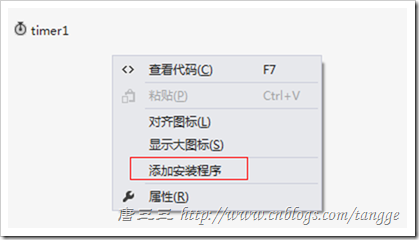
2.服务编写之后,还不能由SCM(服务控制管理器)进行管理,需要给该服务添加装载器。在Service1.cs的设计视图,点击右键,选择“添加装载器”,系统默认就会添加ProjectInstaller.cs这个类
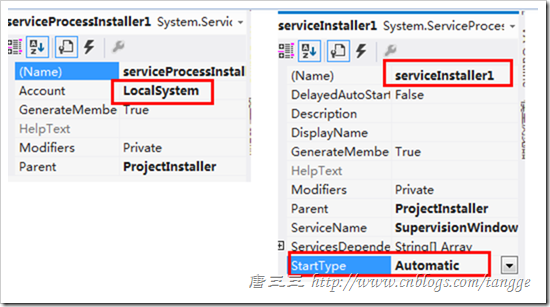
添加该类后,在该类的设计视图上可看到serviceInstaller1和serviceProcessInstaller1,分别设置其属性。
设置serviceInstaller1的运行方式为手动或者自动
设置serviceInstaller1的ServiceName,设置为什么,服务列表中就显示什么
设置serviceProcessInstaller1的运行账号为LocalSystem

using PC.Common;
using System;
using System.Collections.Generic;
using System.ComponentModel;
using System.Configuration;
using System.Data;
using System.Diagnostics;
using System.Linq;
using System.ServiceProcess;
using System.Text;

namespace EditVendingMachineState
{
    public partial class Service1 : ServiceBase
    {
        public Service1()
        {
            InitializeComponent();
        }

        protected override void OnStart(string[] args)
        {
            System.Timers.Timer t = new System.Timers.Timer(1000);
            t.Elapsed += new System.Timers.ElapsedEventHandler(timer1_Elapsed);//到时间的时候执行事件;
            t.AutoReset = true;//设置是执行一次(false)还是一直执行(true);
            t.Enabled = true;//是否执行System.Timers.Timer.Elapsed事件;
            //1000 * 60 * 10 (10分钟)
            t.Interval = 10000;

            //using (System.IO.StreamWriter sw = new System.IO.StreamWriter("E:\\OnLinelog.txt", true))
            //{
            //    sw.WriteLine(DateTime.Now.ToString("yyyy-MM-dd HH:mm:ss ") + "Start.");
            //}
        }

        protected override void OnStop()
        {
        }

        private void timer1_Elapsed(object sender, System.Timers.ElapsedEventArgs e)
        {
            //1.获取时间开始
            GetTheIOName();
        }

        /// <summary>
        /// 获取机器状态和时间
        /// </summary>
        public static void GetTheIOName()
        {
            ConfigurationManager.RefreshSection("appSettings");// 刷新命名节,在下次检索它时将从磁盘重新读取它。
            string address = ConfigurationManager.AppSettings["address"]; //日志地址
            Log.Debug("start", address, DateTime.Now.ToString());
        }
    }
}
在项目进行编译后,在bin\Debuge文件下,将出现两个配置文件(以本项目为例),一个名为“JxcManagement.EXE.config”,另一个名为“JxcManagement.vshost.exe.config”。第一个文件为项目实际使用的配置文件,在程序运行中所做的更改都将被保存于此;第二个文件为原代码“app.config”的同步文件,在程序运行中不会发生更改。
简单点的方法就是修改“JxcManagement.vshost.exe.config”里面的配置文件
同时更改


 3683
3683

 被折叠的 条评论
为什么被折叠?
被折叠的 条评论
为什么被折叠?
 到【灌水乐园】发言


