


 本文详细介绍如何将项目提交至Maven中央仓库,包括工单申请、配置pom.xml、使用GPG签名、部署快照及发布版本的全过程。
一、Maven中央仓库提交过程
① https://issues.sonatype.org 工单管理地址,就是申请上传资格和groupId 的地方。
② https://oss.sonatype.org/#welcome 构件仓库,把jar包上传到这里,Release 之后就会同步到maven中央仓库。
③ http://search.maven.org/ 最终表现在可以在这里搜索到。
利用Sonatype OSSRH可以把jar等资源提交给Maven的中央仓库。
二、Sonatype OSSRH介绍
Sonatype OSSRH使用Nexus 为开源项目提供仓库管理服务,该仓库就是所谓maven的中央仓库,OSSRH允许我们向Maven中央仓库提交二进制文件。
1:提交(deploy)开发版本的二进制文件(snapshorts)
2: 阶段性的发布版本
3:发布一个release,然后同步他们到中央仓库。
三、工单使用
3.1、注册账号
从https://issues.sonatype.org 注册一个帐号,注册地址,登录账号密码后续还要配置 maven 的setting.xml 中,然后创建一个工单,如下图(记住是先注册,下面是创建工单的图)。
3.2、创建工单
地址:https://issues.sonatype.org/secure/CreateIssue.jspa?issuetype=21&pid=10134
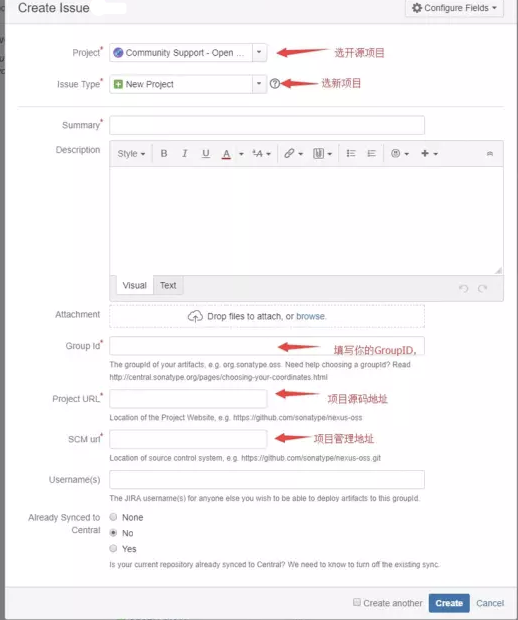
注意:
推荐设置方式
-
Group Id:com.github.bjlhx15
-
Project URL: https://github.com/bjlhx15/common/issues
①Group Id ,唯一标识,推荐使用com.github.xxxxx ,xxxx要与github 用户名一致,会大概5分钟通过
如果用的是其他的比如:com.sojson.core 之类的,管理员会问你这个是不是属于你的网站等等,官方文档:http://central.sonatype.org/pages/choosing-your-coordinates.html
② ProjectURL ,填项目源码的地址,如果不想公布源码,那么填写一个只含README的项目的地址就可以了。
*其实管理员主要就是审核Group Id,其他的不重要
然后点击左侧列表中的Resolved recently 可以找到你刚创建的工单。
这时你的工单的状态Status 是Open ,等到审核通过状态会变为RESOLVED
四、配置使用项目中的 pom.xml
1:提供javadoc和source
2: 使用gpg或者pgp对文件进行签名
3: pom.xml文件
4:正确的坐标:groupId,artifactId,version
    <groupId>com.github.bjlhx15</groupId>
    <version>1.0-SNAPSHOT</version>
    <artifactId>mybatis-plugin-ext</artifactId>
5: projectName,description,url等。
<name>${project.groupId}:${project.artifactId}</name>
<description>mybatis plugins</description>
<url>https://github.com/bjlhx15/common</url>
6: license 信息
    <licenses>
        <license>
            <name>The Apache Software License, Version 2.0</name>
            <url>http://www.apache.org/licenses/LICENSE-2.0.txt</url>
            <distribution>repo</distribution>
        </license>
    </licenses>
7 : 开发者信息
<developers>
    <developer>
        <name>lihongxu</name>
        <email>bjlhx15@163.com</email>
        <url>https://github.com/bjlhx15/common</url>
    </developer>
</developers>
8: SCM信息
    <scm>
        <url>https://github.com/bjlhx15/common</url>
        <connection>scm:git:https://github.com/bjlhx15/common.git</connection>
        <developerConnection>scm:git:https://github.com/bjlhx15/common.git</developerConnection>
    </scm>
注、使用gpg生成密钥
关于GPG的安装使用:https://www.cnblogs.com/bjlhx/p/9956706.html
五、部署
方式一、maven的方式
1:分布管理和认证:
使用了maven部署插件,所以pom.xml中加入:
    <distributionManagement>
        <snapshotRepository>
            <id>sonatype-nexus-snapshots</id>
            <url>https://oss.sonatype.org/content/repositories/snapshots</url>
        </snapshotRepository>
        <repository>
            <id>sonatype-nexus-staging</id>
            <url>https://oss.sonatype.org/service/local/staging/deploy/maven2/</url>
        </repository>
    </distributionManagement>
需要在maven_home/conf/settings.xml配置jira的账号和密码
 <server>
    <id>sonatype-nexus-snapshots</id>
    <username>https://issues.sonatype.org的账号</username>
    <password>https://issues.sonatype.org的密码</password>
  </server>
  <server>
    <id>sonatype-nexus-staging</id>
    <username>https://issues.sonatype.org的账号</username>
    <password>https://issues.sonatype.org的密码</password>
  </server>
2:配置生成javadoc和sources包的插件:【使用第4步综合】
<plugin>
      <groupId>org.apache.maven.plugins</groupId>
      <artifactId>maven-source-plugin</artifactId>
      <version>2.2.1</version>
      <executions>
        <execution>
          <id>attach-sources</id>
          <goals>
            <goal>jar-no-fork</goal>
          </goals>
        </execution>
      </executions>
    </plugin>
    <plugin>
      <groupId>org.apache.maven.plugins</groupId>
      <artifactId>maven-javadoc-plugin</artifactId>
      <version>2.9.1</version>
      <executions>
        <execution>
          <id>attach-javadocs</id>
          <goals>
            <goal>jar</goal>
          </goals>
        </execution>
      </executions>
    </plugin>
3:GPG自动签名的插件:【使用第4步综合】
    <plugin>
      <groupId>org.apache.maven.plugins</groupId>
      <artifactId>maven-gpg-plugin</artifactId>
      <version>1.5</version>
      <executions>
        <execution>
          <id>sign-artifacts</id>
          <phase>verify</phase>
          <goals>
            <goal>sign</goal>
          </goals>
        </execution>
      </executions>
    </plugin>
在maven的settings.xml中配置gpg的签名 :(需要先用gpg来生成)【需要操作】
  <profiles>
    <profile>
      <id>sonatype-nexus-snapshots</id>
      <activation>
        <activeByDefault>true</activeByDefault>
      </activation>
      <properties>
        <gpg.executable>gpg2</gpg.executable>
        <gpg.passphrase>the_pass_phrase</gpg.passphrase>
      </properties>
    </profile>
  </profiles>
4: 使用Profile修改pom文件
应该javadoc和source的jar包生成也需要使用gpg来签名,所以很浪费时间,而且这些执行通常都独立于标准构建流程,所以把他们移动到一个profile.
    <!--综合打包信息-->
    <profiles>
        <profile>
            <!--快照版本-->
            <id>snapshots</id>
            <build>
                <plugins>
                    <plugin>
                        <groupId>org.sonatype.plugins</groupId>
                        <artifactId>nexus-staging-maven-plugin</artifactId>
                        <version>1.6.8</version>
                        <extensions>true</extensions>
                        <configuration>
                            <serverId>sonatype-nexus-snapshots</serverId>
                            <nexusUrl>https://oss.sonatype.org/</nexusUrl>
                            <autoReleaseAfterClose>true</autoReleaseAfterClose>
                        </configuration>
                    </plugin>
                    <plugin>
                        <groupId>org.apache.maven.plugins</groupId>
                        <artifactId>maven-release-plugin</artifactId>
                        <version>2.5</version>
                        <configuration>
                            <autoVersionSubmodules>true</autoVersionSubmodules>
                            <useReleaseProfile>false</useReleaseProfile>
                            <releaseProfiles>release</releaseProfiles>
                            <goals>deploy</goals>
                        </configuration>
                    </plugin>
                    <plugin>
                        <groupId>org.apache.maven.plugins</groupId>
                        <artifactId>maven-compiler-plugin</artifactId>
                        <version>3.0</version>
                        <configuration>
                            <source>1.6</source>
                            <target>1.6</target>
                        </configuration>
                    </plugin>
                    <plugin>
                        <groupId>org.apache.maven.plugins</groupId>
                        <artifactId>maven-gpg-plugin</artifactId>
                        <version>1.6</version>
                        <executions>
                            <execution>
                                <id>sign-artifacts</id>
                                <phase>verify</phase>
                                <goals>
                                    <goal>sign</goal>
                                </goals>
                            </execution>
                        </executions>
                    </plugin>
                    <plugin>
                        <groupId>org.apache.maven.plugins</groupId>
                        <artifactId>maven-source-plugin</artifactId>
                        <version>2.2.1</version>
                        <executions>
                            <execution>
                                <id>attach-sources</id>
                                <goals>
                                    <goal>jar-no-fork</goal>
                                </goals>
                            </execution>
                        </executions>
                    </plugin>
                    <plugin>
                        <groupId>org.apache.maven.plugins</groupId>
                        <artifactId>maven-javadoc-plugin</artifactId>
                        <version>2.9</version>
                        <executions>
                            <execution>
                                <id>attach-javadocs</id>
                                <goals>
                                    <goal>jar</goal>
                                </goals>
                            </execution>
                        </executions>
                    </plugin>
                </plugins>
            </build>
        </profile>
    </profiles>
5、编译打包上传
快照版本【上传后即可使用】
mvn clean deploy -P snapshots
对于release版本可以继续增加一个profile配置
mvn clean deploy -P release
6、登录https://oss.sonatype.org/#welcome,使用上述账号即可
会在中间仓库中Staging Repositories 菜单中看到自己刚刚上传的jar 包,
如果没有错的话,选中它然后点Release 就可以同步到中央仓库了,一般过十分钟左右就能在http://search.maven.org/上边搜到了。


 1405
1405

 被折叠的 条评论
为什么被折叠?
被折叠的 条评论
为什么被折叠?
 到【灌水乐园】发言


