bios 中的代码是源代码么_Leveldb 中的后台线程调度模型源代码解读

最近在搞毕设,重新复习了一遍leveldb的源代码,看了一下其中的后台线程调度模型. 先说一个大概的流程:

b2df6bde30c65a8d91c2301031b539b6.png

整个的模型非常的简单,大体就分为3步.

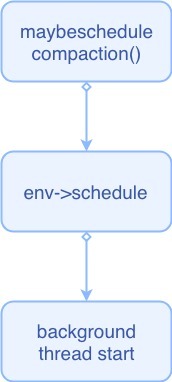
  1. 先是在有可能需要进行compaction时调用MaybeScheduleCompaction()
  2. 随后MaybeScheduleCompaction()会调用不同环境中的schedlue()函数
  3. 在schedule()函数中创建后台线程,执行相应的任务

接下来来讲一下其中的细节.


首先是http://db_impl.cc 里面的MaybeScheduleCompaction()函数,作用是启动或调用后台线程执行compaction task.

void DBImpl::MaybeScheduleCompaction() {
  mutex_.AssertHeld();
  if (background_compaction_scheduled_) {
    // 后台已经进行了schedule,无需compaction
  } else if (shutting_down_.load(std::memory_order_acquire)) {
    // DB 正在被删除,无需进行compaction
  } else if (!bg_error_.ok()) {
    // 发生error,无需继续进行compaction
  } else if (imm_ == nullptr && manual_compaction_ == nullptr &&
             !versions_->NeedsCompaction()) {
    // 不满足需要compaction的条件,无需compaction
    //条件如下:
    //如果没有immutable table, 也没有设置手动compaction,并且也不满足needcompaction的条件
    //则不调用后台线程来进行compaction task
  } else {
    background_compaction_scheduled_ = true;
    env_->Schedule(&DBImpl::BGWork, this);//调用后台线程进行compaction
  }
}

MaybeScheduleCompaction() 会在当compaction有可能需要进行的时候被调用,调用之后会进行一些基本的条件判断: 如上面代码所示,判断是否已经进行了cheldule,是否正在删除DB,是否在调度之前就已经发生了错误,是否满足compaction所基本需要的条件,在进行这些条件判断之后便决定是否调用后台background_thread ,如果这些条件都满足,那么就可以成功调用 env_->Schedule() 来使用后台线程.


下面是http://env_posix.cc 文件中 PosixEnv类中的 Schedule()函数.

void PosixEnv::Schedule(
    void (*background_work_function)(void* background_work_arg),
    void* background_work_arg) {
  //加锁
  background_work_mutex_.Lock();
  if (!started_background_thread_) {
    //如果是第一次调用Schedule, 那么此时后台线程还没有被创建,需要新创建这个后台线程
    started_background_thread_ = true;
    std::thread background_thread (PosixEnv::BackgroundThreadEntryPoint, this);
    background_thread.detach();
  }

  // 如果此时bg_work_queue为空,则说明此时线程正在cv变量上被阻塞,唤醒它
  if (background_work_queue_.empty()) {
    background_work_cv_.Signal();
  }
  //在bg_work_queue中插入bg_work函数(其实就是compaction函数)
  background_work_queue_.emplace(background_work_function, background_work_arg);
  background_work_mutex_.Unlock(); //解锁
}

Schedule()函数基本干的就是下面几件事情:

  1. 首先查看后台线程是否启动,如果没有启动过的话,就启动后台线程,然后执行detach()函数,detach()函数的作用是使其和父线程脱离,在父亲线程结束之后,依然继续运行.
  2. 查看bgworkqueue是否为空,如果为空则该线程则可能在cv上阻塞,那么可以唤醒它
  3. 在bgworkqueue中插入一个新的元素(实际上是compaction函数)

从上面我们可以看到,后台线程只有一个,他承担了所有compaction的工作.


接下来来看一下这个后台线程具体是什么样子的.

BackgroundThreadMain()函数,在http://env_posix.cc 文件中,它被BackgroundThreadEntryPoint()所调用,也就是在Schedule()中创建的后台线程.

static void BackgroundThreadEntryPoint(PosixEnv* env) {
    env->BackgroundThreadMain();
  }

下面是BackgroundThreadMain()的本体.

void PosixEnv::BackgroundThreadMain() {
  while (true) {
  //死循环,保证后台线程在进程活着的情况下永远不会结束
    background_work_mutex_.Lock();

    // 如果bg_work_queue为空,则后台线程阻塞
    // 此处不能用if是因为c++的pthread有bug
    while (background_work_queue_.empty()) {
      background_work_cv_.Wait();
    }
    assert(!background_work_queue_.empty());// assert there is work to be done
    auto background_work_function = background_work_queue_.front().function;
    void* background_work_arg = background_work_queue_.front().arg;
    background_work_queue_.pop();
   //取出队首任务,pop,解锁,执行
    background_work_mutex_.Unlock();
    background_work_function(background_work_arg);
  }
}

后台线程是一个永远执行的死循环, 这就保证了在第一次调用之后自始至终都一直存在,直到leveldb 这个进程结束之后才会被销毁(如果不是死循环的话, 根据detach()的特性,他会在运行结束之后被系统回收)

在后台线程中,如果bgworkqueue为空的话,则说明没有任务执行需要执行,那么后台线程将会被阻塞,直到在父线程中加入新的任务并唤醒它.随后便可以取出队首的函数并执行.(注意这里解锁和执行的顺序)

后台线程只有一个,由他来完成所有的compaction工作, 当它由于compaction的I/O工作而阻塞时,它并不能执行其他的compaction任务(毕竟只有一个),直到这个compaction任务彻底结束,它才能继续从work_queue中取出下一个来执行,类似于流水线式的操作.

代码部分来自Google的重建IBMPC BIOS项目(https://sites.google.com/site/pcdosretro/ibmpcbios),其中的BIOS镜像(*.rom)可用于各种IBM PC模拟器,可按情况使用。源代码可以用masm编译,站内英文说明文件如下: IBM PC BIOS source code reconstruction This is a reconstruction of the IBM PC, PC XT, PC AT and PC XT 286 BIOS source code using scanning and transcription of the BIOS listings found in the IBM Technical Reference manuals. This historically relevant source code is presented here for software preservation. The following BIOS source code has been reconstructed: IBM PC version 1 04/21/81 IBM PC version 2 10/19/81 IBM PC version 3 10/27/82 IBM PC XT version 1 11/08/82 (also used on the Portable PC) IBM PC XT version 2 01/10/86 IBM PC XT version 3 05/09/86 IBM PC AT version 1 01/10/84 IBM PC AT version 2 06/10/85 IBM PC AT version 3 11/15/85 (used on the PC AT models 319 and 339) IBM PC XT 286 04/21/86 Notes: • All 3 versions of the IBM PC BIOS and the first version of the IBM PC XT BIOS were built using Intel ASM86 on an Intel development system. In each case the BIOS source code is a single large file and the BIOS code is 8KB which resides at F000:E000 • The IBM PC AT version 1 BIOS was built using IBM MASM 1.0 on DOS. This is the first IBM BIOS which uses multiple source files. Since IBM MASM 1.0 did not support the 80286 there is a macro file (IAPX286.MAC) which is used to generate the necessary opcodes. This is also the first BIOS to be split into two parts: the main BIOS code resides at F000:0000 and the compatibility section (ORGS.ASM) resides at F000:E000. An additional file FILL.ASM has been added to define the area between the end of the main BIOS code and the compatibility section to allow the BIOS to be linked properly. It is currently unknown how this was originally handled. • The IBM PC AT version 2 and 3 BIOS and the IBM PC XT 286 BIOS were built using IBM MASM 2.0 on DOS. These are similar to the PC AT version 1 BIOS but there are fewer source files as some files were combined and a bit of cleanup was done. IAPX286.INC is used to generate the protected-mode 80286 opcodes which IBM MASM 2.0 did not support. FILL.ASM serves the same purpose as it does for the PC AT version 1 BIOS though in each case the file is specific to the particular BIOS being built. • The IBM PC XT version 2 and 3 BIOS were built using IBM MASM 2.0 on DOS. The later PC XT BIOS code was restructured to be similar to the PC AT BIOS code so there are multiple source files. Like the PC AT BIOS the code is split into two parts though the compatibility section is in the file POST.ASM. Again the additional file FILL.ASM is used to define the area between the end of the main BIOS code and the compatibility section. • The following code is present in all versions of the PC AT BIOS and the PC XT 286 BIOS but does not appear in the published listings. It is inferred from the public symbols in ORGS.ASM and code disassembly. It is unknown what purpose this code serves. .XLIST ;;- ORG 0FF5AH ORG 01F5AH HRD PROC FAR CALL DISK_SETUP RET HRD ENDP FLOPPY PROC FAR CALL DSKETTE_SETUP RET FLOPPY ENDP SEEKS_1 PROC FAR CALL SEEK RET SEEKS_1 ENDP TUTOR: JMP K16 .LIST • In all cases the 32KB ROM BASIC code which resides at F6000 is not available as its source code was never published. • Versions of MASM later than 4.0 cannot be used to build the IBM BIOS source code since older constructs and macros are used. More information about functionality changes in the IBM PC BIOS code is listed here: IBM PC BIOS version history
评论
添加红包

请填写红包祝福语或标题

红包个数最小为10个

红包金额最低5元

当前余额3.43前往充值 >
需支付:10.00
成就一亿技术人!
领取后你会自动成为博主和红包主的粉丝 规则
hope_wisdom
发出的红包
实付
使用余额支付
点击重新获取
扫码支付
钱包余额 0

抵扣说明:

1.余额是钱包充值的虚拟货币,按照1:1的比例进行支付金额的抵扣。
2.余额无法直接购买下载,可以购买VIP、付费专栏及课程。

余额充值