


前言
早在2020年12月的时候,那会儿我正在看The Rust Programming Language。而这本书最后的“结业”任务是要编写一个简单的Socket服务器,而于此同时,我们学校的计算机网络课程的实验作业也是要求我们实现一个这样的服务器。这两者正好重合了。于是在当时我便有了使用Rust编写这一项目的想法。但是当时在学校时间不多,加上自己比较咕(笑),所以这一想法最终没能付诸实现。而现在寒假了,有了更多的时间和精力,也是时候开始这一项目了。
项目的名称最终被称为melantha-rs,这说明它是项目SocketServerMelantha的Rust实现。其中,Melantha这个名字来自游戏《明日方舟》中的角色“玫兰莎”。下文中将用Melantha来代表本项目。项目希望能拥有与原项目相似的行为,并希望能拥有更简单的代码结构与相当的运行性能。
1 对服务器进行配置
不妨首先来编写服务器的配置载入代码。我们希望Melantha能够从配置文件中读取服务器的相关配置;同时,在实际使用时我们也希望能够通过命令行参数来覆盖配置文件中的配置。
为了服务器能够正常运行,需要提供两个参数:Socket端口号以及服务器根目录在主机上的路径。我们使用结构体Config来保存这两个配置参数
pub struct Config {
pub port: String,
pub root_path: String,
}
1.1 通过TOML配置文件来配置服务器
Rust本身提供一个名为toml的crate(Rust语言中的一个术语,类似于Java中的package),用于解析TOML文件,并将文件的内容映射为相应的结构体(这需要另一个crate serde的支持,详见toml的描述文档)。举一个简单的例子,若有如下的TOML文件
[Config1]
option1 = "hello world"
option2 = "world hello"
[Config2]
setting1 = "great"
setting2 = "good"
那么通过toml可以得到如下的结构体
struct Config1 {
option1: String,
option2: String,
}
struct Config2 {
setting1: String,
setting2: String,
}
struct Config {
var1: Config1,
var2: Config2,
}
通过toml我们便可以非常便利地从配置文件中读取配置了。基于此,我们为Config结构体实现了一个read_from()方法,其代码如下
use toml::de::from_str;
use std::fs:File;
use std::io::Read;
impl Config {
pub fn read_from(filename: &str) ->Config {
let mut file = File::open(filename)
.expect("config file not found");
let mut content = String::new();
file.read_to_string(&mut content).unwrap();
let ret: Config = from_str(&content)
.expect("fail to parse");
ret
}
}
1.2 通过命令行来配置服务器
作为标准库的一部分,Rust提供了std::env::args方法来供用户程序获取命令行输入的参数。我们可以使用标准库提供的接口从命令行接收参数,但后续的处理与分析功能的实现代码不免显得复杂。所幸,Rust Cookbook提供了一种成熟的解决方案:clap。
clap是一个用于“parse and validate”命令行参数的crate。如下,我们将通过实际的代码来说明如何使用clap对命令行参数进行处理。
use clap::{Arg, App};
use melantha::config::Config;
fn main() {
// 从命令行读如参数
let matches = App::new("Melantha")
.version("0.2.0")
.author("Artyom Liu ")
.about("A simple web server")
.arg(Arg::with_name("config")
.short("f")
.long("file")
.takes_value(true)
.help("Config file for server to run, default as \"./config.toml\""))
.arg(Arg::with_name("port")
.short("p")
.long("port")
.takes_value(true)
.help("Assign the port for socket to listen"))
.arg(Arg::with_name("root_path")
.short("r")
.long("root")
.takes_value(true)
.help("Root path of server"))
.get_matches();
let config_file = matches.value_of("config").unwrap_or("./config.toml");
let mut config = Config::read_from(config_file);
if let Some(port) = matches.value_of("port") {
config.port = String::from(port);
}
if let Some(root_path) = matches.value_of("root_path") {
config.root_path = String::from(root_path);
}
println!("port: {}", config.port);
println!("root: {}", config.root_path);
/* other codes */
}
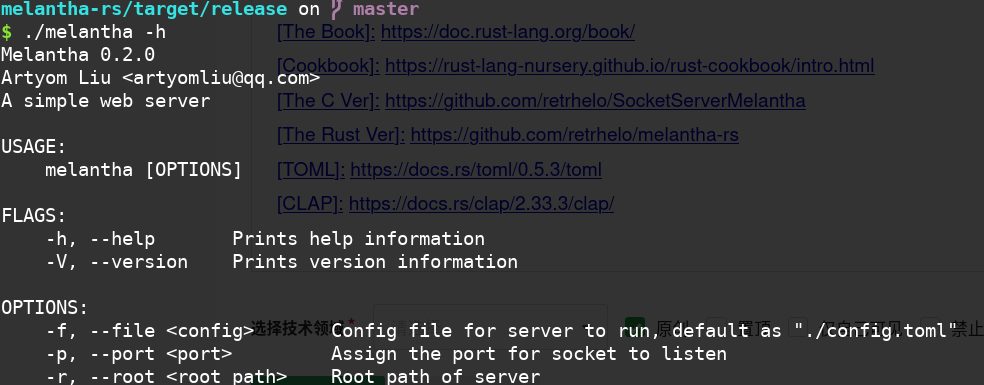
在代码中,我们首先通过App::new()获取ArgMatches实例。随后我们便可以通过ArgMatches::arg()成员函数来设置其所需要读取的命令行参数。其接受一个Arg参数。注意到,在代码中可以通过.short()和.long()来设置参数的长短形式,同时通过.takes_value()来说明该参数是否接受用户提供的参数。最后,通过.help()我们可以为该参数提供一段提示性的字符串。
而为了获取参数的值,我们可以通过.value_of()方法获取参数所对应的值。如代码中所示,我们就获取了"port"和"root_path"两个参数所对应的值。注意,此处所说的“参数的值”指的是参数后紧跟的那串字符串。如命令grep -f filename,“filename"就是参数”-f"的值。该函数会返回一个Option作为结果。
如此一来,我们便可以通过命令行来配置Melantha了。程序具体跑起来的话大概像下图所示


 3146
3146

 被折叠的 条评论
为什么被折叠?
被折叠的 条评论
为什么被折叠?
 到【灌水乐园】发言


