


 本文介绍如何在Microsoft Office SharePoint Server (MOSS)中创建自定义ApplicationPage,包括添加菜单项和使用SPTreeView控件展示站点结构的方法。
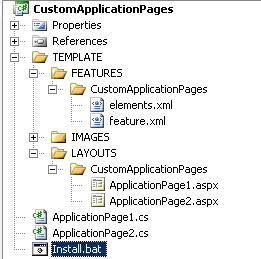
在MOSS中后台管理的页面都是Application Page,比如网站设置的页面(settings.aspx)就是典型的Application Page,它不能被Sharepoint Desiger定制。如果我们要修改只能手动的使用其他工具来修改,我们也可以添加Application Page,必须放在C:\Program Files\Common Files\Microsoft Shared\web server extensions\12\TEMPLATE\LAYOUTS目录下,它对应的虚拟路径为_layouts。所有的Application Page都使用application.master这个母版页,我们自定义的Application Page也是一样,可以使用内嵌代码也可以使用后置代码。自定义的application page继承自LayoutsPageBase类,下面我们就来做两个自定义的Application Page,下面是项目的结构:
Feature.xml中代码如下:
<?xml version="1.0" encoding="utf-8" ?>
<Feature Id="86689158-7048-4421-AD21-E0DEF0D67C81"
Title="自定义ApplicationPage"
Description="使用SPTreeViw演示自定义ApplicationPage"
Version="1.0.0.0"
Scope="Web"
Hidden="FALSE"
ImageUrl="TPG\PithHelmet.gif"
xmlns="http://schemas.microsoft.com/sharepoint/">
<ElementManifests>
<ElementManifest Location="elements.xml" />
</ElementManifests>
</Feature>
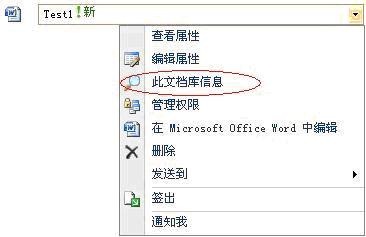
ApplicationPage1.aspx和ApplicationPage2.aspx就是我们自定义的Application Page,ApplicationPage1.aspx演示的是在一个列表库的列表项的编辑菜单里出现一个链接,统计该列表的信息,如下图:
要添加此菜单须在Elements.xml中填加如下代码:
< CustomAction Id ="CustomApplicationPage1"
RegistrationType ="List"
RegistrationId ="101"
ImageUrl ="/_layouts/images/GORTL.GIF"
Location ="EditControlBlock"
Sequence ="240"
Title ="此文档库信息" >
< UrlAction Url ="~site/_layouts/CustomApplicationPages/ApplicationPage1.aspx?ItemId={ItemId}&ListId={ListId}" />
</ CustomAction >
RegistrationType="List":代表注册的类型是列表.
Location="EditControlBlock":代表菜单将出现在控件编辑项当中.
UrlAction 是它的链接,URL中的ItemId 和ListId是通过 QueryString得到的。
ApplicationPage1.cs中代码如下:
using System.Web;
using System.Web.UI;
using System.Web.UI.WebControls;
using Microsoft.SharePoint;
using Microsoft.SharePoint.WebControls;
namespace CustomApplicationPages
{
public class ApplicationPage1 : LayoutsPageBase
{
protected Label lblSiteTitle;
protected Label lblSiteID;
protected Label lblSiteUrl;
protected Label lblListID;
protected Label lblListTile;
protected Label lblRootFolderUrl;
protected Label lblDocumentID;
protected Label lblDocumentName;
protected Label lblDocumentUrl;
protected Label lblDocumentTemplateUrl;
protected Label lblFileAuthor;
protected Label lblFileSize;
protected Label lblFileLastModified;
protected Label lblFileCheckOutStatus;
protected override void OnLoad(EventArgs e)
{
SPSite siteCollection = this .Site;
SPWeb site = this .Web;
lblSiteTitle.Text = site.Title;
lblSiteUrl.Text = site.Url.ToLower();
string ListId = Request.QueryString[ " ListId " ];
lblListID.Text = ListId;
SPList list = site.Lists[ new Guid(ListId)];
lblListTile.Text = list.Title;
lblRootFolderUrl.Text = list.RootFolder.Url;
string ItemId = Request.QueryString[ " ItemId " ];
lblDocumentID.Text = ItemId;
SPListItem item = list.Items.GetItemById(Convert.ToInt32(ItemId));
lblDocumentName.Text = item.Name;
lblDocumentUrl.Text = item.Url;
if (list is SPDocumentLibrary)
{
SPDocumentLibrary documentLibrary = (SPDocumentLibrary)list;
lblDocumentTemplateUrl.Text = documentLibrary.DocumentTemplateUrl;
SPFile file = site.GetFile(item.Url);
lblFileAuthor.Text = file.Author.Name;
lblFileSize.Text = file.TotalLength.ToString( " 0,### " ) + " bits " ;
lblFileLastModified.Text = " By " + file.ModifiedBy.Name +
" on " + file.TimeLastModified.ToLocalTime().ToString();
lblFileCheckOutStatus.Text = file.CheckOutStatus.ToString();
}
}
}
}
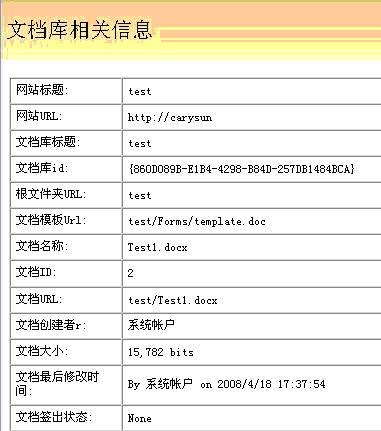
结果如下图:
ApplicationPage2.aspx中我们使用控件SPTreeView来显示该站点的文件夹结构,我们将菜单添加到“网站操作“中,并且设置只有管理员权限才可以看到,如下图:

Elements.xml中填加如下代码:
< CustomAction Id ="CustomApplicationPage2"
GroupId ="SiteActions"
Location ="Microsoft.SharePoint.StandardMenu"
Sequence ="2006"
Title ="获取站点信息"
Description ="使用SPTreeView获取站点信息"
RequireSiteAdministrator ="True" >
< UrlAction Url ="~site/_layouts/CustomApplicationPages/ApplicationPage2.aspx" />
</ CustomAction >
RequireSiteAdministrator="True":改属性说明该项操作只有拥有管理员权限的用户才可以操作
ApplicationPage2.cs中代码如下:
using System.Web;
using System.Web.UI;
using System.Web.UI.WebControls;
using Microsoft.SharePoint;
using Microsoft.SharePoint.WebControls;
namespace CustomApplicationPages
{
public class ApplicationPage2 : LayoutsPageBase
{
protected SPTreeView treeSitesFiles;
const string siteImg = @" \_layouts\images\FPWEB16.GIF " ;
const string foloerImg = @" \_layouts\images\FOLDER16.GIF " ;
const string ghostedFileImg = @" \_layouts\images\NEWDOC.GIF " ;
const string unGhostedFileImg = @" \_layouts\images\RAT16.GIF " ;
protected override void OnLoad(EventArgs e)
{
SPWeb site = SPContext.Current.Web;
SPFolder rootFolder = site.RootFolder;
TreeNode rootNode = new TreeNode(site.Url, site.Url, siteImg);
LoadFolderNodes(rootFolder, rootNode);
treeSitesFiles.Nodes.Add(rootNode);
treeSitesFiles.ExpandDepth = 1 ;
}
protected void LoadFolderNodes(SPFolder folder, TreeNode folderNode)
{
foreach (SPFolder childFolder in folder.SubFolders)
{
TreeNode childFolderNode = new TreeNode(childFolder.Name, childFolder.Name, foloerImg);
childFolderNode.NavigateUrl = Site.MakeFullUrl(childFolder.Url);
LoadFolderNodes(childFolder, childFolderNode);
folderNode.ChildNodes.Add(childFolderNode);
}
foreach (SPFile file in folder.Files)
{
TreeNode fileNode;
if (file.CustomizedPageStatus == SPCustomizedPageStatus.Uncustomized)
{
fileNode = new TreeNode(file.Name, file.Name, ghostedFileImg);
}
else
{
fileNode = new TreeNode(file.Name, file.Name, unGhostedFileImg);
}
fileNode.NavigateUrl = Site.MakeFullUrl(file.Url);
folderNode.ChildNodes.Add(fileNode);
}
}
}
}
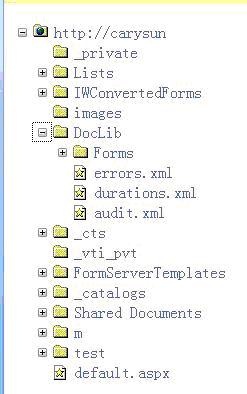
效果如下图:
如何调试:
1.修改当前web应用程序的配置文件如下:
< SharePoint >
< SafeMode CallStack ="true" />
</ SharePoint >
< system.web >
< customErrors mode ="Off" />
< compilation debug ="true" />
</ system.web >
</ configuration >
2.然后附加w3wp进程,设置断点即可调试了。


 35
35

 被折叠的 条评论
为什么被折叠?
被折叠的 条评论
为什么被折叠?
 到【灌水乐园】发言


